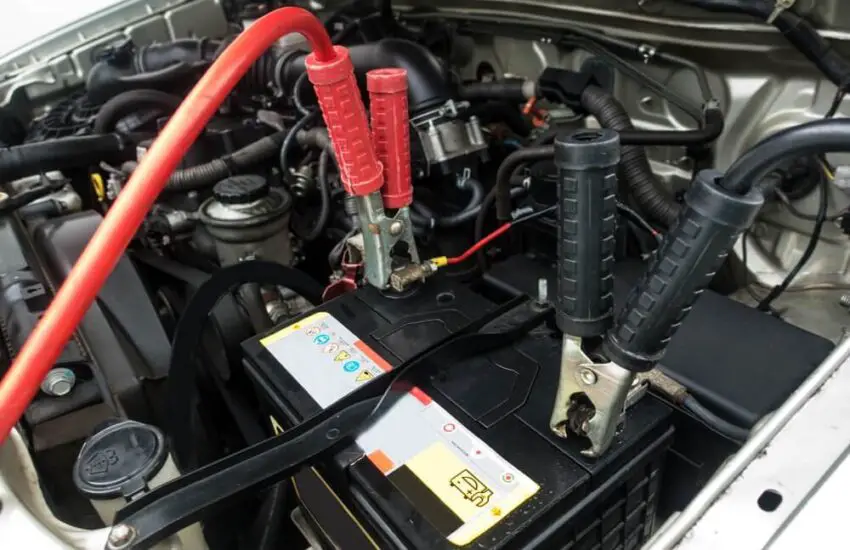
How Many Amps to Start a Car? Have you ever been curious about this? You might need to jump-start the car or buy a new battery, and knowing the amp requirements is necessary for these things.
Important Factors to Consider
There is no clear answer to the amp requirement for starting a vehicle. Several factors come into play, including the operating voltage and the condition of the starter and wires. But the key factors are the engine’s displacement, the type of oil used, and the ambient temperature. A small engine may only need 50 amps for the initial boost, but a larger engine will require more amps. Similarly, other factors also determine the number of amps.
Oil
The fuel used in the car or its viscosity, to be more precise, plays a role in determining the amps. For example, an engine using 5W-15 oil will start more easily than one using 40W oil.
Oil and temperature affect how an engine starts. (Photo Source: picautos)
Temperature
Ambient temperature actually affects the engine oil, not directly the battery’s amperage. Oil becomes thicker at colder temperatures, resisting free flow. For this reason, the battery consumes a greater amount of current at lower temperatures.
How Many Amps to Start a Car?
Most small and medium-sized cars will not need more than 400 amps. This is probably sufficient for most compact SUVs and light trucks. Larger vehicles will require more amps, probably 1,000 amps. Remember that the amps needed to start the engine are always lower than the battery’s cold cranking amps (CCA).
Another thing to consider is that a high-amp jump starter can start a car that requires fewer amps. For example, a 1,000-amp jump starter will work for a vehicle that needs 500 amps to start. But it will not be sufficient if the vehicle requires 1,300 amps.
If you buy a 400-amp device, it will not boost a car that needs 800 amps to start. But the car may not respond due to a dead battery. For example, you might have left your car radio or a light on all night, which drains the battery. In this case, a 400-amp unit can charge the battery, which can easily restart the engine.
Simply connect the power pack to your battery and wait a few minutes to let it recharge. Buying a high-amp power pack is the right decision, but a cheaper 400-amp pack is not bad either. You can use it more than 30 times to boost your vehicle effortlessly.
Even a cheap booster pack can recharge a battery multiple times. (Photo Source: Shutterstock)
The Voltage Calculation
So, now you know how many amps it takes to start a car, but the estimation is a bit different for voltage. If you have a 6V battery, do not plug it into a 12V source, or it will explode.
The starter’s power is calculated in watts, which you get by multiplying volts by amps. For a 12V battery, the engine will need about 200 amps to start. But the figure will increase when the battery voltage drops.
So, the things to remember are that you can use a more powerful amp pack but not a more powerful volt pack.
Rebuilding an Engine from A to Z
Whether it’s about bringing your engine back to life to restore it to like-new condition, customizing it for maximum performance, or as a hobby for a classic car, there are many cases where an engine rebuild is better than just repairing parts. Rebuilding an engine can be a challenging and intimidating task, but it’s still possible in your own garage with this comprehensive guide on how to rebuild an engine.
In this guide, you’ll not only find detailed step-by-step procedures and practical professional tips but also an informative and important discussion on the different options for any car owner needing an engine upgrade or overhaul. These include when to rebuild an engine and when to repair it, as well as a comparison between rebuilding the engine and replacing the existing engine with a “remanufactured engine.”
Partial Repair vs. Complete Engine Rebuild
There are two approaches to improving an engine that is deteriorating after many miles. You can either replace individual parts as needed to save money, known as the “piecemeal” approach, or perform a complete engine rebuild.
The piecemeal approach involves replacing only the worn or broken parts and leaving everything else intact. This maintenance approach typically tries to make do with standard-sized spare parts such as bearings, rings, pistons, and valves.
Obviously, the only underlying motivation here is economic, and you can expect such standalone repairs to keep your vehicle running without significantly improving engine performance.
So, when does the piecemeal approach make sense? When the vehicle and/or engine aren’t worth spending a lot of money on due to old age or low resale value, only the parts that absolutely must be replaced for the engine to keep running are changed. Other repairs can wait for the next owner.
The second approach to engine upgrade is to perform a complete overhaul when the engine needs major repairs and/or you’re hoping for significantly improved performance. This is certainly the more expensive approach, but it also yields much more durable and enhanced results.
By replacing major wear components such as rings, pistons, bearings, exhaust valves, the timing chain or belt, the engine is restored to “like-new” condition. This approach may involve purchasing an engine kit or buying the necessary components individually based on the owner’s preferences.
This usually also requires performing machining work, such as turning the crankshaft and resurfacing the cylinder heads.
Source: Scooper
Rebuilding the Engine vs. Replacement with a Remanufactured Engine
If you opt for a complete engine overhaul, you have two options: rebuild it or replace it with a “remanufactured engine.” There are pros and cons to each choice.
First, not all engines are rebuildable. If the engine block is cracked or severely damaged, rebuilding it is probably not possible.
Second, the internal parts needed for your engine may not be available, although the aftermarket usually has a sufficient supply of components for the most popular engines. It’s always wise to check availability first before starting the actual work.
The third consideration is your level of DIY automotive skill and the time you have. Rebuilding your engine yourself makes more sense if you’re sure the engine block can be reused, if the necessary parts are available and affordable, and if you have the time and ability. The rebuilding process typically requires machining work and you should expect to spend up to a week, probably more, on this project.
If the above conditions aren’t met, consider replacing your old engine with a remanufactured engine. Most remanufactured engines are made by reputable companies and come with a warranty.
Shop around to estimate whether this option will be more affordable than rebuilding an engine yourself, the availability of a remanufactured engine compatible with your vehicle, and the logistics needed to unload a 600 lb engine from a freight truck.
How to Rebuild an Engine: What You’ll Need
If you’re considering disassembling your existing engine down to the bare block and rebuilding it, you’ll need a few things.
Engine Hoists
You’ll need to start by removing the existing engine from your vehicle. Most DIYers use an engine hoist, also called an engine crane. To remove an engine in your own garage, basic engine hoists with a lifting capacity of 1 or 2 tons will be more than adequate for this task.
Load Leveler Bars
When your engine is supported by chains on both sides, it can tilt to one side if the weight is unevenly distributed, which is a challenge when removing an engine. To correct this, an engine load leveler bar allows you to move the horizontal support bar left or right as needed to balance and straighten an unbalanced load. Some load leveler bars are included with hoists.
An Engine Stand
Once you’ve removed the engine from the vehicle, you’ll need to take it off the hoist. An engine stand allows you to securely and safely mount the engine block. Most stands offer the ability to rotate an engine block into any position so you can easily work on all sides.
Other Tools
Engine rebuild kit
Camshaft bearing tool
Cylinder bore honing tool
Cylinder bore ridge reamer
Piston ring compressor
Rod bolt protectors
Silicone gasket maker
Timing gear puller
Torque wrench
Wheel chocks
Engine assembly lubricant
Water-displacing lubricant
Basic hand tool set
Electric drill
Brass punch
Air compressor
Air blow gun and hose
Fender covers
Jack stands
Flashlight
Masking tape
Permanent marker
Oil drain pan (at least 2)
Plastic sandwich bags and boxes: for storing and organizing hardware and parts
Service manual
New Components for an Engine Rebuild
When an engine has accumulated a lot of miles, the internal parts may be worn or damaged and need replacement. The engine parts you’ll replace when rebuilding your engine will depend on their condition.
In the engine block, typical wear items include pistons, piston pins, piston pin bushings, piston rings, connecting rod bearings, and main bearings. Crankshafts are machined if possible and replaced if they can’t be machined. Connecting rods can be reused or replaced.
You may need head gaskets, valve covers, valve cover gaskets, oil pans, oil pumps, harmonic balancers, and timing covers. If you’re rebuilding your existing cylinder head, you’ll need new intake and exhaust valves, valve springs, rocker arms, pushrods, and their associated hardware. Sometimes, you might be able to purchase complete cylinder heads with associated camshafts and valves. You’ll also need new head bolts to secure the heads to the block.
Some other necessary parts include water pumps, associated pans and gaskets, throttle body assemblies, and flywheels.
How to Rebuild an Engine: The Steps
Below are the steps to follow for a complete car engine rebuild.
1. Remove the Engine
Step 1: Position the vehicle near your hoist
You’ll need a large, well-lit garage with a flat surface, with enough space to position your hoist and maneuver.
Step 2: Remove the engine hood
Mark the hinge bolts so you can find them later. While carefully loosening them, ask someone to help you as you slide it. Note that some hoods have electrical connections for the headlights, turn signals, and fog lights mounted on them. Disconnect these as well. Step 3: Disconnect the external engine components
For safety reasons, it’s important to note that you should disconnect the battery ground cable before doing anything else.
Next, drain the coolant and radiator hoses. Be very careful not to damage the metal clamps, which are harder to replace than the rubber hoses.
Remove the radiator and fan shroud.
Loosen the alternator, tensioner assembly, cooling fans, and belts.
Disconnect the intake air supply and fuel lines. If your car has a pressurized fuel system even when the engine isn’t running, drain the fuel and release the pressure before disconnecting them.
Tips: It’s recommended to take close-up photos and label parts with markers for reference as you go, considering the many parts of an engine. This will greatly facilitate the reassembly process later.
Step 4: Remove all electrical connections from the engine
To disconnect the transmission, you must first disconnect the exhaust manifold and unbolt all visible electrical connections to the transmission. You can leave the spark plug wires for later.
Step 5: Remove the bolts that secure the transmission bellhousing to the engine
Lift the car and place it on jack stands, then support the transmission from underneath with additional jack stands. It’s very important to use a support under the transmission before disconnecting the bolts, because once you loosen them, there will be nothing supporting the transmission.
Note: In most cases, the transmission itself doesn’t need to be removed from the vehicle, as long as it can be safely supported when the engine is lowered.
Step 6: Use the hoist to remove the engine
Connect the hoist to the lifting points on the cylinder heads or the largest bolts near the top of the engine and slowly adjust the leveler to begin lifting the front.
2. Disassemble the Engine Block
Step 1: Get the manual for your specific vehicle
It’s essential that you refer to the engine manufacturer’s instructions to understand all the necessary specifications and peculiarities for rebuilding your specific engine.
Tips: Check the identification and casting numbers of your engine to make sure the engine you think you’re working on is indeed the engine you’re working on.
Step 2: Inspect the engine
Look for any signs of overheating, cracking, and burning on the block. Check for any fluid leaking from the many plugs and seals between components. Also check for any excess gasket sealant left from previous maintenance.
Step 3: Inspect external components
Inspect the alternator belt for any signs of wear by spinning the pulley and listening for any unusual noise. Then, inspect the distributor for any signs of play by applying some pressure to it. Also inspect the clutch assembly for wear.
Step 4: Remove the exhaust manifold
If the exhaust manifold bolts or studs are corroded, be careful to loosen them without damaging them. Using lubricants can help. Otherwise, extremely stubborn bolts may require heat to loosen.
Step 5: Disassemble the rest of the engine
Start with the oil pan and valve covers, then the cylinder heads. Protect the lifters when lifting the cylinder heads: if they are bent or damaged, they will need to be replaced.
Step 6: Check the cylinder bores
If the cylinders are too worn, the chances of a successful rebuild will be slim. You may want to use a micrometer to determine the bore diameter, or you can get a good idea of cylinder wall wear by looking at the cylinder ridge. The ridge is the point where the cylinder isn’t worn because the rings don’t go that high in the bore. Cylinder wear must be below this point.
Generally, if the wear is less than 2/1000 of an inch, the original pistons can be reused; otherwise, the engine will need to be bored and oversized pistons used.
Next, remove the cylinder ridge near the top of the bore with a cylinder ridge reamer. This will allow the pistons to be removed without damage and allow the pistons to be reinstalled with new rings.
Step 7: Removal of piston and rod assemblies
After removing the rod caps from the rods, place rod bolt protectors on the rod ends and protect the bolts to prevent them from scratching the engine block. Once removed, put the same rod cap back on the corresponding rod and keep them as numbered, matched, or paired sets. Keep the parts marked or in order to put them back later into the correct cylinder from which they were removed.
Step 8: Remove and inspect the crankshaft
Remove the crankshaft using the crank mounting plates. Keep the old main bearings in order, inspect them for any wear and excess dirt. Remove the camshaft, balance shafts, and auxiliary drives. Keep everything organized as you’ll need to put them back in the correct order. Remove the cam bearings, paying attention to their position.
Check for cracks and any signs of overheating. Measure different dimensions of the crankshaft: journal diameter, out-of-round, taper, and runout. Compare this to the dimensions specified in the workshop manual.
If some dimensions don’t match, mark them and send the crankshaft to a machine shop to have it resurfaced. Then, measure the crankshaft again so you can replace the bearings to get a clearance between the crank and bearings that meets specifications.
Step 9: Finish disassembly
Remove the core plugs, brackets, guide pins, and everything else still attached to the outside of the engine block. Check the engine block for any cracks.
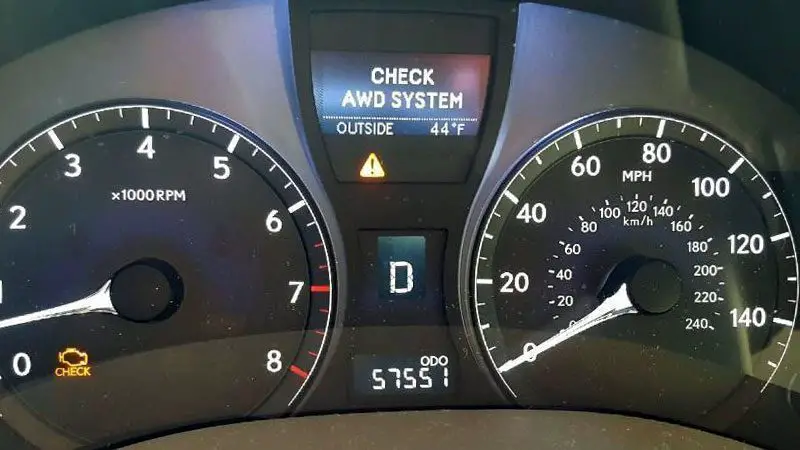
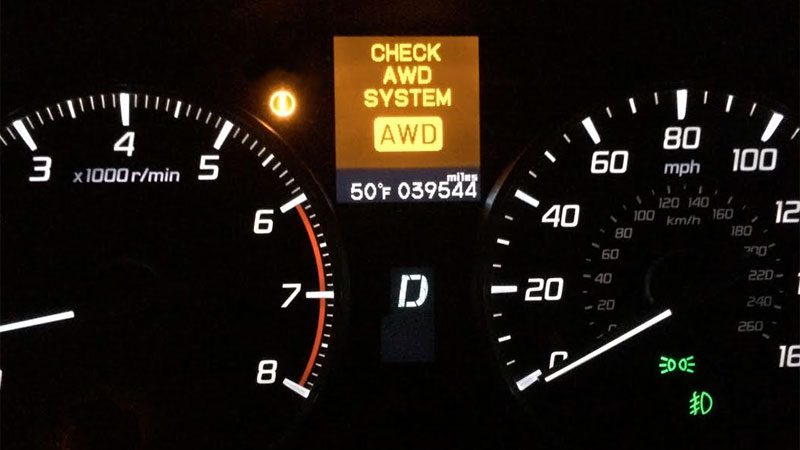
Meaning of “Check AWD System
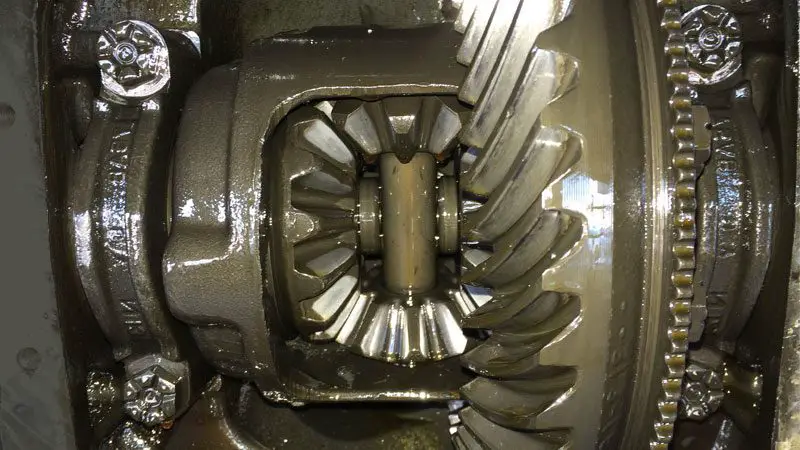
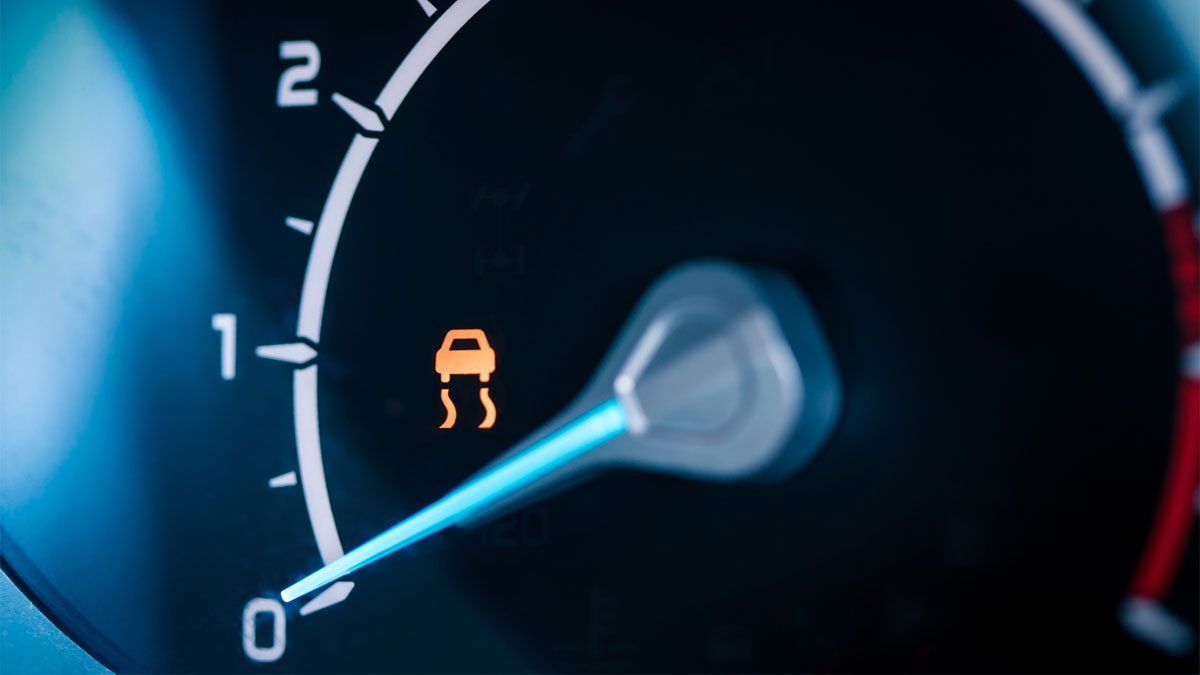
All-wheel drive (AWD) systems send power to all four wheels. All-wheel drive is found on many modern vehicles, especially in regions that tend to experience poor winter weather conditions. If there is a problem with the AWD system, you will often see a message indicating “Check AWD System” or something similar.
Not sure where to start? Keep reading to understand what this warning means, what can cause it to appear, and what you should do if this message appears.
Meaning of “Check AWD System”
If you see the “Check AWD System” message appear on the instrument cluster, it indicates there is a problem with your vehicle’s all-wheel drive system, whether it’s a Toyota Highlander, RAV4, Lexus RX350, or another model.
While this is most common on Toyota and Lexus models, other car manufacturers use similar messages to report issues related to the all-wheel drive system. You might see a message saying “R.DIFF TEMP”, a check engine light, “Check AWD System”, or simply “AWD”.
Causes of AWD System Problems
1) Overheated Differential
Limited Slip Differential
An overheated differential is a fairly common trigger for all-wheel drive system warnings. Differentials can overheat when you drive the car with mismatched tires or when you drive hard for extended periods. You are more likely to overheat the differential in hot weather and under extreme driving conditions.
2) Low or Old Transmission or Differential Fluid
If your differential fluid is old, too low, or the wrong type, the parts inside the differential or transaxle will not be lubricated properly. This can lead to increased wear, slipping, grinding, clunking, and other unusual sensations while you are driving.
If you have recently replaced your transmission or differential fluid and you start noticing these issues, check that you replaced the fluid with the correct specifications. Your owner’s manual should contain a list of specifications you need to follow for each type of fluid.
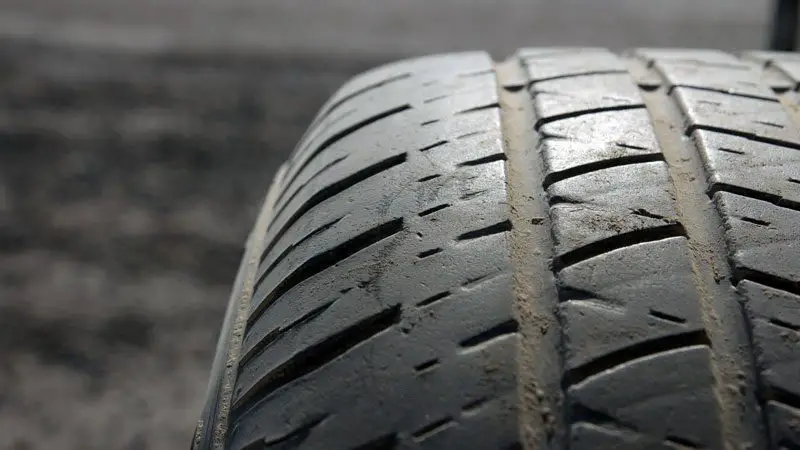
3) Mismatched Tires
All-wheel drive systems tend to be more sensitive to differences in tire diameter. This is because many all-wheel drive systems are implemented using one or more limited-slip differentials. Since these limited-slip differentials aim to limit wheel slip, they produce heat. Excessive heat can wear out the differential prematurely.
Limited-slip differentials have to work harder when the wheels are spinning at different speeds for long periods, as they would be when the tire diameters do not all match. If you find that one or more tires do not match, you can sometimes find a tire shop that will shave a tire so that the tread depth matches all four tires.
Never forget to rotate your tires so you don’t end up in this situation. Rotating your tires is fairly inexpensive, but replacing part of an all-wheel drive system will cost you a lot if this maintenance task is neglected.
4) Transmission Problems
Transmissions are essential components of the drivetrain that transfer power to each of the differentials in an AWD system. Many front and center differentials are integrated into the transmission case. This is what the manufacturer often calls a transaxle.
Transmission problems can cause a number of issues for the AWD system, including shifting problems, transmission slipping, and grinding. Unfortunately, many transmission problems require expensive repairs.
5) Problems with Traction Control or Stability Control Systems
Not all AWD systems work the same way. Some vehicles rely heavily on their traction or stability control systems to limit wheel slip. If you are experiencing problems with your anti-lock braking or stability control systems, you will likely also see an AWD warning on the dashboard.
Traction control and stability control systems are mostly electronic, but they make extensive use of wheel speed sensors (also called ABS sensors). Make sure your wheel speed sensors are working correctly. You can check your wheel speeds using a high-quality scan tool.
6) Disconnected Sensors, Wiring Problem, Bad Ground
Sometimes the cause of an AWD system problem can be as simple as a disconnected sensor or a wiring issue. Modern AWD systems use sophisticated electronic components and software to monitor and control the AWD system. Some AWD systems use the brakes to control wheel slip, which is cheaper and easier to implement than a limited-slip differential.
A disconnected sensor, a wire with worn insulation, or a bad ground can trigger an AWD system warning if the ECU detects an erroneous input. Although wiring problems can be a huge headache, finding a disconnected sensor is fairly straightforward if you have a factory service manual.
If you were just working there, it is often quite easy to retrace your steps to make sure you didn’t forget to reconnect anything once your maintenance tasks were completed.
7) Problems with an Electric Motor or Hybrid Battery
Some hybrid vehicles use a gasoline engine for one axle and an electric motor for the other. Electric vehicles can use two motors: one motor for each axle of the vehicle. If there is a problem with an electric motor or the hybrid battery, one or more axles may not receive power.
If you are experiencing a problem with the hybrid battery or an electric motor, you should see an additional warning on the dashboard indicating this issue. Hybrid batteries can deteriorate over time, but they are replaceable. Unfortunately, the cost of replacing a hybrid battery can be extremely high.
Frequently Asked Questions
What should I do if the AWD system warning light comes on?
If the AWD system light comes on, it is important to have your vehicle inspected as soon as possible. As mentioned above, the light can indicate various problems, some more serious than others.
If you have access to an OBD2 scanner, use it to see what error codes are stored in the ECM that could be causing the AWD light to come on and go from there. Otherwise, schedule an appointment with your local dealer or a good independent mechanic who specializes in your vehicle brand.
Can I still drive my vehicle if the “Check AWD System” light is on?
It is not recommended to drive your vehicle when it is alerting you to a problem with the all-wheel drive system. Continuing to drive your vehicle with the AWD warning light on can cause additional damage to your vehicle and potentially put you and your passengers in danger.
How often should I have my AWD system checked?
It is recommended to have your AWD system checked at least once a year or according to your vehicle manufacturer’s recommendations. Regular maintenance and inspections can help prevent problems with your AWD system and ensure it functions as it is supposed to.
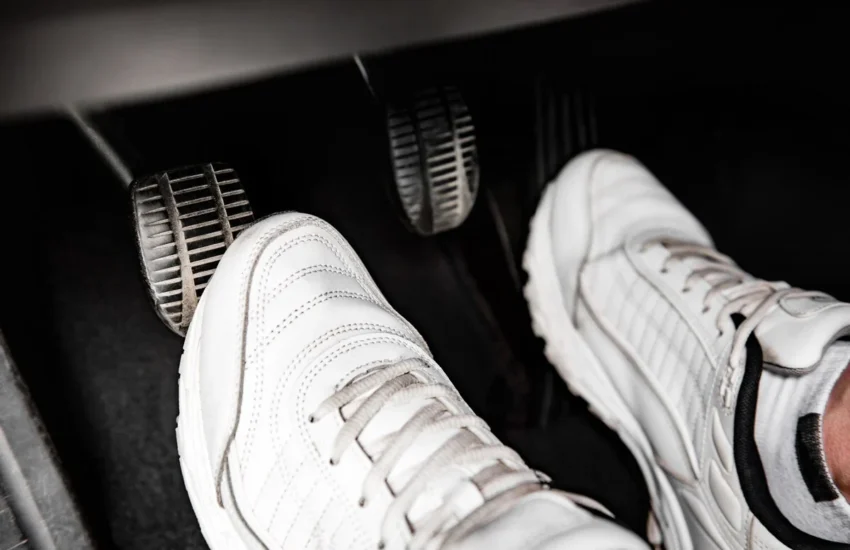
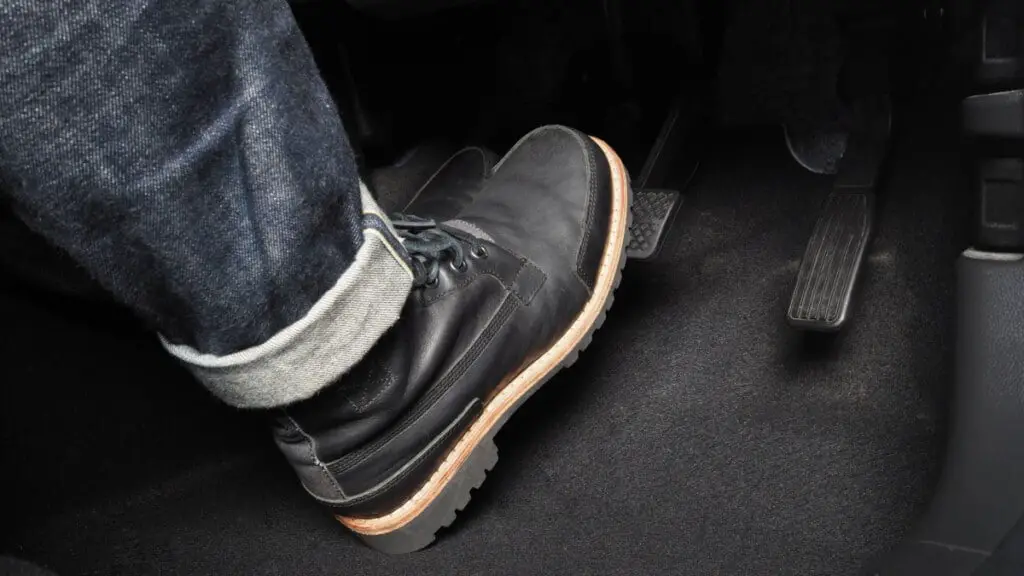
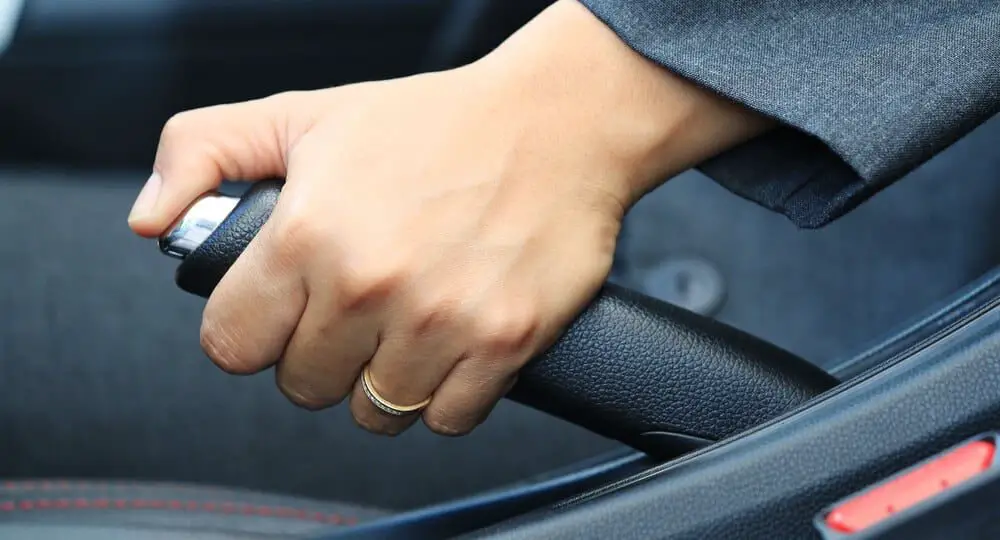
Press the clutch and brake at the same time
Clutch Pedal It often happens that you press the clutch and brake at the same time. Have you ever thought about what happens when you do that? Now is the time! You need to be aware of how your car reacts when you use the brake and clutch at the same time.
Come explore the consequences that arise from your actions.
The Results When You Use the Brake and Clutch at the Same Time
Time clearly shows that the brake and clutch have been used in synchronization. When you brake and downshift together in the right way, things could turn in your favor. On the other hand, if you do it wrong, things could get worse.
Read on to examine both sides of the coin in detail.
1. The Wrong Way
When you apply the brakes in sync with the clutch, it will cause your car to stop immediately. This would be necessary when it is required to stop the car instantly. For example, if a human or stray animal suddenly appears in front of you; you would need to stop the car immediately. You must use the brake and clutch at the same time in such situations.
One must use the brake and clutch at the same time
An important thing to keep in mind is that pressing the brake with the clutch is not at all suitable for your car. The combination of the clutch and brake can lead to excessive fuel consumption, stalling jerks, and wasted energy. Another drawback is the depreciation of brake quality. The brakes, in turn, would wear out easily, increasing risks to your safety while driving.
2. The Right Way
If you are a novice driver, you will need to press the brakes and clutch simultaneously when stopping. One must know that this is not an ideal thing to do. When you want to reduce your speed approaching an intersection or come to a complete stop, a definitive approach must be followed.
The correct step is to brake first, then press the clutch. For example, if you need to reduce your speed, gently press the brake to reach a lower speed. Then, you can press the clutch. This can help you make small stops at approaching signals. Alternatively, when you want to make a complete stop; follow the same procedure by pressing the brakes and then the clutch.
Discover how to use the brake and clutch at the same time (Photo Source: hotcars)
By doing this, you will increase the lifespan of the brakes and clutch while saving on fuel consumption. Refer to the maintenance tips to learn more about advice for increasing the lifespan of the clutch and brakes.
How to Correctly Use the Brake and Clutch at the Same Time?
Using the brake and clutch pedals simultaneously in a car is generally not necessary nor recommended during normal driving. However, there may be situations where you need to press both pedals at the same time, such as during an emergency stop or as part of specific driving techniques. Here is a general guide on how to correctly use the brake and clutch pedals together:
Understanding the Purpose of Each Pedal
Brake Pedal: The brake pedal is used to slow down or stop the vehicle by applying the brakes.
Clutch Pedal: The clutch pedal is used to engage or disengage the engine power from the wheels, allowing you to change gears.
Emergency Stops
In an emergency where you need to stop the car as quickly as possible, you may need to press the brake and clutch pedals simultaneously.
Press the clutch pedal all the way to the floor to disengage the engine power from the wheels, preventing the engine from stalling.
Apply firm and progressive pressure on the brake pedal to stop the car as quickly as possible.
Specific Driving Techniques
In some advanced driving techniques, such as heel-and-toe downshifting, you may need to use the brake and clutch pedals simultaneously.
Heel-and-toe downshifting is a technique used to shift to a lower gear while braking, typically in performance driving or spirited driving.
The technique involves using the right side of your foot to brake and the right side of your foot or the side of your other foot to press the accelerator while the clutch is depressed.
This technique requires practice and coordination and is generally used by experienced drivers.
For a smooth stop, it is advisable to press the brake first, then disengage the clutch progressively while you continue to brake.
This allows the vehicle to slow down smoothly and maintain steering control.
2. Emergency Braking:
In case of emergency braking, it is crucial to brake as hard as possible first.
Then quickly press the clutch to prevent the engine from stalling.
Not disengaging the clutch before braking in an emergency situation can lengthen the braking distance.
3. Downshifting:
To downshift, it is necessary to disengage the clutch before releasing the accelerator.
Then press the brake if necessary to slow the vehicle before shifting gears.
Release the clutch progressively while you press the accelerator.
Important Points to Remember:
Always apply gentle and progressive pressure on the clutch and brake pedals.
Never hold the clutch depressed for a long period, as this can damage the clutch system.
Coordinate your movements between the clutch, brake, and accelerator pedals for smooth and safe driving.
Conclusion
You would now know what happens when you use the brake and clutch at the same time. Always press the brake first, then the clutch to avoid potential wear. Better safe than sorry, and to ensure your safety; driving the car the right way is necessary.
Reasons for water leaks in the car on the passenger side
There are many types of fluids in your car – from fuel in the engine tank to radiator fluid and coolant. So, a fluid leak isn’t really surprising given the volume of fluid contained in a vehicle. Additionally, the car sometimes appears to have a water leak, but that’s not the case. However, you should pay attention when a car leaks water on the passenger side.
Reasons for Car Water Leaks on the Passenger Side
A car needs different types of fluids to operate, but only two systems use water-based fluids. These are the engine cooling system and the windshield washer system.
When there is water on the passenger side of the car, examine these two areas:
1. The Engine Cooling System
This is the first place to start the investigation when you see a car leaking water on the passenger side. The cooling system is highly pressurized, so even a small leak can force antifreeze out.
Furthermore, heating and cooling cycles can deteriorate seals and wear out gaskets and hoses.
The problem could come from the cooling system. (Photo: Elkem)
2. The Windshield Washer System
The entire system consists of a reservoir, a pump, hoses, and nozzles. The reservoir stores the washer fluid and the pump pumps it to the hoses. Then, the hoses bring it to the nozzles, which spray the fluid onto the windshield.
A crack in the reservoir is the most common cause of a leak. This happens due to the extreme pressure exerted by frozen and expanded washer fluid.
You need to install a new reservoir to fix the problem. Use a low-freezing-point washer fluid to avoid it completely.
Remember that water will only leak when you use the washer. If you notice that the car is leaking water on the passenger side after using the system, you’ll know where to look.
My Car Leaks Water into the Passenger Side Floor When It Rains
Why does rainwater flow inside the passenger side? Well, there can be several reasons.
Clogged sunroof drains or a loose drain hose. If your car has a sunroof, check its drainage system for these issues. Problems will cause water to seep into the car instead of draining outside.
The heater core could also be the culprit. Check if the leaking fluid smells like coolant. In this case, the car will overheat or the coolant level will be low.
A clogged drain in the air conditioning system or a vent. The passenger floor is the endpoint for these drains.
Find the source of the leak through water testing. (Photo: CFJ)
If you think rainwater is leaking through one of the seals, you can perform a water test to find the problematic spot.
Find an assistant to spray water on the car while you stay inside to try to locate the leak. Start from the low point, like the door crack, up to the bottom of the windshield and progress to the roof.
Testing takes time, but it’s the most cost-effective way to find the troublesome spot when a car leaks water on the passenger side.
FAQ
Can a clogged sunroof drain cause a water leak on the passenger side?
Yes, a clogged sunroof drain is a common cause of water leaks. When the drain pipes are clogged, water can overflow and enter the cabin, causing leaks.
What should I do if I suspect my car is leaking water on the passenger side?
First, locate the source of the leak by inspecting the affected area. Check for damaged seals, clogged drains, or rusty body panels. If in doubt, it’s best to consult a mechanic for a professional assessment.
Can a damaged windshield seal cause water leaks on the passenger side?
A damaged or poorly sealed windshield can allow water to enter the car. If you suspect this is the issue, have a professional inspect and reseal the windshield.
Is it dangerous if water seeps into my car?
While water leaks themselves are not immediately dangerous, they can lead to issues such as mold growth, electrical problems, and interior damage over time. It’s essential to address leaks promptly to avoid these secondary problems.
How can I prevent water leaks on the passenger side of my car?
Regular maintenance is key. Keep sunroof drains clear, inspect weather seals, and promptly repair any rust or body damage. Parking your car in a garage or under shelter during heavy rain can also help prevent leaks.
Can a faulty air conditioning system cause water leaks in the car?
A faulty air conditioning system can cause condensation buildup, leading to water leaks. If you suspect this is the problem, have your air conditioning system inspected and repaired by a professional.
Is repairing water leaks on the passenger side expensive?
The cost of repairs depends on the cause and severity of the leak. Some tasks, like unclogging blocked drains, can be relatively inexpensive, while others, like replacing a damaged windshield, can be more costly. It’s best to get a repair quote from a qualified mechanic.
Can I temporarily fix a water leak myself, or should I always consult a professional?
Simple issues like unclogging blocked drains can sometimes be handled by car owners.
However, for complex problems or if you’re unsure of the cause, it’s advisable to consult a professional mechanic or automotive technician to ensure a proper and lasting solution. Temporary fixes may not address the underlying issue.
Conclusion
When a car leaks water on the passenger side, it usually stems from various factors such as blocked drainage systems, deteriorated seals, or other related issues.
It is essential to promptly diagnose and address these potential causes to ensure the ongoing safety and comfort of your vehicle.
To this end, regular maintenance practices, like unclogging blocked drains and inspecting seals, play a crucial role in preventing water leaks!
How to Replace the Gear Shift Knob?
Driving with a faulty gear shift knob that constantly comes loose is uncomfortable, frustrating, and dangerous. Why endure all that struggle when you can fix it in no time? Yes, you read that right. Here is the best DIY method that will lead you to the answer to the question: how to replace the gear shift knob?
So, let’s start the gear shift knob replacement procedure now!
The Fastest Method to Replace the Gear Shift Knob
There can be many reasons to change your knob. But what matters here is the correct procedure to replace the knob. To make your driving smoother and safer, follow this top-tier procedure at any time.
1. Engage the Parking Brake
Safety first! For this reason, it’s best to first apply the parking brakes. Of course, no one would want the car to accidentally shift gears or move while you are trying to replace the gear shift knob.
So, make sure to set the parking brake before starting the procedure. After engaging the parking brake, remember to put the vehicle in neutral.
This way, you can have better control over the gear shift while proceeding with the procedure.
The second step is to remove your old gear shift knob. Generally, there are two ways to do this.
The first method involves a thread integrated at the bottom of the knob. This thread is also located inside the gear lever.
So, to remove the knob, simply turn the knob clockwise and you’re good to go. The second method is to remove the screw that holds the knob to the gear lever. You can even use a wrench to accomplish this task.
Here’s how to remove the gear shift knob the right way. Whichever method you prefer, just make sure not to leave any loose ends behind.
3. Carefully Install the New Knob
After successfully removing the gear shift knob, it’s time to install the new knob.
Depending on your method of removing the gear shift knob (i.e., unscrewing or unthreading), the installation involves the same procedure respectively.
To ensure the knob is properly seated, tighten it as much as possible. Now, shift through the gears to make sure the installation went well.
It’s best to be sure of the knob’s placement so it fits better when you need to shift gears. So, follow this amazing way to change the gear shift knob method for a better driving experience.
What tools do I need to replace a gear shift knob?
You will typically need a screwdriver, pliers, a wrench, and the new gear shift knob you want to install.
Can I replace my gear shift knob with any replacement knob?
In most cases, yes. Just make sure the new knob has the same thread size as your gear lever. Some gear shift knobs come with adapters to fit different sizes.
How do I choose the right replacement gear shift knob?
Consider factors such as material (e.g., metal, wood, plastic), design, weight, and ergonomics. Choose one that complements your car’s interior and fits comfortably in your hand.
Are there any safety precautions to take when replacing a gear shift knob?
Ensure your car is in park or neutral and the parking brake is engaged. Disconnect the battery (optional but recommended) to prevent accidental gear engagement while working on the gear lever.
Should I apply lubricant when installing the new gear shift knob?
It’s a good idea to apply a small amount of threadlocker or lubricant to the gear lever threads to prevent corrosion and facilitate future removal.
How can I secure the new gear shift knob in place?
Screw the new gear shift knob onto the gear lever clockwise until it is snug. If there is an adjustment screw, tighten it firmly. Otherwise, use a wrench or pliers to ensure it is tight but not over-tightened.
Can I further customize the appearance of my gear shift knob?
You can add accessories such as shift boot covers, trim rings, or stickers to customize the look of your gear shift knob.
Is it possible to install a gear shift knob with a different shifting mechanism (e.g., automatic to manual or vice versa)?
Converting between automatic and manual shift knobs may require more extensive modifications, such as changing the entire shifting mechanism, and can be complex. It is not a typical DIY project.
How can I maintain my new gear shift knob to keep it looking good?
Clean it regularly with a damp cloth and mild soap. Avoid harsh chemicals that could damage the material. Periodically check and tighten the knob to prevent it from loosening.
Wrap-up
This procedure is the most effective and cost-efficient way to replace the old knob with a new one.
Make sure to perform this fastest procedure to replace the gear shift knob carefully by following each step. In the worst-case scenario, use maintenance tips or consult experts.
So, whenever you’re thinking about how to remove a gear shift knob, then follow this guide!
How to know which wheel bearing is faulty?
Wheel bearings are essential for the wheels to function harmoniously with the hub and tires. There is one bearing per wheel, and it is rare for all of them to fail at the same time. How to tell which wheel bearing is faulty?
Well, we will discuss how to discover the faulty one and what they actually do to keep the wheel assembly together.
What is a wheel bearing?
Before delving into the symptoms of a bad bearing and ways to identify which one is defective, you need to know what it is and its functions.
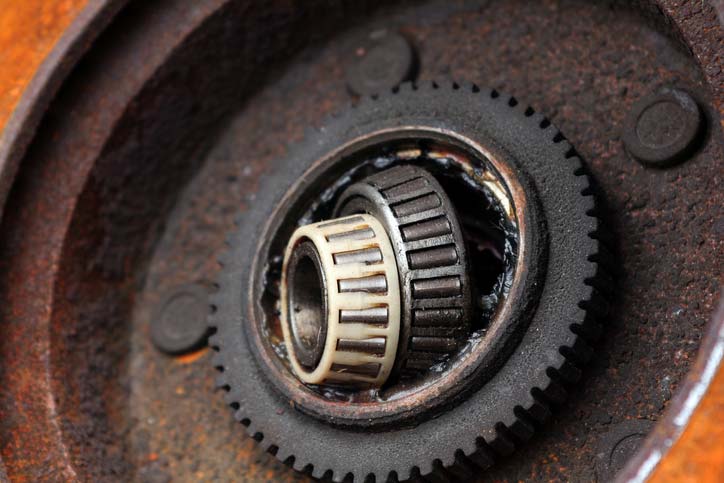
A wheel bearing is a metal ring housing a number of steel balls. The ring, called a race, fits into a hub, which is a hollow metal piece at the center of the wheels.
The hub rolls on a metal axle shaft to reduce friction when the wheels rotate. These ball bearings are the most common type in today’s vehicles. There are also ball bearings and precision roller bearings.
Wheel bearings support the entire weight of a vehicle and do not have a constant source of lubrication. For these reasons, they endure a lot of abuse and wear out over time.
A bearing is essential to the wheel’s operation. (Photo source: istockphoto)
How to tell which wheel bearing is faulty?
Every system in an automobile consists of several small components that must function and be integrated together for the car to run smoothly.
But like everything else, these parts are subject to abuse and show warning signs when they are about to fail.
Wheel bearings also exhibit certain symptoms when they cannot function fully and are about to fail. But how to tell which wheel bearing is faulty: front or rear?
All types of wheel bearings show similar symptoms when failing. Here is how to tell which wheel bearing is faulty:
Pay attention to noises
A grinding noise coming from the tires indicates overused bearings that do not have enough lubrication to prevent the grinding friction between metal parts.
The noise intensifies when the vehicle accelerates and it comes from either the front or the rear, indicating the position of the bad bearing.
Sometimes it can be a rumbling when you drive on a straight road and it intensifies once you make a turn. Here is how to tell which wheel bearing is faulty when turning, as the opposite side of the turn is the affected area.
A click also requires attention, as it likely comes from a broken bearing in the hub.
If a bearing is the cause, the noise rotates faster with acceleration. To identify which bearing is responsible, slow down the car and gently sway it.
If the click is muffled when you move to the left, it is likely that the right wheel bearing is broken.
Check the tires.
The condition of the tires is another simple way to tell if there is a problem with the bearings. If a tire wears unevenly, it is probably because the wheel bearing attached to it is damaged.
Tires will show signs of wear over time. It is completely normal for all of them to deteriorate at the same rate.
Wobbly wheels
Another symptom related to damaged bearings is a wobbly wheel. In this case, the car feels loose or you find the steering less responsive, to be precise, while driving.
When this happens, check each wheel by lifting the vehicle. If the wheel assembly moves back and forth, the wheel bearing attached to it is definitely damaged.
Unstable wheels can also be the result of other problems, such as broken suspension or a misaligned chassis. A mechanic can identify the exact reason by performing a road test.
Stiff wheels
Just like loose wheels, stiff wheels are another safety issue and indicate bad bearings. To find out which bearings are responsible, you need to lift the car with a jack and check the front and rear wheels.
Simply grab the tires and spin the wheels. A rotation without effort means they are fine, but if one of them is stiff, its bearing must be broken.
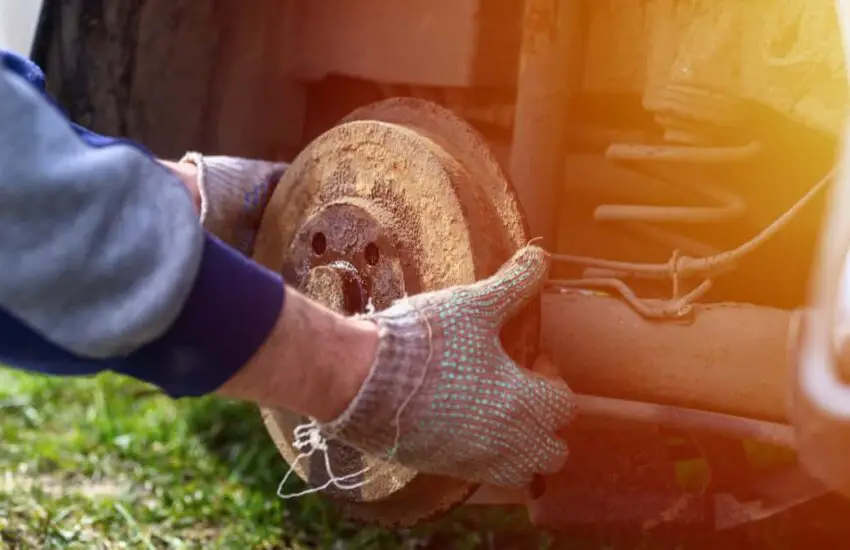
Pulling to one side when braking
Besides a faulty bearing, this problem can result from a number of faulty components, including damaged brakes, a worn rotor, a faulty equalizer, or a broken rotor.
Pulling could be caused by a broken bearing. (Photo: Cooper BMW)
However, if the cause is a broken bearing, it will eventually lead to loose brakes. Whenever you brake, the car acts as if it has a mind of its own and pulls in a specific direction. Examine the bearings on the side towards which the vehicle pulls.
FAQ
Can a bad wheel bearing cause other problems if not replaced?
Yes, a bad wheel bearing can lead to bigger problems if not replaced promptly. These include:
Damage to the wheel hub assembly.
Uneven tire wear, which can affect handling and traction.
Increased stress on other suspension components.
Safety issues as it can lead to loss of control in extreme cases.
Is it difficult to replace a wheel bearing?
Replacing a wheel bearing can vary in difficulty depending on the make and model of your vehicle. Some bearings are relatively easy to replace, while others may require specialized tools and knowledge.
It is recommended to entrust the job to a qualified mechanic if you are not sure about your DIY skills.
Are there maintenance tips to avoid wheel bearing problems?
Even though wheel bearings wear out over time, you can extend their lifespan by:
Keeping your wheels properly aligned and balanced.
Regularly inspecting and lubricating the wheel bearings according to your vehicle’s maintenance schedule.
Avoiding overloading your vehicle beyond its weight capacity.
How much does it cost to replace a wheel bearing?
The cost of replacing a wheel bearing varies depending on factors such as the vehicle’s make and model, labor costs in your area, and whether you use original or aftermarket parts. On average, it can cost between $100 and $600 per wheel.
Can I drive with a bad wheel bearing?
It is not recommended to drive with a bad wheel bearing. Continuing to drive with a faulty wheel bearing can lead to safety risks, further damage to your vehicle, and more expensive repairs.
How long does a wheel bearing typically last?
The lifespan of a wheel bearing varies, but it typically lasts between 85,000 and 100,000 miles (137,000 to 161,000 kilometers) or more under normal conditions. However, factors such as driving habits and road conditions can affect their longevity.
Can I replace just one wheel bearing if it’s faulty, or should I replace both sides?
While it is not mandatory to replace both wheel bearings at the same time, it is often recommended to do so. If one wheel bearing is faulty, the other may not be far behind in terms of wear. Replacing both can help ensure uniform performance and safety.
Remember that if you suspect a bad wheel bearing, it is essential to have it inspected and replaced by a qualified mechanic to maintain your vehicle’s safety and performance.
I hope you now know how to tell which wheel bearing is faulty. Just detect the symptom and perform a simple task to find out which bearing is at fault.
Most Common Problems of the BMW 335i
The BMW 335i had everything you need in a world-class vehicle. But there were some problems with the 2007 BMW 335i that we will discuss below.
BMW is a notoriously reliable car brand. The car manufacturers are known for creating incredible vehicles.
Their engines are among the best machines made to date. But manufacturers face several problems when creating something special in this industry. And the same thing happened with the 2007 BMW 335i!
Customers were satisfied with the handling, performance, and design of this car. But an automobile is one of people’s greatest assets today. And when someone invests in a car, it needs to be there for a long time.
Let’s discuss some complaints about the BMW 335i here.
2007 BMW 335i Problems: A Complete List
BMW designs and delivers remarkable automobiles every time. And the car manufacturer always cares about customer satisfaction and its products.
But the problems with the BMW 335i lead to opposite circumstances. People were not satisfied with the increasing engine problems and higher maintenance costs.
Steering, fuel system, electrical, and engine problems were the main culprits. These problems affect not only the vehicle’s performance but also sales.
There is no doubt that professionals also offer a 10-year or 120,000-mile warranty for the high-pressure fuel pump (HPFP). But customers had an aversion to the same thing.
Now let’s prepare the list of the most common problems related to the BMW 335i.
1. High-Pressure Fuel Pump (HPFP) Failure
The high-pressure fuel pump failure is one of the biggest problems with the 2007 BMW 335i. The fuel pump injects fuel into the engine.
But the risks are higher when the pressure pump is not in good condition. This is the major problem with the BMW 335i engine.
The 335i’s high-pressure fuel pump (HPFP) malfunctioned. (Photo source: Pixabay)
The HPFP system transfers fuel via the injectors directly into the engine. HPFP malfunction means there will be no fuel supply to the engine for combustion. A car engine will not run the fuel if the pressure system fails.
Customers benefited from a 10-year or 120,000-mile warranty after this complaint. The HPFP system also affects the vehicle’s mileage and performance.
2. Fuel Injector Leak
Clogged or leaking fuel injectors were another major problem with the 2007 BMW 335i. Fuel injectors are an important part of the engine’s power.
These injectors have a connection with spark plugs and an ignition system. But the problem worsens in case of a leak.
According to expert maintenance tips, it is essential to keep the fuel injectors in good condition to avoid problems. The engine starts to misfire or takes time to start in case of an injector leak.
3. Vibrations in the AC System
Noise and vibrations in the air conditioning systems were a problem inside the BMW 335i’s cabin. An irritating noise starts whenever the air conditioner is turned on.
You have to turn off the air conditioning to avoid strong vibrations. Low refrigerant charge could be the reason for this problem.
The most common problems of the 2007 BMW 335i you need to know (Photo source: Pixabay)
FAQ
Are cooling system problems common on the 2007 BMW 335i?
Yes, cooling system problems are relatively common. Owners have reported issues such as coolant leaks, water pump failures, and overheating. Regular maintenance and inspections can help prevent these problems.
What are the symptoms of a faulty water pump in the 2007 BMW 335i?
Symptoms of a faulty water pump can include engine overheating, coolant leaks, and a warning light on the dashboard. If you notice any of these signs, it is important to address the issue promptly to avoid engine damage.
Do 2007 BMW 335i models have electrical problems?
Some owners have encountered electrical problems, such as faulty sensors, defective ignition coils, and issues with the iDrive system. These problems can affect various vehicle functions.
Is there a common problem with the transmission of the 2007 BMW 335i?
The automatic transmission in some 2007 335i models may experience problems such as harsh shifting or delayed gear engagement. Regular transmission fluid changes and proper maintenance can help mitigate these issues.
Are there any recalls related to the 2007 BMW 335i problems?
BMW has issued recalls related to some of the common problems of the 2007 335i, including the high-pressure fuel pump issue. It is essential to check if your vehicle is affected and have any recall addressed by a BMW dealer.
How can I prevent or minimize these common problems on my BMW 335i?
To minimize common problems, follow the recommended maintenance schedule, address recalls promptly, and consider regular inspections by a qualified BMW technician. Additionally, using high-quality fuel and coolant can help avoid some issues.
Is it worth buying a 2007 BMW 335i despite these common problems?
It depends on your budget and willingness to address potential issues. If you find a well-maintained 2007 BMW 335i with a documented maintenance history and necessary repairs done, it can still be a rewarding and enjoyable vehicle to own.
Where can I find reliable information and assistance for solving these problems with my 2007 BMW 335i?
You can consult the official BMW website, owner’s manuals, and online forums dedicated to BMW owners for information and assistance.
Additionally, authorized BMW service centers can provide professional help to diagnose and resolve these issues.
The Final Words
There you have it! These are the most significant and common problems with the 2007 BMW 335i. Understanding these problems could help you decide whether to purchase a BMW 335i.
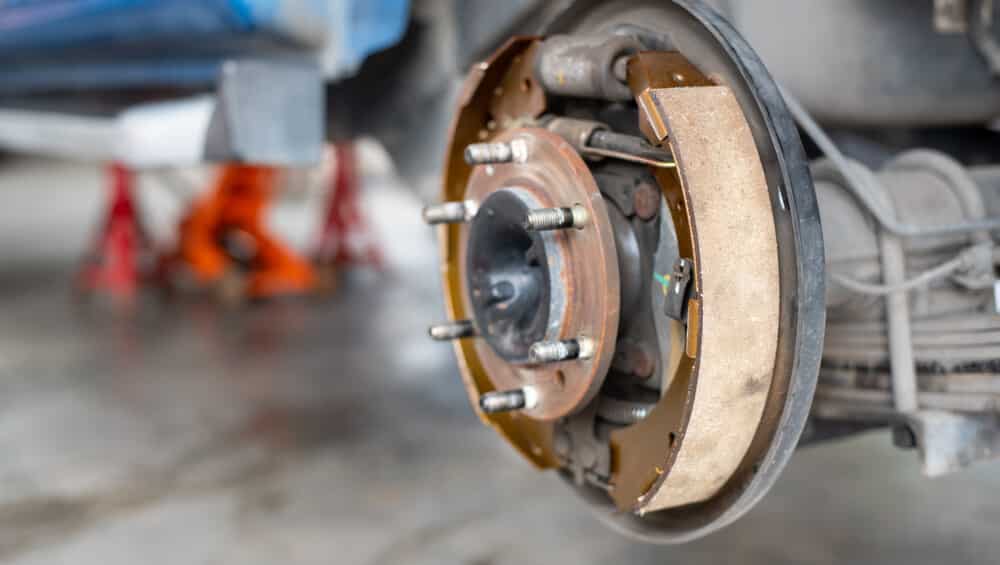
The 6 Symptoms of Worn Brake Drums
The 6 Symptoms of Worn Brake Drums. Nowadays, few cars are equipped with drum brakes, but it was once a popular option for automobiles. If you drive a car equipped with this system, it is important to know the symptoms of a faulty brake drum.
In this guide, we take a closer look at the symptoms that occur when brake drums malfunction. We also examine the function of brake drums, their location, and the average replacement cost. By the end of the article, you will know how to test brake drums and get answers to your main questions.
Symptoms of Bad Brake Drums
When brake drums start to fail, you will notice more noise during braking. The pedal will also become soft or spongy, and braking power will decrease. You might also notice a vibrating brake pedal, uneven braking power, and issues with the parking brake.
Let’s examine these six symptoms in more detail.
1. Noise During Braking
Often, the first sign of a problem is excessive noise when you brake. Once the friction material of the shoe is worn, the metal backing comes into contact with the drum, creating a scraping or squealing noise after applying the brakes.
This noise can also occur if any of the brake hardware components have come loose or are broken, such as the retaining springs. Debris, such as small stones and dirt, can also get into the brake drum and create a strange noise.
2. Soft or Spongy Brake Pedal
If the brake drum is worn or cracked, the pedal may feel spongy when you press it. However, this issue is rarer than some others, as the drum does not often crack.
Instead, a soft pedal is most often caused by air in the hydraulic system. You will need to bleed the air from the system for the brakes to regain normal pressure.
3. Decreased Braking Power
When the brake shoes and drums are worn, you may notice that it is harder to stop the vehicle. With an inadequate amount of friction material, it becomes more difficult to stop the wheels.
Over time, stopping distances will gradually worsen. That’s why it’s best to address the issue before rear-ending another vehicle.
4. Vibrating Brake Pedal
If the brake drums warp or become distorted, they will not establish proper contact with the shoes. Instead of clamping evenly against the drum, the shoes hit certain areas harder than others, leading to a vibration that can be felt through the pedal.
It is important to note that drum brakes do not suffer from the same pulsations as disc brakes. Brake pads and rotors typically have much more vibration. That’s why you want to machine or replace the drums at the first signs of pulsation.
5. Parking Brake Problems
The parking brake is connected to the rear brakes. If you have failing or defective drum brakes at the rear, this emergency braking capability can also suffer.
AD
You may notice that the parking brake does not hold the vehicle steadily. However, the problem could stem from the parking brake itself, such as a cable that needs adjustment, so further diagnosis is necessary.
6. Uneven Braking Power
There are many reasons why a car pulls to one side, one possibility being faulty drum brakes. However, brakes usually wear evenly, which would cause performance issues on all points.
You might also want to consider a possible suspension issue combined with uneven tire tread. Regardless, you want the problem checked to be safer on the road.
What is the Function of a Brake Drum?
Brake drums rotate in alignment with the wheel hub, rim, and tire. Whenever the vehicle is moving, the drum also rotates along with the wheel to which it is connected.
The brake shoes are attached to a steel backing plate, bolted to the spindle or axle. When you press the brake pedal, hydraulic fluid is released into the wheel cylinder. The shoes expand, forcing the lining to make contact with the brake drum. This action slows down the drum and the wheel simultaneously.
Where are the Brake Drums Located?
In the past, drum brakes were found on all four wheels of the car, but this is normally no longer the case. Even though many vehicles now have four-wheel disc brakes, some still use drum brakes at the rear.
Brake drums are made of metal and are circular. They house the brake shoes but are not fixed like the shoes. Instead, the drum rotates in alignment with the wheels until the shoes are applied.
How to Test Brake Drums?
If you want to check the drums yourself, you only need a few minor tools. Here are some steps to consider.
Lift the vehicle and secure it on jack stands.
Remove the wheels and the brake drums. If you have driven recently, be cautious when touching the brakes as they may be hot.
Inspect the wheel cylinders and linings. If you see a substance on the backing plate, you need to determine if it’s brake fluid leaking or grease. You can wash off brake fluid, but you want to know where it’s leaking from.
Inspect the thickness of the brake shoe lining. If they are 1/8″ thick or less, it’s time to replace them.
Inspect the drum for any signs of wear. If you see scoring marks, you need to machine or replace the drums.
You should have your service manual handy and refer to the manufacturer’s specifications for the braking system. You also want to follow any additional instructions provided by the manufacturer.
ADVERTISEMENT
If you are not familiar with the drum brake system, we strongly encourage you to have a mechanic handle the diagnosis and repairs. As professionals, we have seen far too many people attempt to work on their own brakes, only to end in disaster.
How Much Does It Cost to Replace Brake Drums?
On average, expect to spend between $225 and $375 to replace brake drums. You may spend between $150 and $250 for parts and an additional $75 to $200 for labor. If you have mechanical knowledge and a few simple tools, you could replace the drum brakes yourself and save some money.
You should always replace brake drums in pairs. So, if the right side needs replacing, it’s best to replace the left side as well. By replacing both, you ensure that performance remains consistent across the axle. Additionally, you might consider replacing the brake shoes and wheel cylinders at the same time, while everything is disassembled.
To get a better estimate, you need to consider a few factors, including:
Make/model of your car: Luxury cars tend to have more expensive parts. Also, if the brake drums are difficult to work on, labor costs will be higher.
Labor costs: Each region has its own average labor cost for mechanics. If you live in an area where it’s cheaper to hire a mechanic, you might not spend as much as you thought.
Aftermarket or OEM parts: You can choose aftermarket brakes if you don’t mind not having the same quality as factory ones. This choice saves you some money but often doesn’t come with the same warranty as OEM parts.
The upside is that you shouldn’t have to change the drums very often. With many drums lasting 200,000 miles under optimal driving conditions, it’s something you might never face.
When purchasing your replacement kit, make sure it includes all the hardware you’ll need. Otherwise, you need to buy these items separately.
Are Brake Drums Difficult to Replace?
It’s not as complicated as one might think. Although they are different from disc brakes, they tend to be just as easy to work on. If you have mechanical knowledge and the necessary tools to do the job, it might only take you an hour or less. Otherwise, it’s best to leave the job to professionals.
How Many Years Do Drum Brakes Last?
The drums themselves should easily last between 150,000 and 200,000 miles if you take care of your vehicle. The brake shoes, on the other hand, need to be replaced more often. You may need to install new brake shoes every 30,000 to 40,000 miles, depending on the conditions you drive in.
Are Drums More Expensive Than Rotors?
Disc brakes are more expensive than drum brakes, but not substantially. If you need to replace a set of rotors or drums, you will spend less on the latter in most cases. Additionally, drums do not need to be replaced as often as rotors in a disc brake system.
How Many Drum Brakes Does a Car Have?
All cars have four brakes, one set for each wheel. If the car is equipped with four-wheel disc brakes, there are no drums. Older cars were often made with drum brakes on all four wheels. Today, if drum brakes are installed on a car, they are typically only used on the two rear wheels.
Do Worn Brake Drums Make Noise?
They can make scraping or squealing noises if they are warped and the shoes do not make proper contact. You might also hear strange noises when the shoes need replacing. At the first signs of drum brake problems, it’s best to have them inspected to ensure your safety on the road.
What is the Biggest Problem with Drum Brakes?
While drum brakes were considered the ideal solution for older vehicles, their design has several flaws. First, they overheat more quickly than disc brakes, leading to more frequent fade. They also take longer to dry once moisture becomes an issue. Finally, they are heavier than disc brakes, thus adding more weight to the car.
Even though drum brakes are becoming less popular, many cars are still equipped with them. If you own one of these cars, you want to know how to recognize the symptoms of their malfunction and learn to replace them yourself to save money. The good news is that if you are familiar with disc brakes, switching to drum brakes shouldn’t be too complicated for you.
You can easily check the drums and shoes regularly for any signs of damage. Because the drums and shoes are so important for stopping the vehicle in time, you should never delay replacing them once you find they are worn.
Why does my car pull to one side?
Why does my car pull to one side? Most car tires need to be inflated between 30 and 35 psi, but this figure differs depending on the type of vehicle you drive. The recommended psi for your vehicle is found in the owner’s manual or on the label placed on the driver’s side door jamb.
If you are driving with one of the tires at a lower pressure than the others, you might start to feel a pulling sensation. Underinflated tires harm wheel alignment, causing an uneven feeling that creates a pull on the steering.
However, this is one of the easiest problems to solve. Stop and check the tire pressure. Fill the low tire and the ride should straighten out on its own.
2. Poor Wheel Alignment
With good wheel alignment, all tires will be tilted in a way that allows the vehicle to roll straight on the road. If the car pulls in one direction, it could indicate that the alignment is off.
This happens over time and suddenly, if you recently hit a curb or a pothole too hard. It can also occur if the suspension is worn out. Fortunately, this is another simple solution, as wheel alignment typically takes less than an hour at a local mechanic.
3. Bad Wheel Bearing
Wheel bearings undergo a lot of stress and can fail periodically. If a wheel bearing fails, you might notice some pulling to one side or loose steering.
This can also cause a noticeable warning sound, such as a squeal or grinding, especially when you turn to the affected side. You don’t want to keep driving with bad wheel bearings, as it leads to uneven tire wear.
4. Dragging Brakes
Brake calipers operate using hydraulic fluid that provides the necessary pressure to push the brake pads against the rotor. Each wheel equipped with disc brakes has a caliper, so if one of them sticks, the car may pull as if it’s being pulled to one side.
Driving with stuck brake calipers can lead to excessive pad wear. Furthermore, if the pads wear down, it can start to damage the rotors. Instead of dealing with all these issues at once, it’s better to repair the caliper immediately.
5. Worn Suspension Parts
The suspension is a necessary system for maintaining a smooth and steady ride, even on rougher terrain. Yet, when a suspension part starts to fail, it can lead to a bumpier ride and cause the car to pull to one side.
For example, if a lower control arm bushing fails, the arm can move during driving, causing a pulling sensation. However, any worn suspension component could be the culprit, so a full inspection is necessary.
6. Uneven Tire Wear or Bad Tires
If there have been alignment issues or faulty suspension parts, the tires may have worn unevenly. This can also happen if the tire pressure is not correct. Regardless, once a tire wears unevenly, it’s hard to achieve a smooth ride. You need to rotate the tires and hope the wear balances out over time.
It’s also possible that the tires are bad. If there are defects in a tire, it can cause a pulling sensation. Defective tires must be replaced immediately before a blowout occurs.
Additionally, pulling can occur if your tires don’t match. For example, if you replace two tires but two are still worn on the vehicle. These older tires can cause traction problems due to their variable wear.
Reasons Why the Car Pulls to One Side When Braking
If the car pulls to one side only when braking, several causes are possible. Your car may have a damaged or stuck brake pad. It could also be a faulty brake caliper or a worn brake rotor.
1. Damaged or Stuck Brake Pad
Brake pads are meant to be applied only when you press the brake pedal. Once you release the pedal, the brakes should release and allow you to continue driving normally. However, if you find that the brake pads are sticking, even after releasing the pedal, you might have a problem.
It’s possible there is an issue with the master cylinder or the brake lines, designed to supply hydraulic fluid to the brake pads. Whatever the cause, you want to fix it before the pads wear out and damage the rotor.
2. Bad Brake Caliper
One of the most common reasons brake pads stick is a bad caliper. The caliper holds the brake pads, and the pistons are responsible for pushing the pads against the rotor to stop the wheels from turning.
However, when the caliper pistons seize, the brake pad cannot release as it should. This causes pulling to the side and can also cause strange brake noises.
There are several reasons why a brake caliper seizes. It could be due to a collapsed brake hose, corrosion, or general wear. In some cases, you can repair the brake caliper pistons, while in others, they need to be replaced. If you choose to replace the brake caliper, do so with the one on the other side as well to ensure even braking capability.
3. Worn Brake Rotor
Brake rotors are smooth metal discs that the brake pads push against to stop the wheels from turning. Sometimes, the brake rotor can have a rough surface due to damage or wear. This uneven surface creates a pulling sensation when braking.
This can also lead to a grinding noise. In some cases, you might be able to have the brake rotors resurfaced, or they may need to be replaced.
Reasons Why a Car Pulls During Acceleration
When the vehicle pulls to one side during acceleration, the most common cause is a problem with the tires. The tread could be worn, the inflation could be incorrect, or your tire could be defective. If the belts break inside the tire, it can also lead to strange driving that involves pulling to the side.
Additionally, there could be a failure of a suspension component causing pulling. If a part of the suspension is loose or damaged, you might feel more pulling than usual. Whatever the cause, you want the vehicle to be examined by a qualified mechanic to ensure there is no additional wear.
Reasons Why a Car Pulls After a Wheel Alignment
During a wheel alignment, all tires are pointed in the same direction to ensure the vehicle rolls straight on the road. If the car continues to pull to one side after the wheel alignment, there is another problem.
Most often, the suspension or steering has a worn component. No matter how good the alignment is, the car can still pull with this issue. Additionally, you might have a leak in one of the tires, leading to low pressure.
Why Does My Car Feel Like It’s Wobbling Left and Right?
If the steering seems to wobble while you are driving, there might be a broken component. It is also possible that a suspension part is failing, causing pulling and uneven tire wear. To avoid further problems, you should have the steering and suspension inspected by a professional.
How Much Does It Cost to Realign Your Steering Wheel?
The steering wheel is realigned during your typical wheel alignment. On average, a wheel alignment can cost between $50 and $200, depending on the type of vehicle you drive, where you take your vehicle for maintenance, and how many wheels need aligning. Most cars need a wheel alignment once a year.
Can You Drive with a Misaligned Steering Wheel?
You could drive with a misaligned steering wheel, but it is not recommended. Poor wheel alignment causes the steering wheel to be off-center. Continuing to drive this way can be dangerous and lead to irregular tire tread wear, pulling to one side, and vibrations felt through the steering wheel.
What is the Most Likely Cause for a Vehicle to Pull to the Right When Driving and to the Left When Braking?
There are several reasons why a car might pull to one side or the other. The tire tread may wear unevenly, a tire may have low pressure, or a faulty suspension part. It is also possible that the brake caliper is sticking, causing pulling and strange noises while driving.
Can Defective Tires Make Your Car Pull?
Yes, when tires wear unevenly, the vehicle will pull to one side. This happens more frequently if newer and older tires are mixed on the vehicle. The older tire with the worn tread will cause more pulling because it is unevenly suited. Pulling can also occur if the air pressure is low in one tire.
When the car pulls to one side, you will first be alarmed as you try to keep the vehicle under control. However, there is no need to panic, especially if you plan to address the issue immediately. Many times, the car pulls due to a tire or alignment problem. Both of these conditions are simple to fix.
However, it is also possible that there is a problem with the steering or suspension. The braking system could also be the culprit. Diagnosing these issues can be more difficult and require the help of a professional. The sooner you address the underlying condition, the better your chances of avoiding additional vehicle wear. If you want to keep the repair bill as low as possible, you will act quickly.