Symptoms of a seized engine: how to know if the engine is seized
Your car stalls after a loud noise and won’t start. Annoying, right? This can happen even when the battery is new and the tank is full. The signs point to an engine seizure problem, which can be scary because the repair could be extremely costly. What should you do to avoid such expenses, besides regularly changing the engine oil and maintaining the car regularly? You need to pay attention to the symptoms of a seized engine.
What does a seized engine look like?
There are specific symptoms of engine seizure, which give indications of the disaster you are about to face. However, there is also a distinctive seized engine noise that foreshadows an imminent problem.
When an engine seizes, it means that internal components, such as pistons and bearings, are stuck or frozen, preventing the engine from rotating freely. The noise of a seized engine can vary depending on the severity of the seizure and the specific circumstances, but you might notice a few common signs:
Regular maintenance is necessary. (Photo source: 123rf)
When the problem is in its initial stage, you will hear light tapping or knocking sounds when driving the car. This noise occurs because the starter is trying to turn the engine over but cannot rotate it due to seized components. The starter might keep engaging but fails to start the engine. The next stage involves hearing loud, thunderous knocks, excluding metallic strikes. This condition is known as a “dead blow” and happens when the piston rod hits the crankshaft.
In some cases, you will hear no sound when attempting to start the engine. This lack of noise usually occurs because the engine is completely locked up, preventing any movement.
You should take the car to a garage after spotting the symptoms of a seized engine. Diagnosing it earlier can save you thousands of dollars.
Seized Engine Symptoms: How to tell if the engine is seized?
It is necessary to have the car’s engine checked in case of poor engine performance, engine oil warning light, and strange noises coming from the engine. Stay alert for these seized engine symptoms:
1. Loud Sound
A standard vehicle, when running, should only emit 3 sounds considered “safe,” namely the sound of the engine, the horn, and the sound of the entertainment speaker system. Other unusual noises are considered “warnings” and require special attention from car owners. It could be a car engine error.
It has already been mentioned that knocking or thudding noises can also indicate a seized engine. The noise is the result of the condition striking the flywheel.
2. Smoke
Smoke or fire from under the hood can be another symptom of a seized engine. As the starter is unable to start the engine in this state, the wiring can overheat, sometimes causing smoke and even a fire.
Furthermore, depending on the color of the smoke, certain problems can also be diagnosed:
Green smoke: This means the engine is burning oil and there might be a potential leak somewhere in the car engine. If this condition is not fixed, it will lead to oil loss and damage to engine parts.
When the vehicle emits thick white smoke, it almost certainly signals a problem with the engine’s head gasket. When seeing this sign, the car owner must quickly have the car repaired to avoid completely damaging the engine. Additionally, the exhaust pipe spewing white smoke also shows that the car’s transmission fluid is burning, which could lead to a gearbox seizure.
3. Check Engine Light
If the Check Engine light (engine warning light) on the dashboard stays on constantly, it is a warning sign of some problems occurring in the car engine. For example:
The oxygen sensor needs to be replaced.
The Mass Air Flow (MAF) sensor needs to be replaced.
The exhaust filter is damaged and needs to be replaced.
The spark plugs are damaged or worn out (causing engine misfire).
The gas cap is not tightened sufficiently.
Many other problems related to sensors and actuators.
4. Engine Failure
When this happens, it is obvious that your car is in big trouble. However, one should not wait for the engine to reach this state. Complete engine failure means it will not start under any circumstances. Battery-powered accessories such as lights, radio, and others may still work.
The final stage could be engine failure. (Photo source: Hot Cars)
5. Loose Engine Parts
When a component of an internal combustion engine is loose, such as a piston, it can punch through the engine block. An inspection under the hood will make you aware of this problem.
A lack of engine oil is the most common cause of engine seizure. Low engine oil level leads to friction, overheating, and other complications that ultimately result in engine failure. The buildup of water or rust inside the engine can also be the cause of this problem. The failure or damage of engine parts can be another probable reason, but it is very rare for this issue to create a seized engine.
What happens when you turn on the ignition switch
Cars feature a uniquely designed ignition switch system. The switch controls all necessary vehicle components. You might drive cars for a long time without noticing the mechanism behind it. There are different positions of the ignition switch in a car. Traditional vehicles equipped with a standard ignition system have four key positions. But modern vehicles only have three key positions. There is a specific action each time you turn on the ignition switch.
Modern vehicles come with a smart key start system. That’s why there is one less key position. The ignition switch is the centerpiece of an automobile. You won’t be able to start the engine with a faulty ignition. It’s important to keep this switch in good condition.
Let’s discuss in detail the positions and operation of the switch.
What happens when you turn on the ignition switch in a car?
The ignition switch is a crucial element of a car’s interior. You cannot start the engine or turn on accessories without an ignition switch. Do not force the key or any other tool into the ignition switch. This could damage the entire ignition system, causing you trouble. Also, do not apply extreme pressure when inserting the keys.
Let’s explore the mechanism behind the four ignition positions here.
1. Lock – First Position
This is the first position of the ignition switch. Manufacturers describe the lock as the OFF position. You need to turn the key clockwise to turn on the ignition switch. The lock position involves only inserting the keys. There is no effect on the steering wheel or other accessories in the locked position. You can only remove the keys in the lock position.
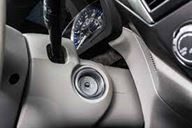
You need to turn the key clockwise to turn on the ignition switch (Photo source: bostonglobe)
2. Accessory/Acc – Second Position
Wondering what acc means in car ignition systems? It’s the accessory mode. You can use some of the standard accessories in this mode. Accessory or Acc is the second position of the ignition switch. Acc brings to life the radio, stereo system, power windows, and seats.
3. ON or Ignition – Third Position
Next is the ignition position. All electronic accessories become active when you turn on the ignition switch in this mode. According to expert maintenance tips, the ON position is the default position in vehicles. You cannot remove the keys from the ignition switch.
4. Start – Fourth Position
You can now start the engine. This is not the off position of the ignition system. The keys return to ON or ignition, which is the default position. The engine starter can be damaged if you leave the keys here for a long time. Let the keys turn to the default position once the engine is started.
The keys return to ON or ignition, which is the default position (Photo source: Shutterstock)
The Bottom Line
That’s all that happens when you turn on the ignition switch. I hope this gives you a better understanding of the ignition switch and its mechanism.
How a fuel pump relay works
You may be familiar with the fuel pump, the component located inside the fuel tank that creates pressure in the fuel lines to push gasoline to the combustion engine so it can run. The fuel pump can malfunction for several reasons, one of which is less known issues with the fuel pump relay.
The fuel pump relay is the electronic component found on all vehicles equipped with an internal combustion engine. “To relay” means “to receive and transmit.” Whenever the ignition is turned on, the fuel pump relay will provide or “relay” a constant voltage to the fuel pump. Consequently, problems with the fuel pump relay will lead to a malfunctioning fuel pump, which will cause starting issues.
A faulty or failing fuel pump relay will often exhibit symptoms that alert the driver that something is wrong. Learn how the fuel pump relay works, the telltale signs of a failing fuel pump relay, how to diagnose it, replacement costs, and regular maintenance tips.
The relay is vital for the operation of combustion engines. (Photo Source: Arrow)
What is a Fuel Pump Relay?
The fuel pump relay is a component necessary for the operation of the combustion engine model. The combustion engine needs fuel to run, and the fuel pump relay ensures that this engine receives what it needs. It is typically controlled by the ignition or the power control module.
When you turn the ignition key, the fuel pump relay is activated and will provide electricity to start the fuel pump. When you turn off the ignition, the fuel pump shuts off.
Location
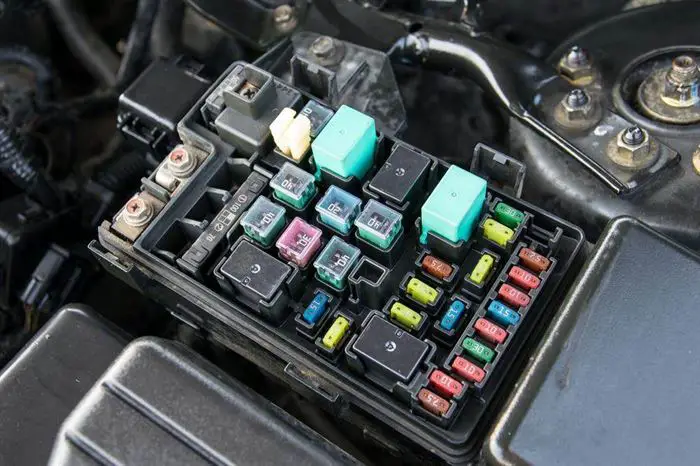
In most vehicles, the fuel pump relay is often located in the engine compartment’s fuse box, which is typically a long black box containing the fuel pump relay along with various other fuses and relays.
The fuel pump relay is found in most engine compartments. (Photo Source: Pinterest)
If you cannot find it, consult your owner’s manual. The fuel pump relay may be located in different places on different cars: under the hood, on the firewall, or near the steering column, to name a few locations.
Function
When you turn the ignition key to start your car, the “starting cycle” of the combustion engine begins. The fuel pump relay is activated long enough to provide the necessary current to start the fuel pump. The key here is to produce a small amount of voltage but consistently to the fuel pump.
Once the engine is running, the fuel pump relay turns off. At this point, electricity for the fuel pump is supplied by the oil pressure sending unit.
When you turn off the ignition, the fuel pump relay is triggered again, long enough to shut down and stop the fuel pump.
Symptoms of a Bad Fuel Pump Relay
The Engine Won’t Start
A common symptom of a faulty fuel pump relay is an engine that simply refuses to start, even though it may still crank when the key is turned, because the fuel pump is not receiving power.
Of course, you may know that a no-start issue can also be caused by a host of other problems. In this case, you should therefore perform a thorough diagnosis.
The Engine Stalls
One of the most common symptoms of a failing fuel pump relay is an engine that suddenly stalls. While the vehicle is running, the fuel pump relay suddenly cuts power to the fuel pump, causing the engine to stall.
If your engine stalls and refuses to restart, you have a completely failed fuel pump relay and need to have it replaced. If you are lucky and your car restarts shortly after, your fuel pump relay is faulty and requires immediate inspection.
Loss of Power
The fuel relay may be to blame if the car suddenly seems to lose power while driving or slows down for no apparent reason. This does not always mean the car will stall.
Sometimes the vehicle continues to run normally for a while. However, in case of a sudden loss of power while driving, inspection and repair are highly recommended, as there is always the risk that next time the car stops, leaving you stranded in the middle of the road.
No Noise from the Fuel Pump
Another symptom that may indicate a faulty fuel pump relay is the absence of noise from the fuel pump when you turn on the ignition. The fuel pump is located in the fuel tank, near the rear of the vehicle, and can usually be heard when the engine starts.
A healthy fuel pump and a healthy fuel pump relay will often produce a variation of a low-volume hum or whine that can be heard from inside the vehicle or from outside, near the fuel tank.
If the fuel pump relay fails, the fuel pump will not receive power and will not operate, so it will be silent.
How to Diagnose a Faulty Fuel Pump Relay
Visual Inspection
Always start with a visual inspection before moving on to other tests, which will be detailed below. A fuel pump relay doesn’t have many parts to inspect, so don’t worry.
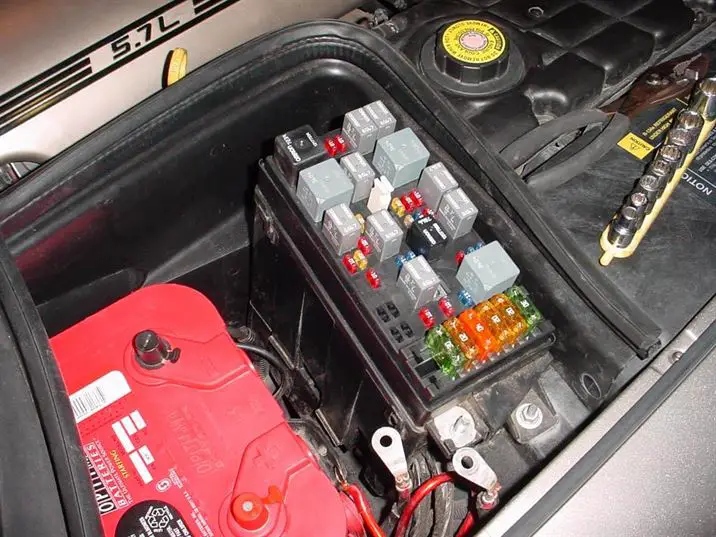
Locate the cube-shaped fuel pump relay. (Photo Source: Pinterest)
Locate the black fuse box located in the engine compartment.
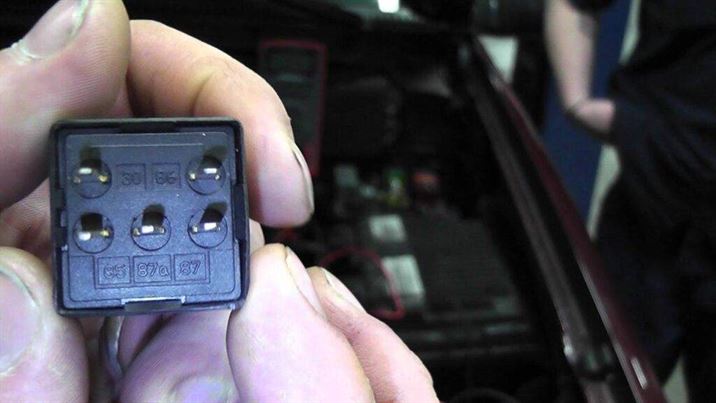
Locate the relay, which is a cube-shaped object that connects with pins like an electrical plug. If the relay is in the black box, carefully remove it using a flathead screwdriver. Unplug the connector and the relay fuse to remove it.
Inspect the terminals and the socket for signs of corrosion and overheating. Remember that even though the fuel pump requires low but constant current, corrosion will prevent proper current flow. Meanwhile, overheating indicates problems with the relay or the circuits it connects to.
Clean corroded terminals and sockets with an electrical contact cleaner. Remember to protect your hands and eyes with gloves and goggles.
Check the contact and the coil, which are the most common parts that burn out or break.
Finally, check all fuses.
Testing
After a visual inspection, if you cannot identify a possible culprit, continue testing your fuel pump relay to see if it has failed:
Set your digital multimeter to the lowest range on the Ohms scale or set it to “continuity.”
Connect one wire to one of the power circuit pins and connect the other wire to the other power terminal.
Your meter should indicate infinite resistance.
If you detect zero ohms or any resistance value instead of infinity, your fuel pump relay has shorted power pins and must be replaced.
Alternatively:
Set your digital multimeter to “continuity.”
Connect one wire to one of the power circuit pins and connect the other wire to the other power terminal.
If you hear a beep, your fuel pump relay’s power pins are shorted. Replace the relay.
You can test the fuel pump relay, as well as many other parts of your car, with the cheap and handy multimeter. (Photo Source: carcody)
Fuel Pump Relay Replacement Cost
You can easily find fuel pump relays online or in any auto parts store. The average fuel pump relay replacement cost ranges from $90 to $150, with $20 to $50 for parts and the remainder being labor costs.
Cleaning a Fuel Pump Relay
Cleaning the fuel pump relay is a simple maintenance job you should learn, as the relay can easily get dirty under many circumstances.
If it is located inside the engine compartment, which can become hot from engine heat, the heat can harm the relay’s performance. Furthermore, in the rare cases where you find the relay placed in the engine compartment but outside the fuse box, it will be exposed to heat as well as dust and dirt. Since any debris will affect the fuel pump relay’s performance, you should inspect and clean it regularly if necessary.
The fuel pump relay is a car electrical part, so be extremely careful when handling a relay. First, remove the relay and use a blower to remove dirt and dust for about 1 to 2 minutes. Never use water, but a bit of ethanol to thoroughly clean this electrical part. Do not use any cleaner unless the relay is free of all debris.
To prevent the relay from getting dirty again too quickly, apply ethanol to the relay and gently scrub to remove remaining dirt. Now that you’re done, let it dry in a ventilated area.
How to Remove Rusted Exhaust Bolts from Your Car
One can face the highest level of frustration when repairing or restoring a car. And the frustration comes in the form of rusty, stuck exhaust bolts. This usually happens in automobiles due to corrosion and aging of nuts and bolts. The rusty exhaust bolt never moves or doesn’t move easily, and certain methods may need to be applied to do so. However, breaking or drilling the bolt is the only option that comes to mind at that moment. One might wonder “how to easily remove rusty exhaust bolts” from automobiles. Many techniques are applied to get rid of these dilemmas.
So let’s find soothing solutions to this regular frustration.
Wondering how to remove rusty exhaust bolts? The Techniques
The true enemy of mechanics and technicians maintaining any automobile is rust. And tackling rusty exhaust bolts is not that simple in an automobile. Indeed, one must get rid of them without damaging the car parts. You can’t just start hammering or drilling holes around the car body to remove the rusty bolts. However, working with a strategy can help complete the project in no time.
Some of the techniques for getting rid of rusty exhaust bolts are:
1. Apply appropriate force
Applying appropriate force to loosen stubborn exhaust bolts is the first possible method considered by every mechanic. Striking the bolt head with appropriate force can help in some ways. Alternatively, one can use proper equipment like a chisel or wrench to loosen the bolt by slowly tapping the parts back and forth. This could be the first and perfect solution for removing rusty exhaust bolts. The solution may vary depending on the bolt’s resistance. So, apply the right force and don’t end up breaking the entire setup.
Trendy points on how to remove rusty exhaust bolts. (Photo Source: pxici)
2. Heat it up
Heating the rusty exhaust bolts and then cooling them to the highest degree expands and contracts them simultaneously. This could loosen the stubborn bolt and make it easier to move with simple tools. This system also removes rust and corrosion from the bolt threads. So, apply it once to get things working properly.
3. Drill gun
Many tools are easily available on the market to drill out rusty bolts. Clean the surface as thoroughly as possible to make the effort worthwhile. The drill gun helps to remove rusty exhaust bolts effortlessly. But there are also risks of breaking the bolt inside the setup. However, following maintenance tips from professionals can help do the job perfectly. So, make sure to do things with the right command.
4. Make cuts on the bolt
Making cuts on nuts and bolts is a sure method to remove immovable bolts. One can apply appropriate force with gentle hands to remove rusty exhaust flange bolts in no time. Indeed, splitting the bolt into pieces reduces tension, making it easier to turn and move.
Reliable ideas on how to remove rusty exhaust bolts. (Photo Source: pxfuel)
Final words
Overall, here are some of the methods for getting rid of stubborn bolts. I hope you now have the answer to the question “how to remove rusty exhaust bolts”. So, choose any method and try it once to get rid of the inflexible bolts.
Reasons why cruise control is not working
Cruise control has been around since the late 1950s. There was a time when this convenient feature could only be found in a few vehicle models. Nowadays, it seems that almost every vehicle model on the road is equipped with cruise control.
The failure of cruise control to engage might seem like a trivial problem, but the inability to activate this convenient function can certainly hinder any car journey. Even though cruise control failures “rarely” pose safety risks, it is necessary to determine the root cause to restore its use. Let’s look at the common causes of cruise control malfunction.
Cruise Control Problems (Acceleration or Maintaining Speed)
If the cruise control malfunctions and stops working completely, you might not think it’s an immediate problem. You will probably understand that you can no longer use the cruise control until the issue is resolved.
However, your cruise control problem could also be related to an acceleration issue. Indeed, some cruise control components can have a detrimental effect on acceleration if these components are faulty. That’s why you need to be aware of the causes of cruise control problems.
Common Causes of Cruise Control Malfunction
There are several possible causes for cruise control malfunction. Below are the 6 most common causes. Check each of these areas and see if they are the source of your cruise control problem. In many cases, the solution to the problem is neither that complicated nor that expensive.
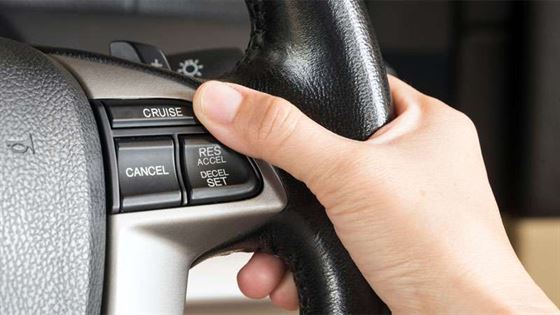
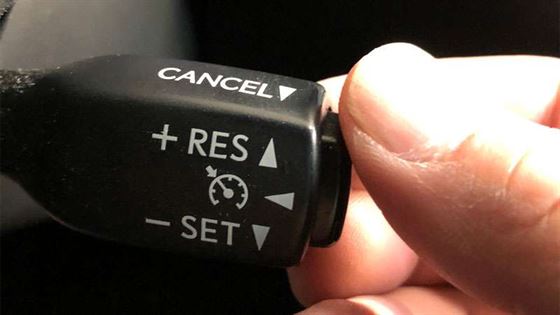
1) Cruise Control Switch
The cruise control switch is what you use to set your cruising speed. This information is transmitted to the engine computer and the cruise control module to maintain the acceleration speed.
If the contacts inside the cruise control switch were to wear out, the module and unit might not receive the necessary speed information they need to maintain acceleration. In response, the system will shut down completely and cancel the currently set cruise acceleration.
2) Brake Light Switch
Normally, you press the brake pedal to disengage the cruise control. For this to happen, the brake light switch must be detected by the cruise control system.
If it fails to detect the switch, the cruise control will automatically disengage until the brake light switch problem is resolved.
A faulty brake light switch can also cause your brake lights to stay on.
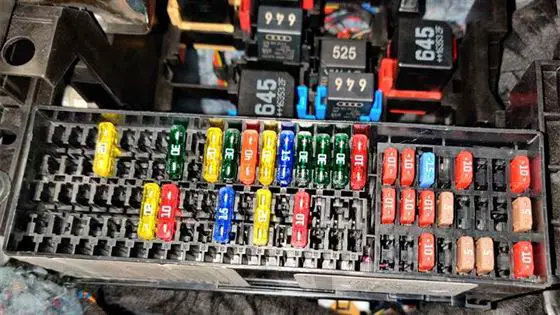
3) Blown Fuse
The electrical components of the cruise control system are protected by fuses. Like inside your home, it’s possible to blow a fuse. This will cause the cruise control system to shut down until the fuse is replaced.
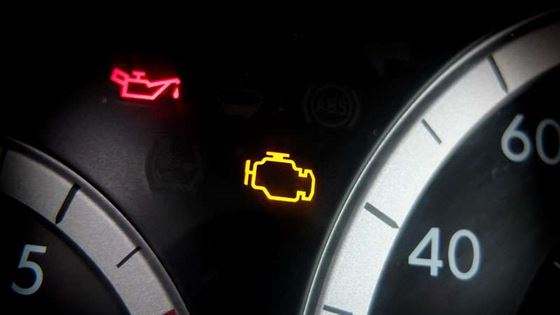
4) Check Engine Warning Light
If the check engine light comes on, it usually means there is a problem with your transmission or engine. Once the engine control unit detects this problem, it may disable your cruise control system in response as a safety measure.
Until you fix the engine problem, the cruise control will remain disabled.
5) Vehicle Speed Sensor
Most vehicles have a few speed sensors to transmit information about the vehicle’s speed to the engine control unit and the cruise control module. The only way your cruise control module knows how fast the vehicle is moving is if the vehicle speed sensors send it this information.
If the module fails to detect the speed due to faulty speed sensors, the cruise control system automatically shuts off.
6) Electrical Problems
Several electrical components are connected to the cruise control system. Connectors, wiring harnesses, and ground straps are definitely components you need to check when the cruise control stops working.
Make sure the voltage source is still powering the system as well. If any of these components are loose or damaged, it would explain why the cruise control is not working.
7) Loose or Broken Cruise Control Cable
Older vehicles equipped with cruise control have two throttle cables: one for the accelerator pedal and one for the cruise control system.
These cables can stretch over time. If the cruise control cable is stretched or is broken, the cruise control system will not be able to operate the throttle properly.
Adaptive Cruise Control Specific Problems
Adaptive cruise control offers an extra layer of convenience while driving, as it adjusts your vehicle’s speed based on the distance to the car ahead of you. However, this presents additional causes of cruise control failure.
One issue you might face is obstructed sensors. Radar and cameras are important components of the adaptive cruise control system. When there is dirt, debris, or ice covering these sensors, your cruise control may stop working. To prevent this, regularly clean your vehicle’s sensors, ensuring they are not obstructed.
Furthermore, faulty cameras could also be the cause. If the cameras are not working correctly, an error warning may appear. It is best to have this checked by a professional to determine if the cameras need to be repaired or replaced. Hopefully, this is not the case, as it is an expensive replacement.
Besides cameras, adaptive cruise control relies heavily on radar technology for its proper operation. A misaligned or faulty radar sensor can lead to erratic behavior of your system. Again, consult a qualified technician to diagnose the issue and, if necessary, recalibrate or replace the radar system.
Safe Driving Without Cruise Control
When cruise control systems fail, it’s hard to adapt to managing speed without the steady pace it provides. But you can do certain things.
Focus on checking the gauges more frequently to stay actively aware of the mph.
Avoid limiting yourself to long trips.
Set phone alerts every few miles to remind you to check the current traveling speed.
Be familiar with highway speed limits, so mental comparison with them continues subconsciously.
Take frequent breaks by stretching your legs to re-energize your vigilance until you can diagnose the cruise faults.
Consider other adaptive cruise technologies equipped on newer vehicles if financially viable, allowing for automated gradual slowing when closing distances on lead cars.
Stay alert to the distances of lead cars and your own speed fluctuations.
Use open lanes with fewer surrounding vehicles if possible, thereby reducing the need for continuous minor adjustments.
Stay vigilant with renewed attention and defensive awareness without the automated convenience of cruise control until repairs are completed.
Identifying Intermittent Faults
When cruise controls experience occasional but repeated failures, meticulously recording each malfunction instance helps uncover patterns guiding towards root causes.
Date and time each cut-off or disengagement that occurs upon activation. Detail all environmental or operational conditions present, such as: weather, bumpy or smooth roads, stop & go traffic versus highway speed.
Reviewing complete repair histories along with these event logs indicates whether previously replaced components only provided temporary fixes before subsequent failure later. Share documented patterns on when and how interruptions occur with workshop technicians to guide their follow-up on the circuit and component testing.
The goal is to determine if specific elements such as an old switch, wire insulation, or solder joint chronically break down only under certain temperature, vibration, or usage stress thresholds.
How Does Cruise Control Work?
If you normally drive long distances, especially on the highway, cruise control allows you to take your foot off while the car maintains the same speed, giving your leg a rest. It might seem like just a luxury feature rather than a necessity, but many people rely on it for safe driving.
There are several different types of cruise control systems, but all implementations share similar basic components. There is a sensor to measure the vehicle speed, a throttle position sensor, and a mechanism to control the throttle without using the accelerator pedal.
The outputs from the speed and throttle position sensors allow the engine computer to determine how much the throttle needs to open or close to maintain speed.
Cruise control systems may also use sensors in the transmission, taking into account the current gear and engine vacuum. The throttle position will be different in each gear at a given speed, especially when driving uphill.
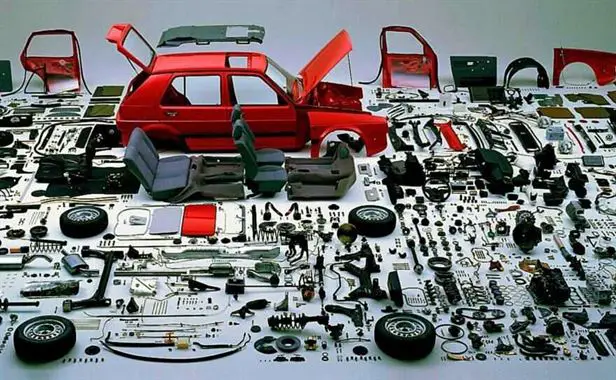
Parts of a Car Every Owner Should Know
Although you don’t need to know the ins and outs of your car to provide it with adequate maintenance, every car owner should familiarize themselves with the most important parts of a car and their functions.
In this article, we will take an in-depth look at the most important automotive components and parts that every car owner should know, briefly explain how they work, and discuss their importance.
Even if you are not a true gearhead but just a regular car owner, you should know this selected list of the most important and basic car parts and their functions.
This guide and the many links to related full articles will help you take good care of your beloved vehicle in your garage.
Basic Car Parts: Most Important Components
Every component of a vehicle is important, although some may be more important than others. Modern vehicles have become much more complex and feature many more parts than their predecessors.
While there are many complex parts, some are a mainstay—common and essential for every vehicle. Below are the most fundamental and at the same time most important parts of a car.
Understanding how they work and how to keep them in good condition will mean smoother and hassle-free travel for you as an owner.
Knowing the basic parts of a car and their function will help you keep your car in perfect condition. (Photo: Spareshub)
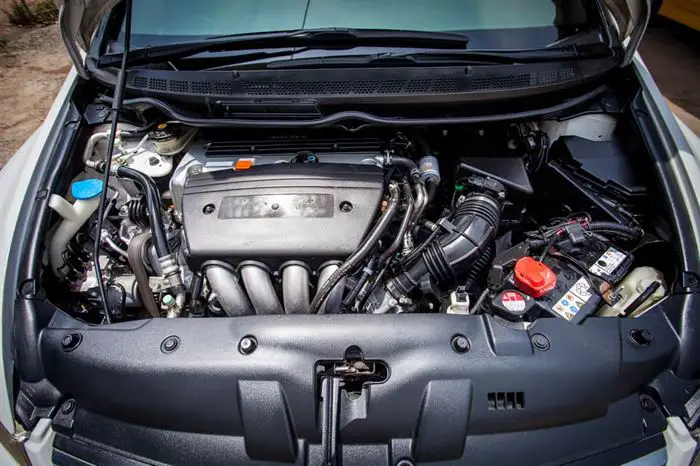
Engine
We would start with the engine. The engine is the heart of the car. It is the most important element of an automobile by all accounts.
A vehicle’s performance depends heavily on its engine. Furthermore, the many engine components and the many other associated parts are very prone to wear, which is why the engine tops the list of car parts you should familiarize yourself with.
This complex and delicate powerhouse is made up of blocks, heads, pistons, and valves. Modern car engines are also called “internal combustion engines.”
This is because the engine generates energy for your car to run by creating combustion inside its chamber. The input for such combustion is a mixture of fuel and air in a precise ratio for optimal results.
Different types of fuels are used by engines, including:
Diesel
Ethanol
Gasoline
Electricity
The engine was housed under the hood. (Photo: cars)
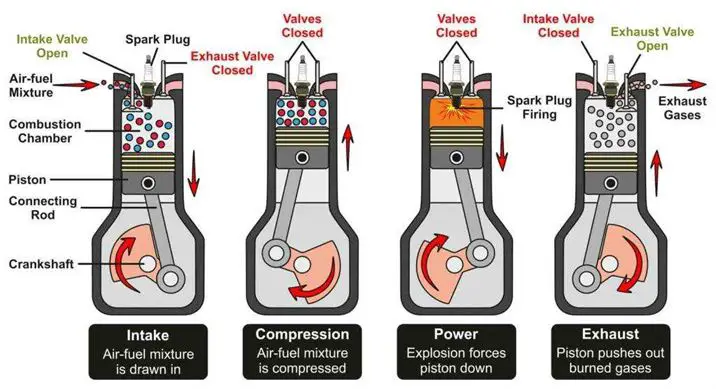
How an Engine Works
The engine block houses the engine cylinders, inside which the pistons move up and down, creating energy. The more cylinders an engine has, the more powerful it is. Engines typically have four, six, or eight cylinders.
In a four-stroke engine, during the intake stroke, the intake valve opens. The piston moves downward and pulls the crankshaft with it, creating suction or a “vacuum” that draws in air and fuel, allowing them to enter the combustion chamber.
The valve then closes. The amount of this mixture allowed to enter is controlled by the throttle, a rotating plate, in the intake valve.
When the piston reaches the top of its compression stroke, the mixture is compressed, while the spark plug ignites the compressed mixture and creates combustion, sending the piston downward on its power stroke, which rotates the crankshaft.
Ultimately, this crankshaft combined with the transmission spins your wheels and sends you on your way to your destination.
When the piston reaches the bottom of its stroke, the exhaust valve opens, pushing the exhaust gases out of the cylinder.
Take a closer look at how an engine works. (Photo: Yadakban)
Engines require regular oil changes to stay lubricated and prevent wear.
Gearbox (Transmission)
The gearbox, or transmission, also called a car’s powertrain, comes right after the engine. It is this part that usually requires special attention when vehicles break down. The gearbox, once restored, can breathe new life into vehicles, even the oldest ones.
The transmission is what contains the different gears that a car must shift into depending on speed. These gears transfer power from the engine to the vehicle’s wheels.
A transmission is available in two types: manual and automatic models.
An automatic transmission system. (Photo source: upcar)
With manual transmissions, the driver selects the gears using a gear lever and a clutch pedal. Meanwhile, automatic transmissions can shift gears on their own, and the driver only has to choose between drive and reverse.
Obviously, an automatic transmission is more convenient and popular, but it doesn’t last as long. Furthermore, some performance enthusiasts claim that you lose control when opting for an automatic gearbox.
Interestingly, many seasoned drivers prefer the manual transmission because it’s more fun to drive.
To discover more helpful maintenance tips for your car’s transmission as well as common problems and how to fix them, check out the comprehensive guides below.
Brakes
If the parts of a car that make it move are vital, the components that make it stop are just as important. They must work side by side.
The next part on the list of important car parts and their functions is the braking system, whose failure can lead to serious, even fatal, accidents. Have you ever wondered how light pressure on the brake pedal can slow down or stop a gigantic moving machine?
When you press the brake pedal, hydraulic fluid is transmitted through steel pipes to the vehicle’s wheels. The brakes use the power of hydraulic fluid to transfer the force the driver applies to the brake pedal into a clamping force that slows the vehicle’s wheels.
A manual braking system requires driver intervention to stop. A later invention is the sensor braking system, which can detect the need to brake and act.
How the Braking System Works
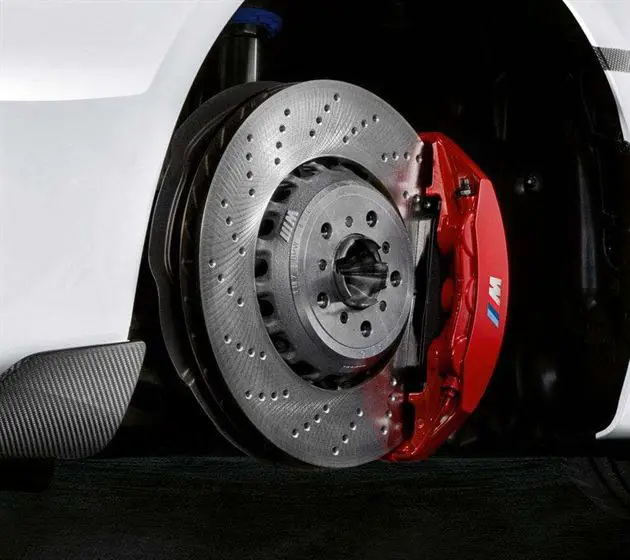
A car’s braking system consists of brake discs, brake calipers, and brake pads. Brake discs are metal discs made of steel and iron. They connect to the axles, the component that rotates the wheels.
Brake calipers are clam-shaped parts that come into contact with both sides of the brake discs to create friction when you brake.
The red brake calipers clamp the round brake discs to stop the wheels. (Photo: Slash Gear)
When you press the brake pedal, the brake calipers clamp onto both sides of the brake discs to slow the wheels to a stop.
To increase braking efficiency and minimize wear on the expensive braking system, the brake calipers are equipped with pads. These sacrificial pads press against both sides of each brake rotor to slow it down.
Whether you have a manual or sensor braking system, it is very important to regularly maintain and replace the brake parts, which can crack under the effect of many impacts.
Common problems with brakes can be due to rusty calipers that can seize, cracked pads, air in your brake lines, or water damage.
To learn more about the different types of brakes, as well as a handy maintenance guide for the many parts of the braking system, refer to the guides below.
Steering System
You surely know that when you turn your car’s steering wheel, the wheels turn. However, what happens when you turn your car is not as simple as one might think.
The two most common types of car steering systems are rack and pinion steering and recirculating ball steering.
While rack and pinion steering is more common on passenger cars, small trucks, and SUVs, recirculating ball steering is more commonly used on SUVs and large trucks.
How Steering Works
You might be surprised to learn that when you turn your car, your front wheels do not point in the same direction.
For a car to turn smoothly, each wheel must follow a different circle. The inner wheel must follow a circle with a smaller radius, or in other words, it makes a tighter turn than the outer wheel.
The steering system ensures that the inner wheel turns more than the outer wheel.
A car’s steering system controls the rotation of the wheels. (Photo: Mercedes)
Steering Ratio
A measurement you should know is the steering ratio. The steering ratio is the ratio between how far you turn the steering wheel and how much the wheels turn.
For example, if one full turn (360 degrees) of the steering wheel turns the car’s wheels by 30 degrees, then the steering ratio is 360 divided by 30, or 12:1.
Generally, sports cars have lower steering ratios. The lower ratio gives the steering a quicker response, so you don’t need to turn the steering wheel as much to get the wheels to turn a given distance.
Furthermore, smaller cars are light enough that, even with a lower ratio, you don’t need to steer so hard to turn the car.
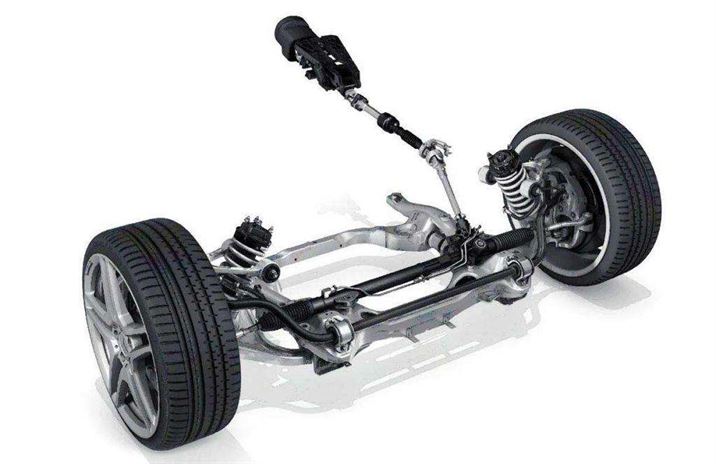
Suspension
After talking about steering, we must follow with suspension in this list of basic car parts. The role of a car suspension is huge. It maximizes the friction between the tires and the road surface, thus providing steering stability and ensuring a smoother and more comfortable ride.
There aren’t many requirements for car suspensions on a flat surface. However, on a rough surface, you might not be able to drive or handle the vehicle correctly.
When the car’s wheel goes over a bump in the road, it moves up and down, causing the car to completely lose contact with the road surface. The suspension system deals with these shocks by absorbing the vertical force from the wheel.
With such vertical force minimized, the wheels continue to roll with horizontal force, allowing the car’s chassis and body to roll undisturbed while the wheels follow the bumps in the road.
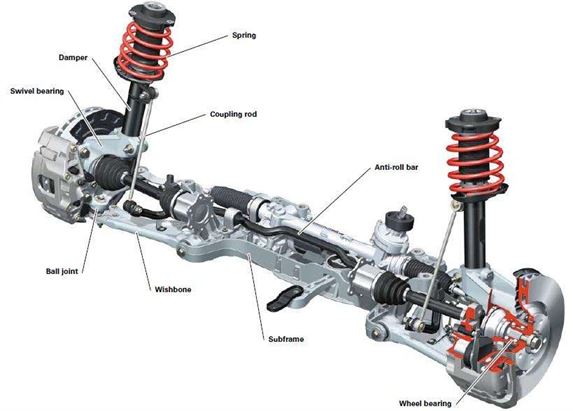
The suspension system is among the basic car parts responsible for stability on the road. (Photo: 7gears)
Chassis
The chassis is the vehicle’s frame that houses and supports everything else in a car. If the engine is the heart of the vehicle, the chassis is its skeleton.
The chassis keeps the vehicle rigid and sturdy. It ensures low vibrations and noise throughout the vehicle.
Car chassis are usually made of lightweight steel or other robust materials like aluminum. Most vehicles on the roads today are equipped with a steel chassis, as it guarantees strength and durability.
Basic Car Parts: Cooling System
Although gasoline engines have improved a lot over time, they are still not very efficient at converting chemical energy into mechanical energy.
About 70% of the energy in gasoline is converted into heat, meaning the engine and other components under the hood are prone to overheating.
Without a cooling system, overheating will quickly lead to malfunction and complete breakdown.
How to remove the milk smell from the car
Spilled milk can be a double curse when it’s spilled in a car. And the stench just doesn’t go away on its own. If you leave it, over time, the situation gets worse, and God forbid if it happens in summer. The sour smell persists, making every trip unpleasant. Learn how to remove the milk smell from the car and fix it as quickly as possible.
Don’t ignore this seemingly minor problem, because spilled milk is a hundred times worse than spilled sodas or fruit juices. Milk can seep deep into a car’s upholstery or carpet and leave a sour smell that can linger for weeks, even months. Even if a quick spray of Febreze or installing an air freshener will briefly improve the smell of your interior, the smell of spoiled milk will come back pretty quickly, especially in hot weather.
Follow this step-by-step guide to ensure you properly clean up the mess and learn how to remove the milk smell from the car once and for all.
The stench of sour milk is a very likely disaster if you have babies in your car. (Photo: Getty Images)
How to Remove the Milk Smell from the Car: 7 Methods
Blot the Spill as Soon as Possible
The very first step to remove the milk smell from the car is to absorb the spill as soon as it happens. Don’t skip this step. The less milk there is to deal with, the less work you’ll have later.
Use a paper towel or microfiber cloth to gently dab the spill to absorb it quickly, but do not rub the spill area. Rubbing will push the milk further into the carpet or padding.
Remove the Floor Mats
If milk has spilled onto the floor mats, they need to be removed from the car. If the milk stays on the floor mats, it will eventually turn sour and the smell will fill the entire car.
Follow these steps to wash the floor mats. If the floor mats are fabric or carpet without a rubber backing, they are machine washable. First use a stain remover on the spill, then put the mats in the washing machine. For more powerful cleaning power, use the warm or hot water setting.
If the floor mats have a rubber backing or are all plastic mats, do not put them in the washing machine. Instead, spray them with a hose or a pressure washer. Use dish soap on the stain to remove the milk.
The mats should then be left to air dry in the sun.
If milk touches other removable fabric parts, like removable seat covers, remove them to wash and dry them as soon as possible according to the manufacturer’s cleaning instructions. You must do this strictly, even if it’s just a few drops.
Method 1: Baking Soda
Baking soda is a super effective and inexpensive solution for bad odors. (Photo: YouTube)
Baking soda has been for decades one of the cheapest, but also most effective and versatile solutions for cleaning and eliminating odors. Since this method is inexpensive, very simple, and you probably have baking soda in your kitchen, it’s the first thing to try when you need to remove the milk smell from the car.
Sprinkle baking soda directly onto the carpet or upholstery where the milk was spilled. To be safe, you can go well beyond the spill area, as it’s likely the bacteria has started to spread.
Rub the baking soda into the fiber using a cloth or a soft-bristled brush. Let it sit for at least overnight to work its magic, or for three or four days if possible would be ideal.
Then, vacuum the baking soda from the upholstery, then put your nose to it. If a slight smell is still present, repeat these steps or move on to one of the other methods below, depending on the severity of the odor.
Method 2: Coffee Grounds
Besides baking soda, coffee grounds or whole coffee beans are widely used to absorb bad odors from households and cars. Many car owners also use coffee beans to get rid of the unpleasant smell of new cars, which takes no less than five years to completely disappear. This method is also inexpensive and simple and will leave your vehicle with a pleasant, light coffee scent.
Simply leave fabric bags filled with coffee beans or plastic containers filled with coffee grounds under your seats for about two weeks. If you’ve already tried the baking soda method or in case of a not too severe spill, this should help remove the spoiled milk smell from the car.
Method 3: White Vinegar
Another inexpensive method with something you probably already have in your kitchen: white vinegar. Spraying vinegar on the carpet or upholstery will help break down the enzymes present in the spilled milk, effectively eliminating the smell from your car. Its use is also completely safe and environmentally friendly.
Be aware that unless you want your vehicle to have an extremely strong vinegar smell, mix vinegar with water. Use a spray bottle and mix four parts water to one part vinegar.
Spray the spill area until it is soaked with diluted vinegar. Let it soak for about five hours, then dry it with a washcloth or clean towel.
If the spill occurs on non-removable parts, it’s best to leave the vehicle’s windows open to allow air to ventilate. Otherwise, remove the mat, proceed with cleaning, then let it air dry in the sun.
Method 4: Carpet Cleaners
A household carpet cleaner should work well on carpeted floor mats or any carpeted area of your car. Follow the manufacturer’s instructions. In most cases, it is advisable to let the product sit for at least an hour, then vacuum it up.
Method 5: Enzyme Sprays
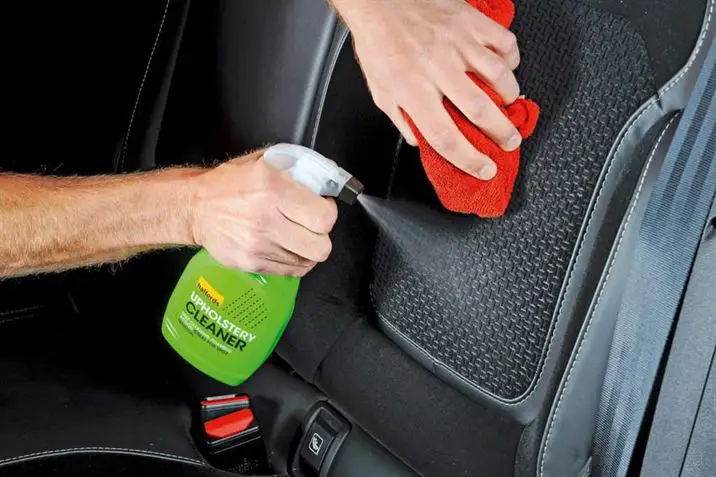
Use enzyme sprays or upholstery cleaners on your upholstery. (Photo: Carsmyfriends)
If the smell persists after the above methods, it’s time to bring out the heavy artillery. Enzyme sprays are environmentally friendly and use proteins and enzymes to break down the molecular structure of stains. Essentially, the bacteria eat away at the mess while eliminating odors.
Spray on the problem area and let it work for a day or two before blotting it with a paper towel or cloth.
Important notes: Always do a test beforehand to avoid staining your carpet or upholstery. Also, these sprays should not be used on leather interiors.
Method 6: Steam Clean the Carpet
If the spill is large or has been sitting for a while, using a steam cleaner will allow you to remove any embedded milk.
If you don’t have one, look online to rent a steam cleaner. A steam cleaner provides a deep clean by spraying a cleaning solution and steaming hot water onto the carpet or fabric, then vacuuming up the water and dirt. This will suck up all the milk residue responsible for the odors, thus eliminating the sour smell once and for all.
Follow the manufacturer’s instructions and change the water frequently during the process. The carpet or upholstery must dry completely for 12 hours after cleaning.
Method 7: Charcoal Bags
Once the stain is cleaned, consider placing charcoal bags in the car on or near the spill point. Bamboo charcoal will effectively absorb any lingering bad odors. It is also environmentally friendly and perfectly safe if you are sensitive to commercial cleaning solutions.
Tips: Ventilate the Vehicle
Once the spill is cleaned, leaving the car windows open will help air out the smell. Direct sunlight will also help dry the stain, kill bacteria, and eliminate odors.
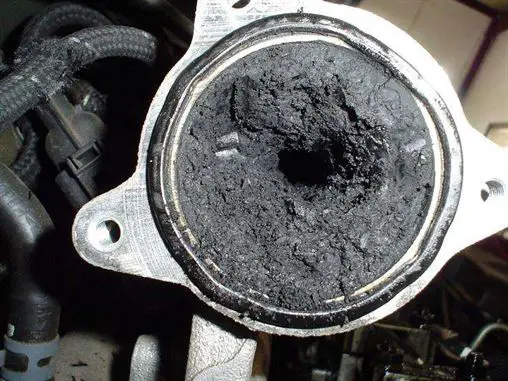
Common Symptoms of a Faulty EGR Valve
The function of the Exhaust Gas Recirculation (EGR) valve is to recirculate engine emissions. This helps these gases return to the combustion chamber instead of directing them to the exhaust system. The EGR system is crucial for reducing carbon emissions. As a concerned driver, you must be aware of the symptoms of a faulty EGR valve to avoid contributing to environmental pollution.
What are the functions of the EGR system?
Present in most gasoline and diesel engines, the EGR system controls vehicle exhaust emissions. Including it as part of the vehicle is a standard government regulation that manufacturers must comply with.
The EGR system reduces combustion temperatures in the cylinder, which results in decreased emissions and releases fewer nitrogen oxides (a pollutant). The working mechanism involves creating a diluted air-fuel mixture by allowing a measured amount of exhaust gas into the engine. Such a mixture lowers the combustion temperature by up to 300°F by burning more slowly.
The EGR valve is the main component of the EGR system. It regulates the amount of exhaust gas passing into the engine’s intake manifold. Be aware of the symptoms of the EGR valve as they indicate that your car is emitting more pollutants than the approved limit.
Symptoms of a Bad EGR Valve
What problems does a faulty EGR valve cause? Recirculation is designed to take place when the engine is at the optimal temperature to function properly. The engine underperforms or has issues when EGR occurs at the wrong time or does not occur at all.
The engine will run poorly.
What are the symptoms of a faulty EGR valve? Well, EGR problems depend on whether the valve is stuck closed or stuck open. These are the symptoms of a faulty EGR valve you need to be aware of.
Below Average Engine Performance
Since the EGR valve monitors the volume of exhaust gas entering the engine, it is obvious that any issues with it will affect engine performance.
You may experience reduced engine power when pressing the accelerator pedal or encounter acceleration difficulties. The long-term effects of these problems are poor fuel economy and the vehicle consuming more fuel than necessary.
This happens due to an incorrect air/fuel ratio. As a result, the engine needs more fuel to produce power.
The Engine Warning Light Comes On
It seems so obvious! The light flashes when there is a problem with the engine and will therefore illuminate if the EGR valve fails.
The Engine Control Unit (ECU) monitors the activities of all engine components. It activates the light when it detects that the valve is not performing its normal function.
The Engine Idles Roughly
A faulty EGR valve fails to control the volume of exhaust gas entering the chamber. Since it remains in a closed or open position, the exhaust gases in the chamber are either too low or too high, causing the engine to idle roughly.
Fuel Smell
The smell of fuel inside the car’s cabin is one of the most obvious symptoms of a bad EGR valve. The smell is so strong that it can be harmful to health. The gasoline stench results from the engine consuming more oil than necessary, leading to more hydrocarbons being released from the exhaust pipe.
Emission Test Failure
A functioning EGR valve reduces a vehicle’s emissions. If it fails, the exhaust pipe will release more pollutants than the approved level. Most countries require a vehicle emission test every six months. Check the EGR system if your car fails the test.
Warning Signs Based on EGR Valve Position
You already know that all problems occur for two reasons: the EGR valve has remained open or has remained closed. Thus, it is possible to divide the symptoms of a faulty EGR valve into two categories:
EGR Valve Stuck Open
An open EGR valve allows exhaust gases to enter the engine but at the wrong time. Common warning signs to look for are:
Rough idling
The engine does not start
Engine stalling and hesitation
The check engine light comes on
Increased emissions are a warning sign.
EGR Valve Stuck Closed
A closed valve does not allow exhaust gases into the engine at all. As a result, the temperature in the combustion chamber increases and creates various problems. Common symptoms are:
Exhaust gas emissions increase
Knocking at cruising speeds
Engine knocking
An illuminated check engine light
How to Fix EGR Valve Problems
Even if your car shows the symptoms of a faulty EGR valve, it doesn’t mean you have to replace it. You should test it before scrapping it.
You can inspect a vacuum-operated EGR valve with a portable vacuum pump, while a diagnostic scan tool is needed to test an electronic EGR valve. It is best to take the car to a maintenance workshop when symptoms appear.
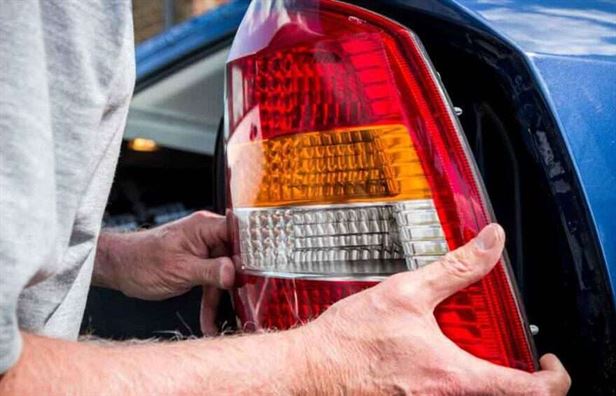
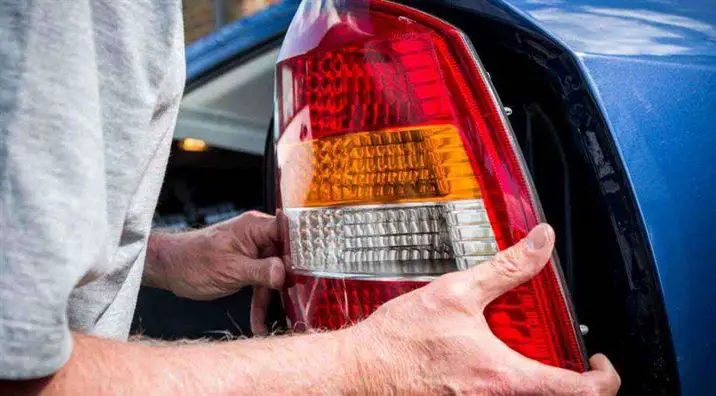
Rear Light Repair: How to Fix a Broken Rear Light at Home
You can easily replace faulty tail lights, but if you have enough time, repairing the tail lights will do the trick. Depending on the type of repair you choose, tail light repair is relatively simple and quick.
However, if the damage is significant, there is no other option than to replace the tail lights. You can, however, repair chips and cracks. If you drive a classic or older model, it is more important that you know how to perform a tail light repair.
Broken or cracked tail lights make driving risky, and you could be subject to a fine for violating traffic laws.
Something to Know About the Tail Light
The tail light of any motor vehicle must be red to distinguish it from the headlight. This way, the driver can always clearly see whether the vehicle is moving or turning to one side or the other.
The car’s tail light can be easily repaired by replacing it with a new one. However, in many cases, the tail light can still be used and repaired.
This will save the car owner time and unreasonable costs, especially in some cases where the light belongs to a classic or rare car range.
Something about the tail light you should know. (Photo: Medium)
The type of repair needed for the tail light depends on the severity of the damage and the shape of the broken part. Let’s take a look at the specific repair steps below to solve your problem when this cracked tail light repair situation arises.
Tail Light Repair: Step by Step
Below are 4 steps to repair a tail light if the question: How to repair a broken tail light? comes up. Read on to find out how to repair a broken tail light at home.
Step 1: Remove the Part You Want to Repair
Start by removing the part you want to repair. Now take your repair kit and discard the plastic film.
Apply the film over any crack or hole. The film only works on a smooth surface. If the inside is rather bumpy or rough, use cellophane tape.
Step 2: Prepare the Chemical Mixture
A tail light lens repair kit usually contains a material inside to repair the damage. To activate the chemical process, you need to mix the ingredients, like an epoxy. Once the mixture is complete, you must apply it as soon as possible to ensure its effectiveness hasn’t diminished. However, in all situations, you don’t need to panic, as you will have enough time to apply the mixture. Follow the instructions of the tail light lens repair kit.
Tail light repair with the handy kit. (Photo: Fish Comics)
Step 3: Apply the Chemical Mixture to the Fixed Area
Use the syringe inside to apply the chemical compound. When applying, make sure not to exceed the area to be covered. Small repairs shouldn’t take more than a few drops. You must apply the compound carefully as it is difficult to remove.
Step 4: Let the Fixed Area Dry and Then Reinstall the Tail Light.
Once you have finished applying the material, wait for it to dry. As it dries, it will appear darker than the rest of the glass. After some time, when you are sure the material is completely dry, reinstall the tail light.
Tail Light Repair FAQ
How Important Are Functional Tail Lights?
Functional tail lights are essential for road safety. They signal the presence and intentions of your vehicle and help prevent accidents, especially in low visibility conditions like at night or in bad weather.
What Are Common Reasons for Tail Light Failure?
Tail light failure can result from burnt-out bulbs, damaged wiring, or a blown fuse. Moisture buildup and accidents can also cause tail light malfunction.
Can I Replace a Tail Light Bulb Myself?
Yes, replacing a tail light bulb is generally simple. Refer to your vehicle’s manual for the correct bulb type and follow the instructions. Make sure to disconnect the battery and wear gloves for added safety.
How to Troubleshoot a Flickering Tail Light?
Flickering tail lights may indicate a loose bulb or wiring. Start by checking and securing the bulb. If the problem persists, inspect the wiring and connections for any damage or corrosion.
Is Condensation Inside the Tail Light a Concern?
Condensation inside the tail light can lead to bulb failure and wiring damage. It is recommended to address this issue promptly by checking for leaks, sealing gaps, and replacing any damaged components.
Can I Drive with a Cracked Tail Light?
Driving with a cracked tail light can allow moisture to enter the housing and damage the bulbs and wiring. It may also lead to legal issues if it affects the visibility of your vehicle’s signals. It is best to repair or replace a cracked tail light promptly.
How to Repair a Broken Tail Light Lens?
If the tail light lens is cracked or broken, you can replace it with a new one. Most replacement lenses come with simple installation instructions, making replacement relatively easy to do yourself.
Why Do My Tail Lights Stay On Even When the Car Is Off?
If your tail lights stay on after turning off the vehicle, it could indicate a problem with the switch or wiring. Check the switch and inspect the wiring for any signs of damage or corrosion. If the issue persists, consult a mechanic.
Can I Use Tape to Temporarily Repair a Broken Tail Light?
Using tape as a temporary solution for a broken tail light is possible, but it is not a long-term fix. The tape may not provide a good seal against moisture and debris, and it could also impact the effectiveness of the light signals.
What Should I Do If My Tail Lights Are Dim?
Dim tail lights can be caused by several factors, such as a weak electrical connection, a worn-out bulb, or a voltage issue. Start by checking and replacing the bulbs. If the problem persists, consult a professional to diagnose and address the underlying cause.
Simplified Explanation of How Locking Torque Converters Work
Any car enthusiast is always on the edge of their seat when it comes to technical details of the engine block. One topic of interest that can add to the curiosity is the operation of lock-up torque converters. These converters have garnered interest from many due to their energy efficiency and the improved lifespan of the transmission.
To learn more about its operation and the new locking mechanism, read on.
Lock-Up Torque Converters – From Scratch
All modern models with automatic transmissions are equipped with a torque converter lock-up. It is an innovative mechanism that is popular in the market for the efficiency it provides. Let’s explore the basics and operation of these systems from scratch.
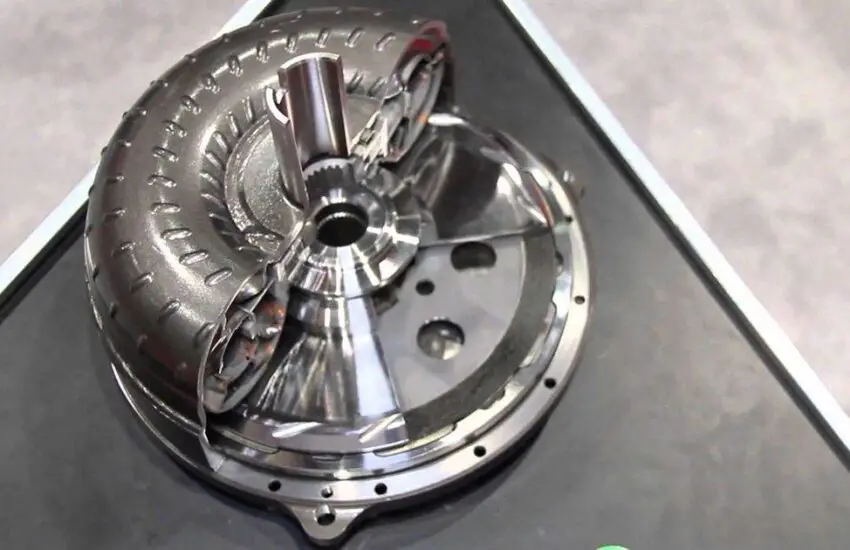
1. What is a Torque Converter?
Torque converters are similar to fluid couplings (a device for transmitting rotational mechanical power) that have the ability to transfer power from an internal combustion engine to the driven load. Regarding positioning, torque converters are located between the engine’s flexplate and the automatic transmission.
The basic function of torque converters is to multiply torque to cope with decreasing rotational speeds. These converters prove to be a blessing when it comes to driving a heavy vehicle on the road. Now that you know what a torque converter is; let’s move on to understanding lock-up torque converters.
A torque converter prevents the reduction of rotational speed (Photo Source: vk)
2. The Basics of Lock-Up Torque Converters
What is torque converter lock-up? It’s important to know that a torque converter is prone to causing efficiency loss. When the engine power is below a standardized threshold value, slippage inside a torque converter is likely to occur. Slippage leads to heat, which in turn results in a loss of fuel economy. To eliminate the underlying issues, a lock-up clutch is thus introduced.
The innovative locking system connects the impeller to the turbine, turning the torque converter into an absolute mechanical coupling. The result of an implanted locking mechanism includes improved slip transmission power and less wasted heat. You can also check out maintenance tips when better transmission speeds are all you desire and how a lock-up torque converter works.
3. The Operation of Lock-Up Torque Converters
A lock-up clutch is engaged as soon as the engine and transmission are spinning at approximately the same speed. The speed at which a locking mechanism automatically activates is around 64 km/h. However, for the transmission to be locked, certain requirements must be met.
At 64 km/h, the locking mechanism is activated (Photo Source: carthrottle)
Coolant temperature, lock-up threshold speed, cruise control, and gears are some parameters that affect the functionality of lock-up converters. If all factors align and the lock-up activates, the impeller and turbine connect. As a result, you can expect 100% power transfer through the torque converter. Isn’t that everything you want?
Wrap Up
This is primarily about lock-up torque converters which add to the overall lifespan of the automatic transmission. There are also some issues related to poor lock-up action that you need to take into consideration. Before diagnosing any of the problems, it is necessary to understand the operation of lock-up torque converters. This explains the hype around the topic!