There are controversies in the secondary automotive market regarding the purpose of a throttle body spacer in your car. Is it really effective or not? We are sure that when considering increasing power or giving your car better performance or better fuel consumption, one of the things most drivers will encounter is installing a throttle body spacer. So, what is the purpose of a throttle body spacer? Everything will be clear in this article:
What does a throttle body spacer do in your car?
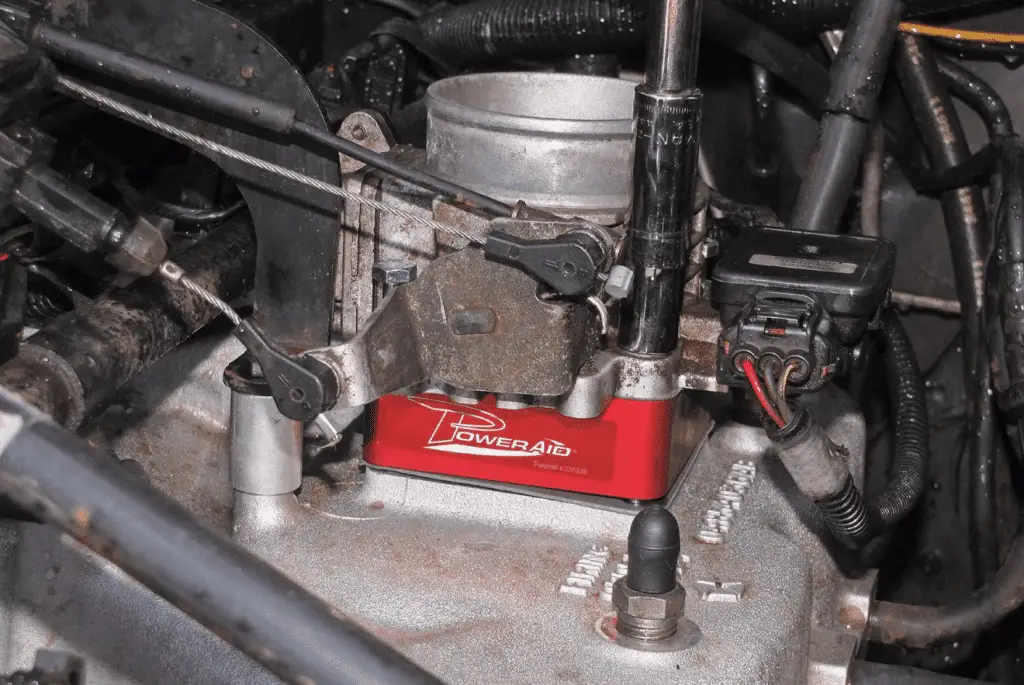
A throttle body spacer is essentially just a metal block that is placed between your intake system and the throttle body to provide better incoming airflow into your engine, which is supposed to increase performance and fuel consumption if you apply and install it correctly. In fact, the main function of the throttle body spacer is to increase the length of the intake manifold (by extending the distance between the rest of the intake and the throttle body inlet) and the volume of the incoming air surface. This will help your engine by more easily combining air and fuel. Almost all throttle body spacers are made of aluminum, so they are usually quite lightweight and will not add extra weight to your engine compartment. You can simply understand the throttle body spacer as a tool to increase the engine’s capacity to circulate airflow.
Normally, a throttle body spacer is not available in your car, so you might consider installing one, but is a throttle body spacer expensive?
The purpose of a throttle body spacer increases the length of the intake manifold (Photo: pinterest.com)
How much does a throttle body spacer cost?
The good news is that it won’t be too expensive to buy a throttle body spacer. Currently, throttle body spacers are on sale for $50 to $150, which depends on your car model and the material of the part you choose. There are two types of throttle body spacers: one with a smooth inner surface, while the other has a rough surface. Most drivers assume that the rough surface creates a turbulent effect on the incoming airflow and provides better performance. We see that the price is very affordable. You don’t need to think too much before buying this part. With this price, is a throttle body spacer worth equipping your car with?
Is the throttle body spacer really effective for your engine?
Most of the time, the answer is “Yes.” A throttle body spacer is considered a tool to increase power, torque, horsepower, and fuel economy. It will help direct the airflow into the manifold to increase the volume entering the intake system. Power improvement is one of the main benefits of installing the throttle body spacer. The spacer will increase the air speed and cause an extension of atomization.
So, how much horsepower does a throttle body add? When equipped with a throttle body spacer, the average increase can be 7 to 15 horsepower and torque from 15 to 125 lb-ft depending on the model and with proper tuning and fuel octane rating. However, note that the spacer works best only for vehicles equipped with carburetors and vehicles with single-port fuel injection systems. Additionally, the spacer can increase the volume of the air space under the throttle body, which can help the car reach high RPM.
However, installing a throttle body spacer is sometimes still not a perfect solution for your engine. Although it is claimed that spacers will increase your engine’s power, some automotive experts analyze that adding a body spacer can decrease the quality of the idling process and possibly cause emissions.
How to install a throttle body spacer?
How much horsepower does a throttle body add? (Photo: pinterest.com)
Let’s move on to this part to learn how to properly install a throttle body spacer:
A few tools you need before installing a spacer for your car:
A socket wrench (7/16″, 7 mm or 10 mm)
Screws
Cleaning solutions
O-ring
Rags
Protective glasses and gloves
After preparing all these tools, roll up your sleeves and carry out the process:
Step 1: Disconnect the electricity or the negative terminal of your car battery.
Step 2: Remove the air intake to start accessing the throttle body. You can do this by disconnecting the screws connecting the air intake manifold to the engine. If the intake has a clamp that needs to be removed, use pliers to loosen it.
Step 3: Use the socket wrench to disconnect all factory torque bolts (you can use the 10 mm wrench)
Step 4: Assemble a new spacer between the throttle body and the air intake system. In this step, use a screwdriver and a 10 mm socket to secure the spacer and tighten the bolts. Make sure all bolts are tightened before moving to the next step. NOTE: When installing the spacer, be sure to use Teflon tape to properly seal the threads.
Step 5: Reinstall the bolts firmly. After that, connect the negative terminal of your battery and start your vehicle.
Final thoughts
Above all, installing a throttle body spacer can probably alter the performance of your car’s fuel injection process, as it actually creates a bit more speed going from the throttle body to the intake system. However, sometimes, adding a spacer probably changes the optimization process of your car on certain models. Therefore, consult a professional or read the user manual carefully before installing this part.
Honda Civic 2012 the right type of oil
So, what type of oil does the 2012 Honda Civic use?
SAE 0W-20, and you’ll use 3.9 liters when you fill up. But don’t just take our word for it. Double-check with your owner’s manual. There might be variations depending on your trim level and other options, so you want to make sure.
This answer leads to a few more questions, like what exactly does “SAE” mean, what does the W stand for, and is it beneficial for you to change your oil earlier? We’ll cover all of that below. Keep reading.
2012 Honda Civic: Reading Your Oil
SAE = Society of Automotive Engineers. This specifies that we use SAE measurements for your oil’s viscosity, not centipoises.
W = Winter. This specifies that the first half of the number measures your oil’s viscosity in cold conditions. The second half measures it when it’s hot. The higher the number, the thicker the oil.
To put the numbers in perspective, an SAE 20 would run at about 140-420 centipoises, or cps. SAE 40 runs between 650 and 900. Water flows at only 1 cps, honey at 10,000, and mustard at 70,000.
In other words, motor oil is quite thin compared to other substances. Peanut butter weighs in at a quarter million cps.
WD40 actually weighs in at 20 SAE. We don’t recommend using it instead of motor oil, but you can use SAE 0W-20 anywhere you’d use WD-40. In fact, Daisy recommends SAE 20 motor oil for lubricating the Red Ryder BB gun.
A Well-Oiled Machine
Keeping your Civic well-lubricated is the simplest path to the High Mileage Club. But what exactly does “well-lubricated” mean? Here are some tips:
Consider using synthetic oil. With synthetic oil, you get fewer impurities, more consistent viscosity, and less frequent oil changes, between 7,500 and 10,000 miles instead of 3,500 to 5,000. Synthetic costs a bit more but can save you from costly repairs later.
Check your oil once a month (or whenever you already have the hood open) to see if it’s dirty or needs topping up.
Changing your oil early doesn’t necessarily extend your car’s lifespan, but it’s better than changing it late. And it’s not a bad idea to change it early if you’re about to take a long road trip.
It’s no exaggeration to say that keeping your vehicle well-oiled is the best thing you can do for it. Without proper oiling, you’ll have bare metal-on-metal friction that will wear out your parts much faster than if they were properly lubricated.
Understanding EPC Light in Audi Q5: A Technical Perspective
In the world of automobiles, technological innovations follow one another at a frantic pace, making vehicles smarter and more functional. Among them, the Audi Q5, a luxury asset that fascinates with its splendor and impeccable technical operation, has particularly caught our attention. However, during its use, one warning light particularly intrigues us: the EPC light, which emits significant signals for your vehicle. Understanding its operation and knowing how to diagnose and resolve the errors it may indicate, as well as preventing future errors, will help you maximize the performance of your Audi Q5 and extend its lifespan.
EPC Light: Technical Operation
The EPC (Electronic Power Control) warning light on your Audi Q5 illuminates when your car detects a problem related to the engine control system. It is, in a way, an alert to inform you that there is a failure in the electronic power control system of your vehicle.
One of the reasons why the EPC light may come on is a faulty accelerator pedal sensor. This is crucial because it tells the car how much power it needs to generate. Never ignore this light.
Another possible cause is a problem with the throttle position sensor. In an Audi Q5, this sensor is associated with the accelerator pedal, and if this sensor fails, the EPC light may illuminate.
Furthermore, problems with the ignition coils can also trigger the EPC light. The ignition coils power the spark plugs, and if one of them is defective, it can lead to a loss of power and the illumination of the EPC light.
A malfunction of the engine control system is another reason why the EPC light may come on. This can involve issues such as engine overheating or a poor air-fuel mixture.
It is essential to note that when you see the EPC light on, it is recommended to avoid driving and take the vehicle to a professional for diagnosis. Ignoring this problem could lead to potentially serious damage to your vehicle.
Remember that today’s technologies can solve the problem more quickly and effectively. Specialized diagnostic equipment is capable of reading the error codes from your Audi Q5, providing an accurate and fast solution to your problem. Using these tools, a qualified technician can determine the cause of the issue and make the necessary repairs.
So, don’t wait any longer. As soon as the EPC light comes on, it’s a signal that your car needs to be examined by an automotive technology expert. This will ensure you get accurate and timely diagnostics to keep your Audi Q5 in perfect working order.
Diagnosing the EPC Light Error
Troubleshooting the EPC light error on an Audi Q5
The EPC light error can cause a series of problems that can affect the overall performance of your Audi Q5. At this point, it is crucial to adopt a methodical approach to correctly diagnose the error.
First, check if an unexpected engine shutdown has occurred. A sudden shutdown could indicate a failure of the engine control system, which could trigger the EPC light error. If this is the case, it is possible that a system reset may fix the problem.
Next, inspect the throttle position sensor. If the sensor is faulty or damaged, it could cause unexpected engine speed fluctuations, or even engine stalling, triggering the EPC light. If you are unsure how to undertake this step, do not hesitate to consult a professional.
Similarly, the accelerator sensor could be the culprit. A faulty accelerator sensor sends incorrect information to the computer, which controls the vehicle’s acceleration, which could trigger the EPC light error.
Another aspect to check is the ignition coil. The role of the ignition coil is to provide the necessary spark to ignite the fuel in the cylinders. If the ignition coil is defective, it could lead to irregular engine performance and the appearance of the EPC light.
Finally, do not ignore the possibility of a failure of the electronic control system itself. A faulty EPC system could, for example, restrict the vehicle’s acceleration capability or cause engine speed fluctuations, thus leading to the EPC error.
In summary, troubleshooting the EPC light error on an Audi Q5 requires methodical attention and careful analysis. Keep in mind that EPC errors can have multiple causes, which requires a systematic approach for their resolution. If you are not equipped or comfortable with diagnosing these problems, do not hesitate to consult a professional equipped with the necessary specialized tools to perform an accurate diagnosis.
Resolving EPC Light Errors
Following the importance of accurate and rapid diagnosis of the EPC warning light, let’s continue our dive into this technically enriching universe. It’s about understanding how to resolve EPC light errors on an Audi Q5 in a pragmatic manner.
One of the most serious problems that can be signaled by the EPC light is the unexpected engine shutdown. However, before using more radical means, a reset of the electronic power control system can sometimes be enough to resolve the problem. This can be done using specialized diagnostic software. If the reset does not solve the problem, then it is time to move to a more in-depth check.
When the system is reset and power is restored, it is recommended to check all elements of the system that can trigger the EPC light. This notably includes the throttle position sensor, the accelerator sensor, and the ignition coil, all of which have been identified as potential causes of EPC error.
A methodical approach is essential. Each component must be meticulously inspected to identify and resolve the exact problem. A professional service equipped with the appropriate diagnostic equipment is often the best option for this step, as the problem can be resolved quickly and accurately.
It is important to note that the electronic control system itself may be at fault. If each component has been tested and is in good working order, then the electronic power management system could be the cause of the EPC error. This requires professional diagnosis and repair, as it takes a certain technical expertise to repair this complex component of the car.
Throughout the troubleshooting process, it is absolutely necessary to preserve the integrity of the vehicle and avoid any further deterioration. For this reason, it is recommended to call upon a professional to resolve EPC errors.
Maintaining a methodical approach in searching for problems and their resolution is crucial. The complex technology that supports each Audi Q5 allows it to deliver optimal performance. However, this requires rigorous maintenance and accurate diagnostics to ensure the proper functioning of all systems. Thus, when it comes to resolving EPC light errors, the most important aspect remains trusting a professional and thorough diagnosis, which will allow you to identify, understand, and resolve problems with precision and efficiency.
Preventing Future EPC Light Errors
Now that we have covered the main aspects of the EPC warning light malfunction, the question remains: how can we prevent this light from illuminating in the future? EPC errors cannot be completely eliminated, as they are generally a sign of a potential underlying problem. However, following preventive measures can greatly decrease the likelihood of having to deal with these errors.
First and foremost, regular maintenance of your Audi Q5 is essential. Well-scheduled maintenance performed by qualified technicians can help identify potential problems before they trigger the EPC light. This involves inspecting critical elements such as the ignition system, the accelerator and throttle position sensors.
Furthermore, familiarizing yourself with the owner’s manual is an essential step. The owner’s manual provides access to valuable information regarding vehicle maintenance and the manufacturer’s recommended maintenance intervals. Adhering to these schedules ensures that the vehicle operates as intended and minimizes the occurrence of an EPC warning.
Driving habits must also be taken into account. Aggressive behaviors, such as hard acceleration or high-speed driving, can contribute to premature wear of the car’s components and cause EPC errors. Driving cautiously and responsibly can help mitigate these risks.
Lastly, do not neglect the importance of an accurate diagnosis if the EPC light illuminates. The failures manifested by the EPC light illumination can be related to a multitude of causes. Only an accurate diagnosis can identify the real cause and ensure its correct resolution to prevent the problem from recurring.
In short, preventing EPC errors requires a combination of regular maintenance, knowledge of the vehicle, cautious driving, and accurate diagnostics when the light appears. By adopting these practices, you can keep your Audi Q5 in excellent condition and minimize the likelihood of future EPC errors.
Thus, the EPC light, although often overlooked, can be a valuable indicator of your Audi Q5’s health. Through a thorough understanding of its technical operation, accurate diagnosis of the errors it signals, effective troubleshooting, and proactive prevention of future errors, we can significantly improve the efficiency of our Audi Q5. Strengthening our knowledge and expertise in these areas is essential to preserve and extend the life of our vehicle. As automotive technology continues to evolve, we must adapt and update our skills to keep pace with these innovations and maintain our vehicles in perfect working order.
The car air conditioning compressor stays on all the time
The hottest days of summer are over, yet you notice that your car’s air conditioner is running all the time or constantly turning on and off. If it’s not due to the weather, the air conditioning compressor stays on all the time, which means there is a problem with the unit.
If the issue is not resolved as quickly as possible, you will face a staggering electricity bill, and your air conditioner will undergo additional wear and tear due to unnecessary overworking.
It should be noted that the compressor has the second highest failure rate among all components of the air conditioning system. Discover the possible reasons why AC compressors stay on permanently and how to fix this common maintenance issue.
What is the purpose of an AC compressor?
The compressor is the component that powers the air conditioning unit.
When you turn on the air conditioner, the compressor compresses and heats the refrigerant, a special fluid mixture. This compressed and hot refrigerant is then sent through the condenser to cool down.
The refrigerant then passes through the dryer to remove contaminants. Once purified, the compressed refrigerant goes through the expansion valve, where it is relieved of its pressure. After passing through the evaporator, the refrigerant is now super clean, dry, and cold.
To create the bursts of cold air coming from your car’s air conditioner, air is sent through this newly cold refrigerant in the compressor tank to cool down, then blown through the fans.
The cold air from the air conditioner is the result of air passing through dry and cold refrigerant. (Photo: istockphoto)
Why does an AC compressor turn on and off?
It is normal for your car’s air conditioning compressor to turn on and off. For example, on the hottest days, the more you set your air conditioning to a cool level, the more the compressor has to work to maintain the desired temperature.
Once the desired temperature is reached, the air conditioning compressor may stop for a while until there is a change in your car’s temperature. Thus, the air conditioning system turning on and off is not a problem, but the frequency of the cycles can indicate issues.
An example of such abnormal cycling frequency is that instead of turning on and off, the AC compressor stays on all the time.
The AC compressor typically turns on and off and is driven by a belt. (Photo source: daily driven)
AC compressor stays on all the time – Common causes
Automatic temperature control
If automatic air conditioning is enabled, the air conditioning compressor will run continuously, summer and winter, if the automatic air conditioning is on a setting other than off.
Low refrigerant level
If the amount of refrigerant in the air conditioning compressor tank is reduced, probably due to a leak in the coils, the compressor might not have enough refrigerant to operate the air conditioning effectively. Due to this inefficiency, the AC compressor will have to work harder than usual.
In this case, you will likely need a professional to find and repair the leak and restore the correct refrigerant level.
Leak detection
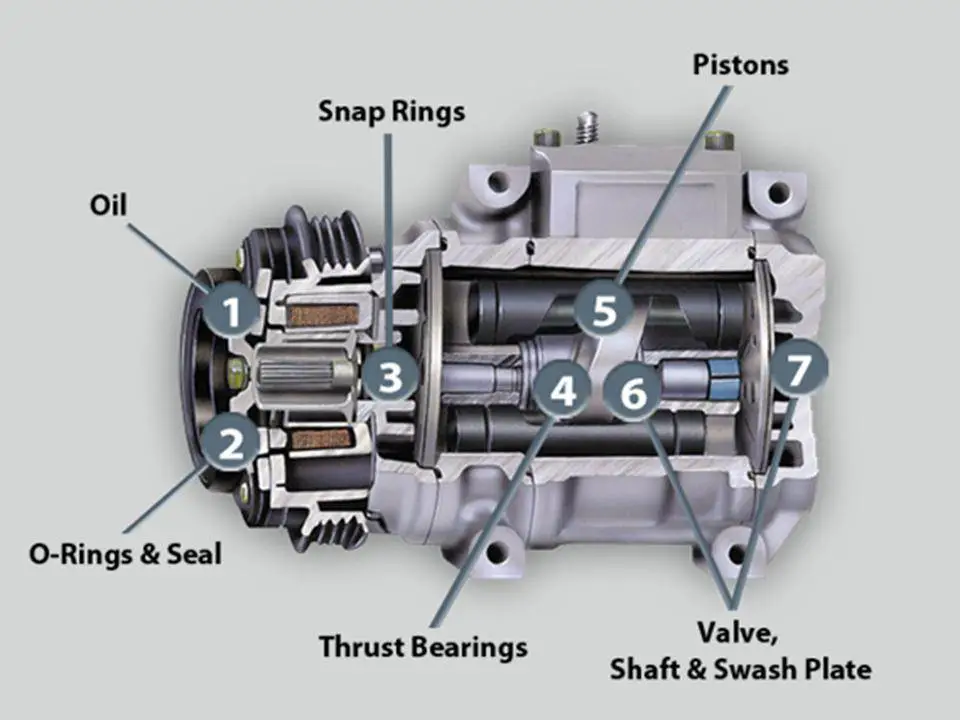
Leaks most often occur at the O-rings, seals, and worn pipes of the air conditioning system, followed by leaks in a pinhole of the condenser and evaporator, and leaks in the compressor shaft seal.
To detect leaks, add refrigerant to restore it to the correct level, then turn on the air conditioner. The simplest but most effective method is to spray soapy water on the suspected areas and watch for bubbles.
If a leak occurs at the O-rings, seals, or pipes, simply replacing them will solve the problem. However, if the issue is from a leak in the condenser or evaporator or the compressor shaft seal, the repair is costly and more tedious and should be done by a professional.
Dirty or clogged condenser
A condenser filled with dirt and debris will not work as effectively as usual to cool the compressed and hot refrigerant passing through it, forcing the air conditioning compressor to overload.
Dirty evaporator coil
Similar to the condenser, the evaporator coil can be covered with dirt and debris, hindering its drying process and the overall cooling process of the system, thus forcing the air conditioning compressor to work harder to cool the inside of your car.
A car’s air conditioning compressor. (Photo: akalink)
If you are experiencing issues with your air conditioning compressor without knowing the exact reason, it is best to have it repaired. Only EPA-certified mechanics can service mobile air conditioning systems.
You might be wondering how much it costs to replace an air conditioning compressor. The average cost for replacing an air conditioning compressor is between $500 and $700 depending on the car in question. Labor costs alone are estimated at just over $200.
Rest assured, an air conditioning compressor typically lasts 8 to 10 years, which generally corresponds to the length of time an average car owner would keep their car.
How to Fix a Tire Leaking Air Around the Rim
A leaking tire can ruin beautiful trips in no time. Familiarizing yourself with the repair process to prevent a tire from leaking around the rim can be very helpful.
There has been a lot of progress in the field of tires, from traditional vehicles to the modern era. From tube tires to tubeless tires, manufacturers have strived to make our long journeys smooth.
Tubeless tires are the most advanced technology on the market. These tires hold air longer and the grip is also perfect. One of the biggest dilemmas related to tires is that of leaks.
How to know if your car tire is leaking?
The tire doesn’t work “alone,” you might find that even if it’s not leaking, it’s still flat. So there is a very simple way to check if the tire is leaking around the rim or not. Let us show you how to do it!
Get a generic spray bottle. Then prepare a liquid mixture including dish soap with water, mix well and put it in the bottle. The ratio is about 1 part soap to 4 parts water.
The next step is to inflate the tire to the valve caps and also spray the solution on the valve end so you can see if the valve itself is leaking.
If you see soap bubbles forming somewhere, there is a leak. For a small leak, it takes 10 to 20 minutes to notice the change in the tire and the soap bubbles. This method is simple for checking your tires at home and you can do it without experience.
The tire doesn’t work “alone,” you might find that even if it’s not leaking, it’s still flat. (Photo: Autoily)
Step-by-step process to repair tire air leaks around the rim
Repairing a leaking tire is not as complex as it seems. The changing process is much easier if you have a proper equipment kit with you.
You may need to consult a mechanic to repair tube tires. Repairing tubeless tires is easy thanks to special techniques and equipment.
Let’s review the repair process to prevent a tire from leaking around a car’s rim.
1. Remove the tire and start the procedure
The first step to prevent a tire from leaking around the rim is to remove the tire and place it on a flat surface. Make sure the air inlet valve is not facing the ground.
Check if there is a visible leak or hole. It will be easier to treat the leak on the outside than the tire leaking around the rim.
Fill the tire and rim with water. The leak area will be identified by bubbles from an air leak. Check both sides of the tire with plain or soapy water.
2. Release the air from the valve
Locate the leak area on the tire and mark it accordingly. Deflate the tire by pressing the valve inlet with a pin. It is essential to deflate the tire before treating it.
There is also a tool to remove the valves in the car’s equipment kit. Make sure the leaking side of the tire and rim is visible for treatment. That’s all you need to do for the second step of repairing a rim leak.
Follow the procedure to solve the problem of tire air leaking around the rim. (Photo: It Still Works)
3. Release the tire-rim attachment
The tire and rim are secured with a seal. The air inside the tire tightens the seal. You may need something heavy to release the attachment. According to expert maintenance advice, a heavy hammer and a wooden board will do the job perfectly.
It is essential to remove the tire from the rim if the problem is due to tire leaks around the rim. Hit the board with the hammer after bringing it closer to the rim seal.
4. Clean the edges and repair
The final step to prevent a tire from leaking around the rim is to clean the edges of the tire with a cloth after detaching the seal. It is easy to press the removed tire with your hands and clean it accordingly.
Put some repair solution on the leak and refill the air. While the air is circulating in the tire, make sure to position the tire and rim appropriately. You can check the tire leak again with water.
How much does a rim leak repair cost?
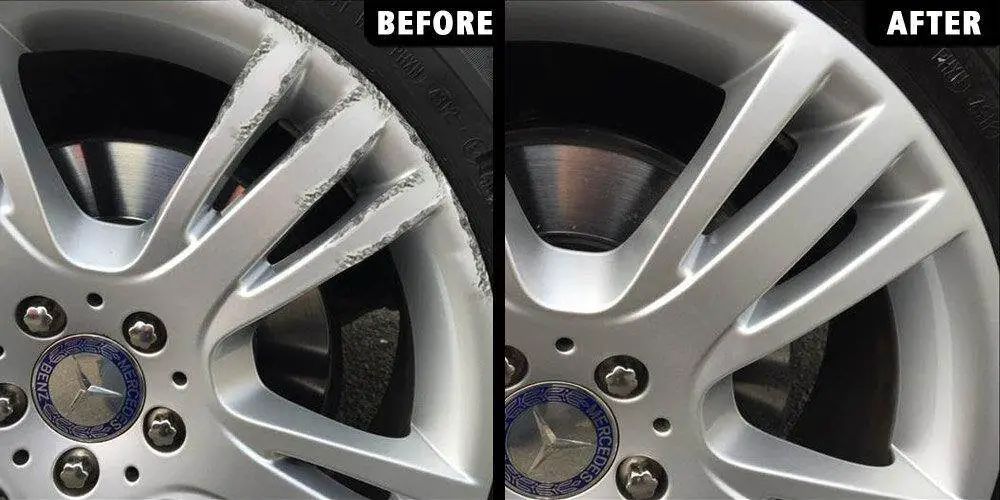
Most people who ask how to prevent a tire from leaking around the rim wonder how much it costs to repair the leak. If it’s the rims, then the wheels are struggling.
At the garage, the repairer will dismount the tire, clean the rim inside, then apply the anti-bead product and remount the tire. They also change the valve stem for you. The total cost is about $20 to $30 per wheel.
The problem is that, instead of solving the problem from the rim, you might consider it a bad bead or something that will charge you a lot of money to throw sealant on the problem.
Your car will be fine for a week and the leak will return to what it was before. Also, some shops might just grab something from the store and smooth it out.
They try to smooth the surface where there was a leak, then apply a bunch of bead sealants. Again, the problem is not completely solved.
At the garage, the repairer will dismount the tire. (Photo: Uptown Automotive)
Final words
This is about how to prevent a tire from leaking around the rim. Follow these essential tips and continue your journey flawlessly on the roads. You can do it yourself at home or if you’re not sure whether you can do it or not.
Take your car to the trusted garage, tell them you have a slow leak on the tire, and ask them to check the rim. So everything will be on the right track!
Symptoms of a Bad Air-Fuel Ratio Sensor
If you’re like most people, you probably know very little about your car’s air/fuel ratio sensor. But what if I told you that this small piece of equipment is responsible for ensuring your engine runs properly and efficiently?
Let’s look at what an air-fuel ratio sensor is, where it’s located, the common symptoms of failure, and how much it will cost to replace. It’s going to be fun!
What is an Air-Fuel Ratio Sensor?
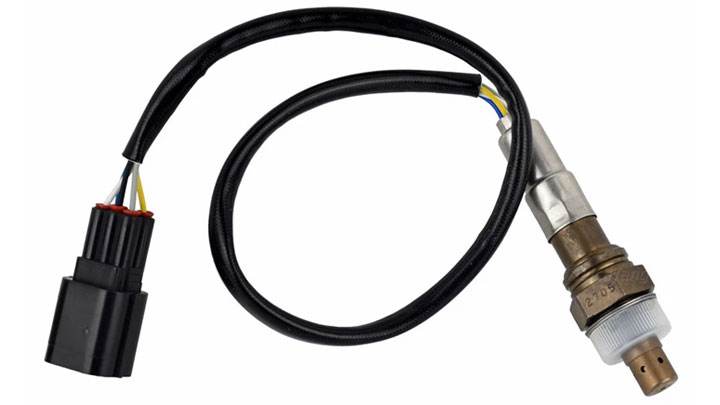
An air-fuel ratio sensor (or air-fuel sensor) is a simple device found in your vehicle’s engine. It constantly measures the amount of oxygen in your exhaust gases and sends this information back to your ECU (your car’s central computer).
This allows your engine to know if it needs to run richer, leaner, optimize fuel economy, or if you like a certain SPEED – and your car has this feature – your ECU can even optimize performance.
Essentially, you’ll need a properly functioning air-fuel sensor to maintain a healthy engine. This is because the engineers who created the engine designed it to operate at optimal air/fuel levels.
If the ratio changes too much in one direction or the other, the sensor will instruct the ECU to turn on a check engine light on your dashboard. This will “weaken” your engine so you can drive it to your nearest auto mechanic to fix the problem. This might sound extreme, but this way, you’ll still have a car at the end of the day.
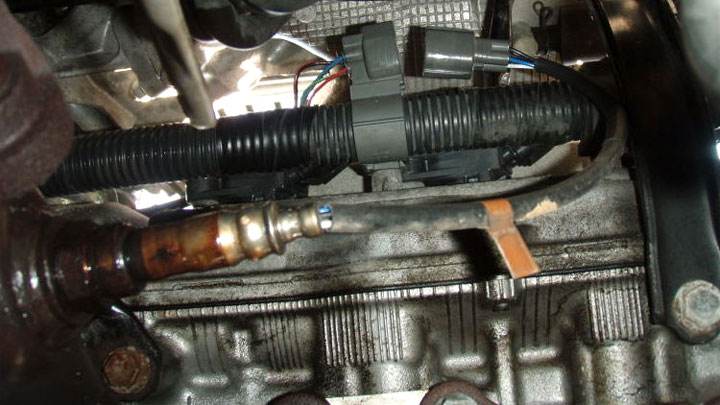
Where is it located?
The air-fuel ratio sensor is located either in the exhaust manifold or in the front exhaust pipe. It measures the amount of air in your exhaust gases and uses this information to determine your current air-fuel ratio.
Symptoms of a Bad Air-Fuel Ratio Sensor
#1 – Rough Idle
If, for some reason, you notice your engine’s RPM increasing, then decreasing, then sputtering a bit, then returning to normal, you might be experiencing a rough idle. You might also feel it through the floor when you’re sitting in the car with the engine running and the vehicle in “Park.”
It might just feel like a “tapping” or intermittent rumbling for no apparent reason. This could be a potential symptom of a bad air/fuel sensor.
#2 – Engine Ping
If your car makes a metallic noise, almost a rattling sound, when you accelerate from a stop and it hasn’t always done this, the air-fuel sensor might be failing. Sometimes called “spark knock,” engine ping is the result of an improper combustion cycle.
If you don’t have enough air or too much air in your air-fuel mixture, you could end up with incomplete combustion. This will release harmful gases into the atmosphere that none of us want to breathe.
#3 – Poor Gas Mileage
If you’re like me, you pay attention to how far a tank of gas can take you. The thirstier the car, the more I pay attention to how much money I’m spending.
For example, I know that my Toyota Sequoia, driven at 5,200 feet above sea level (as I drive), will average about 16 to 17 MPG. If I suddenly saw it drop to 12 MPG and my habits hadn’t changed much, I might check the air-fuel ratio sensor for an issue.
You can get a scanner that plugs into your OBD 1 or 2 port and it will tell you the kind of codes your engine is throwing, which could be much cheaper than taking the car to your mechanic. Or, you can go to the dealership and they will tell you exactly what’s wrong, then fix the problem while you wait.
#4 – Increased Exhaust Emissions
If you notice your car smoking a lot on startup, there’s a change in smell from your exhaust, or it seems like there’s a bit more smoke than usual coming out, take your car to the mechanic. They will be able to determine if your air-fuel sensor is faulty and if you’re getting incomplete combustion.
Alternatively, if you need to register your car or take a new emissions test, you’ll need to go to your state agency to have this measured. If you fail the test, but just passed it last year, you might have a faulty air-fuel sensor.
Related Fault Codes: P0131, P0132, P0133, P0134, P0135, P0170.
#5 – Decreased Engine Power
You’re driving and you’re going to pass a semi-truck, but suddenly you find it’s taking longer than usual. You check the back seat, and there’s no extra equipment inside, and you don’t have a pen of squealing pigs in the trunk – everything should be fine, right? Wrong.
You seem to have a sudden drop in engine power, which is a potential symptom of a bad air-fuel sensor. Take the car to your favorite repair shop to have it checked. It’s a fairly simple and inexpensive fix if you take care of it quickly. This way, you can avoid further problems later.
What Causes Sensor Failure?
As is the case with most other sensors in your vehicle, fuel, grime, dirt, debris, and physical damage can all negatively impact your air-fuel sensor’s ability to properly transmit information to your ECU.
Unfortunately, this isn’t something easy to avoid because the sensor lives in your exhaust system, so you’re not going to take it out and clean it all the time (I don’t know anyone who would). So, when it goes bad, replace it and move on. At least, that’s what I recommend.
Can You Drive with a Faulty Air-Fuel Sensor?
Yes, you can drive with a faulty air-fuel sensor, but we don’t recommend driving with a check engine light on for very long. It could just be your air-fuel sensor, but it could also be a catastrophic engine failure, and the average driver won’t know the difference.
So, if you see the check engine light on, take it to a mechanic. If they say it’s a faulty sensor, just ask them to replace it if you can afford it. Otherwise, try to limit your driving to only necessary trips.
Air-Fuel Sensor vs. Oxygen Sensor
Both have very similar purposes. The only difference is that a proper air-fuel ratio sensor reads a much wider range of inputs than the conventional O2 sensor. This is why it’s sometimes called a “wideband O2 sensor” instead of an air-fuel ratio sensor.
If you’re considering tuning your car, you might want to look into a wideband O2 sensor instead of the conventional method. This data can then be displayed via an aftermarket air/fuel ratio gauge mounted inside your car. More information means more power.
All of this depends on your mechanic’s rate and the type of car you own. Generally, a more expensive car = more expensive parts = a more expensive repair. Expect to pay between $50 and $200 for this repair.
Symptoms of a Rear Main Seal Leak and How to Diagnose Them
Do you have oil stains in your driveway, or an engine block that leaks when you look under your vehicle? Sorry, very bad news: you might have a rear main seal leak. Few words from a mechanic will stop all drivers in their tracks faster than “You have a rear main seal leak!”
A rear main seal leak is one of the worst things that can happen to any vehicle, because the rear main seal is very difficult to access and requires disassembling a large part of your engine.
On most modern engines, seal failure is due to a condition inside the engine or a component connected to the rear of the engine and is more common in older cars.
For many drivers, the announcement of such a problem means it might be time to buy a new vehicle, as repairing the rear main seal usually costs more than the value of vehicles old enough to develop such leaks.
Replacing a rear main seal is one of the most dreaded, labor-intensive, and expensive tasks you can perform on your car, after replacing head gaskets or rebuilding your transmission. It can easily cost you between $800 and $1,200 at a mechanic.
Furthermore, there are no shortcuts or quick fixes if the seal has expired. A replacement is not something you’ll want to undertake yourself, and even a seasoned mechanic might struggle with it because it’s in an extremely difficult position.
That said, a proper diagnosis will save you a lot of money by having a mechanic check if your current oil leak situation is indeed a rear main seal leak. Plus, in some mild cases, you can spend less than $20 to fix the issue.
Read on to learn everything you need to know about the rear main seal leak, including how it works, the symptoms and causes of a rear main seal leak, how to troubleshoot, and what to do.
What is the purpose of a rear main seal?
The rear main seal is designed to prevent oil leaks between the block and the crankshaft. Originally, manufacturers intended rear seals to last the lifetime of a vehicle, so no replacement would be needed, unlike many other engine components under the hood that need replacing every few years.
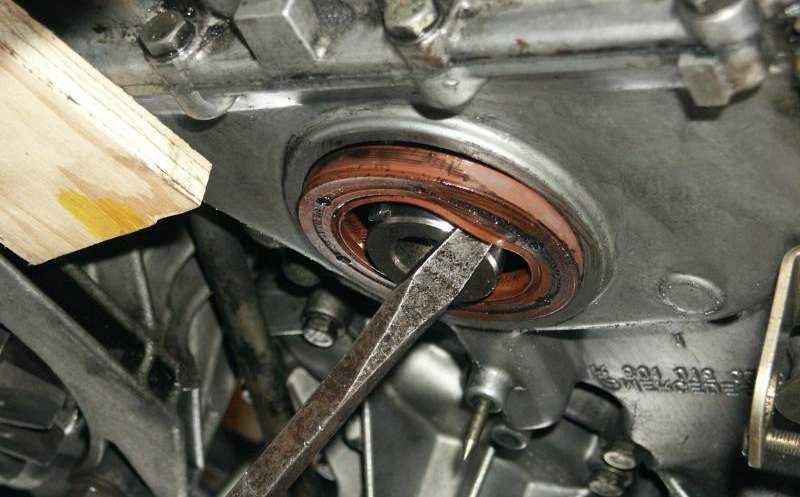
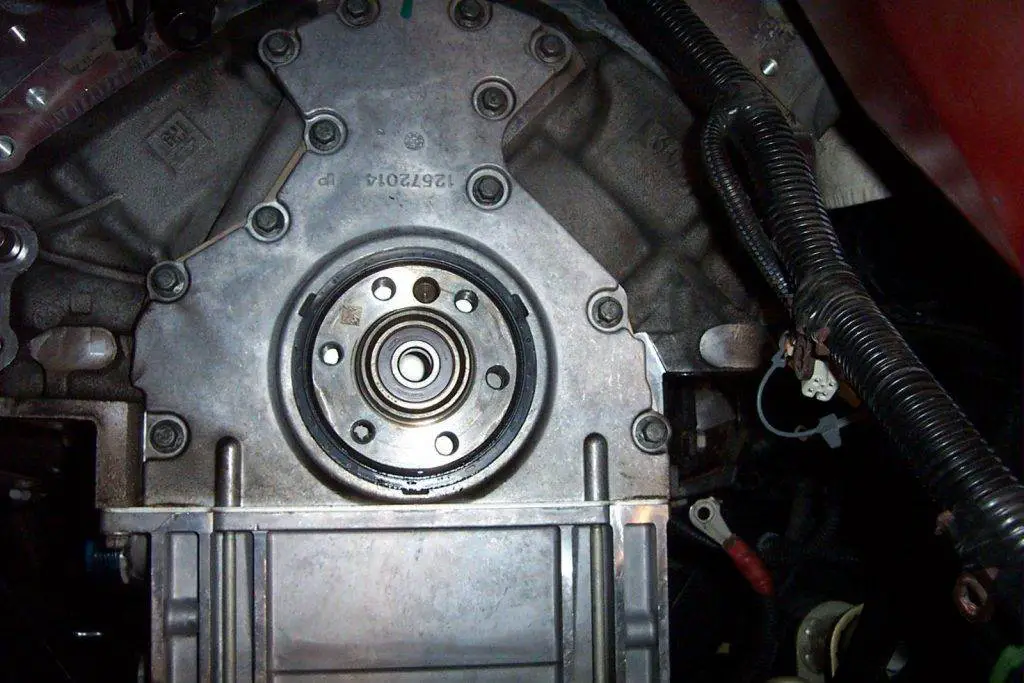
The rear main seal is located deep within your vehicle’s engine compartment. Source: UsedCars.co.ke
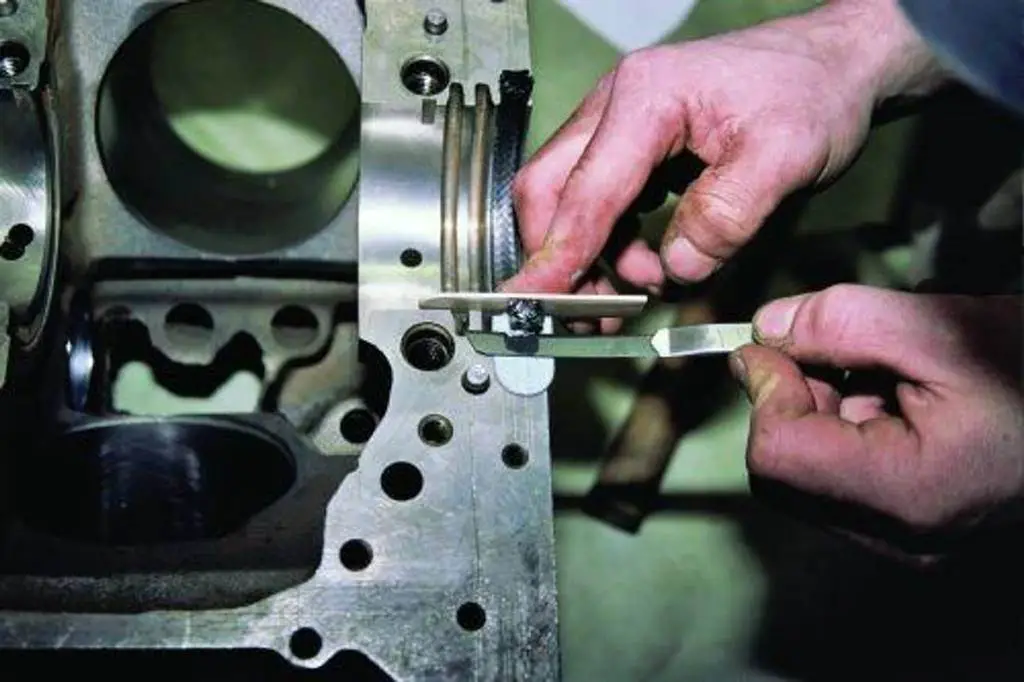
It is located just outside your rear main bearing, which supports your engine’s crankshaft in your engine. These bearings support the majority of your engine’s load and play a crucial role in converting the axial motion of your piston into the rotational motion of the crankshaft.
The main bearings achieve this by absorbing the axial load from the piston pushed down by combustion, while allowing the crankshaft to rotate.
To accomplish this task, these bearings must be incredibly smooth and remain well-lubricated by your engine oil. In other words, the correct oil for your engine is extremely important for creating the optimal conditions allowing the main bearings to do their job without excessive wear.
This oil must also be contained within your engine so that everything remains constantly lubricated, and that’s exactly where the rear main seal comes in. The rear main seal allows the crankshaft to exit the engine block so it can bolt to the flywheel or flexplate and transfer its energy into the transmission.
The rear main seal also holds the engine oil and keeps it inside your engine where it can keep your main bearings lubricated.
Rear Main Seal Repair Cost
The average cost to repair a leaking rear main seal is between $800 and $1,200. In rare cases, some drivers have reported getting quotes as high as $2,500 on certain vehicles.
Is a Rear Main Seal Leak Serious?
Rapid Leak and Permanent Engine Damage
Driving with a rear main seal leak is dangerous due to the high possibility of a very rapid leak. A rapid leak will cause the engine oil level to drop very quickly to dangerous levels, which can lead to permanent engine damage.
The possibility of a rapid leak is very likely, as the rear main seal is in a location that receives a lot of oil and has the additional wear of the crankshaft spinning inside it.
If the seal tears or cracks, even slightly, the rotation of the crankshaft can cause a very rapid tearing of the seal, leading to a rapid leak.
A quick side note is that when a vehicle is parked on a slope, an oil leak is bound to worsen much more quickly. Therefore, if your driveway is built on a slope, park your car on the flat street in front of your house until the issue is resolved.
On vehicles with a manual transmission, the clutch disc can become soaked in oil if you let a leak persist for too long.
High Risk of Leak
Some seals and gaskets in your engine never cause major leaks due to their design or because they are not subjected to high oil pressure in the engine.
In contrast, the rear main seal is an engine component very prone to developing a leak. This is because it is subjected to high oil pressure since it is right next to the rear main bearing as well as the rotating crankshaft, which constantly wears against the inside of the seal.
No matter how often you change your oil, the rotating metal crankshaft will eventually wear the seal enough to cause a leak.
The rear main seal is located at the rear of the engine. Source: YouTube
Expensive Repair and Replacement
As mentioned earlier, inspecting and replacing the rear main seal requires disassembling a large part of your engine. Therefore, labor costs would be very high, and of course, if you’re not a professional DIYer, it would be a very complicated project.
The problem comes from the location of the rear main seal. It is located at the rear of the engine and seals the crankshaft where it exits the engine. The flywheel or flexplate of your vehicle is then bolted to the crankshaft flange, sandwiching your rear main seal between your engine and your transmission.
To replace the seal, either the engine or the transmission will need to be removed. Once one of them is removed, the oil pan must also come out, so this maintenance work is extremely labor-intensive.
Types of Rear Main Seal
The majority of older vehicle models use the rope or wick seal, with a small number using split seals. Meanwhile, newer models use the one-piece seal for improved performance.
Rope seals and split seals are much more universal and can work on almost any engine, while one-piece seals are less prone to leaking.
Rope or Wick Seal
Named for its resemblance to rope and lamp wicks, this seal is designed to withstand the impacts of intense crankshaft rotations and the friction caused by temperature fluctuations.
Therefore, a rope/wick seal can fail in two ways: shrinking in cold weather or expanding in hot weather. The seal is lubricated to prevent drying out with a small amount of oil, which also keeps it in place next to the crankshaft.
In modern cars, the new design of rope seals doesn’t have the resilience of the old version when it comes to preventing oil leaks.
According to many professionals and specialists, such a design change is due to stricter environmental regulations, which restricted the use of materials like asbestos.
Such regulations forced manufacturers to cut costs to reduce the production cost of the rear main seal. As a result, most modern rope/wick seals are vulnerable to contact with the crankshaft and engine RPM and therefore must match your engine’s RPM requirements.
To avoid bad rope/wick seal replacements, only buy from reputable parts suppliers, and it’s best to check reviews on Amazon before making a purchase.
Only buy from reputable parts suppliers to avoid bad replacement rope/wick seals. (Photo: Hemmings)
Neoprene or Split Seal
Made of rubber-like material, the split seal has a lip shape and is installed in one direction to prevent oil from passing through. Although effective for this purpose, neoprene seals are just as vulnerable to leaks as rope/wick seals.
One-Piece Seal
One-piece seals are the most difficult to maintain and don’t have the universality of rope seals and split seals. With its unique round design, the one-piece seal only works on specially manufactured crankshafts.
Therefore, you cannot install one-piece seals on older engines without replacing the crankshaft.
Symptoms of Rear Main Seal Leak
The problem can be difficult to identify because the parts in question are relatively unknown to most car owners. The hard-to-reach location of the rear main seal shows that this part of the vehicle was never really intended to be replaced during the car’s ownership period.
How to tell if the rear main seal is leaking? The main symptom of a rear main seal leak is when your car starts leaving black spots on your driveway or parking spot.
Another sign is aggressive oil loss: you find yourself having to top up oil more frequently, despite the same routes and driving conditions. At the start of a leak, the oil loss may not be fast enough for black spots to appear where the vehicle is parked.
While you might see an oil spot in your driveway overnight, the leak might not be fast enough to leave its mark on the supermarket parking lot during your grocery run. Therefore, you may need to perform tests to determine if you are losing oil or not.
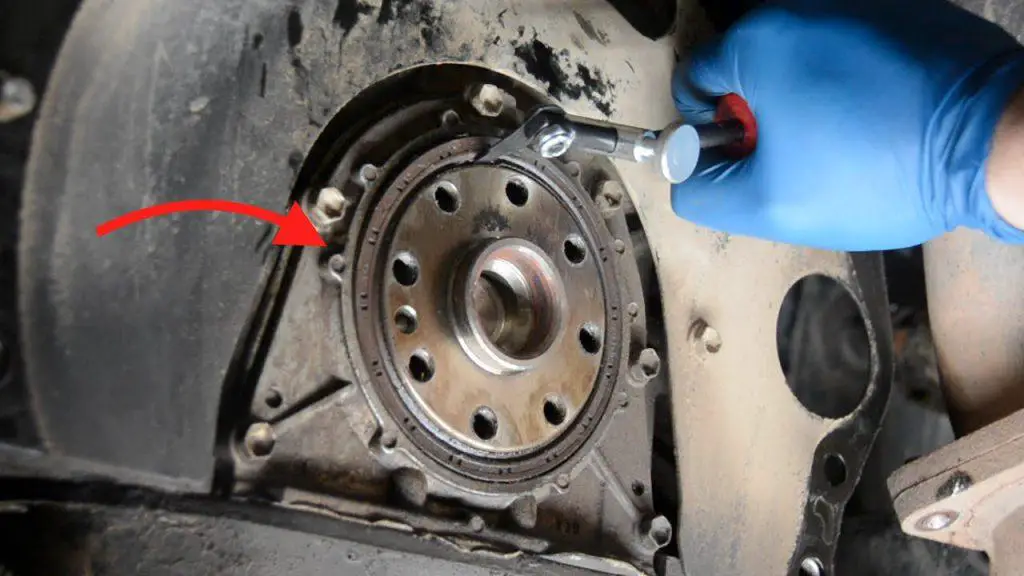
One of the symptoms of a rear main seal leak is the presence of oil spots. Source: Shutterstock
Rear Main Seal Leak Causes
There are many causes of rear main seal leak. Any of the following conditions can cause your rear main seal to leak because they can deform or deteriorate the seal.
Worn Main Bearings
If your vehicle has worn main bearings, the crankshaft is able to move excessively inside the bearings, which will stretch and displace the rear main seal while the engine is running. This will allow oil to flow past the seal.
It is difficult to know if your engine has worn main bearings without removing many components.
If this is the cause, you are likely looking at a full engine rebuild, which would involve removing the engine and replacing many other components in addition to the rear main seal itself.
Clogged or Blocked PCV System
Most rear main seals have a lip that rests on the shaft. Pressure inside the crankcase will push the lip against the shaft. Too much pressure will eventually cause the lip to swell and allow oil to pass.
So when will there be too much pressure? If the Positive Crankcase Ventilation (PCV) system is blocked, it will increase pressures inside the crankshaft and push the seal out.
Otherwise, if the engine is supercharged or turbocharged, excessive blow-by from worn or damaged piston rings can lead to increased crankcase pressure, which can also damage the rear main seal, causing a leak.
Engine Oil Condition
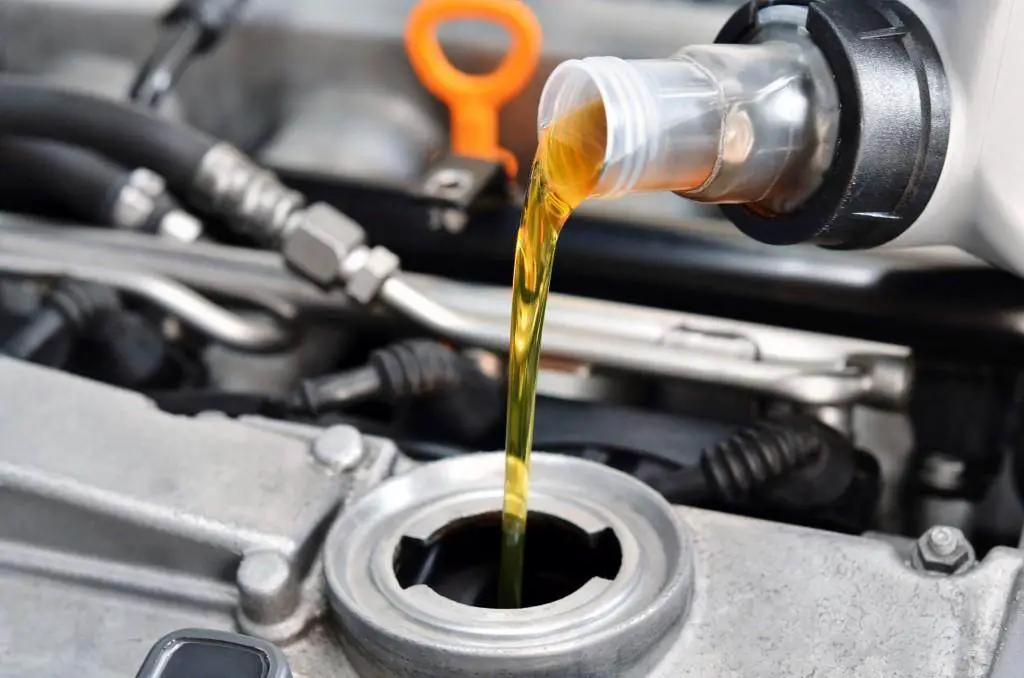
Another frequent cause could be a low oil level or using the wrong type of oil. Most oils contain chemicals in their additives that condition the engine seals. If the oil isn’t changed regularly, the seal will deteriorate.
The sealing conditions deplete over time, just like the additives present in the oil. The lip that rests on the crankshaft will become stiff and will no longer be able to seal against the crankshaft.
Regular oil changes can prevent rear main seal leaks. Credit: Ensup | Getty Images/iStockphoto
Crankshaft Condition
Rear main seals have a lip that rests directly on the crankshaft. Therefore, the condition of the surfaces the rear main seal rests on
Is It Safe to Drive with the Transmission Temperature Warning Light On
Do you know your car’s mechanism well? Not much, right? Well, don’t feel embarrassed, because most people are like you! Now, you need to understand a few basic functions to drive safely. And the transmission temperature light is one of them!
So, what does the transmission temperature light mean? It means your transmission is overheating. Is it dangerous? Yes. Heat, more than anything else, is the cause of transmission failure.
Is it safe to drive when the transmission temperature light is on?
No! Why? Let’s find out:
The normal transmission temperature is between 175 and 225 degrees Celsius. It is in very good health when operating at a temperature equal to or below 175°C.
Remember that for every 20-degree increase beyond 225 degrees, you will halve the normal lifespan of your transmission. Similarly, every 20-degree drop in temperature is likely to double its lifespan.
When the light is on, it indicates that the fluid temperature has reached at least 250 degrees. At this point, the fluid begins to break down, thus reducing the transmission’s lifespan.
Do not drive when the transmission is overheating. (Photo: The Economist)
If you continue driving, the temperature will keep rising. It would be a disastrous situation if the temperature exceeded 270 degrees. The fluid will completely break down at this point, and the transmission will stop working.
Thus, continuing to drive with the transmission temperature light on can lead to an accident due to car breakdown and expensive repair work.
Why is the transmission temperature light on?
Transmission fluid shortage
Lack of transmission fluid is one of the reasons your transmission temperature light comes on. To fix this issue, you can add the appropriate fluid and determine where the leaks are.
High transmission temperatures
If the transmission overheats, most cars will also instantly display a transmission warning light.
In this case, it is essential to check the overall quantity and quality of your vehicle’s transmission fluid and replace it according to the manufacturer’s maintenance schedule.
Recorded diagnostic codes
In many circumstances, if a transmission-specific failure code is recorded, the vehicle’s transmission light will come on. Internal transmission failures or basic electrical issues in the valve body can all cause such codes.
Your car needs maintenance
Under certain conditions, a transmission light coming on in a car may not be symptomatic of a problem at all. Instead, some cars use a similar light to warn that routine transmission-specific maintenance is needed.
What to do when the transmission temperature warning light is on?
You should stop driving. Immediately. Continuing to drive under these conditions is extremely dangerous. You need to park somewhere and wait a while for the transmission to cool down.
Then start again but with caution. If the light comes on again, stop the car, let the transmission fluid warm up, and then take the car to a repair shop. If driving seems dangerous, call a towing company to take the vehicle to the mechanic.
How to know if the transmission is overheating?
Watch for the transmission temperature light to come on! But there are several other ways to tell. A hot transmission gives off a kind of sweet smell. Sometimes the light may not come on, but if you smell something out of the ordinary, stop the car.
Start the journey again after some time when you think the fluid temperature has returned to normal.
Change the fluid if the level is low or if it is dirty. (Photo: Bryant Motors)
Another way to discover the problem is to check the transmission fluid. Unlike engine oil, it does not burn while driving the car.
So, a low fluid level is a sign of some issues. If you find it black or darker than the normal color, it’s a surefire way to know that the transmission is overheating.
FAQ on the transmission temperature light being on
Is it possible to drive with a heated transmission?
Transmission overheating is a big problem. If it happens, you need to have your transmission system checked as soon as possible. Driving with an overheated transmission can be quite dangerous, and it might even prevent you from driving.
How can I reduce my transmission temperature?
From time to time, shift to neutral.
Allowing your car to idle in neutral in heavy traffic, on railway tracks, or stopped at a red light reduces the pressure on the transmission. This is your chance to reduce the intensity of your transmission by cooling it down.
What is an acceptable transmission temperature?
Temperatures ranging from 160 to 220 degrees.
Keep your transmission temperature between 160 and 220 degrees to ensure its safety. Some transmissions can maintain a normal and safe transmission temperature at slightly higher temperatures than this range.
Is coolant used to keep the transmission cool?
During typical driving, the transmission, just like the engine, heats up. The fluid is sent through a cooler located in the radiator to cool the transmission.
When the engine cooling system is working properly, the engine coolant flows through the radiator and over the transmission cooler.
How long can I drive with the temperature gauge light on?
Generally, this light tells you at least a hint of a major problem. Keep an eye on the light for about a kilometer, and if it doesn’t go off by then, stop and turn off the engine.
Final words
It is essential to detect transmission problems early to avoid larger malfunctions and expensive repair work later. So you must pay attention to the transmission temperature light and other symptoms to keep your car operational.
Black transmission fluid: mistakes you can avoid
A car’s transmission system functions properly when the moving parts inside the transmission are well-lubricated and not damaged by the intense heat generated during their operation. The fluid in the transmission plays a crucial role in ensuring the vehicle’s gears shift correctly. Black transmission fluid is a red flag indicating several issues within the system.
What is the purpose of transmission fluid?
Transmission fluid is an important catalyst that helps the engine parts inside the gearbox to cool down and operate smoothly and stably. The role of transmission fluid in manual transmission vehicles: For manual transmission vehicles, the transmission fluid acts as a lubricant, coolant, and cleaner for the internal friction parts.
In an automatic car, automatic transmission fluid (ATF) serves both as a gear lubricant and a hydraulic fluid. By reducing friction between the various components of the system, the fluid undergoes extreme heat cycles, which can change its color. As the car’s mileage and age increase, it may turn black due to burning or the accumulation of debris.
Black fluid is a warning sign. (Photo: popular)
The transmission oil in new cars is usually red, sometimes pink or light brown. However, the color of the transmission fluid changes over time due to the hard operation that occurs when we drive the car. When you check that the fluid has turned black, you should immediately change the oil with a new one to avoid damaging the transmission system.
Black transmission fluid means that its lubricating effect has been completely disabled due to oxidation. This can lead to acceleration problems, gear shifting issues, and in the worst case, transmission failure. Regular inspection and prompt cleaning can avoid such consequences.
Black Transmission Fluid: Measures to Take
When the fluid looks like tar or has a distinct burnt smell, you can take some measures:
Clean the entire system
The general recommendation is to drop the pan and properly drain the entire transmission. You should replace the filter and refill with the correct fluid recommended in the owner’s manual. Using the wrong type, incompatible with the vehicle, can lead to disaster for the entire transmission system.
Do not flush
Do not flush black transmission fluid. This method can cause too much damage by pushing dirt and other large particles or debris into the small spaces and crevices of the transmission system. There is also the risk of dislodging tiny but important objects or delicate transmission parts.
Never fill a dirty transmission system
Are you considering putting fluid into a dirty automated transmission (over 150,000 miles) with black fluid? Not a good idea! Several transmission parts may have already been destroyed when the fluid smells burnt, appears too thick, or has a visible layer of deposits. Replacing only the fluid can lead to complete transmission failure.
Perform a regular dipstick check. (Photo: driveenvy)
The new fluid can further degrade the system by transferring sludge into small crevices. The best thing to do in such cases would be to change the entire transmission system. It costs a lot of money, but at least the risk of a transmission failure in the middle of a highway will not be present.
Transmission Fluid Colors: What Do They Mean?
One fact you may not know is that over time, the color of the transmission fluid will change. This can be due to the vehicle operating in harsh weather conditions or the friction between the parts of the transmission system. There are several cases where a change in transmission oil color can indicate that our vehicle is experiencing problems:
Light Brown
Over time, the transmission fluid will change from light red to light brown. In this case, you can still be reassured and you do not need to change the fluid because the transmission fluid still has a good lubricating effect.
Dark Brown
From this stage, the transmission fluid is contaminated. At this point, the fluid no longer effectively lubricates the transmission system. If you still try to use this oil, it will easily cause damage.
Black Fluid
Black transmission oil means that its lubricating effect has been completely neutralized due to oxidation. In this case, you should immediately change to new fluid to avoid damaging the transmission system.
Light Pink
It may seem unbelievable, but if the oil turns light pink, there is a high chance that the transmission system contains mixed water, which could easily damage the gears.
In a nutshell, if you see black transmission fluid, replace it with the correct one, avoid flushing, and change all transmission parts if there is a burnt smell. Use a dipstick to check the fluid’s condition at regular intervals.
Detection of 7 Common Manual Transmission Problems
If you’re used to driving a manual transmission, you should be aware of these common manual transmission problems. Unless you have sufficient knowledge about manual transmission issues, it will be more difficult for you to detect any problem. Overall, manual transmission problems are quite straightforward. So, let’s take a look!
The 7 Most Common Manual Transmission Problems
Manual Transmission Fluid Leak
Oil leaks are one of the most common manual transmission problems
You’ve probably all heard of this issue before. Often, the fluid leaks from the unit and ends up at the rear. You can recognize this problem simply by looking for the oil leak inside the car’s system.
To find the cause, drivers can simply follow the oil leak trail forward to detect the source. This helps you instantly resolve one of the manual transmission problems.
Manual Gearbox Problems
The gearbox is another automotive part that requires special attention.
In a manual transmission, the running engine keeps it busy with the gear. Sometimes it can pop out quickly and hurt your joints.
In some other situations, the transmission can drop out quickly, especially during deceleration or when going uphill. This is one of those manual gearbox problems that requires urgent attention.
The Manual Transmission Won’t Engage
The engagement issue is always a tricky problem
This one is a bit tricky. If you find that the manual transmission won’t engage while the engine is running, there might be a clutch problem. This can happen quite often with older cars.
You can be sure if you see the transmission engage when the engine is not running. It’s another problem in the series of manual transmission problems. Whenever you spot this issue on your dear vehicle, we recommend entrusting it to a professional auto mechanic for the best outcome.
The Transmission Grinds When Engaging a Gear
A new clutch might be the cause of this problem
This is one of the most common manual transmission problems, and it usually happens when you install a new clutch. Let’s get into the details to see what’s happening inside your manual transmission at this point.
It might be that the synchronizer rings fail to engage the gears by slowing them down to the necessary level. So, you feel a grind when you try to shift the gear lever. The synchronizer rings act as a kind of brake on the gears; Thus, when they are worn out, they don’t slow down, and consequently, the gear doesn’t engage.
Using the wrong type of fluid can also be the cause of this kind of manual transmission problems. To ensure a healthy and normal lifespan for your transmission, you should choose a good quality engine oil.
If the clutch refuses to disengage the transmission, grinding will occur. A poor-quality clutch can also cause the same problem.
Noises – Ticking, Knocking, Clicking
A strange noise is always a bad sign
Different types of sounds indicate various problems. We will help you list the noises related to manual transmission problems. For example, a rattling noise most likely means a broken tooth, while a knocking noise means a damaged or broken gear. Last but not least, a ticking or bearing noise means a bad gear.
To avoid further internal damage, you should consult a mechanic.
Gear Won’t Engage in Cold Weather
The synchronizers in the manual transmission help match the rotational speed of the gears, making gear shifts smoother. Cold weather can make the synchronizers less effective, leading to gear engagement issues. In this case, you might need to wait for the transmission to warm up slightly before attempting to shift gears.
Furthermore, cold weather can affect the clutch system, making it stiff or less responsive. Ensure the clutch fluid is at the proper level and consider bleeding the clutch system to remove any air bubbles that could affect its operation.
Temperature affects your vehicle a lot
Burning Smell
Any burning smell from your car is a cause for concern, and one of them is overheating transmission fluid. Transmission fluid plays a key role in keeping parts lubricated and cooled so they don’t wear out or get damaged.
The system overheats too much, leading to increased friction and corrosive activity as well as the buildup of additional sludge and debris if the fluid degrades. If this problem occurs too often, the transmission will eventually become damaged enough to fail completely, leading to a costly replacement. The most common causes are low fluid levels or using an incorrect brand/type of fluid.
If the outside temperature is near ZERO, the gear may not engage until the temperature reaches the normal line. This happens when your engine lacks lubricant, or there is a problem with your hydraulic clutch. You can try a lighter oil to solve the problem.