How to align the flywheels? The right way to do it
How to align steering wheels? The proper way to do it. It’s nice to have good control over your car, but sometimes it becomes difficult to keep the wheels aligned. If even after turning the steering wheel in the correct direction, your car drives in the wrong direction, consider straightening the steering wheel.
And, if the question “How to straighten the steering wheel” bothers you; the following procedure would certainly help you a lot.
How to Straighten the Steering Wheel
The stability of the steering wheel is an essential element in vehicles when it comes to improving driving comfort. Shaky steering wheels ruin the driving experience for any car enthusiast. But don’t worry, it’s not a problem you can’t solve.
This misalignment of the steering wheel can be easily corrected by following some guidelines and instructions.
Initialization Process and Loosening the Nuts
The first step towards straightening the steering wheel is to drive your car in a straight line without any deviation. Then, park it in a spacious place and lift it on ground jacks to easily reach the tie rods.
Next is loosening the tie rod nuts. A large wrench should be your tool when it comes to loosening the tie rod nuts. Let the wrench hook onto the nut and turn it halfway so it loosens a bit.
One thing to remember here is that you don’t need to completely remove the nut; it’s just the loosening that needs to be done.
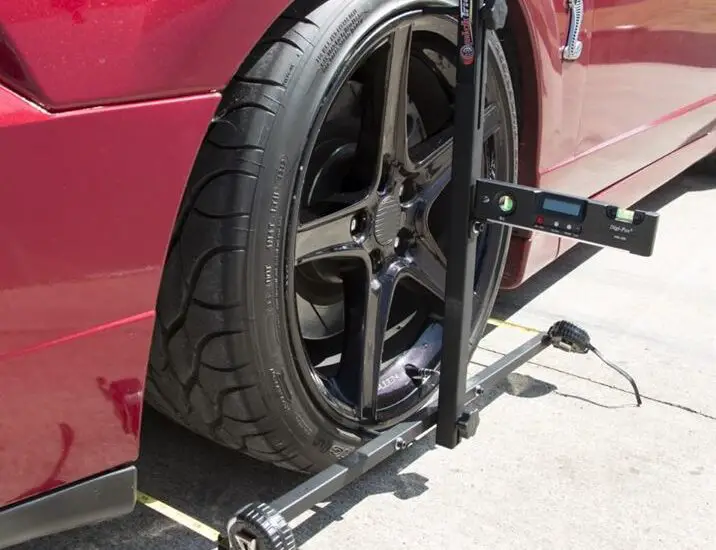
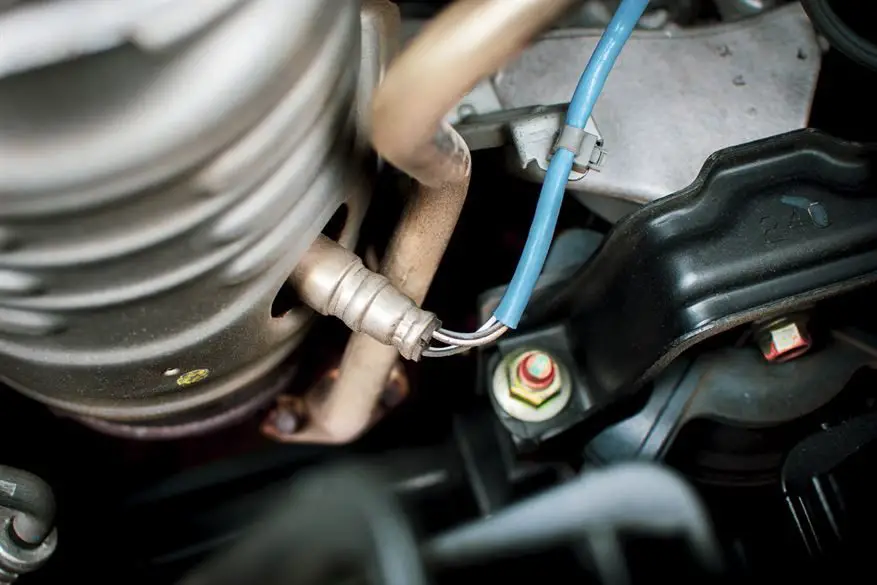
Be careful when aligning and adjusting the steering wheel. Source: Carsworld
Working on the Steering Wheel
Once the inner nuts of the tie rod are loosened, get into your car. Grab the steering wheel and try to straighten it by turning it several times.
Make sure the alignment is perfect, and if you are naive and have no idea about alignment, it is advisable to seek the help of a professional.
This will ensure the safety and efficiency of the work to be done. You can also look for maintenance tips that can help you understand the steering wheel alignment mechanism.
Aligning and Adjusting a String in Parallel
This step answers “How to straighten the steering wheel.” First, find an unbreakable string as long as your car.
Start from one end of the string and wrap it around any sturdy object. Make sure the object is high enough to match the height of the wheel center.
Repeat the process with the other end, ensuring the string passes through the center of the wheels. To adjust the string, use a measuring tape by placing it on the wheel rim at the rear of the car.
Check the distance between the wheel rim and the string. Repeat the process at the other end of the same wheel. If the measurements turn out equal, the alignment is done.
But if not, adjust the distance between the strings to ensure an equal measurement or readjust the tie rods. Repeat the process on the other wheel.
Follow a few steps to straighten the steering wheel. Source: YouTube
Tighten the Nuts and You’re Ready to Go
The final step is to tighten the loosened tie rod nuts. You can do this using the wrench and ensuring the wheels do not move.
Repeat the process on the other wheel. Now, you are ready to go. To ensure everything has been perfectly achieved, take a test drive.
If the driving experience improves, you have done a good job. And if the problem continues to affect the driving experience, you must repeat the mentioned steps.
Whenever “How to straighten the steering wheel” goes around your head, following this simple procedure will improve your driving experience.
However, keep in mind that it is never too late to consult the right professional if you are stuck in between.
FAQ on Straightening Steering Wheels
Can I drive with a crooked steering wheel?
Although it is possible to drive with a crooked steering wheel, it is not advisable as it may indicate alignment or suspension issues.
Continuing to drive this way can lead to uneven tire wear and affect the vehicle’s handling. It is best to address the issue promptly.
Can I fix a crooked steering wheel myself?
Minor steering wheel adjustments can be made by carefully centering it when the vehicle is stationary.
However, for more complex issues or if the problem persists, it is recommended to consult a professional mechanic for proper diagnosis and adjustment.
What causes steering wheel misalignment after hitting a pothole or curb?
Hitting a pothole or curb with force can disrupt the vehicle’s alignment, causing steering wheel misalignment. This impact can affect wheel alignment angles and steering components.
How can I tell if my steering wheel alignment is bad?
Signs of steering wheel misalignment include a crooked steering wheel when driving straight, the vehicle pulling to one side, uneven tire wear, or the car feeling like it’s pulling in one direction. If you notice these issues, it’s time to check and adjust the alignment.
Can wheel alignment be done at home?
Although minor adjustments can be made to center the steering wheel, it is better to perform professional wheel alignment at a specialized automotive service center.
This requires precision equipment and expertise to ensure correct adjustments of camber, caster, and toe.
How often should I have my wheel alignment checked?
It is recommended to have wheel alignment checked annually or whenever you replace tires, hit a significant obstacle, or experience handling issues. Regular checks can help prevent uneven tire wear and maintain vehicle stability.
What does a professional wheel alignment service involve?
A professional wheel alignment service involves measuring and adjusting the wheel angles, including camber, caster, and toe, according to the manufacturer’s specifications.
It ensures that all four wheels are properly aligned for optimal handling and tire wear.
Can a DIY wheel alignment kit be effective?
DIY wheel alignment kits are available, but they may not offer the same level of precision as professional equipment. For accurate alignment and to avoid potential safety issues, it is advisable to have alignments performed by professionals.
Conclusion
Straightening a steering wheel is a simple but important task to maintain safe and comfortable driving.
Whether your steering wheel is misaligned due to a recent repair, tire rotation, or general wear, taking the time to correct it ensures your vehicle drives straight and you have full control at the wheel.
Symptoms of a Faulty Diesel Pressure Regulator: How to Recognize and Treat Them Effectively?
Symptoms of a Faulty Diesel Pressure Regulator, When your diesel pressure regulator starts to show problems, it can significantly impact your engine’s performance. But how can you recognize the symptoms of a faulty pressure regulator and address them effectively? In this article, we will review the most common signs of a faulty diesel pressure regulator and provide you with practical tips for remedies.
One of the most obvious signs of a faulty pressure regulator is a loss of engine power. If your vehicle struggles to accelerate or frequently stalls, it may be due to a malfunctioning pressure regulator. Additionally, you might notice excessive fuel consumption and difficulties starting the engine. These issues can also indicate a faulty pressure regulator.
It is important to quickly diagnose diesel pressure regulator problems to avoid further damage to your engine. In this article, we will guide you on how to recognize the signs of a faulty pressure regulator and provide effective solutions to resolve these issues.
Importance of a Properly Functioning Diesel Pressure Regulator
A diesel pressure regulator plays a crucial role in the proper functioning of your engine. It is responsible for maintaining constant fuel pressure in the injection system, which allows for efficient combustion. When the pressure regulator is faulty, the amount of fuel injected may be incorrect, leading to a loss of engine power and other performance issues.
Common Symptoms of a Faulty Diesel Pressure Regulator
Identifying Irregular Idling and Stalling
Another common symptom of a faulty diesel pressure regulator is irregular idling or frequent stalling. If your engine runs unevenly or shuts off abruptly when you are stopped, it may be a sign of a faulty pressure regulator. These issues can be particularly troublesome, as they can make driving difficult and unpredictable.
Understanding Black Smoke Emissions
Black smoke emissions are another common indicator of a faulty diesel pressure regulator. When the pressure regulator is not working properly, an excessive amount of fuel may be injected into the engine, resulting in incomplete combustion. This leads to black smoke emissions from your vehicle’s exhaust. Not only can this be harmful to the environment, but it can also indicate a serious problem with your pressure regulator.
Addressing Engine Misfires
Engine misfires are another common symptom of a faulty diesel pressure regulator. If you experience unusual shaking or vibrations while driving, it may be due to a malfunctioning pressure regulator. These misfires can be intermittent or constant, but they all require immediate attention to avoid further damage to your engine.
Dealing with a Faulty Diesel Pressure Regulator
When you experience symptoms of a faulty diesel pressure regulator, it is essential to take steps to address the problem. Here are some steps you can follow to effectively deal with a faulty pressure regulator:
1. Seek professional help for diagnosis and repair: Diesel pressure regulators are complex components, and it can be difficult to accurately diagnose problems. Therefore, it is recommended to consult a qualified professional for diagnosis and repair.
2. Replace the faulty pressure regulator: If your pressure regulator is faulty, it will need to be replaced. Make sure to purchase a quality pressure regulator from a reliable supplier to ensure optimal performance.
3. Perform regular maintenance on the fuel system: To prevent pressure regulator issues in the future, it is essential to perform regular maintenance on the fuel system. This includes regularly replacing fuel filters and using quality fuel.
Seeking Professional Help for Diagnosis and Repair
It is essential to quickly diagnose diesel pressure regulator problems to avoid further damage to your engine. If you experience any of the following symptoms, it is recommended to consult a professional for accurate diagnosis and appropriate repairs.
Conclusion
In conclusion, it is essential to recognize the symptoms of a faulty diesel pressure regulator so that you can take corrective measures quickly. If you experience a loss of engine power, excessive fuel consumption, or difficulties starting the engine, it is recommended to consult a professional for accurate diagnosis and appropriate repairs. Do not let a faulty pressure regulator cause further damage to your engine. Take action now to maintain your vehicle’s optimal performance.
Common Transmission Problems You Cannot Ignore
Common transmission problems you cannot ignore. In every vehicle, the car transmission is one of those components that directly affects performance. By following proper maintenance procedures, you can keep the transmission running smoothly. This way, you won’t have to worry about costly maintenance and replacements. However, having some knowledge of common transmission problem signs will help you detect any issues with your transmission in time. In this article, we will take a closer look at the most common transmission problems. But before that, it is suggested to understand what a transmission is.
What is a transmission in cars?
A transmission, or as some car owners prefer to call it, a gearbox. The car transmission is the part of the car that transfers the vehicle’s power so the car can use it. There are two types of transmissions usually seen in vehicles:
Manual Transmission
In short, a manual transmission, or a manual gearbox, is like a bicycle’s gear lever, but much more powerful and of course doesn’t have a chain inside. Car owners disconnect the transmission and the engine by pressing the clutch. To shift the vehicle to a new gear, drivers adjust the gear lever to the new gear, then release the clutch to continue driving.
Automobiles need gears to prevent the engine from destroying itself. The transmission and engine are temporarily separated during gear changes. Instead of using your own hands, drivers can use the clutch pedal to control the spring plates. There are two plates that play an important role in the manual transmission for shifting gears:
One plate is the pressure plate. This automotive part is connected to the flywheel. The other is the driven plate located on the input shaft connected to the gearbox. By pressing the clutch pedal, the driver releases the pressure on the spring clamp and separates the engine from the gearbox.
Automatic Transmission
An automatic transmission, also known as an automatic gear lever, is the improved version of the manual gearbox. Drivers do not need to shift gears manually using a clutch since the automatic transmission will do everything. Normally, a low-speed car will mostly start to struggle as it is pushed to higher speeds. However, with an automatic transmission and a torque converter, the car can detect speed changes. More precisely, when the driver accelerates or slows down, the car automatically shifts to an appropriate gear.
Signs of Transmission Problems
Recognizing that your vehicle has transmission failures, car owners must repair it as soon as possible before it becomes much worse and much more expensive. So, how can we know when our car has automatic transmission problems? Here are our symptoms for drivers to spot transmission problems:
Delays in shifting gears
The car shakes while driving
Transmission grinding
Fluid leak
Burning smell under the hood
Transmission fluid is thick or foul-smelling
Dull and whining noise from the vehicle
Unable to engage a gear on the manual transmission gear lever
Remember: the car transmission is crucial and any type of transmission problem can make your car unable to drive. The typical function of your car’s transmission is to direct engine power to the driveshaft that effectively turns the wheels.
Now that we recognize the symptoms of automatic transmission problems, the list below presents some of the most common transmission problems.
Automatic Transmission Problems
1. Grinding or Whining Noises
Whenever you hear noises, don’t panic
If everything is working normally, the automatic transmission operates smoothly when shifting gears. More precisely, there will be no sensation of slipping, shaking, or grinding when moving from one gear to another. When you hear a strange brushing noise, even with a gear in good condition, the problem will surely lie in the torque converter.
Damaged or worn needle bearings are one of the most common automatic transmission problems. It is usually just a minor issue, but since it is connected to a torque converter, you will know immediately.
Even if it seems like a minor problem, it can cause huge damage to the transmission if drivers do not take care of their dear vehicle.
2. Lack of Response
If there are faulty responses or no response from your car when you engage the gear, this problem surely comes from the transmission. Of course, one of the most important problems regarding car transmission must be the transmission itself. However, this problem could be complicated. It could be as simple as low transmission fluid level, or perhaps something more serious.
The cause of transmission failure is mostly the lack of proper care. Especially if you usually drive cars on difficult terrain like towing and in hilly areas, it is recommended to take care of the transmission and engine, as well as change the filters and fluid at the recommended time and mileage.
For this reason, if your car is unresponsive, entrust it to a professional service to avoid losing even more pennies from your wallet!
3. Burning Smell
Another symptom in the list of common transmission problems is a burning smell. The smell of something burning is a bad warning sign that you don’t want to happen in your car. Many factors can cause this burning smell, but the main factor is often the transmission fluid overheating. If you have to face this bad situation, you must calm down and have your car checked by a professional as soon as possible.
With a non-professional person, diagnosing some car transmission problems is not the best thing to do. Keep in mind that whenever you feel or hear strange things, don’t wait to see if the problem goes away. The most urgent thing to do is to take your car to a repair shop to avoid any further terrible damage. Solving your car’s transmission problems as quickly as possible not only saves you trouble, time, and money but also prevents you and others from accidents on the road.
4. Torque Converter Problems
Torque problems happen very often
In the list of common transmission problems, torque cannot be ignored.
Speaking of definition, a torque converter is a connection that transfers engine torque to the transmission and the vehicle’s drive wheels. Undoubtedly, it plays a crucial role in transmitting the fluid pump drive to operate the transmission.
However, torque transmission and the converter can cause different types of problems responsible for failures or damage in the transmission. Drivers often face problems related to damaged or worn needle bearings. Hot needle bearings often create easily audible noises while driving. At neutral, it is unlikely to make noise. But, as soon as you shift into drive gears, you can hear brushing or grinding noises.
Although most transmission problems include overlapping symptoms, car owners must carefully check all other parts of the car before blaming the torque converter.
5. Low Fluid Levels or Leaks
Oil leaks are one of the most common transmission problems
The most common car transmission problem is probably transmission fluid leaks or low fluid levels. Such a problem can occur if there is a leak in the transmission system. There are many reasons for this problem: a leak at the pan gasket, driveshaft or axle seal, or even a transmission cooling line. This will lead to burning or lack of fluid, overheating, and significant damage. In situations where the driveshaft or transmission is faulty, leaks can occur. You can fix the problem by replacing the transmission seals. In other cases, coolant also contaminates the transmission fluid. The common term for such a fault is cross-contamination.
Fluid leaks or low fluid levels usually result in slow shifting or gear slipping. Immediately change the fluid or completely flush and fill the transmission whenever you notice fluid contamination.
6. Flashing Check Engine Light
One of the most common transmission failures that we can easily notice is the flashing check engine light. Experienced drivers all recognize that the check engine light can say a lot about their car’s problems.
More precisely, the air conditioning, braking systems,… and many other car components can cause this light, including the transmission. So, if the check engine light is flashing, the transmission is the place to check.
7. Solenoid Problems
The solenoid is the cause of many common transmission problems
The solenoid is a major component of the vehicle that manages the up and down movements and gear changes while the car is running. Throughout the car transmission and the fluid flow is controlled by this car part.
However, electronic malfunctions or inadequate fluid levels can severely damage the solenoid. Drivers can spot the faulty solenoid through these symptoms:
Your car does not shift gears
Strange and changing patterns
Delay in shifting gears
Flared or slipping shifts
Unable to upshift or downshift.
When the solenoid is faulty, the result can be the same as in the case of a fluid leak or shortage: transmission problems, pressure issues, and faulty shifting. As long as there is no leak, but your transmission continues to slip, there is a problem with the solenoid. Furthermore, your engine power drops sharply. The good side of things, car owners can simply fix this problem by just replacing the solenoid.
8. Shudders
Shudders are one of the most common car transmission problems. More precisely, when the bands or clutches are faulty, the transmission starts to shudder. Many factors cause this problem: incorrect computer signals, faulty engine operation, dirty or low fluid, damaged or worn clutches…
With this problem, we recommend finding an automotive technician to help you solve this one.
9. No Shifting
In the list of common transmission problems, no gear shifting is included. For the car to be able to shift up and down normally, the transmission bands are designed to wrap around the internal parts of the transmission. Along with that, it also has solenoids, pistons, and fluid pumps that control and provide pressure. The combination of these components contributes to the proper functioning of the car.
However, if any of these components is faulty, car owners cannot shift gears at all. So, if your car fails to shift gears properly, the transmission may be the main factor.
10. Delays
This is a rather difficult way to detect common transmission problems, as drivers detect delays in gear shifts quite often.
However, if car owners notice a significant delay when shifting gears or between gear changes, they may know there is a problem with the car’s transmission.
Manual Transmission Problems
1. Clutch Pedal
A clutch that cannot disengage is a common transmission problem. When this happens, drivers will hear a grinding noise when shifting gears. In some cases, they cannot even move, which is dangerous while driving.
Most drivers are unaware of the underlying problem: there may be a leak or air inside the system. This reduces the force needed to release the pressure, which creates a dragging clutch.
Car owners can adjust the clutch if possible or turn to an auto mechanic if you want to ensure your car’s components are treated properly.
2. Grinding
Last but not least, you can observe that this symptom presents differently in automatic and manual transmission. If your car is a manual transmission vehicle when shifting gears, you feel or hear a grinding sensation, it may mean that your car’s clutch has just worn out and it’s time for you to replace it. However, it also means that one of your car’s transmission synchronizers is damaged and worn.
If you own an automatic transmission car, a harsh gear shift instead of a seamless shift could be caused by several factors. In the case of automatic transmissions, you should take your car to an auto shop for diagnosis.
These symptoms sometimes occur before or after your transmission starts slipping. These problems can occur when you haven’t replaced your fluid levels at the correct intervals, your engine is running poorly, or the clutches are worn.
How to Prevent Transmission Problems
Let’s be honest, when was the last time you checked your transmission? Most car owners do not maintain or regularly check their vehicle, especially their automobile’s transmission. That’s normal, but you will lose a huge amount of money for an auto maintenance workshop. Usually, as soon as car owners start noticing a problem with their vehicle, it’s time to find the problem and fix it immediately.
However, the best way to
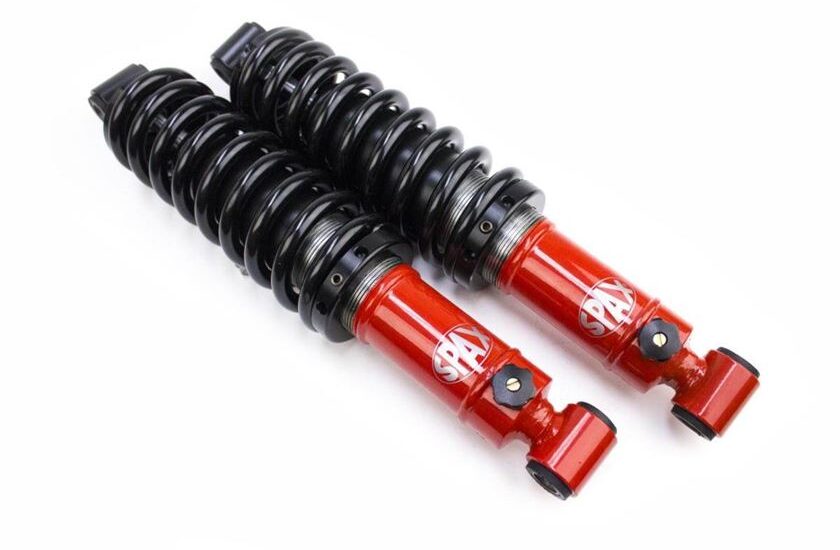
How Long Do Shock Absorbers Last
Many drivers are unaware of how essential shock absorbers and struts are to vehicle safety. Like all components of the powertrain, shock absorbers and struts can wear out over time. You need to know how long shock absorbers last and when to replace shock absorbers and struts to detect faulty ones and protect your car’s safety.
What are shock absorbers and struts?
Many people use the terms interchangeably, but shock absorbers and struts are two different parts of a car’s powertrain. They are part of the suspension system that dampens shocks and vibrations when the car is on the road.
The suspension can be of several types, but the most common consists of a combination of shock absorbers and struts. On modern vehicles, shock absorbers remain on the rear wheels while struts are found at the front. They mitigate the vehicle’s lateral movements caused by bumpy roads.
Struts are different components.
Shock absorber and strut assemblies work continuously, whether the car is moving or not. For this reason, they deteriorate more quickly. But how long do shock absorbers last and what is the lifespan of struts?
How long do shock absorbers last?
The lifespan of shock absorbers, as well as struts, is at least 4 to 5 years. However, this depends on road conditions. The lifespan can extend up to 10 years if you drive the car mainly on smooth pavement. Similarly, it can be less than 5 years if you primarily drive on uneven roads filled with cracks and potholes.
Some experts use mileage to track the condition of shock absorbers and struts. The general rule is that shock absorbers last at least 50,000 miles before needing replacement. But again, it’s difficult to predict an exact figure when it comes to the lifespan of struts or the lifespan of shock absorbers. They might not last as long if the roads the car was driven on were not smooth and flat.
So, how long do shock absorbers last? The regular numbers are either 5 years or 50,000 miles. But it can be more or less depending on the condition of the roads. The same rule applies to strut assemblies.
Symptoms of bad shock absorbers and struts
Once shock absorbers and struts start to wear out, they bottom out quite quickly. The seals around their joints begin to wear out, and the fluid or gas inside leaks.
Shock absorber failure is a huge safety issue. (Photo: Lexus)
Watch out for these signs as they warn you of shock absorber and strut failure:
Moisture on the top of these components or drips on the side in the case of a fluid-based unit.
In turn, it feels like the rear of the car is a bit “loose.” Furthermore, the rear seems more bouncy than usual.
Knocking noise coming from the rear suspension.
Driving on rough and uneven roads becomes tiresome due to excessive shaking and jolting.
The car does not sit level with the ground.
Excessive bouncing: If you notice your vehicle bouncing excessively after hitting bumps or dips in the road, it could be a sign of worn shock absorbers or struts. The bounce may be more pronounced, and the vehicle may take longer to regain stability.
Poor handling and stability: Worn shock absorbers and struts can lead to decreased vehicle stability, causing excessive swaying or leaning of the car during turns or maneuvers. You might experience a loss of control or a floating sensation while driving.
Fluid leaks: If you observe oil or fluid leaking from the outside of the shock absorbers or struts, it indicates damage or failure. The presence of fluid is a clear sign that the internal seals have deteriorated and the component needs to be replaced.
Regular maintenance and inspections by a qualified mechanic are essential to ensure the proper functioning of your shock absorbers. They can assess the condition of the shock absorbers and determine if replacement is necessary based on factors such as wear, leaks, or reduced performance. Remember that worn shock absorbers can negatively impact handling, braking, and the overall safety of your vehicle. Therefore, it is important to address any issues promptly.
How to Bleed ABS Brakes: With and Without Scan Tools
Do you know how to bleed ABS brakes? Bleeding is necessary when replacing an ABS modulator or other hydraulic components. It may not be necessary during a wheel-level hydraulic repair, but you must be careful not to let air into the system. You need to bleed brake systems when air bubbles enter the system during a repair or replacement task.
An anti-lock braking system (ABS) tolerates air bubbles and contaminated fluids less than a non-ABS system. An ABS hydraulic pump uses thousands of psi to push brake fluid through tiny valves. Contaminated fluid can easily damage the valves and pump, so you should never delay when the system needs to be bled. Although bleeding ABS brakes is difficult because the high pressure in the pump whips the air bubbles and brake fluid into a foamy substance.
The Need for ABS Brake System Bleeding
We already mentioned that the system needs to be bled due to air bubbles present in the system. But how do these air pockets form inside the system?
Well, whenever the brake lines are opened to repair or change certain parts such as wheel cylinders, calipers, or ABS units, air enters the system.
Any brake-related repair lets air into the system. (Photo source: istockphoto)
When there are air pockets inside the lines, the brake pedal feels spongy and the whole system feels unbalanced. For this reason, brake bleeding is mandatory for any brake work. Skipping it would lead to various braking problems after some time, as without bleeding, you not only let the air pockets remain but also push contaminants through the system.
Flushing the brake fluid every two to three years is part of the regular maintenance schedule. This will keep the system free of contaminated fluid and air bubbles.
How to Bleed ABS Brakes: A Technique for All Types of Units
Bleeding involves removing air pockets and replacing the old fluid. The old fluid must be changed because polluted fluid absorbs moisture from the air and lowers its boiling point. Such degradation affects braking performance.
Things You Will Need
A few 8-ounce cans of brake fluid
Plastic tube
Car jack and jack stands
A turkey baster
A hex key
Cloths or microfiber towels
Spacer
A small bottle
Gloves and safety glasses
The ABS Brake Bleeding Procedure
Before removing bolts and loosening nuts, you will need to prepare for bleeding the brakes. This includes lifting the vehicles and removing all four wheels. You can also work by keeping the wheels in place, but lifting the vehicle high enough to be able to use a wrench on the bleed valves.
Loosen the Bleed Valves
After preparing the vehicle, your first task is to loosen the bleed valve bolts. Use a hex key for the job. If the bolt threads seem rusty, spray some penetrating oil the day before. This will make the job easier as you can break the corrosion with a few light taps with a hammer.
Be careful when doing this as these small hollow bolts can break if you apply excessive force. If this happens, you will need to replace the wheel cylinders or brake calipers (depending on the vehicle model), meaning a loss of time and additional money.
Carefully loosen the bolts so they don’t break. Leave them closed without removing them completely. Let’s move on to the next step: how to bleed ABS brakes.
Remove the Old Fluid
Use the turkey baster to remove the old fluid and deposits from the master cylinder reservoir. Use a lint-free cloth to remove sludge from the reservoir. Be extremely careful when handling brake fluid as it is corrosive. An accidental spill on a painted surface will immediately dissolve the paint. You should also wear gloves so they don’t touch the skin.
Bleed the ABS System
Take a piece of plastic tube (any type of cheap tube will do) and push one end onto the brake bleed bolt. The other end will go into a small bottle filled with an inch or two of fresh brake fluid. This little trick will prevent air from re-entering the caliper or brake cylinder.
By releasing the line pressure, the pedal will move from its position. To prevent this, place a spacer under the pedal. Then, fill the master cylinder reservoir with new, clean fluid and close its opening by replacing the cap. Otherwise, every time you release the pedal, fluid will spurt out through the reservoir opening.
You will need an assistant during this bleeding process. At this point, ask them to press the brake pedal with a force you would apply to stop the vehicle at a traffic light. Tell them to maintain pressure while you turn the bleed bolt a quarter turn.
This would force some contaminated fluid out through the end of the tube going into the bottle. Close the bleeder when the flow stops completely. Then, ask the assistant to release pressure on the pedal.
This is how to bleed ABS brakes. However, you are not finished yet. Repeat this process until clean fluid comes out of the bleeder. After that, tighten the bleed bolt and move to the next wheel to repeat this same procedure.
Siphoning the old fluid with a turkey baster. (Photo source: sunliv)
Throughout this entire process, keep filling the reservoir with fresh fluid. Never let the fluid level drop below half of the reservoir. Otherwise, air could enter the master cylinder.
Furthermore, you must not skip any of the bleeding steps, as this could draw air into the caliper.
Bleeding with a Scan Tool
Many ABS modulators are not equipped with bleeders. In this case, use a scan tool to operate the pump and valves. How to bleed ABS brakes with a scan tool?
The scan tool is mainly needed to activate the pump and operate the valves to bleed those areas. For example, the Ford version of the EBC 310 requires an NGS scan tool for bleeding. This tool helps operate the dump valves and activate the pump so that it becomes possible to bleed those areas.
The telltale signs of engine oil that is too old: what should you know?
The telltale signs of old engine oil. Have you noticed your engine running less smoothly lately? You might need to change your engine oil. Engine oil is essential for the proper functioning of your vehicle, but it deteriorates over time. So, how can you tell if your oil is too old and it’s time to change it? In this article, we will outline the telltale signs of worn engine oil that you need to know. Unusual noises, increased fuel consumption, a pungent smell, or reduced power can be signs of outdated engine oil. It’s important to recognize these signs to avoid potential further damage to your engine. Additionally, you will discover in this article how to maintain your engine oil to extend your engine’s lifespan and avoid costly repairs. You will learn how to check the oil level, when to do an oil change, and how to choose the right oil for your vehicle. Don’t let worn engine oil slow you down. Keep reading to learn more about the telltale signs and the steps to take to keep your engine in good working condition.
The importance of engine oil in a vehicle
Engine oil plays a crucial role in the efficient operation and longevity of a vehicle’s engine. It acts as a lubricant, reducing friction between the moving parts of the engine and helping to dissipate the heat generated by the engine’s operation. Without adequate engine oil, engine components can wear out prematurely, leading to costly repairs or even complete engine failure.
What happens to engine oil over time?
Over time and with use, engine oil undergoes a natural degradation process. It breaks down due to heat and accumulated contaminants, which diminishes its lubrication and protection capabilities. Additionally, it can become diluted with unburned fuel and accumulate dirt particles, reducing its effectiveness and potentially damaging the engine.
Signs of used engine oil
Several signs indicate that engine oil has reached the end of its useful life. These signs include a dark or opaque color, a thinner consistency than normal, a burnt or rancid smell, as well as the presence of visible particles. These signs indicate that the oil is no longer effectively fulfilling its role of protection and lubrication.
How to check if engine oil is old?
To check if engine oil is worn out, it is recommended to consult the vehicle owner’s manual for the recommended oil change interval. Additionally, an oil quality test can be performed using a dipstick or by consulting an automotive maintenance professional.
The consequences of using used engine oil
Using used engine oil can have serious consequences on the vehicle’s engine. Insufficient lubrication can lead to engine overheating, premature wear of parts, and potentially engine failure. Moreover, used engine oil can lead to the accumulation of harmful deposits in the engine, reducing its efficiency and durability.
How often should engine oil be changed?
The frequency with which engine oil should be changed depends on several factors, including the type of oil used, driving conditions, and the vehicle manufacturer’s recommendations. Generally, it is recommended to change the engine oil every 5,000 to 10,000 kilometers or every 6 months to a year, whichever comes first.
The proper disposal of used engine oil
It is crucial to properly dispose of used engine oil to avoid harming the environment. Automotive recycling centers or auto repair shops often accept used oil for proper recycling. Used oil should never be poured down drains or into landfills, as this can contaminate water and damage the ecosystem.
Tips for keeping engine oil fresh
To keep engine oil fresh and extend its lifespan, it is recommended to regularly check the oil level and top it up if necessary. Additionally, it is important to follow the manufacturer’s recommendations for vehicle maintenance and use quality oil that meets the engine’s specifications.
The role of engine oil in vehicle performance
Quality engine oil is essential to ensure optimal performance of a vehicle’s engine. By providing adequate lubrication, it reduces friction between moving parts, allowing for smoother and more efficient engine operation. Quality engine oil can also help improve fuel consumption and reduce polluting emissions.
Conclusion
In conclusion, engine oil plays a vital role in the operation and durability of a vehicle’s engine. It is essential to regularly monitor the quality and level of the oil, as well as to adhere to the recommended oil change intervals to keep the engine in good working condition. By taking care of the engine oil, you can extend the engine’s lifespan and ensure optimal vehicle performance in the long term.
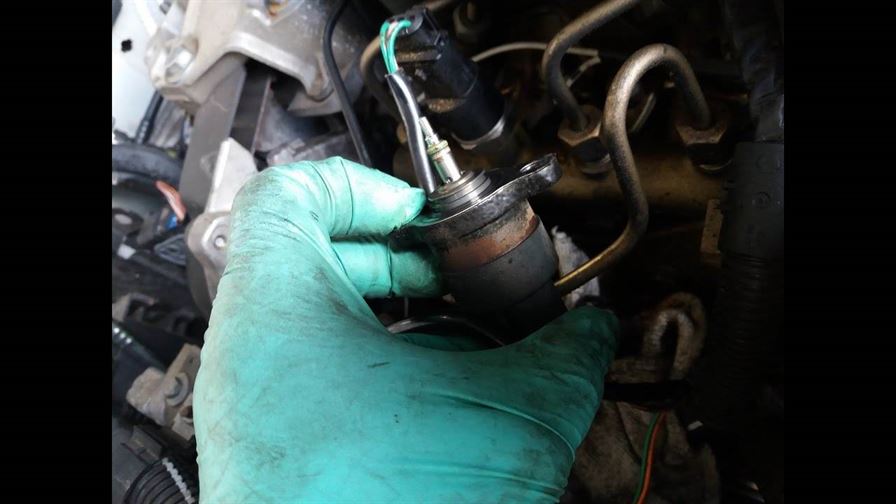
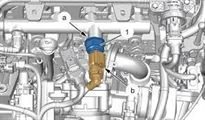
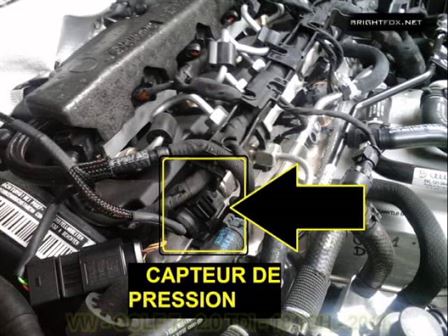
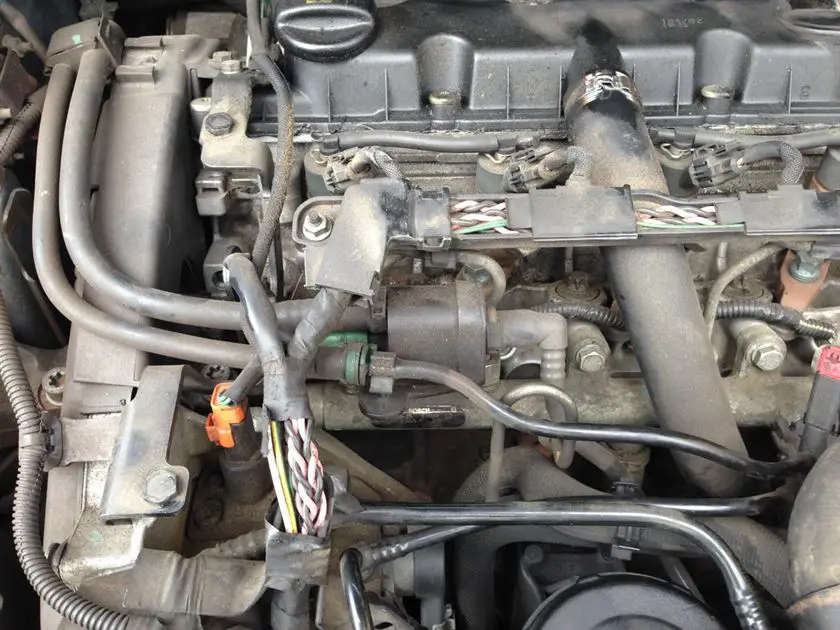
Common Rail Pressure Sensor Problem 2.0 HDi: Complete Guide to Solve the Issue
Explanation of Code P2137: “Throttle/Pedal Position Sensor/Switch ‘D’/’E’ Voltage Correlation”
Severity
Level: 🔴 High (risk of complete loss of throttle control).
Urgency:
Engine may stall while driving (immediate danger).
Limp mode activated (reduced power).
Common Symptoms
🚨 Check Engine Light on (MIL) with code P2137.
🛑 Stuck throttle (engine RPM frozen).
🐌 Sudden loss of power (even at cruising speed).
🔄 Unstable idle or stalling at stop.
Common symptoms of a faulty rail pressure sensor
A faulty rail pressure sensor can cause various symptoms, including engine misfires, loss of power, starting difficulties, jerking during acceleration, and even sudden engine shutdowns. These signs often indicate a disruption in the fuel injection system, requiring immediate attention.
Diagnostic methods to identify the problem
To diagnose a problem with the rail pressure sensor, several methods can be used. This includes using an OBD scanner to read fault codes, checking fuel pressure with a pressure gauge, as well as a visual inspection of the sensor itself and its electrical connections.
Step-by-step guide for replacing the rail pressure sensor
Replacing the rail pressure sensor can be done by following a few simple steps. First, it is essential to locate the sensor on the engine, then disconnect the battery for safety reasons. Next, simply remove the old sensor, replace it with the new one, and reconnect all electrical connections.
Troubleshooting tips for related issues
In case of related issues, such as fuel leaks or pressure regulator malfunctions, it is important to check the entire fuel injection system to ensure no other component is faulty. Additionally, regular system cleaning can help prevent future problems.
Preventive measures to avoid future rail pressure sensor problems
To avoid future problems related to the rail pressure sensor, it is recommended to follow regular vehicle maintenance, including replacing the fuel filter according to the manufacturer’s recommendations and using quality fuel. Additionally, careful and attentive driving can help prevent premature wear of fuel injection system components.
Main Causes
Wiring problems:
Corroded/deformed throttle body connector (“pigtail”).
Wires shorted to ground or bare wires.
Electronic throttle body failure:
Seized gears (deformed cover).
Failed throttle actuator motor.
Faulty accelerator pedal position sensor:
Incorrect or intermittent signal.
PCM/ECM error:
Reprogramming needed (e.g., after throttle body replacement).
Diagnostic Procedure (Detailed Steps)
Step 1: Check Technical Service Bulletins (TSB)
Example: TSB NTB14-058 for Nissan (stalling issues related to code P2137).
Step 2: Inspect the “Pigtail” Connector
Location: On the throttle body (common models: Nissan Altima, Renault Mégane IV).
Action:
Disconnect and inspect the female terminals (corrosion, bent pins).
Clean with CRC contact cleaner spray and apply dielectric grease.
Step 3: Test the Accelerator Pedal Position Sensor
Multimeter:
Measure voltage on the signal wire (0.5V to 4.5V progressive).
If voltage jumps or is absent → Replace the sensor.
Step 4: Check the Throttle Body
Remove the cover: Check plastic/metal gears for wear or binding.
Throttle actuator motor test:
Direct 12V power supply → Throttle plate should open/close.
If no movement → Throttle body is faulty.
Solutions & Costs
Problem
Solution
Average Cost
Faulty throttle body
Replacement (new or used)
€200 – €800
Failed pedal sensor
Replacement
€80 – €150
Wiring repair
Replace the “pigtail” connector
€30 – €100
PCM reprogramming
At dealership
€100 – €300
Mistakes to Avoid
❌ Forcing the gears: Risk of breaking plastic teeth.
❌ Forgetting the relearn procedure: Necessary after replacement (e.g., Nissan = 5 pedal presses).
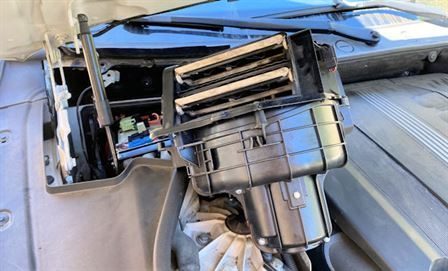
Effective solutions for solving a heating problem in your car
Effective solutions for solving a heating problem in your car. Heating problems in your car can be extremely frustrating, especially during the freezing winter months. Turning on the heat and waiting for warm air to come out of the vents can seem like an eternity. Fortunately, there are effective solutions to fix these heating issues and keep you warm during your journeys. Whether your car isn’t producing enough warm air or no warm air is coming out of the ventilation system, there are several potential causes for these problems. It could be a faulty thermostat, a coolant leak, a defective fan, or even an electrical issue. To resolve these problems, it’s important to understand their origin. In this article, we will present several effective solutions for solving heating problems in your car. You will learn how to check and replace the thermostat, how to diagnose and repair coolant leaks, and how to fix fan or power supply issues. Don’t let heating problems prevent you from enjoying your car rides during the cold months. Discover these effective solutions and stay warm and comfortable, no matter the outside temperature.
Common heating problems in cars
When the biting cold of winter sets in, your car’s heating system becomes an essential ally for making journeys comfortable. However, sometimes this system malfunctions, which can make trips unpleasant. In this article, we will explore common heating problems in cars, as well as the signs indicating that something isn’t working correctly.
Signs indicating that your car’s heating system is not working properly
When your heating system isn’t working properly, several signs may appear. You might feel cold air blowing from the vents, even when the setting is on maximum heat. Similarly, strange odors or unusual noises coming from the heating system can signal an underlying problem.
Diagnosing your car’s heating problem
Identifying the exact source of the heating problem in your car can be challenging, but it’s worth it to regain optimal comfort during your journeys. Start by checking the coolant levels and ensure there are no leaks. Then, examine the fuses and relays related to the heating system.
Possible causes of heating problems in cars
Heating problems in cars can be caused by various factors. Coolant leaks, a faulty thermostat, a clogged radiator, or a failing heater fan are among the most common causes.
Simple DIY solutions for heating problems in cars
For minor heating issues, there are DIY solutions that can be attempted. For example, bleeding air from the cooling system, replacing a faulty fuse, or cleaning debris from the radiator can sometimes resolve the problem.
Tips for maintaining your car’s heating system
To avoid heating problems, regular maintenance is essential. Make sure to have your cooling system checked periodically, replace the coolant according to the manufacturer’s recommendations, and regularly clean your car’s air filters.
When to call a professional for car heating problems?
If heating problems persist despite your diagnostic and DIY efforts, it’s time to call a professional. A qualified mechanic can perform a thorough diagnosis and carry out the necessary repairs to restore the proper functioning of your heating system.
Cost-effective solutions for car heating problems
Before replacing expensive components, consider cost-effective alternatives such as repairing rather than replacing. Sometimes, a simple repair may be enough to solve the problem, saving you on repair costs.
Preventive measures to avoid heating problems in cars
To prevent future heating problems, adopt preventive measures such as regular checks, proper use of the heating system, and paying close attention to early warning signs of potential issues.
Conclusion: Importance of addressing heating problems in cars
In conclusion, heating problems in cars can compromise your comfort and even your safety on the road. By understanding the signs of malfunction, performing proper diagnosis, and taking preventive measures, you can avoid the hassles related to your car’s heating and enjoy pleasant journeys, even in cold weather. Don’t underestimate the importance of keeping your heating system in good working order, as it can make all the difference in your daily commutes.
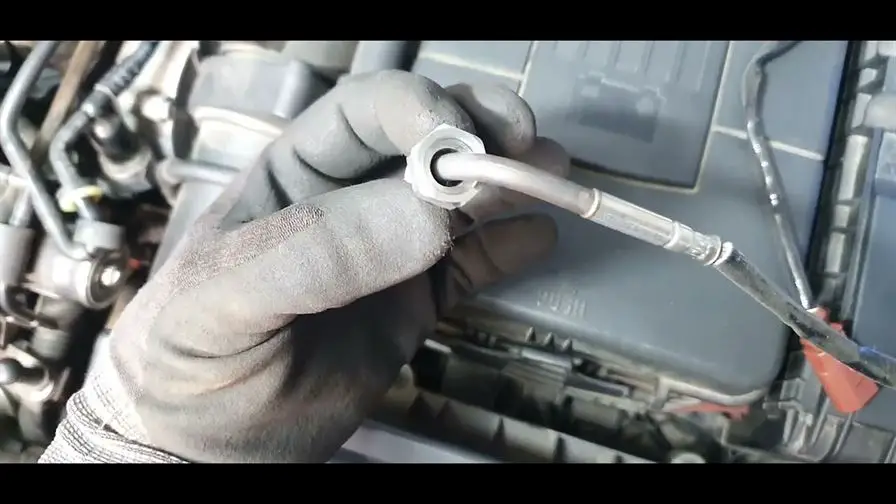
Faulty Exhaust Temperature Sensor: Symptoms, Solutions, and Prevention
Is your car engine running hotter than usual? Are you hearing unusual noises, experiencing engine misfires, or noticing a decrease in overall performance? If so, your exhaust temperature sensor might be faulty. In this article, we will examine the symptoms indicating a faulty exhaust temperature sensor, possible solutions to fix this issue, and provide you with prevention tips to avoid future breakdowns. The exhaust temperature sensor is a key component of your car’s engine management system. It measures the temperature of the exhaust gases to ensure the engine runs optimally and emissions are controlled. A failure of this sensor can lead to poor engine management, increased fuel consumption, and a decline in the vehicle’s overall performance. To learn more about the symptoms of a faulty exhaust temperature sensor, solutions to address this problem, and preventive measures you can take, continue reading this article.
Common Symptoms of Exhaust Temperature Sensor Failure:
When the exhaust temperature sensor begins to show signs of malfunction, several indicators can signal an imminent failure. It is crucial to recognize these symptoms to act quickly and prevent more significant damage to your vehicle.
Engine light illuminated on the dashboard
Loss of engine power
Increased fuel consumption
Abnormal smoke emissions
Difficulty starting the engine
Causes of Exhaust Temperature Sensor Failure:
Understanding the possible causes of exhaust temperature sensor failure is essential for effective repair. Various factors can contribute to this failure, from normal wear and tear to more complex issues.
Natural wear due to age
Accumulation of dirt and debris
Exposure to extreme temperatures
Electrical or connectivity problems
Diagnostic Process for Exhaust Temperature Sensor Failure:
The diagnostic process is crucial for accurately identifying issues related to the exhaust temperature sensor. Proper diagnostic methods allow for quick localization of the source of the malfunction.
Using an OBD scanner to read error codes
Visual inspection of the sensor’s condition
Testing sensor continuity and resistance
Solutions for Exhaust Temperature Sensor Failure:
In case of exhaust temperature sensor failure, vehicle owners have several options. The choice will depend on the severity of the problem and the resources available for repair.
Replacing the faulty sensor
Cleaning the sensor to remove deposits
Checking and repairing electrical connections
Preventive Measures for Exhaust Temperature Sensor Failure:
Prevention is often the best approach to avoid costly exhaust temperature sensor failures. Simple preventive measures can extend the lifespan of this crucial component of the exhaust system.
Regular maintenance of the exhaust system
Cleaning the sensor during service checks
Using quality fuels to reduce emissions
Importance of Regular Maintenance of Exhaust Temperature Sensors:
Regular maintenance of exhaust temperature sensors is essential to ensure the proper functioning of the vehicle. Paying special attention to these components can prevent unexpected failures and guarantee optimal performance.
Improved engine performance
Reduction in polluting emissions
Fuel savings
Common Misconceptions About Exhaust Temperature Sensor Failure:
Some misconceptions persist about the causes and consequences of exhaust temperature sensor failure. It is essential to dispel these false notions for an accurate understanding of the problem.
Sensor failure does not affect engine performance
It is difficult to diagnose an exhaust temperature sensor problem
Oxygen sensor O2 in the exhaust pipe for calculating the ingredients in the engine system.
Expert Tips in Case of Exhaust Temperature Sensor Failure:
Do not ignore symptoms and warning signs
Consult a professional for an accurate diagnosis
Replace the sensor as soon as possible to avoid further damage
Experts recommend specific actions in case of exhaust temperature sensor failure. These tips can help vehicle owners effectively manage issues and avoid costly repairs.
Conclusion: Maintaining your exhaust temperature sensor in perfect condition is essential to ensure your vehicle’s proper functioning, reduce polluting emissions, and save fuel. By following preventive measures and acting quickly in case of failure, you can extend the lifespan of your sensor and avoid more serious problems.
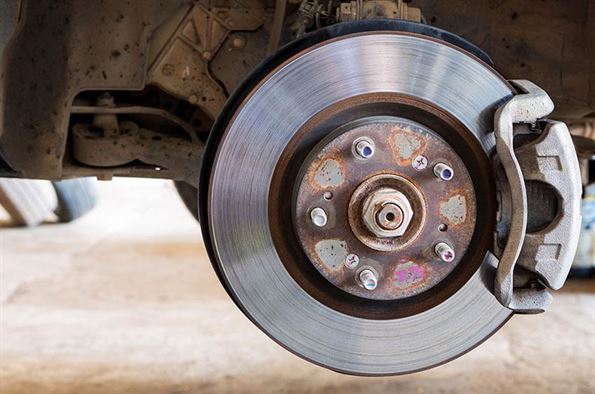
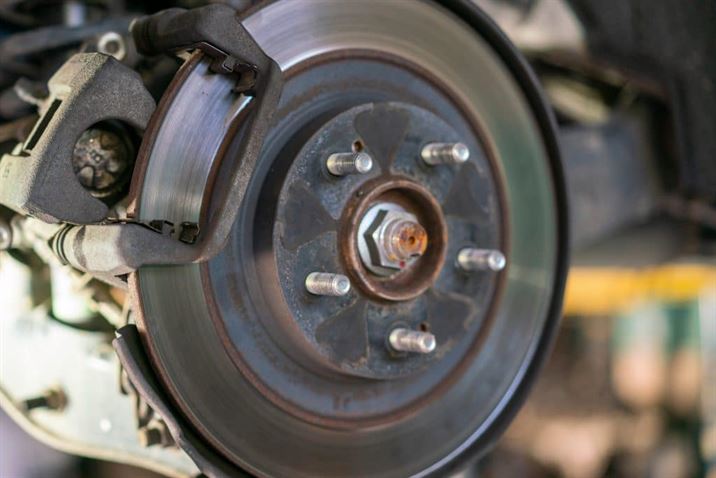
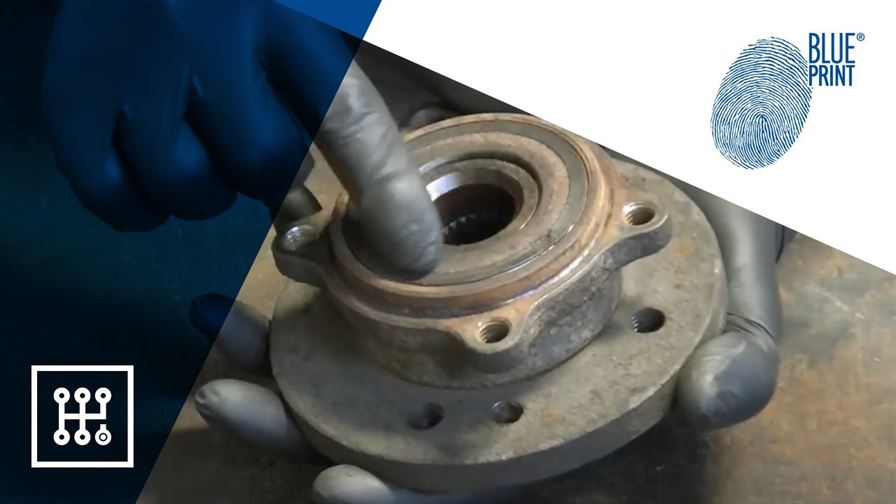
Signs of Defective Rear Wheel Bearings
You are on the road and you notice signs of weakness coming from the rear wheel of your vehicle. It is important not to ignore these signs, as they could indicate a faulty rear bearing. When the rear bearing is damaged, it can cause serious safety issues and compromise the handling of your vehicle. Therefore, it is essential to take action quickly to resolve this problem. In this article, we will introduce you to the most common signs of a faulty rear bearing and give you advice on what to do when you identify them. We will also discuss the importance of regular maintenance and seeking the help of a professional to carry out the necessary repairs. Do not let a faulty rear bearing compromise your safety and that of others on the road. Be attentive to the signs and take appropriate measures to mitigate potential risks. Follow our tips and extend the life of your vehicle by keeping your rear bearing in good condition.
The Importance of Rear Wheel Bearings
Rear wheel bearings are often overlooked when it comes to maintaining a vehicle, but their proper functioning is essential for ensuring safe and smooth driving. These components play a crucial role in the proper functioning of the rear wheel, facilitating its rotation while supporting the vehicle’s weight and absorbing road shocks. Understanding the signs of faulty rear wheel bearings, as well as the steps to diagnose and replace them, is therefore essential for maintaining your vehicle’s performance and safety.
Common Signs of a Faulty Rear Wheel Bearing
Faulty rear wheel bearings can manifest in different ways. The most common signs include grinding or growling noises coming from the rear wheel, a feeling of play or vibration in the steering wheel or vehicle body, and impaired handling, especially during turns or braking. A visual inspection of the rear wheel may also reveal excessive play or signs of grease leakage around the wheel hub.
Diagnosing a Faulty Rear Wheel Bearing
To diagnose a faulty rear wheel bearing, it is important to carry out a thorough inspection of the vehicle. This may include a visual check of the rear wheel, looking for any signs of damage or excessive play. Additionally, a road test can help identify abnormal noises or vibrations associated with a faulty bearing.
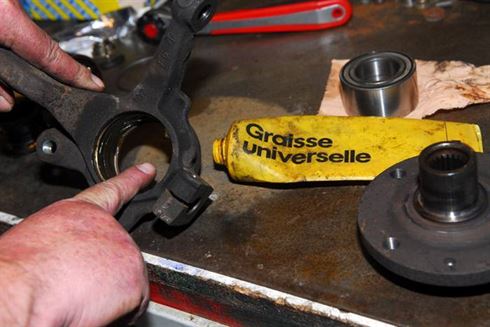
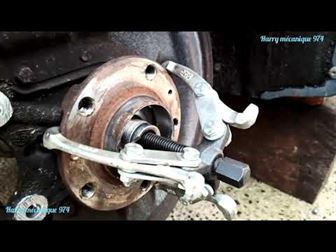
Steps for Replacing a Faulty Rear Wheel Bearing
Replacing a faulty rear wheel bearing requires several steps. First, it is essential to lift and secure the vehicle properly. Then, the brake and suspension components must be disassembled to access the wheel hub. Once the hub is exposed, the faulty bearing can be removed using specific tools and then replaced with a new quality bearing. Finally, all parts must be reassembled carefully, and the braking system should be bled if necessary.
Tools and Materials Needed for Rear Wheel Bearing Replacement
To replace a rear wheel bearing, you will need specific tools and materials, including socket wrenches, pliers, a bearing puller, bearing grease, and seals. It is also recommended to have a workshop manual specific to your vehicle to guide you through the replacement process.
Seeking Professional Help for Rear Wheel Bearing Replacement
Although replacing a rear wheel bearing can be done by an experienced DIYer, it is often better to call a professional. Qualified mechanics have the knowledge and expertise needed to correctly diagnose problems, choose the appropriate replacement parts, and perform repairs safely and effectively. Additionally, using a professional can guarantee a warranty on parts and labor, providing extra peace of mind.
Preventive Maintenance of Rear Wheel Bearings
To extend the life of rear wheel bearings and avoid costly breakdowns, it is recommended to follow a regular preventive maintenance schedule. This may include periodic lubrication of the bearings, visual inspection of the rear wheels during every oil change, and immediate repair of any signs of damage or wear.
Cost of Replacing Rear Wheel Bearings
The cost of replacing rear wheel bearings can vary depending on several factors, including the type of vehicle, make and model, as well as the labor required to perform the repairs. Generally, replacing a rear wheel bearing can cost between X and Y dollars, including the price of parts and labor.
Conclusion
In conclusion, rear wheel bearings play a crucial role in the proper functioning and safety of a vehicle. Understanding the signs of faulty bearings, as well as the steps to diagnose and replace them, is essential for ensuring safe and worry-free driving. By following a regular preventive maintenance program and relying on a qualified professional when necessary, you can extend the life of your rear wheel bearings and avoid costly breakdowns on the road.