How far can I really drive once my fuel level is low? And is my gas tank really empty when my low fuel warning appears? You might question yourself. Don’t worry! All this data will be displayed through one indicator: DTE. What does DTE mean in a car?
What does DTE mean in a car?
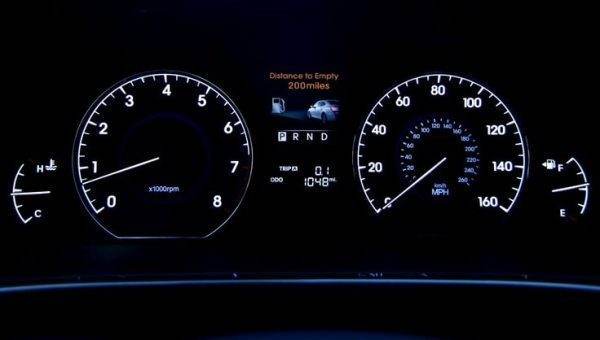
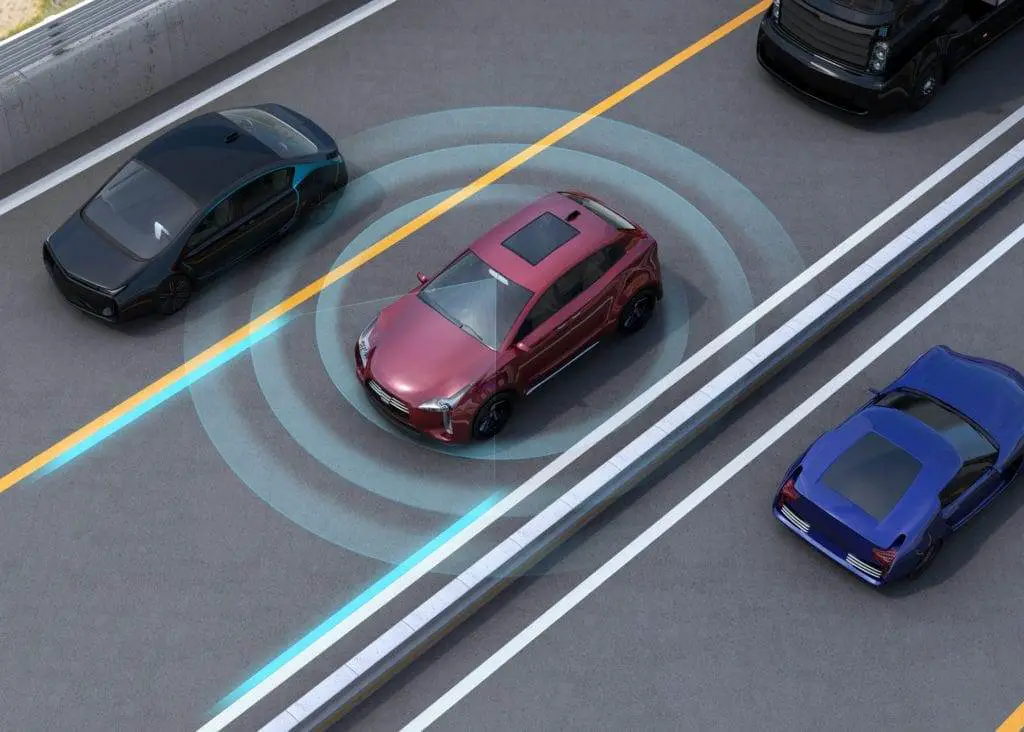
DTE or you can also call it “distance to empty” – What does DTE mean in a car? As the name suggests, the DTE meaning is an indicator that estimates the distance a car can travel with the amount of fuel remaining in its gas tank. The length of the remaining distance corresponds to how far you can drive before you need to stop to refuel. This indicator will appear on the screen as a small car icon, text, a dot, or an arrow. You probably already know that your vehicle warns you when it’s time to refuel. But did you know it might also be able to tell you how far you can drive once your little fuel reminder light comes on? That is also the main function of DTE.
When your fuel starts to run low, you’ll notice a low fuel level indicator in your instrument cluster and you’ll hear the changes. For example, you have about 35 miles or 1/6 of a tank left. If your car is equipped with a “distance to empty” function. You can know approximately how far you can drive with the remaining fuel in your tank.
What is the DTE calculation?
If your car doesn’t have the DTE calculation, the best way to guess how long you can drive until the fuel tank is empty? is to compare your fuel consumption figures to the amount currently in your gas tank. And we must say that this estimate cannot be accurate because it does not take into account other factors like driving conditions, the road, and load. So, how does the DTE calculation work? The DTE calculation aggregates various data to give a more accurate estimate of the distance you have left until your car runs out of fuel.
More specifically, DTE is calculated by dividing the amount of fuel remaining by the average MPG. This means that when you know the MPG, you can know how many miles you will travel with that amount of fuel. The DTE calculation depends on many factors: your driving style and the quality of your fuel.
Driving styles can affect your DTE calculation. In some ideal situations, if you do a lot of highway driving. A DTE warning might give you an earlier modification of up to 80 miles of fuel remaining before reaching the empty condition. And if you are towing a trailer or idling for long periods. Your DTE features might warn you at 35 miles or less. So we can see that the distance to empty varies depending on your current fuel economy. You might notice different distances displayed each time you fill up the gas tank.
Remember that the system resets automatically after refueling. So, your needle should point to F or full when you turn the key back on after refueling. However, if you parked on a slope or your gas station nozzle shut off before your tank was full, it’s possible the needle won’t return to the F position.
How accurate is DTE?
Generally speaking, the DTE system is fairly accurate when providing you with a rough estimate of the distance you can travel. However, in most DTE systems, this estimate does not take into account factors such as weather, traffic conditions, driving conditions, and a number of other external factors that can affect MPG. This might be the reason why DTE is not accurate in some situations. When you are going downhill, it will increase the DTE while if you are stuck in traffic, the distance to empty will decrease. For safety’s sake, do not assume your DTE reading is correct. If your dashboard indicates you have 20 miles left, it’s safe to say you only have 16 to 18 miles remaining.
Just understand that the DTE gauge will use previous data to provide you with a distance estimate. And it cannot change or update in real-time. The result is that you will realize the data is not accurate at that moment. The DTE system will reset automatically after a certain distance. Your dashboard will display the past numbers.
We recommend that if you are going to travel a long distance or different types of driving styles. To ensure safety, you should stop the car and refuel. When you have at least half a tank of gas to never risk running out of fuel. Furthermore, the way to calculate DTE will vary across different car models. That is also a reason for significant variations in the DTE calculation.
How many miles can you drive on an empty tank?
When the fuel light comes on, every driver understands that the amount of fuel left in the tank is very low. But how much is it and how far can the car go? This is extremely important, especially when the car is in traffic, on the highway, or in a remote area and is far from the gas station. Many drivers have a habit of taking a “risk” when the light is on. Normally, when the fuel needle is near E, the user should actively refuel. But perhaps due to busy work or for some reason, you cannot refuel. The question is: how far can you drive when your tank is empty?
There is no universal standard, but with most cars, the gas light comes on when there is about 10 to 15% fuel left in the tank. This number equates to your car being able to travel about 10 to 50 additional miles.
Conclusion: What does DTE mean in a car?
The fact that the fuel light comes on when the car is still far from the destination or in an unfamiliar place. This will create a feeling of insecurity for the driver. When you don’t know exactly how far you will go until your car runs out of gas. With increasingly modern technology, car manufacturers have equipped themselves with the “distance to empty” function to help drivers more comfortably during driving. Although these estimates are not entirely accurate, they provide insight to help drivers refuel in time. I hope after reading the article, you have an answer to the question: what does DTE mean?
What happens if you put windshield washer fluid in the coolant
It’s a very common mistake when you put windshield washer fluid in the coolant because, in your car’s structure, the washer fluid reservoir is designed right next to the coolant. So, if you make this mistake and are worried about what happens to your car? Don’t worry! We are moving forward to help you!
How does windshield washer fluid work?
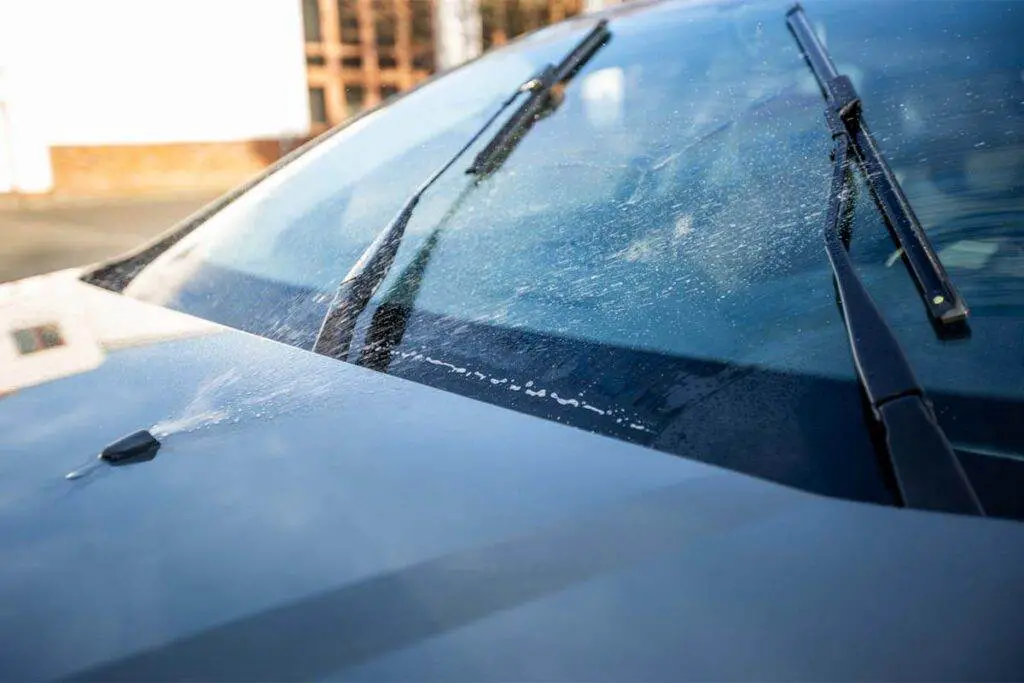
Windshield washer fluid is used to clean windshields with wipers while your car is moving. It is a specialized chemical for cars that helps clean the windshield to ensure the glass is always clean and clear to improve visibility while driving. This fluid is stored in the car, the washer fluid is sprayed from an automatic sprayer and combined with a lever to wash dirt off the windshield surface.
Windshield washer fluid requires higher requirements than normal glass cleaner, meaning this washer fluid should not be scaled because if it creates residue, it will clog the pump, more than that when sprayed on the glass surface. If there are residues, it will scratch the windshield. Windshield washer fluid does not contain too much detergent, bleach because too much soap damages it and hardens the wiper as they have synthetic rubber.
How does it work? An onboard controller works to spray the washer fluid onto the windshield, usually using an electric pump through nozzles mounted under the windshield or under the wiper(s). The levels are activated automatically, cleaning dirt and debris on the windshield. In some high-end models, the washer fluid can be preheated before being sprayed onto the windshield. This is especially ideal in cold climates where a thin layer of ice or frost accumulates on the windshield surface. Thus, it eliminates the need to scrape the glass or manually pour hot water on the glass.
I put windshield washer fluid in the coolant. What will happen to my car? (Photo: pinterest.com)
5 benefits of using windshield fluid
A good washer fluid with specialized cleaning will help remove the oil film, eliminate the phenomenon of reflection and light refraction.
Easily penetrates, dissolves, and quickly cleans stains, making the windshield surface shiny and ensuring driver visibility.
Helps the wiper operation to be smooth, without wear from friction, contributing to the longevity of the wiper and protecting the windshield surface from scratches.
Does not corrode metal parts, does not age the rubber, and does not affect the car’s plastic parts.
Washer fluid with a rain-repellent coating will help raindrops roll up and bounce off the car to help you drive safely in bad weather like storms.
Where to put windshield washer fluid?
The windshield washer fluid will be contained in a reservoir. The most important thing is that you must identify exactly the position of this reservoir to be able to pour the fluid. Windshield fluid reservoir locations can be designed to be located in several places depending on the year, make, and model of your vehicle.
It is usually located in the engine compartment and is found near the windshield along the firewall. The windshield washer fluid reservoir will be marked with a small image of a water solvent spray. If you cannot locate the reservoir, you can refer to the manufacturer’s manual for guidance.
What happens if you put windshield washer fluid in the coolant?
If you accidentally pour washer fluid into the coolant reservoir. And it makes you worry about what will happen to your car when you mix coolant with washer fluid. Our answer is that it’s not a big deal but putting washer fluid in your coolant tanks is also not a good idea. The main component of windshield fluid is mostly water, so in case you haven’t put too much fluid in the tank. It will simply cook when your engine warms up. The other chemicals in this solution will not affect the antifreeze and the car’s cooling system.
After pouring the wrong fluid into the coolant, the most dangerous consequence that can happen is that your car will not run and will clog the cooling line or radiator. Because washer fluid contains a small amount of soap that easily expands when your coolant heats up. And if the washer fluid stays in the tank for too long, some of the chemicals in this fluid will react with the antifreeze, turning the coolant into a gel.
Furthermore, some types of washer fluid contain alcohol which will provide some antifreeze protection. However, when the engine heats up, the alcohol boils and blows through the radiator cap. As a result, you will leak coolant and antifreeze. Seriously, the methanol in the washer fluid can also affect the seals and hoses.
What to do if you have poured washer fluid into the coolant reservoir?
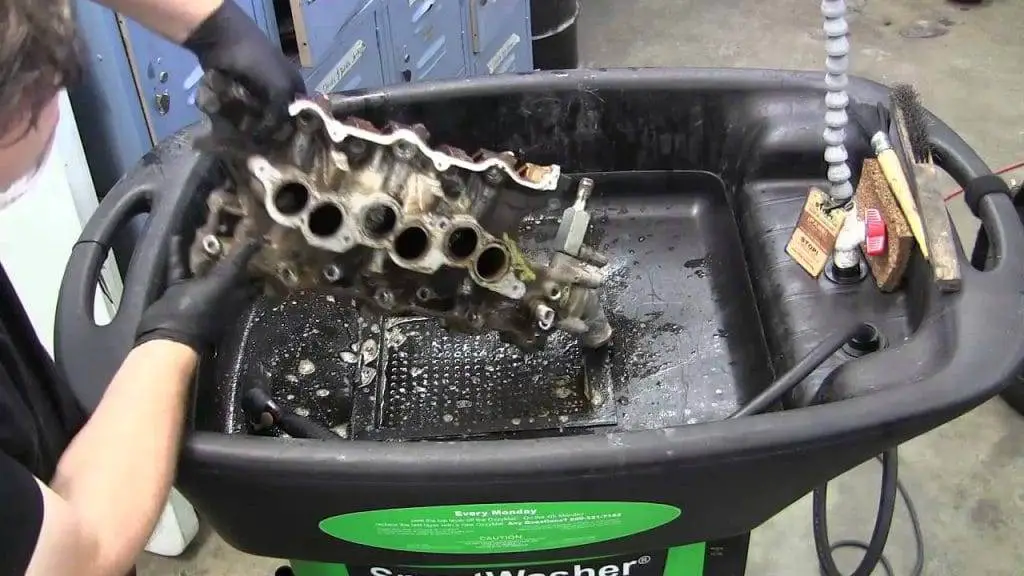
Presumably, you accidentally put the windshield washer fluid instead of the antifreeze in your cooling system. What should we do next? Windshield fluid includes methanol with a significant share and a bit of ammonium hydroxide. Methanol will burn to produce carbon monoxide, ammonium hydroxide into ammonia, instead of letting it boil, we should drain it. In this situation, the best solution we think is effective is that you must flush all the mixture in your coolant reservoir.
You can use specialized tools or simply a turkey baster to suck the contaminated fluid from the coolant reservoir. Or you can use a small tube and a can to drain all the fluid from the container. Make sure all the fluid has been sucked from the tank. You can pour more clean water and proceed to suck it out, this will help you clean the tank while limiting the scaling phenomenon.
Can you use windshield washer fluid as coolant? putting washer fluid in your coolant tanks is also not a good idea (Photo: offroadingpro.com)
FAQ
Can I use water instead of windshield fluid?
According to experts, using water to replace washer fluid is only temporary. And in the long run, it can damage the wipers and clog the spray nozzle. The dirt on the windshield surface is very diverse. It can be dirt from the environment, tree sap, bird droppings, insect carcasses, or paint spots. Water alone cannot dissolve the dirt and even the wiper cannot wipe the dirt off the windshield.
Therefore, manufacturers often recommend drivers to use water mixed with chemicals and additives to facilitate the cleaning process. Currently, some consumer organizations are concerned that the solvents in the washer fluid may affect your car’s paint and chrome. So many drivers in warmer latitudes have chosen to use plain water instead of washer fluid.
Can you mix windshield washer fluid with water?
You can mix water with the washer fluid without causing danger or damaging your engine or other parts, but of course. The windshield cleaning performance might be decreased. Many drivers often use tap water to pour it directly into the washer fluid to save money. However, regular use of water will cause the wiper and hoses to harden, not to mention in cold temperatures, water can absolutely freeze.
How to put windshield washer fluid in a car?
Step 1: Locate the windshield washer fluid reservoir.
The windshield washer fluid reservoir has a fairly basic structure. Usually located under the engine compartment with a usually blue cap and a wiper-shaped symbol. Depending on the car’s make and model. The position of the washer fluid reservoir will be different, some cars are located behind the trunk. And some are located at the front of the car, inside the engine compartment. You should check your vehicle’s owner’s manual to see where the reservoir is.
Step 2: Turn the cap and check the condition of the reservoir.
Gently open the container lid and check if there is still old fluid. If the washer fluid has been stored for a long time, you need to drain it and clean the reservoir.
Step 3: Fill with fluid
After making sure the reservoir is clean and free of old fluid. You can use a funnel to pour the windshield washer fluid into the reservoir. You can activate the test spray button and see if everything is fine. If the fluid sprays evenly, the process is complete and you can be reassured.
Final thoughts
We believe that by reading this section, you already have the answer to the question: Can you use windshield washer fluid as coolant? So, if you accidentally put washer fluid in a coolant reservoir, it’s okay because it cannot damage your engine. But this fluid should not stay in the reservoir, you must flush this fluid. Or you can take your car to a trusted repair center to have a guide.
Automobile safety features you want to get when buying a car
The automotive industry has come a long way. Not too long ago, the main safety features of a car only included 3-point seat belts, airbags, traction control, and anti-lock brakes. Today, there are so many cutting-edge technologies designed to keep you as safe as possible on the road that not all car owners know everything that comes with their vehicle.
This article on car reviews will explain the most useful and sophisticated safety features you should consider before buying a car, depending on the type of driver you are. That said, remember that a fully attentive driver beats even the most advanced technologies. So, put away your phone and never answer a call or text while driving.
Parking Assist or Parking Guidance System
Even experienced drivers dare not lose their concentration when attempting the challenging quest of parallel parking. If you don’t give it 100% of your attention, you will hit nearby cars or bump the curb. Manufacturers know this well and have developed another super convenient technology to make street parking less nightmarish: parking assist.
Parking assist function in BMW. Photo credit: PLATFORM Design Blog
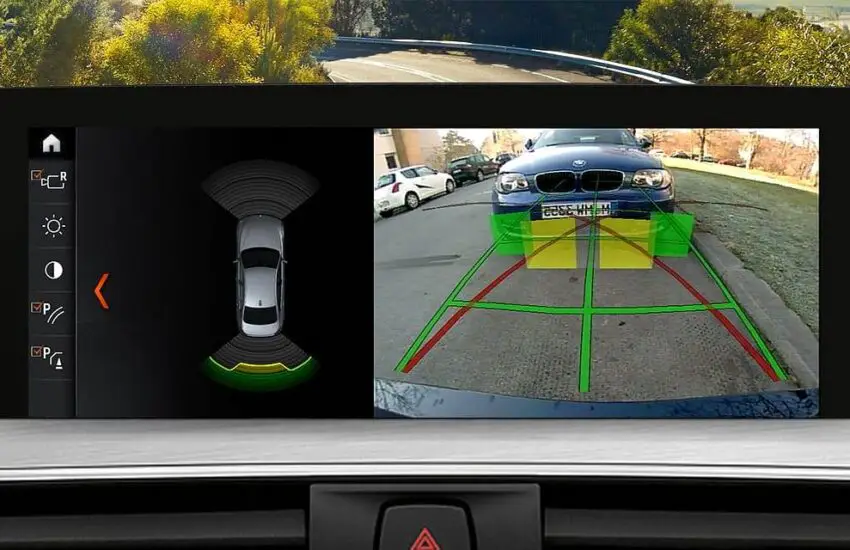
This feature also goes by different names, including parking guidance system, parking aid, parking assistance, and active parking assist. Parking assist is an automated function that uses computer processors linked to multiple sensors, including ultrasonic sensors, as well as camera-based solutions and other technologies that might be too high-tech to explain here, to steer the car into a tight parking spot with minimal assistance from the driver. Yes, you read that right. Like, at the push of a button. All you have to do is watch. This technology is useful for both reverse parking and parallel parking.
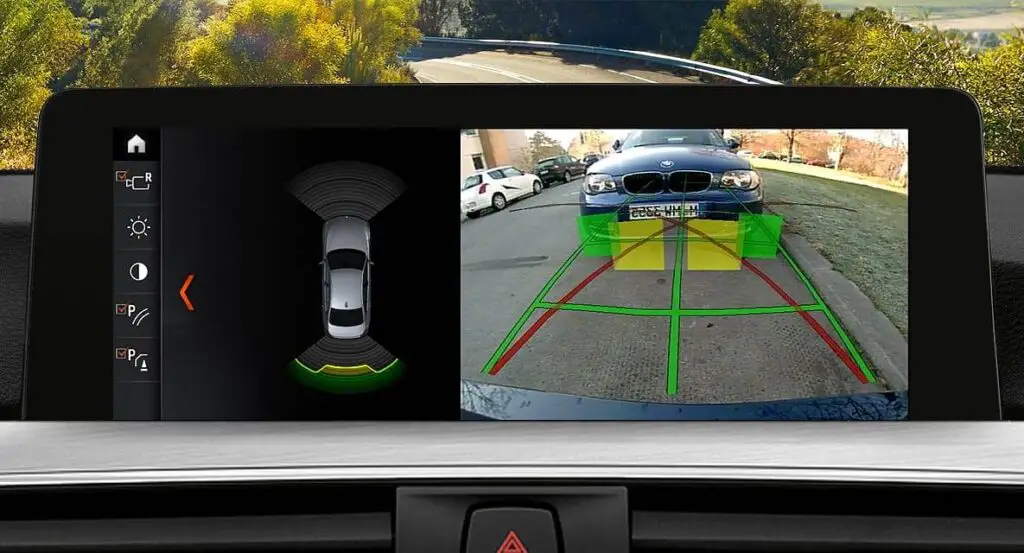
In short, the processor uses the many special sensors to determine the steering angle and displays this information on the touch screen. When the vehicle is put into reverse, the rearview camera is activated so the driver can see behind, and the parking assist function is engaged.
As for parallel parking, when the driver shifts into reverse and selects the parallel parking button, the parking spot will appear on the screen with a grid of lines and several adjustment arrows. Simply adjust on the screen, and once the ideal alignment is set, just press the OK button, release the steering wheel, and press the brake pedal. As the car reverses into the designated space, slowly release the brake.
Blind Spot Monitoring
While there are car features nowadays that are borderline unnecessary, blind spot monitoring can be considered a must-have. Particularly useful when turning, a visual or audible warning alerts you when a vehicle is in your blind spot. This will make turning and lane changes much easier.
Safe Exit Assist
This safety feature, as seen in the recently introduced Hyundai Santa Fe SUV, is intended for families with young children. The safe exit assist is an extension of the blind spot monitoring system. It uses sensors and cameras to detect when vehicles and moving objects in general are approaching from behind and temporarily prevents children from opening the rear doors. It is gaining popularity among parents of young children.
360-Degree Camera
You might know that all vehicles sold in the U.S. market are required by law to have backup cameras. They are used for entering and exiting parking spots, as they act as an extra pair of eyes that can look into the driver’s blind spots. We are in 2021, and automakers have upped the game with 360-degree camera systems offering superior visibility.
This technology can go by many names given by different manufacturers, such as bird’s eye view, multi-angle view, surround view, and surround vision. The system essentially uses multiple cameras, which are displayed on a single dashboard screen, allowing the driver to have a 360-degree overview of their surroundings.
You might think your backup camera is adequate, but if you have to navigate crowded parking lots daily, this advanced camera system will make your life much easier. Another nightmare for every driver, namely parallel parking, will also become much more manageable.
Forward Collision Warning (FCW)
If vehicles get too close to another vehicle or obstacle ahead, an FCW will alert the driver. Photo credit: BabyDrive
Since we’ve already talked about blind spot monitoring, it’s natural to follow up with forward collision warning. As the name suggests, this technology is designed to alert drivers if they are too close to the car in front of them and any other potential forward impact hazard.
It uses a combination of cameras, radar, and laser to detect obstacles ahead of you, their speed, trajectory, and the distance between them and your vehicle. Taking all this information as input, coupled with your own vehicle’s speed. If the distance with a preceding vehicle decreases too rapidly, it will alert the driver with an audible or visual signal.
Besides collisions during turns, rear-end collisions with a vehicle ahead of you are a very common type of car accident (think of how many times you’ve spotted front and rear damage on cars in the parking lot), and they can happen very quickly partly due to how fast they can occur. You just need to let your mind wander for a few seconds, and before you even realize it, the vehicle ahead stops or slows down, and you would brake too late.
Pedestrian Detection
This technology is like a hybrid between older forward collision warning and automatic emergency braking systems. A pedestrian detection system, as the name implies, is specifically designed to detect pedestrians and cyclists using multiple radar sensors and cameras.
The system can actively monitor the distance and direction of any pedestrian or cyclist heading towards the vehicle. If necessary, it will alert the driver and automatically apply the brakes to avoid an impact.
Anti-lock Braking System (ABS)
Sudden braking can cause uncontrolled wheel skidding, which will cause the driver to lose control of the vehicle. As the name suggests, an anti-lock braking system is an automated safety feature that keeps a car’s wheels rotating instead of locking up, thus preventing uncontrolled skids and allowing you to maintain control during an emergency stop.
Automatic Emergency Braking (AEB)
Certainly, there are times when you need to brake suddenly to avoid a collision with a passing pedestrian, a wild deer, or a broken-down vehicle on the road. However, hazards can arise so quickly, and you might not react in time. For emergency situations like this, or a deer on the roadway, automatic emergency braking (AEB) is designed to help stop your vehicle safely, or at least minimize the severity of the accident.
When a potential forward collision hazard is detected by the multiple sensors and cameras, an AEB system automatically applies the brakes. This is fully automatic, to make up for any delay in human reaction time.
As mentioned above, frontal collision is among the most common types of car accidents. Aware of the importance of the AEB system, 20 major automakers have committed to making the system mandatory by 2022. The U.S. Insurance Institute for Highway Safety (IIHS) estimates that these systems will reduce 28,000 cases of frontal collision per year by 2025.
Lane Keeping Assist
You may have also heard of the term “lane departure warning,” which should not be confused with “lane keeping assist.” The lane departure warning function was introduced earlier, so it is now more common and standard. That said, lane keeping assist has been widely used nowadays for its usefulness, so it is now almost as popular.
Lane departure warning systems were designed to prevent distracted or tired drivers from unintentionally leaving their lane, which happens more than you think. When the car leaves its lane, there will be audible and/or visual alerts on the car’s mirrors to warn the driver.
However, if you change lanes intentionally, these alerts can be annoying. This is how lane keeping assist is more advanced. The visual and/or audible signals only activate if the vehicle crosses into another lane without the driver turning on the turn signal. So, you are only warned if you are crossing lanes due to distraction or when you forgot to turn on your blinker when changing lanes, which is another common driving mistake.
The latest lane keeping assist systems offer more safety assurance: they even automatically correct the car’s steering to gently bring the car back towards the center of the lane it is in.
Electronic Stability Control
There are several instances where you can lose control of your vehicle, such as a sudden swerve to avoid a head-on collision or when you underestimated the sharpness of a curve. In extreme maneuvering situations, which are very common, the electronic stability control (ESC) system can be a real lifesaver. Also called electronic stability program (ESP) or dynamic stability control (DSC), it is a computerized system designed to maintain a car’s stability.
ESC is beneficial in many ways. In case of sudden and extreme steering, it can automatically engage the brakes to prevent the vehicle from going off the road or steering into the wrong lane. Additionally, in case of loss of traction, it can detect difficult driving conditions and help the vehicle regain stability using various measures, including reducing engine power to slow the car down safely.
Adaptive Cruise Control
Traditional cruise control systems are a convenient feature for maintaining a constant speed on the highway. They essentially take over the car’s accelerator to maintain a constant speed set by the driver. However, they can be cumbersome to use off the highway, i.e., in traffic jams when every vehicle is not moving at the same pace or at a somewhat constant speed.
Manufacturers have pushed conventional cruise control a bit further to make it “adaptive” to the actual speed of surrounding traffic at a given moment. Adaptive cruise control (ACC) systems use a set of built-in sensors to detect the distance between your vehicle and the one ahead, then maintain a safe gap by automatically accelerating or braking if necessary.
When the car ahead slows down, your car also slows down, but without you having to adjust anything. In the event that the car ahead brakes, many ACC systems even bring your car to a complete stop without you pressing the brake pedals. This means extra help in avoiding front collisions and much less stress in frustrating traffic jams.
All-Wheel Steering
It should already be known that the rear wheels do not always turn in the same direction as the front wheels, that is, before the invention of four-wheel steering or all-wheel steering systems. This system allows all four wheels to turn in the same direction, thus improving steering response time, overall maneuverability, and vehicle stability at higher speeds.
All-wheel steering technology is a particularly useful feature in emergency situations when it’s easy to lose control of your vehicle, such as when a pedestrian appears unexpectedly, or turning on wet or icy roads, driving on rough terrain, being stuck in a snowy or icy area while driving.
Not just in emergencies, but you will also easily regain stability when hitting a pothole or can drive in strong winds with minimal sway. Another advantage of this technology that many drivers are unaware of is when you need to change lanes quickly on the highway while using cruise control. All-wheel steering allows for a smooth lane change with minimal steering wheel rotation and minimal acceleration while maintaining your speed.
Another benefit of an advanced four-wheel steering system is improved braking, and a representative example is the Acura RLX sedan equipped with a precision all-wheel steering system, which controls the wheels to point inward for a sharp and stable stop.
Differential
When a vehicle turns, the outer wheels need to spin faster than the inner wheels to cover more ground in the same time. Therefore, all cars must have two crucial components: the differential and the drive shaft. They allow the four wheels to rotate at different speeds by distributing different amounts of engine torque to each wheel.
The front differential is located between the two front wheels and serves to distribute engine power to the front wheels, while the rear differential is located between the two rear wheels and serves to distribute engine power to the rear wheels. Each differential actually consists of a set of gears to do the job.
The front differential is directly connected to the engine, since the engine is located at the front of the car. Meanwhile, since the engine is far from the rear wheels, the drive shaft is needed to connect the engine to the rear differential and transfer engine power to the rear differential. In general, a drive shaft is a mechanical part used to connect other components of the system that cannot be connected directly due to distance or other reasons.
Limited Slip Differential
The limited slip differential is an upgrade of the conventional differential system aimed at helping the car quickly regain stability in wet and slippery conditions. It does this by reducing the engine power sent to the wheel losing traction while increasing the power sent to the other wheels with good traction.
In other words, it redistributes torque from the wheel that is spinning or lifting off the ground to the other wheels. Meanwhile, with standard differentials, if one wheel spins or lifts off the ground, it will spin while the wheels in contact with the ground will remain stationary. More control and stability also means less tire wear.
If you want to check if your car has this handy feature, lift it and spin one of the rear wheels. If the other wheels spin in the same direction, then your car indeed has a limited slip differential system.
Adaptive Headlights
Driving at night is something every driver wants to avoid. Limited visibility is an added headache on winding roads. This is where the adaptive headlights feature comes into play. Standard headlights always point in one direction, so when you turn, the headlights illuminate the side of the road. Meanwhile, with advanced adaptive headlights, you will actually see where you are heading.
Adaptive headlights use sensors to measure the driver’s steering inputs and then adjust the angle of the headlights relative to the road ahead accordingly, so the driver can have a better view of where they are going.
OBDII
Every modern vehicle has this industry-standard port. It is designed to provide access to the Engine Control Unit (ECU) data for onboard diagnostics. You can plug a diagnostic tool into the OBD II port to get a readout of your car’s status. This port is used by many application manufacturers for car diagnostic and performance review apps.
OBD II is very convenient and widely used, for example, when a driver notices a problem with their vehicle and wants to understand what’s wrong before taking the car to the mechanic.
All modern vehicles are equipped with this port. Specifically, all cars and light trucks manufactured in the United States after January 1, 1996, were required by law to have OBD II. It has also become a standard feature for many major automakers. If you’re unsure, look for a sticker or plate under the hood that says “OBD II Certified” or “OBD II compliant.”
Facial Recognition Software
2021 wouldn’t be 2021 without facial, fingerprint, and voice biometrics. You may have heard of the new 2021 Cadillac XT4 designed for the Chinese market, which comes with a host of high-tech features, including a new facial recognition system, called Face ID, as well as fingerprints and voice for access, ignition, and control.
If a Cadillac is too far out of your reach
What is the difference between friction and regenerative car brakes
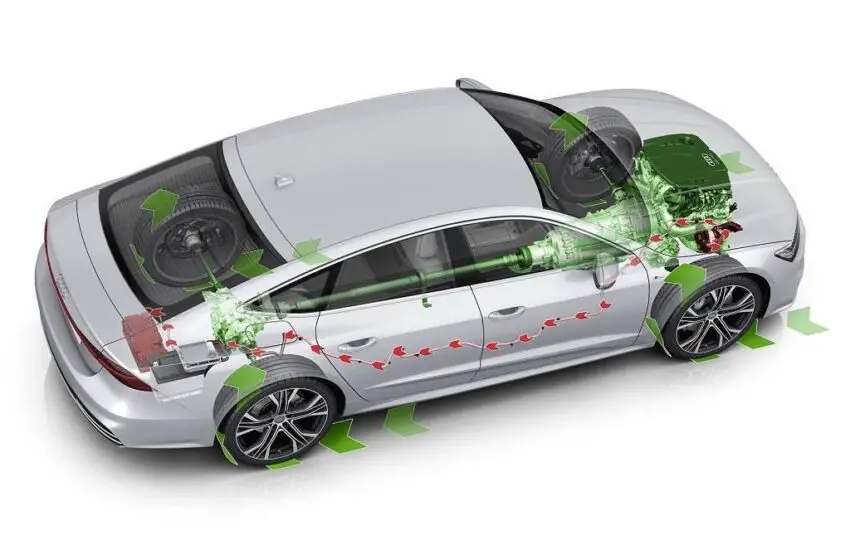
Many traffic control systems are a feature of urban streets. Vehicles on city roads undergo modest deceleration and acceleration when they depart from one location and subsequently reach their destination. Substantial energy loss occurs when a motor vehicle continuously accelerates, then slows down or stops. Regenerative braking technology for cars allows this energy to be captured and used to propel the vehicle, thereby avoiding energy losses.
The regenerative system is becoming increasingly popular, as there are more and more hybrid electric vehicles or fully electric cars on the roads.
What is Regenerative Braking?
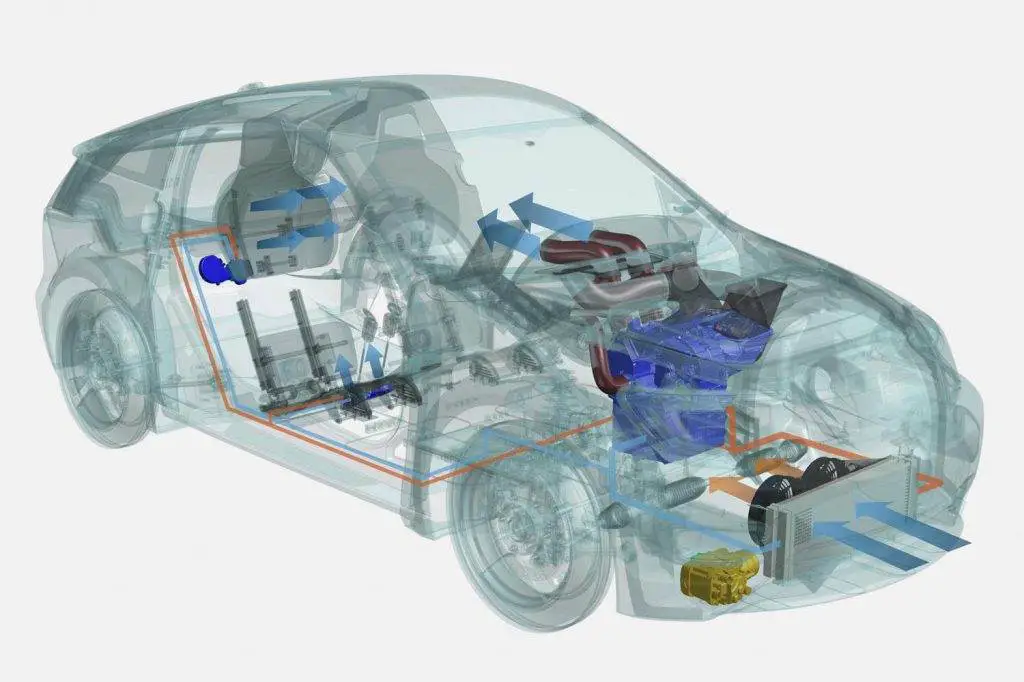
This system is widely known as an energy capture method. The process slows down a moving car by converting its kinetic energy into another form of energy, preferably electrical energy, to charge an integrated battery system. This stored charge can then propel the vehicle’s wheels and increase its energy efficiency.
When an electric motor runs forward, it consumes energy from the battery. However, when the same motor operates in reverse, it charges the car’s battery. This is the main science behind this braking mechanism.
Mechanism of the regenerative braking system. (Credit: JIM SHORKEY KIA)
When a car moves on the road, it produces substantial kinetic energy due to its speed and mass. In this energy-saving process, an electric traction motor uses the same momentum as the vehicle to generate electrical energy and charge a battery. Otherwise, the momentum will transform into heat energy in the brake discs, which will be useless.
Regenerative Braking vs. Conventional Friction or Dynamic Brakes
After applying force to the brake pedal, the conventional braking system applies friction from the brake pads onto the brake discs, and the car’s wheels gradually stop. The vehicle’s kinetic energy transforms into thermal energy in the braking device. This ultimately results in a waste of gasoline energy due to friction braking.
A relatively advanced idea is dynamic braking. An electric motor would capture the vehicle’s kinetic energy and produce electrical energy, but it is instantly consumed in resistors that release a lot of heat.
However, the regenerative system is a revolutionary process where activating the brake pedal causes the electric motors to stop the moving wheels. Instead, they propel a traction motor in the opposite direction, which generates electricity and charges the onboard battery.
As the technology suggests, the regenerative system is highly efficient for battery-operated electric vehicles. This methodology improves the car’s mileage by 16% to 70%. The efficiency range is wide because the success of this method depends on the driver’s braking style, the vehicle’s heat, and the ambient temperature.
Conclusion
Automotive industry statistics suggest that a standard-size electric vehicle with one occupant traveling at 120 km/h produces kinetic energy of 0.25 kWh/km. If the car uses regenerative braking, this kinetic energy can increase the vehicle’s range by 1.25 km with each braking event. Therefore, new-era electric vehicles offer more energy efficiency than conventional ICEVs. Next time you decide to buy an electric vehicle, be assured that you will save money and the environment at the same time.
How to Paint Plastic Car Parts
Learning the basics of plastic spraying or painting plastic car parts is an excellent way to enhance your car’s fresh appearance and create its unique marks. The step-by-step guide below will walk you through the necessary steps to achieve a professional-looking and durable finish using easy-to-follow methods and affordable rattle cans.
People may have based these tips on painting protective strips. But the same technique can be applied to all plastic elements, such as interior trims and mirror shells. The most important things needed to achieve a good result when painting plastic car parts are time and patience. If you have properly prepared these two things by following this guide, you will most likely achieve a stunning finish as desired in the end.
Below are the tools and equipment you will need for a smooth process.
A designated spraying area, free from any dust and moisture
Sandpaper grit from 150 to 2500. You can use 2500 grit sandpapers (wet and dry sandpaper) with water for lubrication.
Paint color
Plastic primer
Clear lacquer paint
A cutting compound or any commercially available anti-scratch product is acceptable.
Paint polishing liquid/reducer
Microfiber car polishing pads/sponges or waxing sponge for polishing car details
Step-by-Step Guide on How to Paint Plastic Car Parts
Here are the detailed steps of a plastic part painting process for your quick reference:
Preparation
Priming
Matting the primer
Color coat
Backing the color coat
Clear lacquer
Finishing – Cutting and polishing
Step 1. Preparation
The first thing to do is remove the parts you wish to paint. Before starting with the primer, it is essential to key the surface of the car part and eliminate the bubbles that are common on many exterior plastic parts.
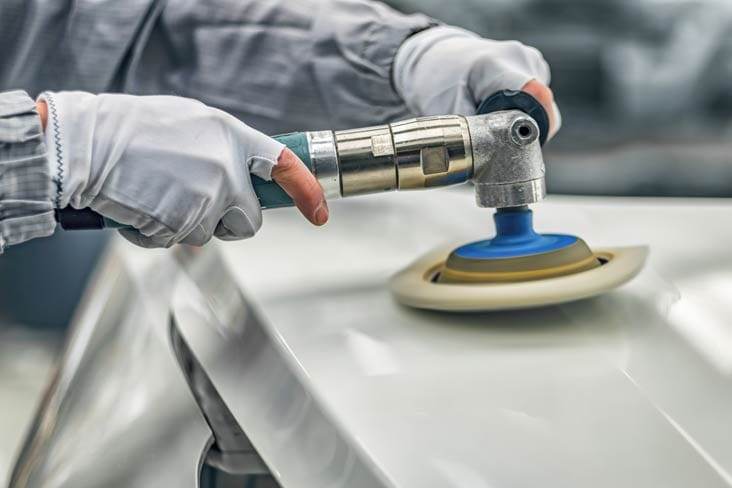
The color coding of the protective strip had bumps, and from car polishers’ experiences, it is necessary to smooth them out using sandpaper. You can start sanding with 150 grit, then 800 grit, and finish with 1200 grit sandpaper to achieve a smooth finish before priming. However, note that sometimes, sandpaper doesn’t seem to work very well on plastics and tends to clog up quite quickly, meaning you go through quite a few sheets. Although it might be a bit stressful to take your time through this step and achieve a nice smooth surface, you know its role in the appearance of your final paint.
Apart from parts that have a more special treatment, with plastic parts that don’t have fuzz, you should always clean the surface and remove the shine. If you ignore this act, the car primer will not be handled and will not adhere properly. And then after 2 or 3 months, the new paint layer will likely trigger and start to flake or crumble into pieces.
Once everything is in order, clean the car parts with warm soap and rinse them with cold water.
Remember to clean the surface well and get rid of dust, dirt, and debris that may have accumulated over the years. This act will help the part look its best. Soaps may contain harsh chemicals that damage the paint if left on car parts. It would be best to be safe and clean everything. Let them dry in a clean place to avoid dust and have a cup of tea knowing your first effort is done.
Step 2: Priming
Overall, priming is a vital step in every car painting process. Finding a good place to do the priming before painting can be tricky, but sheds or outdoor garages are all ideal.
Here are some things to consider when priming:
The importance of cleanliness is always apparent. It is a key element in preserving the environment and the smoothness of the process. It can be frustrating to accidentally get dirt or dust on the car paint in the middle of painting.
A warm, dry, low-humidity environment is also perfect for the process to ensure quick and proper drying of the paint layer.
As outdoor weather is hard to manage, the ideal place to get things done is indoors. You can achieve the same result by painting outdoors, but it will take twice as much paint. And there will be more chances of something spoiling your car paint.
If you are spraying on a plastic surface, make sure you have a specialized plastic primer, not a typical primer. Please read the instructions on the primer can. Shake it vigorously for a minute and ensure the can is also at room temperature. If the can is cold, it will reduce the pressure, meaning the paint won’t spray as a fine mist.
Additionally, if you want to delve into the priming prayer technique for applying car paint in a smooth layer, check out these tips below:
Keep the spray nozzle or flow tip about 5 inches from the plastic car parts about to be painted.
Gently move the spray over the entire surface of the parts and always keep it in a straight direction.
When spraying, before moving to other unpainted parts, you should spray until you have finished the previous ones.
It may take some time to discover the optimal spraying speed, giving the best paint result. It strikes a balance between a paint layer that is too thin, which may waste paint or take time, and one that is too thick, which risks causing the paint to run. Make sure to pay attention to the fine edges of the paint layer, as they can easily become too thin and peel off easily. Spraying three to four coats of primer will suffice, and waiting 20 minutes between coats will help ensure each layer dries properly.
When the final primer coat is applied, let them dry in a warm place for a few days. You can wait for the solvents to completely evaporate before proceeding with cleaning. To check if it is a certified dry piece, you can put your nose to it and take a deep sniff. As ancient wisdom advised, if the paint still smells fresh, your painting project will require more waiting and delays. And once everything is dry and set, get ready to sand the surface.
Step 3. Smoothing the Primer Coat
Even if you do everything correctly, spraying the primer evenly and taking care to prepare the surface, it will still be textured and not smooth. There must be a reason why paint molecules settle and dry as they do. So, to achieve a smooth, polished surface, you need to practice wet sanding.
After wet sanding the area, it should be smooth to the touch. Now, try handling some of the sounds you haven’t worked with yet and see how they are different. As it is not easy to distinguish the areas of the part that have been smoothed and those that haven’t, you should only check the smoothness by touch. The water running off the car part will be a color matching the primer used. If there are still rough spots on the primer, it will be time to take extra precautions to sand them. If you want to ensure your woodwork is perfectly sanded, using a flat surface like a sanding block is a good idea.
Once everything is in order, quickly rinse the car part with cold water to remove any primer residue. If you ignore this single beat in one step, the paint may dry as dust, and you will then need to wipe it off before applying the color coat.
Step 4. Color Coating
You now have a smooth and attractive primer base, perfect for applying the next color coat layer. To achieve a flawless result, perform the exact color-spraying technique described above. Make sure to cover all tricky edges for the best results. You might be a bit annoyed if you are going to smooth the coat, and some of the gray primers show their ugly side because the car’s coating paint was too thin and delicate. A few coats (4 to 5 coats) of color should be enough, and drying may take about 20 minutes.
car-coating-dry
If you wish to speed up the part’s effective drying process, placing it on a low-temperature radiator can help. In this case, the smell test can help determine when the paint is dry enough for wet sanding.
Step 5. Smoothing the Painted Coat
Many people probably get impatient with the waiting and desire to find a faster solution for the smooth painted coating. Don’t give in to the temptation to cut your stay here short. You have already invested too much time, and it would be a mistake to ruin everything for a few hours. If all goes as planned, you should now have a beautiful finish, and all reflections on this surface will likely be blurry. However, if not, there is still a little time to fix and make your color coating perfect. The following part is about solid colors, not pearlescent or metallic-type surfaces.
To achieve a smooth finish, follow the same steps you used when smoothing the primer coat. A bit of pressure is needed to achieve the desired result. Rinse thoroughly with running water to avoid any potential reaction with the lacquer. After wet sanding the color coating, there may be a dull matte appearance once it is completely dry. Be patient as this is supposed to happen.
Step 6. Clear Lacquer
At this stage, you can use the same spraying technique once more, but keep in mind that the varnish or lacquer tends to be heavier than primer and paint, so be particularly careful to avoid streaks. Applying the lacquer will make the dull finish more vibrant, with a beautiful glossy impression.
So, how much lacquer should be applied to achieve the desired finish? One or two coats should be enough. Wait 20 to 30 minutes between coats to allow the paint to dry. Make sure to get good coverage on the edges of your artwork. This will make it elegant and persuasive.
Step 7. Cutting and Polishing the Paint Layers
Polishing the lacquer before it is fully hardened can cause disasters. Chances are you will need to wait about a week for your protective strips to dry. Depending on the size and temperature of the part, the process may be extended for an unlimited duration. To affirm that the lacquer is ready, smell it to see if the solvents are still evaporating. In case you still don’t smell anything, it is better to redo it after one or two days to be safe. Make sure to wait until the lacquer is completely dry before polishing it. This will help keep it looking its best.
This is the final step in the lacquer finishing process, where we smooth out any unwanted orange peel and correct any imperfections. If everything goes according to your painting plan, you will already have a beautiful paint coating. With a little effort to cut and polish the paint, the overall look of your project can be enhanced.
For the cutting process, there is a variety of compounds available on the market, so you can choose the one that gives the best paint results for you. Some people prefer to use harder compounds such as G3, while others prefer to use Meguiars Scratch X. Both are well recommended and have fairly high quality.
Start polishing with a small amount of cutting compound. Apply moderate to heavy pressure to focus on small areas at a time. Work and break down the compound. The optical quality of the reflections will be significantly improved by the cutting method, and a final polish will give it that perfect mirror finish.
Tips for an Effective Plastic Car Part Painting Process
Once you have grasped almost all the advice related to the method of painting plastic car parts, follow the helpful tips on how to paint plastic car parts effectively to the maximum. We have mentioned some of these tips above, but here are the tips in more detail for your reference. Stay tuned!
Isolate the plastic car parts you will handle later before doing anything related to painting.
It is necessary to take care of other areas when painting plastic parts to ensure they are not damaged. There are two ways to ensure your car painting lessons don’t lead to many problems later. The best option is to remove the parts from the vehicle and paint them separately. This will minimize the amount of work needed and ensure a high-quality finish. Unfortunately, it may not be possible to completely cover the painted area with some types of cars. In this case, it is best to use masking tape to cover the area around the paint. This act will create a barrier between the color paint and the rest of the vehicle, ensuring a clean and successful project.
Prepare the car’s plastic surfaces before painting
Before painting your plastic car parts, take the necessary precautions to ensure a perfect finish. There are many variations in the different types of plastic car parts, so the preparation process will vary depending on which ones you are about to paint. Some of the previous paint on these parts will need to be removed for the new paint to adhere properly. And if it is heavily scratched or dented, you need to use a specified filler to smooth out the imperfections.
Regardless of the part’s condition, you should always sand any plastic surface before painting. Sanding can help smooth car surfaces and eliminate many small defects invisible to the bear’s eye, making your project smoother and more polished. Not only does sanding make the plastic surface smoother, but it also creates small crevices that make the plastic more absorbent. The more surface area, the more likely the paint will adhere to the plastic, resulting in a more durable finish. And after carefully smoothing the car’s plastic parts, make sure to clean and rinse them to get rid of any paint residue.
machine-polishing-car-paint
Use a plastic adhesion promoter when painting
Most professional car painters may agree that using plastic adhesion promoters is essential for effectively painting plastic car parts. Promoters contain powerful chemicals that can open the pores of plastic car parts. Using adhesion promoters will make it easier for new paint layers to stick to the surface. However, be aware that they should only be used on clean, bare plastic and only if necessary. It is ineffective and may even damage the vehicle when applied over primer or combined with any other treatment.
Paint plastic car parts in a clean, well-ventilated workspace
To achieve the best possible results when painting plastic car parts, set up
Frost Inside the Windshield: Causes and How to Prevent It
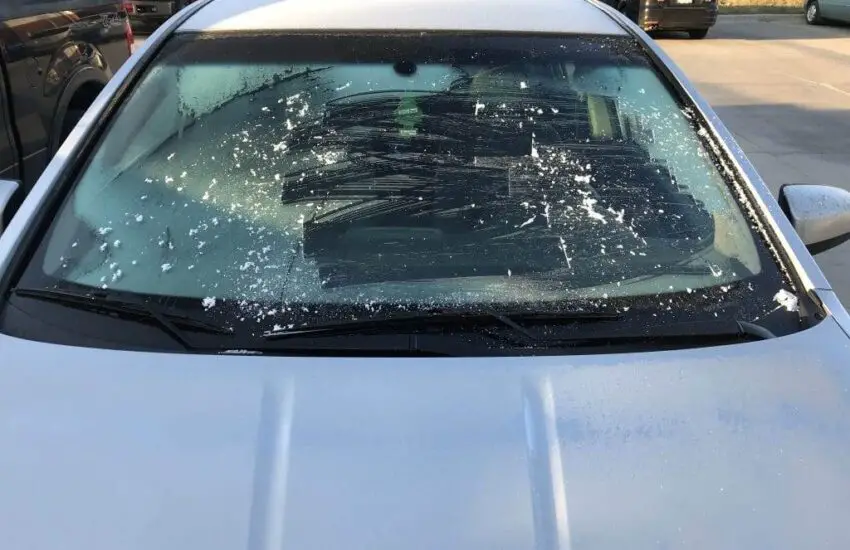
During freezing weather or heavy rain with snow, drivers often encounter frost on the inside of the windshield, which obstructs vision and affects the driving process. Frost on the inside of the windshield will make it difficult for the driver to see, cause discomfort, and can be potentially dangerous. In today’s article, we discuss the reasons and how to remove ice from your windshield.
Why Does My Windshield Frost Up on the Inside?
The car’s windshield is an important part installed at the front of the car, both enhancing aesthetics, ensuring the driver’s safety, and completing the vehicle’s structure. It resembles a shield plate that withstands direct impacts from the environment such as light, UV rays, objects, dust… protecting the driver and complementing the vehicle’s design. All drivers know the role of a windshield in the vehicle. Suddenly, when you wake up on a winter morning and notice frost on your windshield, what are the reasons? Let’s find out with us:
Why does my windshield frost up on the inside? (Photo: pinterest.com)
Damaged Door or Window Seal
This is the popular reason leading to frost on the inside of the windshield. When the outside temperature drops below 0 degrees, you will notice a thin layer of ice forming on the inside of the windshield. The cause is that your vehicle’s doors or windows have cracks or are not sealed, worn or damaged rubber seals can create conditions for vapor to invade the vehicle.
Over time, the rubber seals around the doors can weaken and wear out. They can open on their own, come out of the door frame, and start to leave a gap between the door frame and the rubber seal. So, don’t forget to check this small detail if you notice frost building up on the inside of the windshield.
Temperature
Low temperatures can cause your windshields to be covered with frost on the inside. Windshields are usually designed with a heat-conductive material that allows them to easily absorb heat from the surrounding environment. In warm weather, the sun’s heat will quickly neutralize the cooling effect of the glass. However, in cold weather, there will be a temperature difference between the outside and the glass, causing condensation on the windshield. In cold air, water vapor condenses and turns into ice.
Excessive Humidity
In winter, the weather is erratic, sometimes terribly below freezing, sometimes a slight thaw. For example, the weather is warm during the day, it rains and snows, it starts to get colder in the evening, and as a result, the moisture that accumulates on the glass turns into ice that freezes the wipers on the glass.
This situation occurs on the principle of condensation when cold air mixes inside your car. Or it can be caused by human breathing or by the evaporation of wet objects in your car. The amount of water vapor in contact with the cold glass surface condenses to form ice that obstructs the driver’s vision, making it more difficult to control the vehicle.
How to Prevent Frost on the Inside of the Windshield?
A few tips below will help drivers effectively overcome the situation where the inside of the windshield is frozen:
If your windshield is fogged up by frost, you could be in danger due to limited visibility. (Photo: pinterest.com)
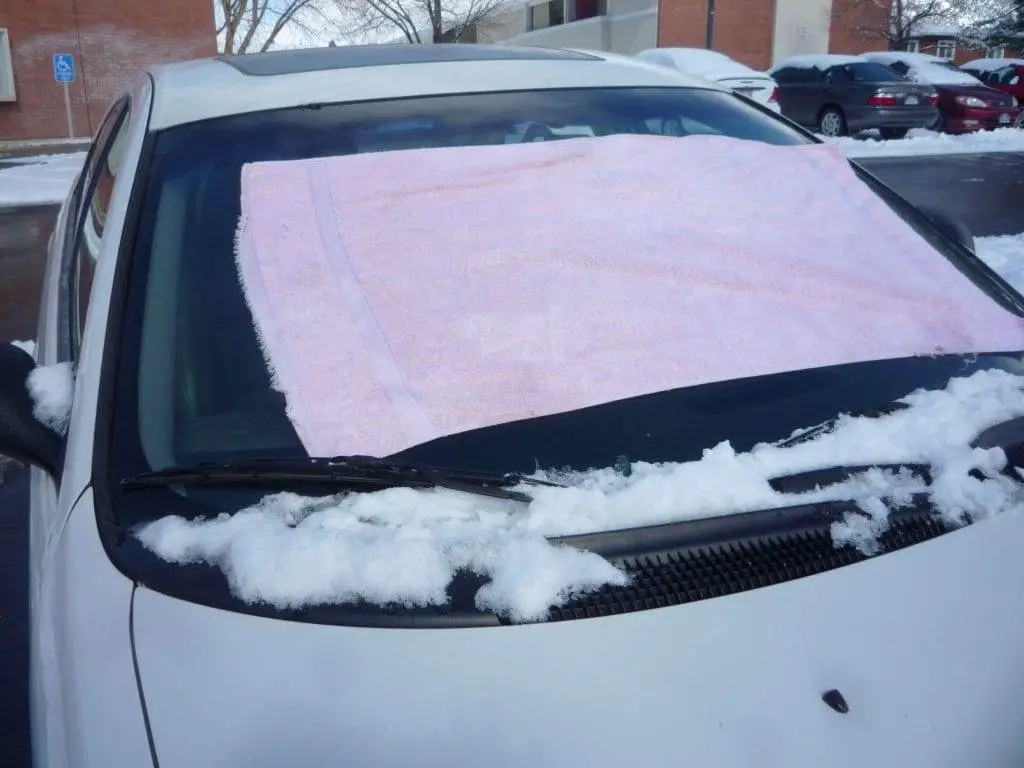
Avoid Placing Wet Objects in Your Car
Water vapor from wet coats, umbrellas, or damp towels, etc., placed in the car when exposed to warm air, evaporates. If the driver does not open the door, this amount of vapor remains in your car and condenses on the glass. Therefore, to reduce the possibility of ice forming in the car, car owners should limit placing wet objects in the cabin without cover or packaging.
Balance the Temperature Inside and Outside the Car
In cold weather, you usually want to close all the windows to protect yourself from the cold; however, this is not an ideal measure as it can form ice on the windshield. To avoid this situation, you can open or lower the window by 10 to 15 cm to promote air circulation and moisture removal, create a temperature balance inside and outside the car, and reduce condensation conditions. This operation is extremely simple, does not consume fuel, and is highly effective. However, drivers should only apply it in light rain and not too cold weather.
Turn On Your Air Conditioner
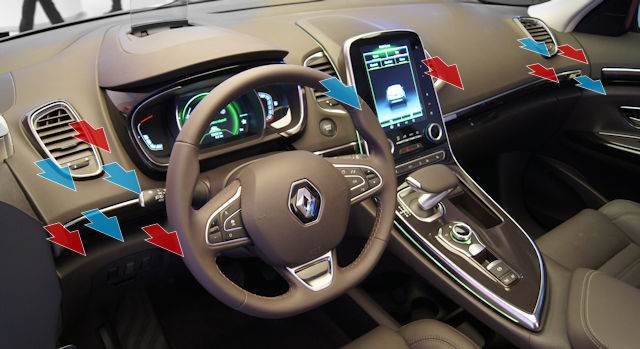
The car’s air conditioning system not only helps you regulate desired temperatures but also effectively removes humid air. Frost on the inside of the windshield is caused by the difference between outside and inside temperatures. Therefore, drivers should turn on the AC and adjust the fan towards the windshield, helping to dry the glass.
Note that you should not choose a temperature that is too cold, which would result in the temperature inside the vehicle being too low compared to outside the car. However, to avoid temperatures that are too cold and will affect the health of occupants, especially the elderly and young children, you should only choose a temperature difference of 2-3 degrees from the outside and turn off the air conditioner immediately when the frost on the inside of the windshield disappears.
When you turn on the air conditioner, the amount of vapor stuck to the windshield surface evaporates immediately. Even the moisture from your breath is dispersed into the air instead of settling on the windshield.
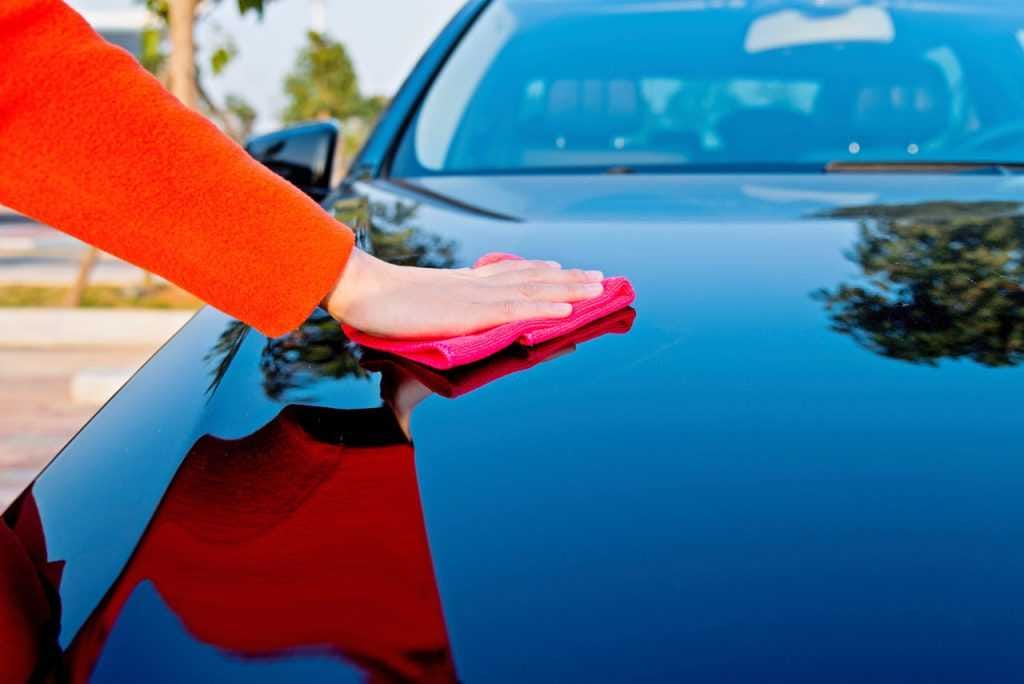
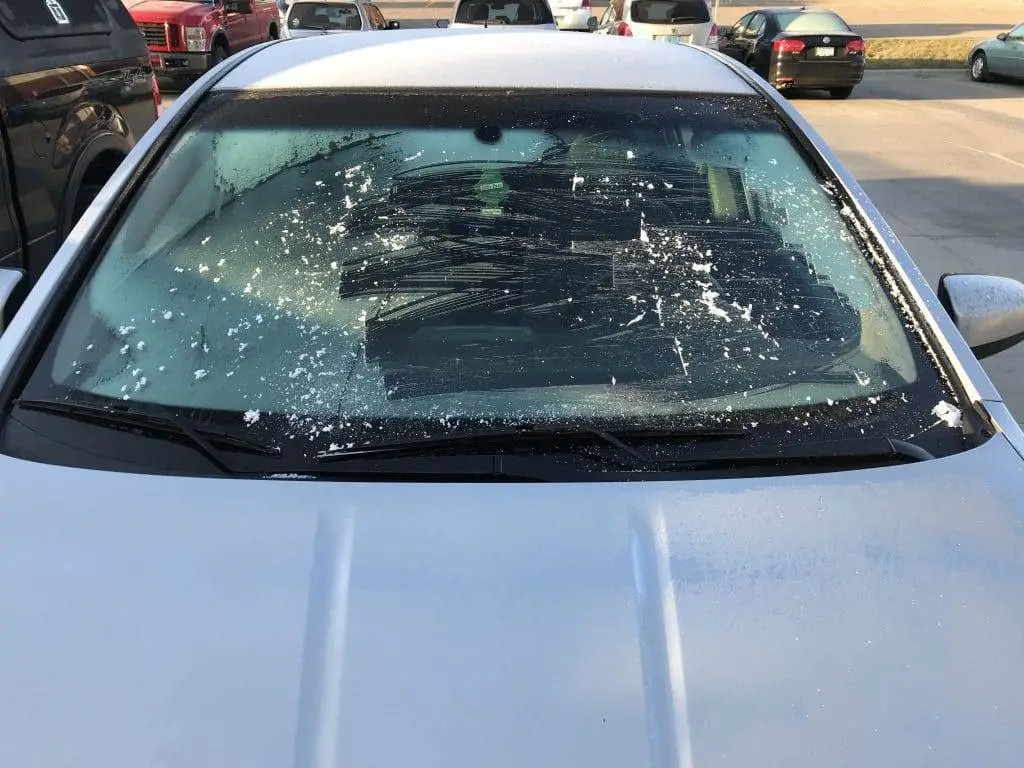
Ensure Your Windshield is Always Clean
If your windshield is fogged up by frost, you could be in danger due to limited visibility. It is essential to regularly clean the windshield from the inside. In a few simple steps, you can clean and polish your windshield like new. To avoid scratches on the glass surface, you can use a soft towel or paper to clean the glass. Besides helping you deal with ice buildup, it also helps you see better and prevent potential accidents.
Use a Car Dehumidifier
Car owners can use a portable dehumidifier to reduce vapor and limit frost. When air is drawn in and passes through the evaporator, the vapor condenses. And some of the remaining air will escape from the back of the device.
Use Anti-Fog Additives
Use shaving foam or an anti-fog additive on a soft, dry, clean cloth to wipe each area of the car’s glass. Wait at least 2 minutes, then use another dry towel to wipe off any remaining foam on the glass. Additionally, you can use silica gel to reduce humidity in your car. As we analyzed, when the air humidity in your car is too high, it creates thin layers of ice on the inside of the windshield. In this case, silica gel is a good option for you.
In daily life, people often encounter silica gel in small packets placed in medicine bottles, food packaging, and electronics. There, silica gel acts as a dehydrating agent to prevent the above products from being damaged by moisture. Similarly, when silica gel packets are placed in the car, they help absorb moisture and help keep the car space dry and comfortable. There is a note that when you put these packets in your car. You must find a safe position to place the silica gel to keep them out of reach of children. Because it can be dangerous if your child eats it.
Final Thoughts
Frost on the inside of the windshield always occurs in cold climates, and for drivers, it must be an annoying problem. However, if you know how to apply simple tips. Drivers can certainly limit this situation and drive completely in difficult conditions while ensuring maximum safety.
Besides the frosted windshield, cars often fog up the rearview mirror due to high air humidity. How to prevent your car from freezing on the inside? or What method do you usually use to solve the problem? Let us know by commenting in the box below. Please read our upcoming articles for more useful information for drivers.
How much to repair the VSA system
Buying a car and aspiring to its eternal lifespan might be the most refined desire of every driver. And for a component responsible for the car’s stability and regularity like the VSA system, its purely durable and flawless function until the end could be a miracle. However, in reality, things won’t always go as you wish.
The system will crash and eventually misbehave. And to be well-prepared and understand the amount you need to pay for unexpected system errors, we will now discuss the cost to repair the VSA system.
How Much to Repair the VSA System
When you notice the system starting to malfunction and showing very visible or sensitive symptoms, you’ll need to look into the base price and solutions. Repairing a VSA system malfunction will cost between $1,200 and $1,800. However, the price differences offered by centers across states and service centers are significant. If you intend to replace the VSA system, you shouldn’t spend more than the usual cost. But there is no definitive answer regarding the cost to repair a VSA system, as the nature and severity of the damage, as well as the vehicle’s brand and model year, will all affect the final price.
If you can repair the damage without replacing major components, it often costs less than if you had to replace them. For instance, if only a sensor or fuse needs to be changed, the cost would be minimal. You must keep in mind that if the entire VSA system is changed, the price for this service and the one-time fix will be much more expensive. There are many different VSA systems, and some can cost up to $700. However, an alternative system costing between $300 and $700 is available for many different vehicle brands and versions.
Overall, the simplest way to understand the cost of repairing the VSA system or making improvements is to consult a competent mechanic or a specialized dealer.
After getting the information on the VSA modulator repair cost, for those who want a better design and understanding of the entire system operation, follow the next parts.
What is VSA in a Car
In this section, we will clarify the working principle of the VSA system in the car. Loss of control and vehicle skidding are among the main causes of traffic accidents. International research shows that at least 40% of fatal accidents are caused by wheels skidding off the road. And for those unexpected moments, VSA came to the rescue.
According to the National Highway Traffic Safety Administration (NHTSA), the Vehicle Stability Assist (VSA) system reduces the number of accidents by 35% and is one of the most advanced safety systems available today. In 2015, this stability control system was made almost mandatory for all car models sold in Europe.
Apparently, VSA can prevent up to 80% of skid-related accidents, as it will determine if a skid risk is imminent. The system will intervene very quickly, and the driver can always keep control of the vehicle away from these hazards, provided they do not exceed the limits of the laws of physics.
Basics of the VSA System
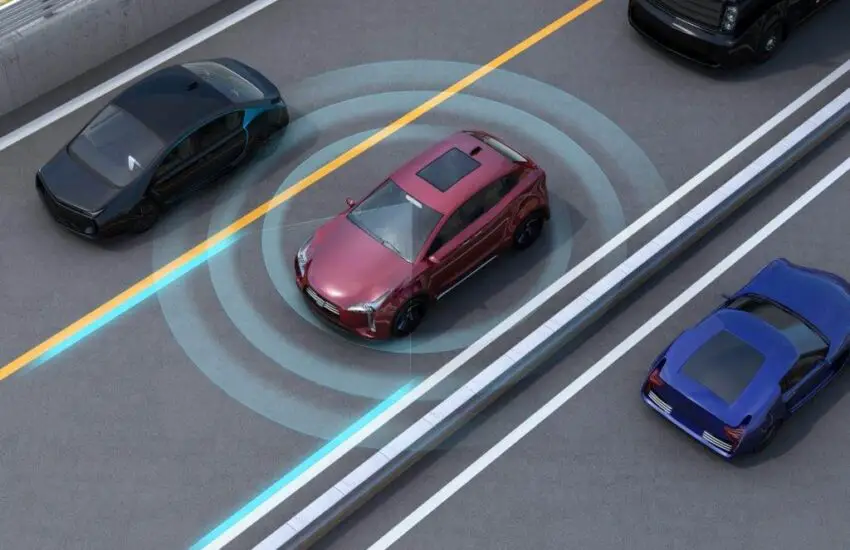
Specifically, VSA is an electronically controlled safety system that reduces the risk of loss of control due to errors made by car owners. This stabilization assist is always activated on the vehicle. Within a system, a microcomputer receives and checks signals from VSA sensors every 25 times per second to ensure that steering movements match the vehicle’s actual directions.
Furthermore, it will determine potential skidding turns, acceleration, and steering angle to intervene when the vehicle tends to roll over or lose control. Loss of car control can occur when the driver turns the steering wheel quickly to avoid an unexpected obstacle. They might also turn too much or too little in curves, causing the vehicle to deviate, spin out, and potentially cause an accident.
The system uses independent brakes on each wheel to steer the vehicle after losing control, which humans are less likely to do. Additionally, VSA not only triggers intervention in the braking system but can also intervene in the engine to help accelerate or decelerate the wheels.
Vehicle-stability-assist
VSA is essentially a system composed of the following subsystems:
ABS: The Anti-lock Braking System can minimize the loss of control phenomenon when the driver brakes and avoids obstacles at high speed. If the wheel sensor detects skidding on a wheel, the brake pressure on that wheel will decrease.
ASR: The Acceleration Slip Regulation system prevents the drive wheels from skidding when the vehicle starts and accelerates abruptly. Another main task of ASR is to help improve vehicle stability by adjusting wheel traction during starting and acceleration. If ASR detects that the drive wheel is skidding, the wheel speed sensor will send this signal to the ECU. The ECU will command the braking system to act on the wheel and reduce unnecessary smooth turns. At the same time, the VSA system also sends a signal to the engine control unit to close the throttle or retard the ignition timing to reduce engine torque.
EBR: The Engine Braking Regulation system prevents the drive wheels from skidding when operating in forced idle mode and ensures vehicle stability. This process occurs without the driver’s knowledge.
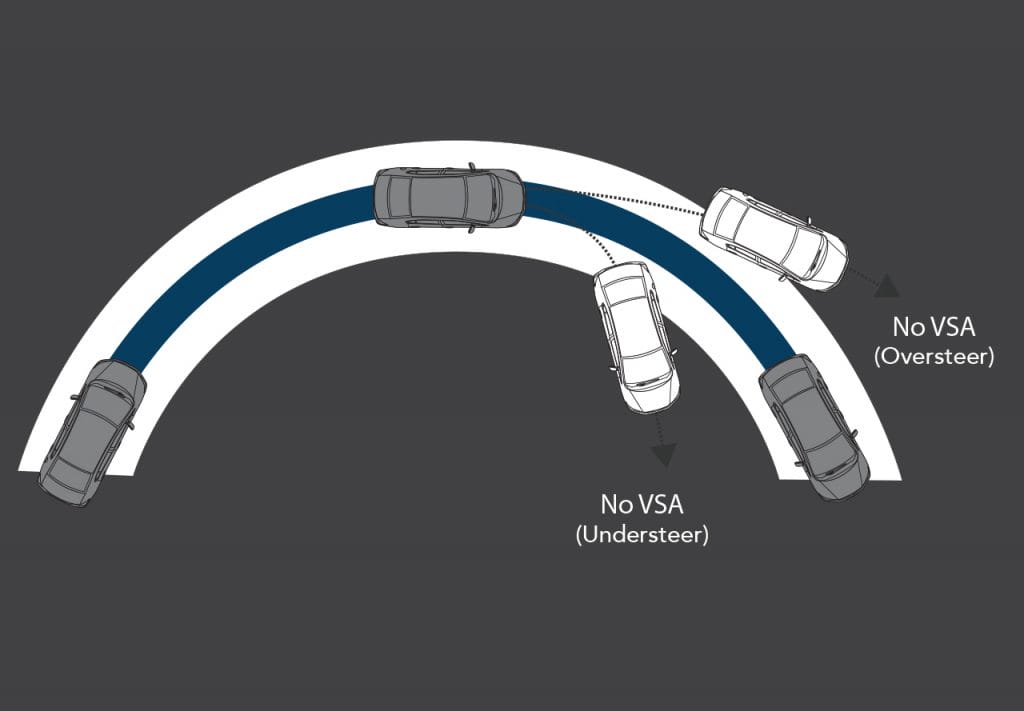
With the coordination of the above mechatronic systems, the main function of VSA is to minimize understeer and oversteer phenomena when the vehicle enters a curve or avoids an obstacle in case of an accident.
Additional Functions of VSA
As mentioned above, VSA’s main task is to prevent the vehicle from skidding out of rotation. But it can offer us more than that. The system then increases safety and provides the driver with a comfortable feel and an extremely flexible driving mode.
Hill Start Assist System
Starting on a slope is always a complex task, especially for large trucks. Drivers must act very quickly between the brake pedal, accelerator, and clutch to prevent the vehicle from drifting downhill. On the VSA system, the hill start function makes things easier. This function maintains brake pressure for about 2 seconds after the driver lifts their foot off the brake pedal. As a result, the driver has enough time to switch from the brake pedal to the accelerator without using the handbrake.
Emergency Braking Assistance
In an emergency, the driver often does not press the brake pedal hard enough. The emergency braking assistance function knows when to help the driver stop the vehicle by monitoring the sudden change in pressure on the brake pedal. If the driver isn’t braking hard enough, the system will increase the maximum braking force.
Load Adaptation
The payload and center of gravity of a utility vehicle can vary significantly from time to time. The vehicle’s load has a huge impact on brakes, traction, and balance. The adaptive load function identifies changes in the vehicle’s mass and center of gravity, then makes corresponding adjustments through interventions from the ABS, ASR, and ESP safety systems.
Vehicle Rollover Prediction
The rollover prediction function uses the ESP system’s sensors to intervene when the vehicle is at risk of rolling over. It can apply brake pressure on each wheel individually or reduce engine power to prevent the car from rolling over and keep it balanced.
Tire Pressure Monitoring System
A drop in tire pressure can lead to differences in speed and grip at the affected wheels. By comparing the speed of each car wheel, it’s possible to detect any pressure changes. This function will monitor tire pressure to avoid using additional pressure sensors in the tire.
When Does the VSA System Work
The indicator lights on most cars usually appear on the dashboard displaying full driving information, just like VSA. When this system is operating, the VSA light illuminates or flashes. Conversely, if the left light illuminates, we can recognize that the system has been deactivated.
If the indicator lights up, you can also understand that the traction control or anti-skid system (TCS or ASR) is working to help the car accelerate without the wheels skidding. Since these two systems (VSA and ASR) are interdependent, considering both lights as one is sometimes acceptable. However, at the same time, if both lights flash uncontrollably, there’s a high chance your stability assist system is malfunctioning. Then you need to take the car to a service shop for a full-speed check.
Meaning of VSA Lights
You can get the most out of your stability maintenance system and the vehicle in general through a series of lights that flash incessantly or dimly on the electronic control panel.
A Flashing VSA Light on the Dashboard
You might feel disturbed and worried when the VSA light flashes on your vehicle’s dashboard non-stop or suddenly. But there’s no need to carry these feelings with you since these flashes don’t indicate any defects or other serious warnings.
The flashing light on the dashboard is just a reminder that the car’s navigation and safety systems are working well together to help you steer safely. When the stability assist system is running, you might notice some changes in handling, including:
The accelerator may not provide as much power increase as expected.
If you don’t lift the accelerator, the engine power may slow down.
The brakes may be applied automatically, although this should be relatively minor and gradual.
Although the VSA system is a great tool for drivers, it’s not without drawbacks. If you see the car light come on frequently, you might be pushing the car a bit too hard. And this act resembling overuse, in the long term, can lead to damage and cause dangerous situations if left unrecognized.
Steady VSA Activation Light
If the VSA activation indicator stays lit on the dashboard, it often means the system has been deactivated by turning it off using the console switch. If you turn the system back on, this light will go off.
VSA System Assistance Light
For better and more attentive observation of the entire system to get the fastest car treatment possible, you should also be aware of the second VSA light on the dashboard. When the VSA system light comes on and stays on, it can be a sign that the system isn’t functioning properly internally. If you notice this, stop if it can only be done safely, turn off the engine, and then restart it. If the light comes back on, you might consider setting up a service inspection as soon as possible to determine the root cause of the problem.
Meanwhile, you can still drive your car safely when the VSA indicates the light is flashing. But the VSA system won’t be able to protect you in surprisingly difficult conditions.
vsa-system-on-car
Why the VSA System Fails and Needs Repair
Besides the cost of VSA system repair and its basics, you should also be aware of the reasons why it might fail in the first place to be prepared for the well-prepared inspection and have a better plan for the following maintenance acts.
Tire Size
Every tire on your car should be set to the same dimension and be of a specific type to ensure the VSA system inside will function correctly. Replacing one or more tires with different specifications and varieties can cause the VSA unit to fail.
Using smaller, lighter, and thicker tires will make them less tolerant to breakage and malfunctions. It’s best to use winter tires of the same size as those provided by the manufacturer, otherwise the VSA might fail.
Faulty Braking System
The VSA system can influence your car’s engine power and the braking system to help slow your vehicle if necessary. VSA cannot help you if your braking system is malfunctioning due to rust, fatigue, or other relevant factors. To prevent your brakes from wearing out, you should inspect and maintain them regularly.
Faulty Sensor
The VSA system requires two sensors to be operational to function properly. This sensor monitors and controls the speed of your vehicle’s tires. The system’s sensitive sensors enhance grip on a rocky or slippery surface by automatically adjusting engine power. When you turn a sharp curve or bend, one of your tires might spin faster, forcing your driving steering angle to be out of sync with the others. In this case, the tire speed sensor will be activated to correct this issue.
Whenever the ABS light comes on alongside the VSA indicators, it means the ABS is faulty and not sending instructions to the VSA. In this case, the following operations won’t be performed as requested, leading to VSA system malfunction.
Steering Angle Sensor
This sensor ensures you will always drive and monitor your car in the desired direction. VSA sends information to the driver so that if the driver oversteers while negotiating a turn, this stabilization system can take control and ensure the car handles the turn correctly. Whenever the VSA light comes on, the steering angle sensor isn’t working properly, preventing the VSA unit from functioning correctly.
Faulty VSA Switch
You can use the VSA button to turn the VSA system on or off. The circuit is completed whenever the VSA system’s traction and tire movement systems regulate themselves. If the VSA button is broken, it won’t light up instantly. You can test the switch’s integrity by removing the VSA button and using an electronic multimeter.
Additionally, if the circuit is damaged, the VSA lighting will falsely indicate that the system is operational. For example, after pressing the VSA switch to activate the VSA system, the VSA lights might still be off.
Worn Tires
Your tires need good grip on their tread to help the car stay on the road and turn easily. The VSA system will help you take turns well. So, if your car’s tires are worn out, there will likely be a malfunction even if it performed the necessary commands.
VSA is designed to increase engine power and maintain a constant speed when climbing steep slopes. Due to the small friction between the tires and the road, if you use worn tires, it can make the process even more difficult.
FAQ on the VSA System in the Car
1. How to test a VSA modulator?
If you have a diagnostic system, note the neutral position of the VSA sensor as follows:
Connect the system to the 16-pin data link connector under the dashboard on the driver’s side with the ignition off.
In the Select System menu, choose VSA to open the VSA Properties dialog box.
Select Neutral Test from the dropdown menu, then All Sensors. Follow the system’s instructions.
2. Can you drive with the VSA light on while ensuring your safety?
It’s essential to understand this when discussing the question of how much to repair the VSA system. Without VSA, your car will brake and turn normally, but it won’t have the VSA traction and stability enhancement.
The VSA system is activated when you start the car. So is it safe for you to drive when the VSA is still flashing? Yes.
What are the signs of car odometer fraud
Many drivers who have used and are looking to buy a car believe that the higher the mileage, the more the car has been driven, and vice versa. Understanding this mindset, some scammers deliberately roll back the odometer, deceive car buyers, and sell at a higher price. To avoid falling victim to odometer fraud, it is necessary to have knowledge about the signs when the odometer has been rolled back. Below, we list some visible signs so you can avoid being exploited.
What is odometer rollback?
A car’s odometer is a useful measuring device in a vehicle. Indicators such as speed, mileage, oil temperature, fuel gauge, and oil pressure are displayed on this meter to help the driver be more proactive in the car driving process.
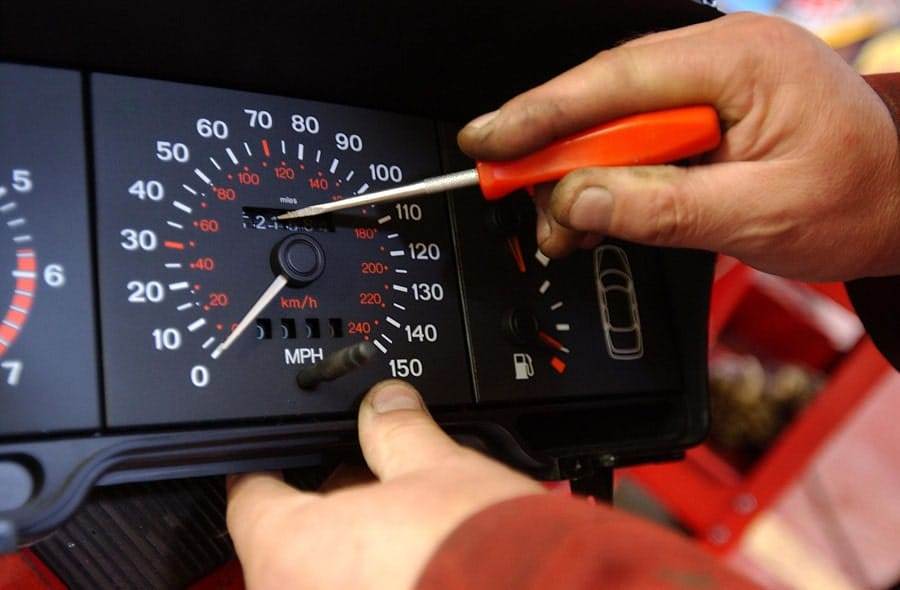
Most drivers believe that looking at the numbers displayed on the odometer tells them how many kilometers the car has traveled, but few consider the possibility that the odometer has been rolled back. Rolling back the odometer! What is it? Odometer fraud is the situation where scammers deliberately reduce hundreds or even thousands of kilometers from the number displayed on the odometer or alter the odometer reading.
This metric is important data for potential car buyers, and unfortunately, rolling back the odometer is a trick people have used for decades. Previously, odometer fraud was done manually. But with modern technology, with digital odometers, the rollback is done by removing the circuit boards to change or using a rewinding device attached directly to the vehicle’s electronic circuit.
How do you know when scammers have rolled back the odometer? (Photo: pinterest.com)
6 pieces of evidence to tell you about odometer fraud.
Odometer rollback usually occurs when drivers decide to buy a used car, as the mileage driven is the factor that determines the car’s value. So if you are considering shopping for a used car or even a new car, do not ignore the following 5 signs to avoid these fake odometers:
Detect signs of odometer tampering
This is also a very important way to check if the odometer is fraudulent. You should notice the numbers printed on the odometer to see if they are misaligned or crooked. Check if there are notable discrepancies in the numbers at unnecessary lengths.
The second warning sign not to miss is the trace of fingerprints. Although not always a certain sign of tampering, smudged fingerprints inside the car’s odometer could be a sign telling you that someone is deliberately scamming you.
Damaged markings or materials around the odometer are a growing concern. Odometer tampering does not always occur, but at least it also lets you know that someone has done something to the odometer. In this situation, you can directly ask the dealers if the odometer has been tampered with or altered.
Check the vehicle documentation
When buying a used car, many experts recommend checking the documentation for information on parameters: year of manufacture, registration (for the first time and subsequent times for vehicles that have changed owners), and the number of times the vehicle’s owner has been changed. The year of first registration is when the car starts running, from which it is possible to calculate the average number of kilometers corresponding to the years the car has been driven.
On average, your car travels about 15,000 to 20,000 km per year with popular cars and under normal usage conditions. With luxury cars and sports cars, this number may be lower. Therefore, for vehicles that have been used for 3 years or more, it is not possible to have mileage of 20,000 – 25,000 km; if possible, it will be very rare.
Check the vehicle history report (VIN)
What does a VIN report tell you? A vehicle history report gives you a range of information about a car you are going to buy: odometer readings, ownership history, title status, and more. To get a report on the vehicle you want to buy, you will normally need a 17-digit vehicle identification number or VIN. The VIN is found on the driver’s side panel near the windshield. Through the VHR report, you will know the faulty odometer parameters and if any alteration has been performed on the odometer. It will also show the average miles driven for each previous owner.
Check the condition of the vehicle’s interior and exterior.
Car interior: The surface of the seat (especially the driver’s seat) if the car has low mileage, there will not be many wrinkles and the elasticity is still good, the wear on the steering wheel, buttons, door handles, etc. Conversely, these details are more likely to show wear, discoloration, and scratches.
Car exterior: scratches around the car body, whether the door rubber seal is still firm or broken, is the hood edge failing or still tight? Check for color difference, whether new paint covers scratches or not.
Wear and tear of car parts
Car manufacturing technology is improving day by day. Quality is increasingly higher, and it is difficult to check if the odometer has been rolled back or not. However, the odometer parameters will also come with the wear and tear of car parts, and car buyers can fully make their decision based on these signs:
Tires are one of those spare parts that faithfully reflect the condition of your vehicle. Tire wear and tread depth can help you assess your vehicle’s usage. On average, a pair of tires has a lifespan of about 5 years. An odometer showing 25,000 miles should still have the original tire and a tread depth of 2/32 inches. You can use the Abraham Lincoln coin to check the depth.
Check the undercarriage: This is an area few people care about. While it is the place where the car’s condition is clearly visible. Vehicles that have been used a lot will have signs of rust and many dents from rocks or when going up and down the curb. Additionally, the area under the car is also a place to know if the car has had a serious collision or a major accident.
Inspect the accelerator, brake pedal, and gear lever: When the car is used a lot, the braking system will show signs of wear quite clearly. If the wear exceeds the number of kilometers displayed on the vehicle, drivers should wonder if the vehicle has been tampered with on the car’s odometer. If the pedal is in a too-new condition, it may also have been replaced.
Test drive the car
Rolled over odometer, meaning scammers deliberately alter the odometer reading.
Once you have finished, one of the ways is to check if the odometer has been rolled back. You should also test drive the car before deciding to buy it. The action helps you know the driving feel and detect noises and vibrations from worn parts from previous use. One way to check old cars applied by experienced mechanics is to drive the car on steep slopes and bumpy roads… At the same time, turn on the air conditioner to its maximum capacity. This will help you easily detect errors in the engine system and chassis.
After checking some of the above details yourself and still not completely assured, you can take the car to reputable garages or authentic centers. Although it costs more, it is the most reliable way to check the overall condition of your vehicle before making a decision. It is best to have your car inspected by a mechanic, as they can immediately tell you if specific parts of the car are altered or wearing out more than usual.
What to do if you are a victim of mileage reduction?
The odometer rollback is an important factor for you to decide whether to buy that car or not. Of course, buyers want a reliable car to be a long-term partner. Knowing how many kilometers a car has traveled is a good indicator of its lifespan. Additionally, the value of a used car is heavily influenced by the distance traveled. Buying a car with a rolled-back odometer means you are paying more than its true value.
Our data suggests that there are one and a half million vehicles with an odometer rollback, and it costs people thousands of dollars. Because our decision to buy a car is always based on low mileage. Mileage is an important factor in the car’s price. For example, when you roll back 50,000 miles, you artificially inflate the car’s value. What to do and how to avoid falling prey to this scam?
What should we do if scammers rolled back the odometer?
If an odometer rollback happens to you, you must absolutely report the incident. It is a good way for you and future buyers not to be trapped by this scam by knowing the vehicle’s record. It is not only a good deed to help you get justice, but also the seller or dealers who committed this fraud will be held accountable for their illegal actions. Many drivers wonder, who should I report odometer fraud to? Depending on the country and state, we have agencies that handle complaints about odometer rollback:
You can contact local law enforcement. They will investigate the issue, take appropriate action, and guide you to the next step.
You can also report suspected odometer fraud to the national consumer protection agency or the NHTSA organization. They will help you file a complaint.
How to protect yourself from tampered odometers?
To prevent this scam from happening, we recommend buying a car from a trusted agency or seller. You must be aware of the potential for dominant fraud, something that occurs more often with unlicensed dealers or private sellers. They will help guarantee the quality and origin of the vehicle. If you are considering a new car or a used car, make sure you have all the necessary documents before buying. This will help you limit problems when driving the car.
Final thoughts
Cheating on the odometer leads to many problems for the unfortunate new owner. Not only do you have to pay more than the car’s value, but it will cost you maintenance and care measures. Probably, you do not know that a car’s age is not measured in years but in the number of kilometers traveled. We hope that through this article, you will have the necessary knowledge not to fall victim to these scams.
Air only blows from the defrost vents: how to fix the problem in no time
Imagine enjoying your days with the fresh, breezy air blown from your beloved car on a sunny day. Then, one day, you suddenly realize that your air conditioner’s air only blows through the defrost vents while the others stop working. Even when you restart the engine, everything still works the wrong way and causes you a lot of confusion.
So, to help you solve this problem, we will now address the issue for you in the quickest way and share some of the most effective solutions for handling your defrost vent to ensure a cool and safe journey.
Air Only Blows Through the Defrost Vents: The Malfunction Is the Problem
Generally, we can solve any issues related to the car’s ventilation system fairly quickly because it’s not a complicated problem. Due to high pressure, the air surrounding the car will be drawn into a duct at the front and some small ones along the grille above the hood when the car moves at high speed. The external air flows, at the vehicle’s intake, will be heated or cooled by the air conditioner, then distributed throughout the interior via air ducts scattered inside the cabin. Ultimately, these air waves will then pass through a vent at the rear to exit, completing a smooth ventilation cycle inside the car’s cabin.
Nowadays, some vehicles are also equipped with a different ventilation system, where the air recirculates inside the vehicle’s cabin without being blown out. The vents will draw in the air while reheating or cooling it again, then send it back into the car. This defined system setup is beneficial if you don’t want hot, humid, or foul-smelling air to infiltrate your car while keeping the air inside the cabin fresh and cool.
The ventilation process repeats endlessly in your vehicle. (Photo: titan.cd)
In seasons with extreme weather conditions like summer or winter, as we often turn on the air conditioner to keep warm or cool down while traveling on the road, the ventilation system, especially the vents, may have to operate continuously and lead to overuse. Like almost everything, after a long period of use and poor maintenance, they can get clogged, develop bad odors, deteriorate, and even damage surrounding automatic parts, whether related or not.
Not only does the AC blow through the defrost vents, but anything that interferes with the smoothness of the ventilation system while you’re on the road should be noticed and requires intervention to be fixed promptly before it can cause many other uncontrollable damages.
How to Fix AC Stuck on Defrost
Who would want to sit in a car filled with awkward condensation on the windows and that smells bad? You probably also don’t want your beloved air conditioner to break down in the middle of a hot summer or cold winter.
Defrosting is a vital function that can prevent your vehicle from freezing and frosting over during cold winters. Moreover, not only is it a part of the ventilation system working hard to do its job, but the defroster plays a significant role as it can affect the smooth operation of the temperature control system and the safety and health of the vehicle, as well as the driver.
Finding the cause and solution for stubborn stuck defrost vents in advance can save you a trip to the garage for a full repair and cleaning process. Although the cost of cleaning and repairing a car with a ventilation system issue isn’t too expensive, it will waste a lot of time and effort that isn’t worth it.
That said, take a closer look at the following causes and solutions for this rather bothersome car defrost stuck issue right now.
1. Mode Door Actuator in Bad Condition
The first cause of AC only blowing through the defrost vents problem is a faulty mode door actuator. The function of the mode door actuator is to control the vents to ensure that air is blown correctly according to custom settings.
Nowadays, many modern door actuator systems have been gradually developed based on automation. As you can see, even modern systems that integrate multiple types of high-performance technologies will wear out and fail over time, not to mention manual systems. The actuator is also always in a vulnerable phase because it’s often exposed to air from various raw air sources.
It’s a device equipped with plastic gears that can easily break and slip during operation. Additionally, the door actuator can encounter many problems and operate incorrectly due to overload, incorrect or confusing wiring, poor quality of incoming air, and even improper installation.
One of the most visible signs indicating a mode actuator problem is that when you turn on the air conditioner, the front vent slot makes a clicking sound, and that’s when the air only blows through the defrost vents issue occurs. And the next notable thing is that you need to find a way to fix this problem. When the mode door has difficulty functioning correctly, you should unplug it immediately and rotate it inside with your fingers.
If your rotation feels smooth and there doesn’t seem to be any difficulty running, you can be relieved with that. Remember to clean your car’s mode door actuator from time to time to ensure it will function correctly and efficiently during a season with extreme weather conditions if unfortunately encountered.
2. Obstructed Air Intake
Normally, air enters the car in two main ways: the first is the vents above the dashboard, and the second is the duct where air is recirculated in the car. If both of the above air blowing lines are blocked or obstructed by obstacles, the vehicle will face an AC stuck on defrost problem, where the air will be concentrated in one vent without being able to escape.
Obstructed air intakes are mainly caused by obstacles falling into the vents while you’re traveling on the road, such as nuts, dead leaves, long sharp sticks, or bird nest branches. All these direct factors mentioned above cause blocked vents that you need to address immediately to avoid long-term consequences that are difficult to resolve. A dirty ventilation system will affect the air quality and temperature every time you travel. And no matter how cool the destination may seem, the polluted air in the car always gives you a not-so-great experience.
To solve this problem, you should clean and possibly replace the air filters without spending too much time analyzing why the air only blows through the defrost vents.
You can completely pump pure air to filter out pollutants that cause health issues. Moreover, all the home solutions you can think of for cleaning the air intakes are highly recommended to save money, instead of going to the repair shop, as long as they don’t damage or break the system.
Try to ensure you clean the air intake at least once a week with specialized cleaning solutions from supermarkets. Although they are just simple small actions, they will be effective in the long run.
3. Broken Blower Motor
The blower motor is one of the most vital parts of the car’s ventilation process. (Photo: the car repair guys)
The function of this part is to blow air through the vent. It can also check the amount of air blown when combined with a blower motor resistor. With such irreplaceable functions, a damaged blower motor will cause serious problems for your car. A vehicle operating with a damaged blower motor cannot expel air through the vents, resulting in no airflow to regulate and balance the air inside the cabin.
The most common problems with the blower motor are corrosion and tearing. As it fails, you can easily spot the issue by the loud humming when you start the air conditioning system, or you’ll hear an unusual vibration. If you have to travel for a long time and your car runs longer than usual, you might smell a burning odor from the vents due to overload and overheating.
And gradually, starting from a seemingly tiny part, every component of your motor will deteriorate if it often faces air restriction issues, the most notable causes being rust and overheating.
The best way to care for a damaged blower motor is to identify the causes and address the problems. If you don’t want the car’s components to suffer from overheating due to air restriction, pay close attention and take good care of the ducts. You should also watch out for rust issues, preventing dirt from entering your blower motor. Quickly repair any leaks in the blower motor if you notice strange smells or noises and change the air filter periodically.
4. Faulty Blower Resistor
The blower resistor will blow cold or warm air through the vents when you turn on the AC/heater and set the car’s fan to operate at various speeds according to your needs. When the car’s air conditioner is stuck on the defrost vents, your blower resistor might be faulty and requires intermediate repair.
Thermal overload or overheating is the main cause of this problem. So, to give the blower resistor full control over the airflow and strengthen the cabin air, have it replaced at a professional repair shop.
5. Damaged Blend Door Actuator
The function of a blend door actuator is to regulate and control the temperature in the car by allowing or preventing air from passing through the heater core. This part is made of plastic gears, which are quite fragile and unstable. Being made from non-rigid materials will create more opportunities for the blend door actuator to be exposed exclusively to damaged and broken conditions. Not only that, but this part is also prone to operating erratically or even ceasing to function when the electric motor is in an exhausted state caused by excessive and prolonged operations.
Keep an eye on the temperature in your car whenever you turn on the air conditioner. If you feel the temperature gradually becomes erratic or doesn’t cool and heat effectively as you customized the system, your blend door actuator is very likely to have issues that require immediate repair. Before the actuator is completely damaged and cannot be repaired with regular cleaning and maintenance methods, you can easily hear small ticking noises coming from the dashboard.
Considering the problems deemed quite serious with this type of actuator, trying to fix it temporarily is not a good idea. However, you can still replace the broken one with a brand new one with just some disassembly and basic tools. If you’re not confident in your mechanical skills, find a reputable repair center to ensure the system returns to proper operation as soon as possible.
6. Blown Fuse in the Ventilation System
The annoyance of seeing air blows only through the defrost vents of the car can also be triggered by a blown fuse, the part that protects the entire ventilation system from dangerous sudden voltage surges (electrical surges). When this unpleasant phenomenon occurs due to a short circuit, electricity won’t be able to reach the blower motor, so the ventilation system may stop working.
There are 3 types of fuses you need to pay attention to if you encounter the above situation. These are the ventilation fuses, the blower fuses, and the AC compressor magnetic clutch fuse. Generally, fuses have the effect of protecting the windings that connect the entire electrical circuit or limiting cases of serious explosions in your vehicle’s system.
You should pay attention to regularly monitor and check the car’s fuses. If they blow again even after replacing them previously, take your vehicle to the nearest repair shop for a comprehensive consultation and examination.
7. Bad Relay (Electrical Problem)
The current needed for ventilation is controlled by a relay. (Photo: 1A Auto)
The relay must supply current to the blower motor for it to operate. If this doesn’t happen, the ventilation system will be limited, forcing the air to pass only through the defrost vents.
Due to the continuous actions of opening and closing, the relay is tolerant to wear and tear. And it’s also one of the reasons why the blower cannot function properly to ensure the car’s ventilation system encounters no obstacles. Another sign of a faulty relay is if you feel hot or warm when you touch it, indicating that the relay has absorbed too much heat as a result of the failure.
Check and replace the relay periodically if you don’t want its problems to add more complications to the entire ventilation system and air quality whenever you get into your vehicle.
Wrap Up
Here are some of the main causes and solutions for the problem of car air conditioner air blowing only through the defrost vents that we would like to introduce to you today. With the article above, we hope you better understand the importance of vehicle ventilation systems as well as vents for better air quality and good health.
No one wants to get into a stuffy, secretive, and foul-smelling car. So, remember to identify the cause and address it appropriately to avoid wasting precious time on fruitless efforts. Take good care of the ventilation system, air conditioner, and all components of your vehicle that contribute to a pleasant and cool drive. You might be surprised at what a small act of maintenance can do for a car composed of a thousand parts.
Regenerative Braking: Its Mechanism and Advantages
Regenerative braking is a way to return energy to the battery. It stores some of the energy typically lost during braking. This conserved energy then recharges the car’s battery to power the motor. It’s one of the extraordinary things about hybrids and electric vehicles.
How does this braking system work? Does it offer an additional advantage over the traditional braking system? Let’s clear up all your confusion.
How Regenerative Braking Works
The braking system is a way for hybrid and electric vehicles to recover their energy and recharge their batteries. This energy would be lost as heat in conventional engines.
The electricity produced by this conversion can either be stored in a battery or used immediately by the electric motor to propel the vehicle forward.
In gasoline engines, brakes use friction to slow the car down. This transforms the kinetic energy of your vehicle into thermal energy that must be dispersed. This thermal energy dissipates as heat, which is why brake pads often get so hot.
If you’ve ever driven on a highway with many hills, or even just climbed a long flight of stairs, you know how hot your brakes can get.
The system works in a simple way. (Credit: Car QI)
In a hybrid or electric vehicle, another source of braking power works in addition to the friction brakes. When you brake, kinetic energy is converted into electrical energy and then used to recharge the battery. This helps extend the car’s range and reduces the need to recharge it as often.
Let’s say you’re driving a Toyota Prius. There are two motors: one that powers the wheels and one that recharges the batteries. When you need to slow down, instead of using the brake pedal (which would be attached to the wheels), you can press what we call the “regen” button (this stands for “regenerative”). This reverses the energy flow from the batteries to the wheels, slowing you down without wasting kinetic energy as heat.
The Unique Advantages of Regenerative Braking
Hybrid and electric vehicles offer unique advantages over ordinary gasoline or diesel cars due to this braking system. Here are some of the most important ones:
Reduces the Car’s Carbon Footprint
This is because your kinetic energy won’t be wasted; instead, the system will use it to power something. It’s also one of the main ways to reduce the use of fossil fuels and decrease the greenhouse gases emitted by an automobile.
Thus, this braking helps reduce your car’s fuel consumption and emissions. This makes your vehicle more environmentally friendly and can help you save money on gasoline.
Less Wear on Brake Pads
As we mentioned earlier, this braking reduces the amount of heat generated when you apply the brakes. This helps extend the life of your brake pads and reduces the need for replacement.
Improves Mileage Range
In electric cars, this braking technology extends the car’s range by recharging the battery. This makes it easier to travel long distances without stopping to recharge the vehicle.
Increases Efficiency
It helps power both the electric motor and the gasoline engine in hybrid cars. This increases the car’s overall efficiency and reduces fuel consumption.
Conclusion
Regenerative braking is an innovative technology for electric and hybrid vehicles. It offers many benefits in addition to reducing environmental impact. Try it and see how much of a difference it can make for you.