Our cars are the best means of transportation for getting to the office and for long trips. Therefore, none of us have time to deal with transmission fluid leaks. If a car loses transmission fluid, it involves a lot of time and money.
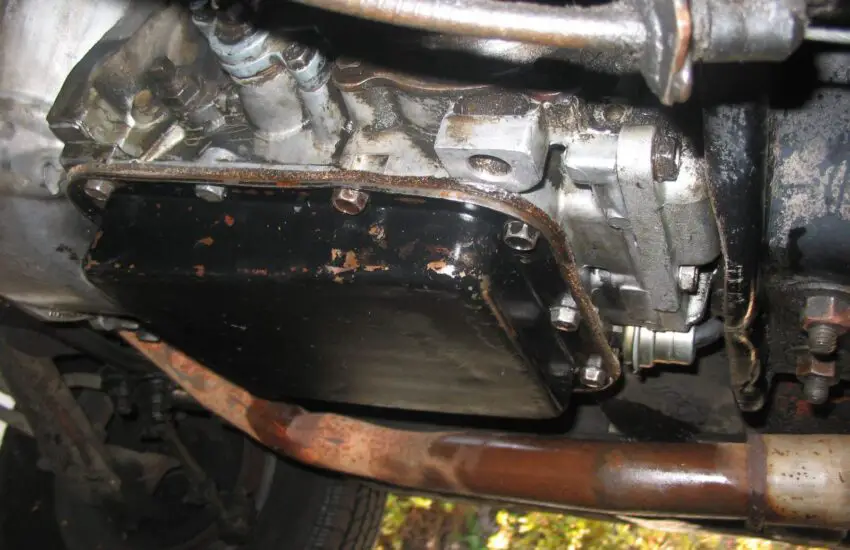
The transmission usually leaks due to a loose pan where the bolts remain unstable after changing a filter. However, this doesn’t always happen for the same reason.
Because the fluid is the lifeblood of every vehicle, its leak can cause problems as well as a decent investment.
What Causes Transmission Leaks
The main cause of a transmission leak is a cracked pan gasket. Nevertheless, there are also other causes that can lead to this leak.
Here are some common causes:
1. Broken Fluid Lines
Transmission fluid flows through moving parts, absorbing heat which it expels via the aluminum transmission cooler.
These lines are used to circulate ATF and are usually made of rubber. They often start leaking due to external damage.
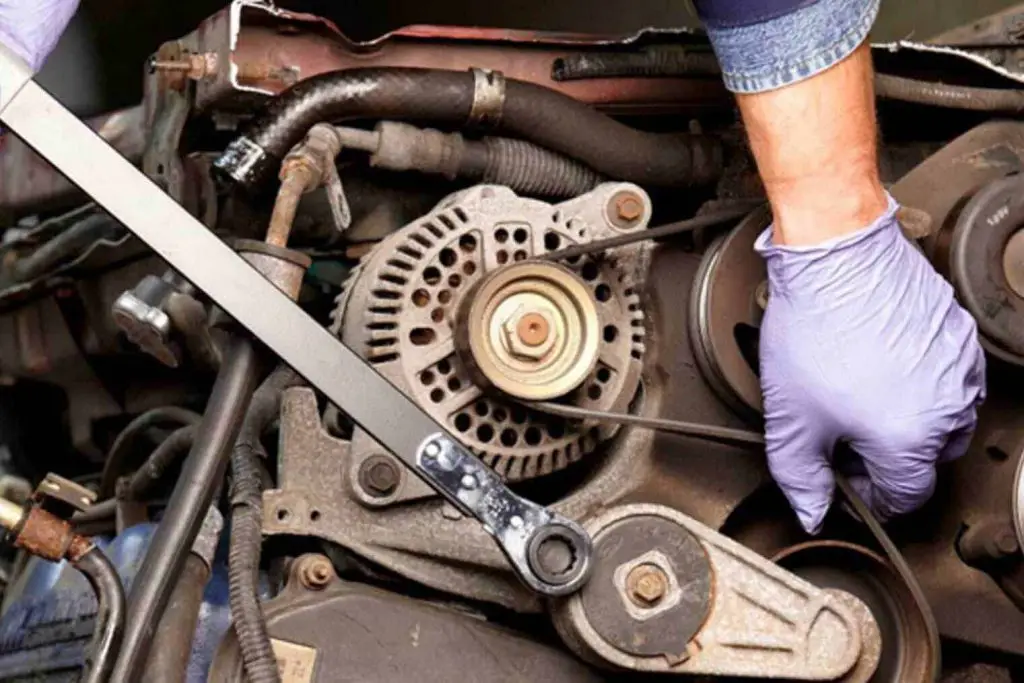
2. Degraded Pan Gasket
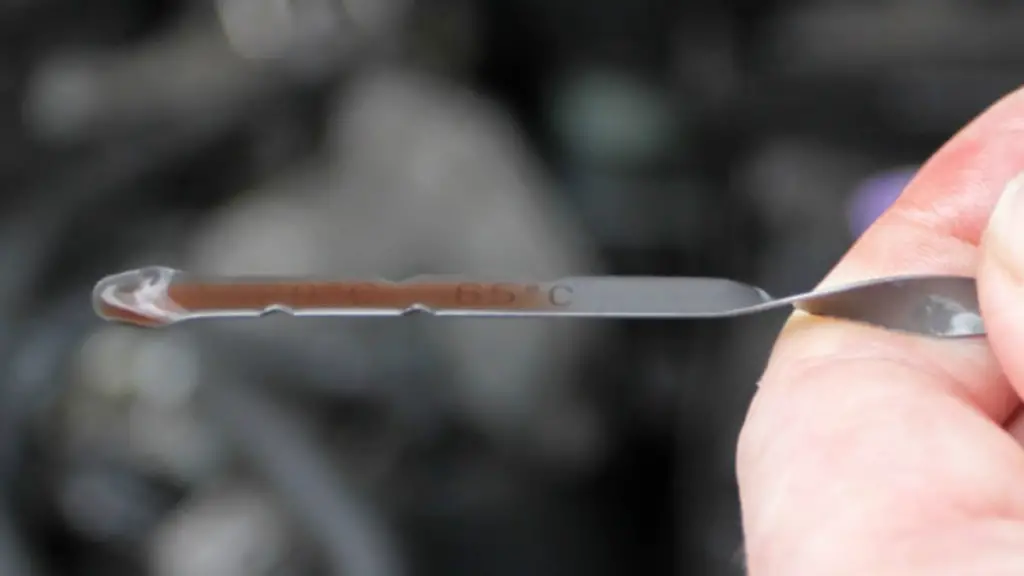
Reasons for Transmission Leaks (Photo Source: tmproductions.com)
As mentioned above, pan gaskets are the most common source of fluid leaks. Over the years, their material can degrade, causing ATF to leak into your driveway. Another reason for this leak is improper installation of the pan gasket.
3. Hole in the Pan
The pan is located at the very bottom of the transmission and is one of the most sensitive parts of the vehicle.
Although it is made of durable metal, it is vulnerable to cracks and punctures. If the damage is severe, it is best to replace the entire transmission pan.
4. Damaged Seals
To maintain hydraulic pressure and prevent transmission leaks, an automatic transmission uses several seals.
These seals deteriorate over time and naturally fray and crack. If this is the case, the risk of transmission leaks increases.
5. Cracked or Damaged Transmission Lines
Transmission lines are responsible for carrying transmission fluid between the transmission and the transmission cooler (if applicable) in the radiator. They are typically made of metal or rubber and can be damaged for various reasons:
Road debris: Small stones, debris, or road hazards can puncture or damage transmission lines. When a line is damaged, cracks or holes can form, allowing transmission fluid to escape.
Corrosion: Over time, especially in areas with harsh weather conditions or where road salt is used, transmission lines can corrode and weaken. This corrosion can lead to weak spots or holes in the lines.
Accidents or collisions: In the event of an accident or collision, the impact can damage transmission lines, leading to fluid leaks. Even a minor fender-bender can potentially damage these lines.
6. Excessive Transmission Fluid Pressure
The transmission operates at a specific fluid pressure level to function correctly. If this pressure becomes too high, the fluid can be forced through seals and gaskets, which can lead to leaks. Several factors can cause excessive transmission fluid pressure:
Malfunctioning pressure regulator: The transmission is equipped with a pressure regulator that controls fluid pressure. If this regulator is not working properly, the pressure can rise beyond recommended levels.
Obstructions in fluid passages: Any blockage or restriction in the transmission’s fluid passages can hinder fluid flow, leading to a buildup of pressure.
Overfilling transmission fluid: Adding an excessive amount of transmission fluid during maintenance can lead to high pressure levels, as the excess fluid has less room to circulate properly.
What are the Best Solutions for Transmission Leaks?
Although you know the various causes of transmission leaks, you should also be aware of the different ways to fix them.
Here are some points to get you started:
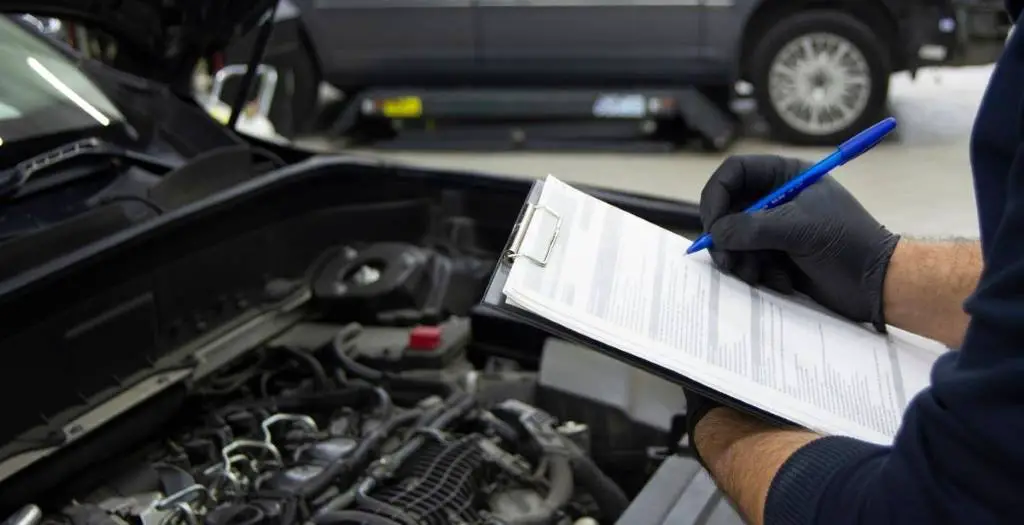
1. Check the Fluid Timely
The Best Solutions for Transmission Leaks (Photo Source: 00ONE/ISTOCK)
It is very important to check the fluid level at every oil change. This is the most important maintenance tip of all.
2. Pay Attention to the Fluid Color
Keep a close eye on the fluid color. New fluid appears red and translucent, while the older it gets, the darker it becomes. So change it as soon as it changes color.
3. Replace Damaged Parts
Replace damaged parts such as the pan gasket, fluid lines, etc., to keep the transmission system in perfect working order. It is advisable to seek professional help rather than using DIY techniques.
4. Repairing Cracked or Damaged Transmission Lines
Repairing or replacing damaged transmission lines is essential to stop fluid leaks. The specific repair process can vary depending on the extent of the damage and the type of lines used. Generally:
If there are minor cracks or holes, it may be possible to repair or temporarily seal them. However, this is not a long-term solution and replacing the damaged section is recommended.
In case of more significant damage or corrosion, it is better to replace the affected lines entirely.
This typically involves removing the damaged section and splicing in a new piece of line, which must be made of the appropriate material (metal or rubber) and properly secured to prevent future leaks.
5. Solution for Excessive Transmission Fluid Pressure
To address excessive transmission fluid pressure:
A mechanic will typically inspect and diagnose the problem, which may involve checking the pressure regulator and inspecting the fluid passages for blockages.
If the pressure regulator is faulty, it will need to be repaired or replaced.
It is essential to remove any blockage or restriction in the fluid passages to restore proper fluid flow and pressure levels.
It is also important to ensure the correct amount of transmission fluid is in the system, neither overfilled nor underfilled, to maintain the correct pressure.
It is important to note that driving with excessive transmission fluid pressure can lead to serious damage to the internal components of the transmission. Therefore, it is crucial to address this issue promptly to avoid further damage and fluid leaks.
Final Words
Transmission leaks are common, so don’t panic if it happens. However, taking this issue lightly is certainly not the right way to handle it. Gather knowledge about it and stay informed about potential ways to reduce it.
Function and symptoms of a faulty radiator cap
You may know that your car’s radiator is responsible for the engine overheating. What is interesting and often overlooked is the importance of a seemingly insignificant small component, the radiator cap. A faulty radiator cap can render the entire cooling system inefficient and cause costly damage to the precious engine. Therefore, knowing the functions and the symptoms of a faulty radiator cap is a practical and simple maintenance tip you should keep in your pocket to maximize your engine’s performance and lifespan.
Cooling System in the Car: What You Need to Know
Before getting into the details of the radiator cap, you need to understand the basics of a car’s cooling system. When it comes to a complex machine like your car, a small failure in a single component would affect the operation of the entire system, and symptoms can manifest through the other components of the same system.
A car’s radiator acts as a heat exchanger, transferring excess heat from the engine coolant to the air. The radiator is composed of tubes that carry this coolant, a protective cap that acts as a pressure valve, and a tank on each side to collect the coolant overflow.
An interesting feature is that the tubes carrying the coolant usually contain a turbulator, which agitates the fluid inside. This way, by creating turbulence inside the tubes, the coolant mixes and is thus cooled evenly, not just the liquid touching the tube walls.
While the engine is running, the liquid from the cooling tubes enters the cylinder heads and engine blocks. After absorbing heat from the engine, this liquid returns to the radiator. There, the air entering through the grille lowers the temperature of the coolant.
A faulty radiator cap can render the entire cooling system inefficient and cause costly damage to the precious engine. (Photo: natrad.com.au)
Below are some of the main components of a car’s cooling system. The system includes other parts, but to understand the function of the radiator cap, this article will focus on those below:
Coolant
This mixture in the coolant is mainly composed of water and an antifreeze solution in a 1:1 ratio.
Where water extracts all the heat from the engine, the antifreeze solution, on the contrary, increases the boiling point of the solution. Thus, the latter helps fight corrosion and the boiling of the liquid in the system.
A higher boiling point means the coolant can transfer more heat from the engine, as a boiling liquid is itself at its maximum temperature and therefore cannot transfer any heat from the engine.
Coolant Tubes
The main purpose of their design in the cooling system is to build a bridge between the radiator and the engine. Responsible for circulating the coolant, they are also known as bypass tubes.
Overflow Tank
Located on each side of the cooling circuit, these small tanks collect the liquid expelled during high pressure in the tubes. Through this action, they simply allow the recycling of the coolant once a vacuum is generated in the coolant.
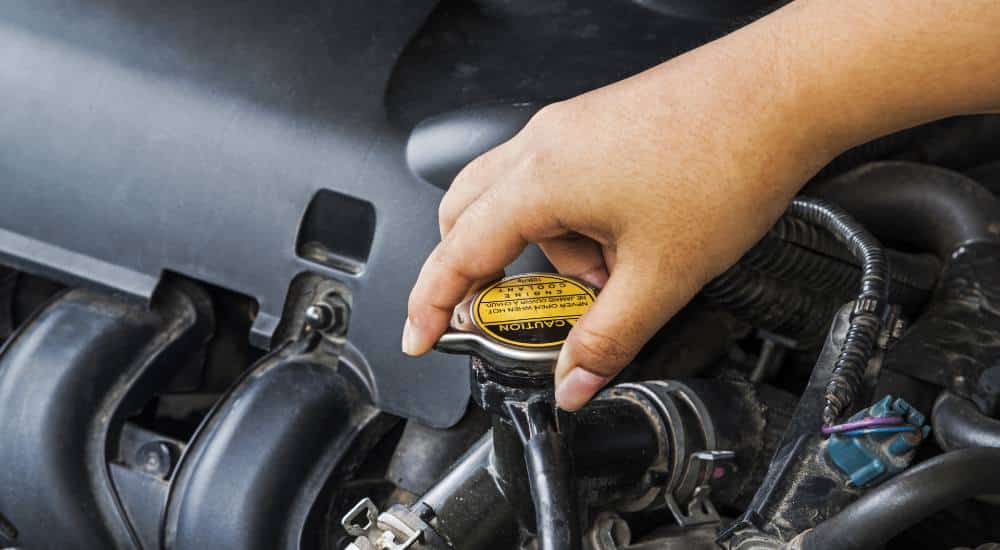
Radiator Cap
This pressure cap operates using spring valves. Its main use is to let liquid out into the overflow tanks when the pressure inside the system increases. Similarly, in case of a pressure drop, it brings the liquid back from the tanks.
For your convenience, if you don’t want to encounter a faulty radiator cap, then always follow its maintenance tips.
How Does a Radiator Cap Work?
When the engine coolant heats up, it expands, thus increasing the pressure inside the closed cooling system. The radiator cap controls this expansion and maintains a constant pressure level inside the cooling system. The radiator cap also allows the engine coolant to contract and return to the radiator without letting air into the cooling system.
Cooling systems withstand different pressures but are typically between 13 and 16 pounds per square inch (psi), or about 1 bar. High-performance radiator caps have a pressure between 19 and 32 psi. This pressure must remain constant.
Too high pressure will exceed the manufacturer’s specifications for the cooling system and could lead to failure of the system components. Too low pressure could cause the coolant to boil. With little or no liquid to cool the vehicle, the engine risks overheating.
Allows Coolant to Expand and Maintains Pressure Level
When the engine heats up, the coolant overheats and expands, putting it under high pressure. When it enters the radiator, the pressure increases even further because it is in an enclosed space.
The radiator cap acts as a relief valve set to open at the maximum pressure point, i.e., the radiator cap’s rated pressure. This is usually set at a density of 15 psi, or otherwise between 13 and 16 psi.
When the pressure inside the cooling system reaches the radiator cap’s rated pressure, the cap’s spring valve is forced to open, allowing heat to escape and excess coolant to overflow into the coolant overflow tanks on each side of the radiator.
This way, the radiator cap allows for the expansion of the coolant inside the cooling system. This is important because, without this function, the pressure would simply continue to increase, causing sudden leaks or even explosions since the accumulated pressure has no outlet to release.
Secondly, the radiator cap’s spring valve helps maintain a specific pressure inside your cooling system. When atmospheric pressure increases, the boiling point of a liquid also increases. A boiling liquid is not effective at transferring heat because the liquid itself is overheated, so increasing the pressure inside the cooling system means the coolant can dissipate more heat before it starts to boil.
Allows Coolant to Contract and Return to the Radiator
The radiator cap also allows the coolant to return to the radiator after completing its mission of cooling the running engine. As the engine cools, the coolant contracts, creating a vacuum inside the engine cooling system.
The radiator cap’s vacuum valve then opens and sucks the coolant from the coolant overflow tank back to the radiator, continuing its journey in the cooling system. In other words, the radiator cap’s vacuum valve allows for the contraction of the coolant inside the cooling system.
Symptoms of a Faulty Radiator Cap
Replacing your radiator cap is an easy job to do (Photo: dubizzle.com)
A faulty radiator cap may not seem particularly dangerous, but such a slight deviation can greatly affect your engine’s performance and lifespan. Ignoring a faulty cap can lead to overheating issues and potential engine damage, especially during the hot summer months. If you leave it too long, a faulty radiator cap could mean you risk being stranded on the road with a malfunctioning engine.
Below are the most common symptoms of a faulty radiator cap. Be attentive to the very first sign of abnormality and have everything inspected as soon as you get the chance.
Overheated Engine
A coolant leak or air in the cooling system can lead to engine overheating. If you notice your engine starting to smoke due to overheating, do not look under the hood unless you have turned off the engine. Then, let the engine cool down for a while before opening the hood.
This way, the engine can stay cold while you check it. If there is coolant near the radiator cap, the pressure cap may be damaged. Check this and replace it if necessary.
Coolant Leak
If the radiator cap is stuck, pressure can build up inside the radiator, which could cause a leak or an explosion of the cooling system components.
If you notice coolant near the radiator or the radiator cap, it means the coolant is leaking. Check if the radiator has holes or if the cap appears worn or damaged. If so, replace the cap.
White Marks on the Radiator
When coolant leaks from the radiator filler neck and dries, it often leaves white marks. Even if you don’t notice a coolant leak under the radiator cap, pay attention to these white marks. They can indicate that the cap is leaking under pressure or intermittently.
Overflowing Tank
Coolant enters the tank as it expands. The radiator cap releases the extra pressure by sending coolant into the overflow tank.
If your radiator cap is faulty, the coolant could flow out too quickly and cause the tank to overflow. While you’re at it, check that your coolant overflow tank is functioning properly.
Radiator Hose Collapses
The radiator cap might be faulty if the radiator hose collapses. The radiator cap is not releasing the vacuum properly, and this causes the radiator hose to collapse during the cooling period.
If this happens, inspect the cap to see if it has any damage. If so, replace it immediately.
Radiator Hose Bursts
If the pressure in the cooling system is too high, you will likely see one or more hoses start to spray coolant all over the engine compartment. Most of the time, the pressure is not high enough to tear the hose in two. You will often see a pinpoint leak that only sprays coolant when the car is hot.
A hose with a small hole can seal perfectly when the car is cold. As you drive, the pressure in the cooling system increases. The pressure will eventually be enough to force coolant through the small hole, and your car will slowly lose coolant.
If this is the case, you will probably notice a leak on the ground or in the engine compartment when you reach your destination, but not when you start driving. Check if your overflow tank is slowly emptying over a few miles. This can give you an idea of the problem.
Air Entering the Cooling System
As mentioned above, an important role of the radiator cap is to allow the expansion and contraction of the coolant, or its movement through the cooling system, without letting air into the system.
When the radiator cap is not closed properly, air can enter the cooling system. This will cause air pockets to form inside the heater radiator, thermostat, and radiator hoses. As a result, the engine will start to overheat because it cannot maintain a constant temperature.
How to Check and Replace the Radiator Cap
Now, after knowing the symptoms of a bad radiator cap and its standard operation, it should be easy to inspect the cap area and save your vehicle from any damage or costly repairs.
*Warning: Never open the radiator when it is hot! Let the engine cool down completely before opening the radiator. The radiator is under high heat and pressure. If you try to open a hot radiator, scalding steam and coolant will escape, and you are highly likely to burn yourself.
Cap Inspection
Before you start diagnosing, check that the pressure indicated on the radiator cap matches the cooling system pressure specified by the manufacturer. You can find this information in a repair manual, a factory maintenance manual, or online.
Visually inspect this cap to ensure the spring moves freely and there is no debris or corrosion under the cap.
Cap Replacement
Replacing your radiator cap is an easy job to do and only takes a few seconds of your time.
Pay close attention to your cap’s pressure rating and choose one with the same pressure rating. Once you have a replacement and your engine is cold, simply unscrew the old cap and install the new one by screwing it on.
You can easily find a radiator cap for your vehicle for less than $10 generally. Some may be more expensive, but most will cost you less than $20.
Radiator Pressure Test
If you have a radiator pressure tester, you can inspect the cooling system in your garage. This can help you find leaks or determine if the radiator cap is faulty. You can also rent or buy this tester from your local auto parts store or on Amazon.
To begin, open the hood and locate the radiator. It is usually located right in front of the vehicle’s engine. Remove the radiator cap by pushing it down first, then turning it counterclockwise.
Take the cap adapter and screw it onto the end of the pressure tester. Continue screwing until you can’t screw it anymore. If you don’t know what the cap adapter looks like, check the pressure tester packaging label and see if it’s pictured there. You can also look it up online.
After attaching the cap adapter to the pressure tester, screw the other end of the cap adapter onto the radiator filler neck until it is tight. The pressure tester should now be sealed against the radiator. If not, you might not be using the adapter suitable for your specific radiator.
Using the pump handle, start pumping the tester until you reach the pressure indicated on your radiator cap. Check if the gauge can hold the pressure. If the pressure starts to drop and you are sure you have a good seal against the radiator filler neck, you have a leak in the cooling system.
It is best to look for any external coolant leaks while the system is under pressure, as it will be easier to detect them. Any component that is leaking will need to be replaced.
Once the pressure test is complete, slowly unscrew the adapter from the radiator cap so that coolant doesn’t spill everywhere. It might be wise to have a pan or bucket handy to catch any overflow. Refill the coolant that was lost and clean up any coolant that spilled on the floor.
How to Detect and Solve Car Engine Vibration Problems
Are you experiencing engine vibration issues? It’s generally accepted that vehicles should run smoothly on ordinary roads at any speed. However, when you’ve owned a vehicle for a long time, it’s likely that your automobile has developed some vibration problems. This is one of those irritating vehicle issues that tend to start gradually and slowly, and are subtle enough that you might not notice or even overlook them.
If the car engine isn’t receiving enough fresh air, fuel, or spark needed for proper operation, you’ll likely notice vibration coming from the engine area. This problem manifests as shaking and jerking when your car accelerates, or as rumbling within a certain speed range. Below are the best ways to find and solve engine vibration problems in 45 minutes and how to reduce car engine vibrations? Let’s begin:
5 Things That Will Change Your Approach to Car Engine Vibrations:
1. Misfiring Spark Plug
When an engine misfires, it vibrates because the engine balance is disrupted. Check your spark plug and see if something is wrong. In many vehicles, a common cause of engine vibrations is worn or failing spark plugs. Worn or fouled spark plugs cannot function effectively in each cylinder.
Engine Mount
Engine vibrations or shaking can be caused by engine mount failure. The engine mount is the part that holds the engine in the correct position, preventing it from moving during operation. This part connects the engine to the vehicle body.
The mount is typically made of rubber to help absorb engine vibrations during operation. Due to high-intensity work, the rubber part wears out and damages easily, leading to poor vibration absorption. When the engine mount fails, the vehicle chassis comes into contact with the engine and the engine starts vibrating! To solve this problem, you need to replace your engine mount.
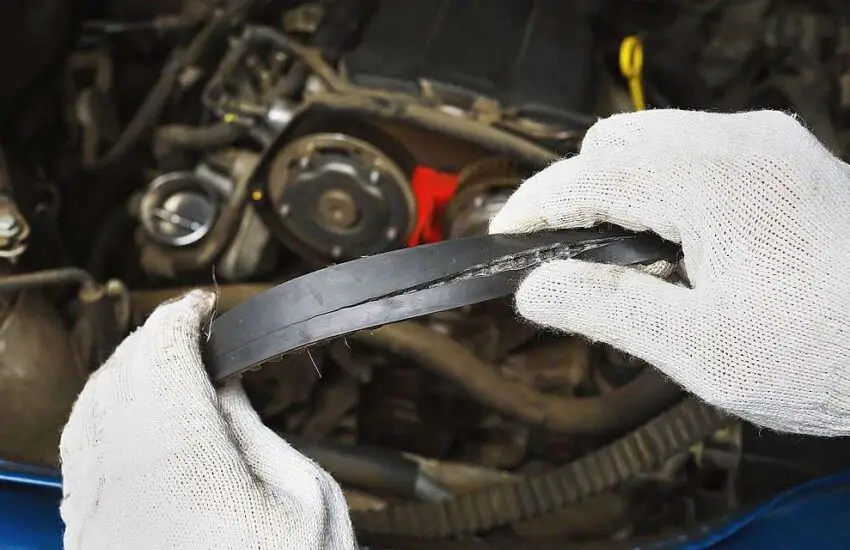
Serpentine Belt Tensioner
A serpentine belt tensioner causes engine vibrations (Photo: uchanics.ca)
Most of the time, a serpentine belt tensioner causes engine vibrations. When the serpentine belt tensioner fails, the belt loses its grip. The serpentine belt tensioner can bounce, leading to engine vibration problems. You need to add a new serpentine belt tensioner to get rid of it. Problems with belt-driven components or the belt itself are another typical reason for engine vibrations in automobiles. Timing belts as well as other belts that are loose or cracked can prevent belt-driven parts, such as fans and other components, from moving or rotating at a consistent speed, which can cause car engine vibrations.
To avoid these kinds of problems, it’s best to regularly check all vehicle belts to ensure they’re free of cracks and ribs, as well as properly tightened and functioning as they should.
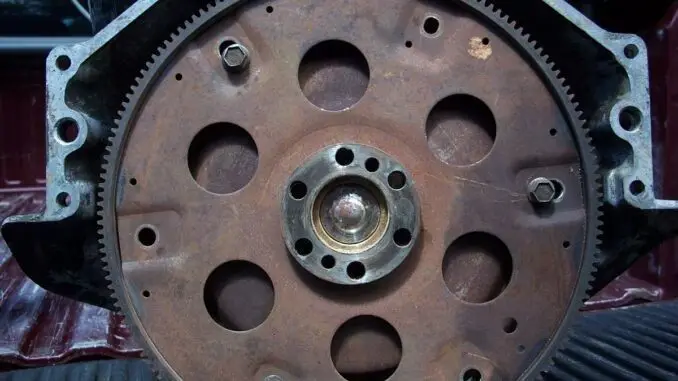
Flex Plate
A flex plate contains a circular steel disk with punched holes (Photo: gmride.com.my)
Flex plates play an important role in automobiles equipped with automatic transmission. A flex plate contains a circular steel disk with punched holes and, depending on the product, teeth on the outer circle that engage the starter. A flex plate bolts directly onto the crankshaft flange and connects to the torque converter with large mounting bolts. Problems with your vehicle’s flex plate can cause vibrations. You need to disassemble your engine parts and take a look at the flex plate. If you haven’t replaced your flex plate for a long time, it’s time to replace it! If you’re having problems with a new flex plate, contact experts to identify the main problem causing the vibrations.
Harmonic Balancer
Check the vibration damper. If you find that the “rubber insulator” is missing, make sure the “vibration damper” is causing the vibration problems. This is because when the vibration damper fails, the engine starts vibrating. You need to check your vibration damper and front crankshaft seal. Clean them, apply grease, and that’s it!
Since vibrations are slightly different from other noises specific to vehicles, it’s generally difficult to identify the source of the problem. This problem can spread far from the exact cause or appear in another location. This transfer of vibration noise is known as telescoping.
6. Braking Problems
Over time, car brakes wear out and often warp due to friction and external forces. Additionally, due to stressful operations, the brake disc surface will also be damaged due to friction. Therefore, a problem with the braking system will cause strong vibrations when starting the vehicle, particularly when applying brakes during the driving process.
How to Solve Car Engine Vibration Problems?
If you’re experiencing vibration problems when starting the engine, accelerating, pressing the brake, slowing down, etc., car owners can refer to some of the following solutions:
Check and clean the engine’s spark plugs and high-tension cables to see if they’re damaged. If they’re defective, replace them immediately.
Regularly check and clean the air filter to limit dirt buildup in the engine.
Check and replace the engine mount if damage is detected.
Find the exact cause and address it quickly to avoid more serious damage that’s dangerous for drivers.
Take the vehicle to a reputable center for regular repair and maintenance.
A vibrating car is a sign that one or more car parts have problems. When vehicle owners detect this sign, they should take their vehicle to maintenance and repair centers to quickly address the damage, thus avoiding causing serious problems.
A low rumbling noise during acceleration? The causes
Hearing a faint rumbling during acceleration can be unsettling for many drivers. This phenomenon can indicate a range of potential issues with your vehicle, from minor repairs to more serious problems requiring immediate attention.
Understanding the causes and knowing what steps to take can help ensure your vehicle remains in good working order. Below, we explore common reasons behind this issue and answer some frequently asked questions.
Causes of Faint Rumbling Noise During Acceleration
A more detailed look into the causes of a faint rumbling noise during acceleration can help understand what might be malfunctioning with your vehicle. Each cause has specific characteristics, implications, and solutions.
Exhaust System Issues
The exhaust system plays a crucial role in directing combustion gases away from the vehicle’s cabin and reducing engine noise. Problems can occur in different parts of this system.
Leaks can happen in the exhaust manifold, which collects exhaust gases from the engine cylinders, if the manifold cracks or its gaskets deteriorate. This results in a noticeable rumbling as gases escape.
Exhaust pipes can be damaged by impacts or corrode over time, creating openings through which exhaust gases leak, producing a rumbling noise.
Similarly, issues with the muffler, which reduces noise from the exhaust process, can result from damage or corrosion, compromising its efficiency and leading to a louder rumble.
Faulty Engine Mounts
Engine mounts stabilize the engine and absorb vibrations. When these mounts fail, degradation of the rubber or synthetic materials can lead to cracks or breaks.
This allows the engine to shift more than normal, especially during acceleration, causing vibrations and noise. This excessive movement can also strain other components, such as the transmission and drivetrain, potentially leading to further issues.
Engine mounts stabilize the engine and absorb vibrations. (Photo: CarParts.com)
Worn or Damaged Drive Belts
Drive belts, including serpentine belts, are essential for powering engine accessories such as the alternator, air conditioning compressor, and power steering pump. As belts wear out, they can crack, become glazed, or start to fray.
A worn belt can slip on the pulleys, causing vibrations and a rumbling or whirring noise. Regular inspections help identify this wear early, allowing for timely replacement to avoid further complications.
Transmission Problems
The transmission is essential for transferring engine power to the wheels. Transmission issues can be complex and varied.
Low fluid levels, for example, reduce lubrication and cooling of the transmission, leading to increased friction, heat, and wear, which can cause a rumbling noise.
Difficulty shifting gears, along with rumbling noises, can indicate deeper transmission problems that may range from a simple fluid change to more extensive repairs.
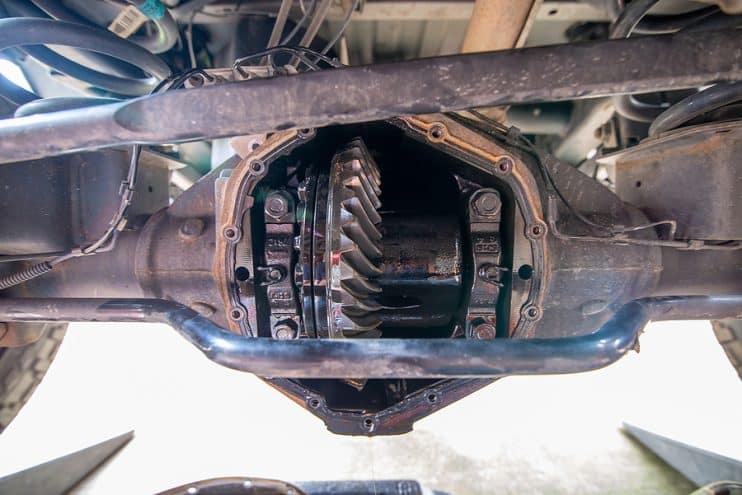
Differential Issues
The differential allows the wheels to rotate at different speeds, which is essential for turning. Low differential fluid levels lead to poor lubrication, resulting in increased friction and wear, which can manifest as a rumbling noise, particularly noticeable during acceleration or turns.
Over time, the differential’s gears and bearings can also wear out, leading to noise and operational issues.
The differential allows the wheels to rotate at different speeds. (Photo: BreakerLink)
Tire Problems
Sometimes, what sounds like a rumble from the engine or exhaust might actually come from the tires. Uneven tire wear, low tire pressure, or unbalanced tires can create rumbling, especially at high speeds.
Regularly inspecting your tires for signs of wear and maintaining proper inflation can help mitigate this issue.
Wheel Bearing Wear
Wheel bearings allow the wheels to spin smoothly. If a wheel bearing is worn or damaged, it can produce a grinding or rumbling noise when the vehicle accelerates.
This noise generally increases with the vehicle’s speed and can sometimes be more pronounced during turns. Wheel bearings should be replaced by a professional.
Suspension Problems
The suspension system, including shocks and struts, helps absorb road irregularities and maintain vehicle stability.
Worn or damaged suspension components can lead to a rumbling noise due to increased movement of suspension parts or the vehicle’s body itself.
Inspecting the suspension system for worn parts and ensuring prompt replacement can prevent this issue.
Brake System Wear
Issues with the brake system, such as worn brake pads, damaged rotors, or problems with the brake caliper, can sometimes cause a rumbling, especially if the noise occurs or worsens during braking.
Regular brake inspections and maintenance are essential to ensure the system operates correctly and safely.
Each of these causes underscores the importance of comprehensive vehicle maintenance and the need to pay attention to various systems beyond the engine and transmission.
Problems with the brake system can sometimes cause a rumbling noise. (Photo: Minit-Tune & Brake)
FAQ
1. Can tire problems cause a faint rumbling when I accelerate?
Yes, tires can contribute to a faint rumbling noise, especially if they are unevenly worn or underinflated. Misaligned wheels or unbalanced tires can also create vibrations and noises during acceleration.
2. Could the type of fuel I use influence the rumbling noise during acceleration?
Although less common, using fuel with a lower octane rating than recommended by the vehicle manufacturer can sometimes cause engine knocking, which might be perceived as a rumbling during acceleration, especially under load.
Always use the fuel grade specified in your vehicle’s owner’s manual.
3. Is it possible that a faint rumbling noise is simply a characteristic of my vehicle?
Some vehicles, especially those with larger or high-performance engines, may naturally produce a deeper rumble during acceleration due to their design and exhaust system configuration.
However, any change in the sound’s character or intensity should be investigated to rule out underlying issues.
4. Can weather conditions affect the occurrence of rumbling noises during acceleration?
Extreme temperatures can affect vehicle components and cause noises. Cold weather, for example, can harden materials and fluids, causing the engine and transmission to operate noisily until they reach optimal operating temperatures.
Similarly, heat can expand components, potentially altering clearances and leading to unusual sounds.
5. If my vehicle is electric or hybrid, should I still be concerned about a rumbling noise during acceleration?
Although electric and hybrid vehicles generally operate more quietly than their gasoline counterparts, they are not immune to mechanical issues.
A rumbling noise in these vehicles could stem from the electric motor, transmission, or even interactions between the tires and the road. Any unusual noise should be investigated.
6. Could the rumbling noise be related to aftermarket modifications?
Aftermarket modifications, such as changes to the exhaust system, engine tuning, or the addition of certain performance parts, can alter the vehicle’s acoustics and dynamics.
These modifications can introduce new sounds or amplify existing ones during acceleration. Always ensure modifications are performed by professionals and comply with the vehicle’s specifications.
Conclusion
Identifying the source of a faint rumbling noise during acceleration may require some detective work. Understanding these potential causes provides a solid foundation for diagnosing and addressing the car issue, ensuring your vehicle’s proper operation!
Step-by-step guide on how to repair a car cigarette lighter
This is a quick guide on how to fix a car cigarette lighter. If you want to easily repair a car cigarette lighter, this guide is for you. Imagine you’re driving on a long trip and you notice your phone battery flashing red, and you think, “No problem, I’ll just plug it into my car charger.”
But then you realize that your car’s cigarette lighter socket, which also serves as a charging port, is unresponsive and broken. Very frustrating, isn’t it?
Well, don’t worry, because that’s the purpose of this article, as we look at the steps to fix a car cigarette lighter.
Why Should You Care?
Originally, cigarette lighter sockets were only for lighting cigarettes, but the days when they were just for lighting cigarettes are long gone. In today’s vehicles, that small socket is a lifeline for powering all the necessary useful gadgets that make life on the road easier for us. Imagine a car trip without your GPS or a car full of bored children with dead tablets. That doesn’t sound fun, does it?
Why Do You Need to Fix Your Cigarette Lighter?
Your car’s cigarette lighter can be a source of many inconveniences and issues in your car if it stops working. Although we all have different reasons for wanting to fix the cigarette lighter port, below are some of the common reasons why we might want to repair them.
Avoid expensive mechanical repairs later on.
It’s very convenient to have a properly working socket (you can charge your gadgets wherever you are).
It’s easy to fix minor faults like blown fuses, sockets, etc., in your car, and a cigarette lighter is no exception.
Common Causes of a Faulty Cigarette Lighter in a Car
The most common causes of a faulty or broken cigarette lighter in a car can range from minor, insignificant issues to slightly more complex problems. Often, it might just be a simple blown fuse. Other times, it could be due to a loss of power to the socket or something as simple as a stuck gum wrapper inside. Whatever the reason, the solution is usually within your reach.
Diagnosis and How to Fix a Car Cigarette Lighter Step by Step
#1. Checking and Replacing the Fuse
The problem is often a blown fuse. Located in your car’s fuse box, it’s usually a simple fix. Grab your car’s manual (yes, the one gathering dust in the glove box) and locate the fuse box. Once you’ve found the fuse responsible for the cigarette lighter, inspect it. If it’s broken or blown, replacing it is straightforward. Remember to always match the amperage of the new fuse to the old one.
#2. How to Handle a Stubborn Fuse
If the new fuse blows immediately, it’s a sign of a deeper issue, perhaps a short circuit somewhere in the wiring. This might require a bit more effort or, in complex cases, professional help.
#3. Cleaning the Cigarette Lighter Socket
Sometimes, the problem isn’t electrical but physical. The socket can become a haven for all sorts of debris, from crumbs to small bits of paper. A good cleaning can often get it working again. Just make sure the car is off and use a non-conductive tool to gently remove the debris.
#4. Inspecting the Lighter Itself
Remove the lighter element and inspect it. Signs of burning or corrosion might indicate that the problem lies with the lighter itself. Replacing it is usually as simple as going to an auto parts store and buying a new one.
#5. Testing the Electrical Circuit
Using a multimeter, you can test the socket’s voltage. Set the multimeter to measure voltage and touch one probe to the center of the socket and the other to the side. A correct reading should be around 12 volts. Any reading significantly lower indicates a problem with the socket itself.
#6. The Role of Plugged-In Devices
In our eagerness to turn our cars into mobile charging stations, we often overload the cigarette lighter socket with various devices. Sometimes, unplugging them can solve the issue. It’s also wise to check the devices themselves: a faulty charger can sometimes be the culprit.
Additional Tips and Tricks
Stay Safe: Always ensure your car is off and the keys are out of the ignition before attempting any repairs.
Spare Fuses: Keeping a small assortment of spare fuses in your glove box can save the day.
Regular Cleaning: Make a habit of regularly cleaning the cigarette lighter socket to prevent any buildup that could cause problems later.
Conclusion
A non-working car cigarette lighter can be a minor inconvenience or a major obstacle, especially in today’s device-dominated world. However, with a bit of know-how and some basic tools, most issues related to this problem can be resolved at home. This not only saves you a trip to the mechanic but also gives you a better understanding of your car’s inner workings. Remember, when performing car repairs, safety is paramount. If in doubt, seeking professional help is the wisest course of action.
Short block and long block engines – Performance comparison of automotive engines
The luxurious exterior of a car is worthless if its engine doesn’t function properly. The engine is the pillar of your car. So, why not choose it wisely? But, when it comes to buying a new engine, a thought might also cross your mind: “should I opt for a long block or a short block engine?” Well, your choice of engine can affect your car’s performance. Therefore, it’s essential to find a fruitful solution by comparing short block and long block engines.
These two engines are different from each other in many ways, and it’s crucial to determine which is best for your car.
What is a Short Block Engine?
A short block engine for a car refers to the short block assembly specifically designed for automotive applications. It includes the engine block, crankshaft, connecting rods, and pistons but does not include cylinder heads, intake and exhaust manifolds, timing components, or other external parts.
The short engine block is the heart of the car’s internal combustion engine. It forms the basis of the engine’s operation by housing the cylinders, pistons, and rotating assembly. The short block assembly is responsible for converting the combustion process into rotational motion, which ultimately powers the car’s wheels.
Short block engines are typically used in situations where an engine needs to be rebuilt or replaced. By reusing the short block assembly, the cost of rebuilding or replacing the engine can be reduced. The engine builder can focus on replacing or upgrading other components, such as cylinder heads, camshaft, and intake system, to meet specific performance requirements or address issues.
What is a Long Block Engine?
The long block engine is called a “long block” because it extends beyond the short block, incorporating more components necessary for the engine’s operation. It is often referred to as a “drop-in” engine because it is designed to be a ready-to-install unit that can replace a worn or damaged engine in a vehicle without requiring significant additional parts.
By including cylinder heads and other external components, the long block engine offers a more complete solution for engine replacement or rebuilding. It simplifies the installation process and ensures that critical components, such as the valvetrain and intake/exhaust systems, are properly matched and aligned for optimal performance.
The long block engine is particularly useful when the existing cylinder heads or other external components are damaged, worn, or need upgrading. By replacing the entire long block, the engine builder can save time and effort by having a complete, compatible unit ready for installation.
Fundamental Difference Between Short Block and Long Block Engines
Let’s see which is best for your car and which engine will meet your requirements, right now!
1. Long Block Engine
This engine is complete in itself. One could also say that this engine is as close to a complete, ready-to-run engine as possible. All the essential components that an ideal engine should have are intact and require less time for installation.
The long block is more powerful than the short block, and negative efforts are needed to assemble the parts. This engine is equipped with the following parts: assembled block, crankshaft, camshaft, valvetrain, and cylinder head as well.
The fundamental difference between long block and short block
However, it does not include the fuel system, intake, electrical components, and exhaust. Furthermore, the need to replace the long block indicates that the short block and cylinder head have been so damaged that they can no longer be repaired. Typically, the manufacturer offers a complete repair kit where reconditioning repairs are performed.
Moreover, this engine is more expensive than the short model. Also, the engine parts may differ from one supplier to another.
So, if cost is not an issue for you and you want to get the best performance, opting for the long block will be the best option.
2. Short Block Engine
You can find a short block below the cylinder head and above the oil pan. This engine is not complete and comes with a piston, crank, and connecting rods. Installation is required to assemble all the parts. The external parts needed for external attachment may include cylinder heads, oil pumps, and gaskets. Additionally, you might also find some engines with timing parts.
Discover the differences between long block and short block engines. Credit: kickers | Getty Images
Your maintenance advice provider may have told you that installing a short block engine takes more time than a long block engine. Well, that’s true! Each part must be held in a specific position, and the process of linking the parts together can be time-consuming. This engine is affordable because buying only the necessary parts reduces the cost. In the race between long block and short block engines, in terms of replacement, the internal parts of the short block are more expensive than the external parts of the long block.
In terms of performance, short blocks, due to their freedom in additional parts, are more efficient than long blocks.
Conclusion
The car we drive says a lot about us, just like the engine. Long block or short block engine, choose the one that suits your car and your needs for better results.
Why do we use disc brakes and drum brakes respectively at the front and rear?
You may have been driving your car for years, but do you know why disc brakes and drum brakes are used at the front and rear respectively?
Generally, people don’t have a precise answer to this question, which ultimately leads them to make the wrong choice of components for their car.
Well, find out now the reasons why disc brakes are used at the front and drum brakes at the rear!
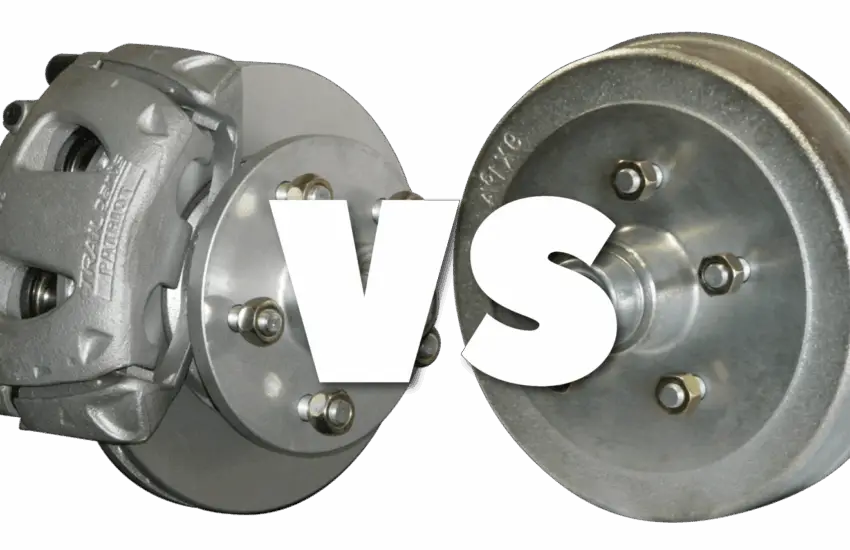
Reasons for Using Disc Brakes and Drum Brakes at the Front and Rear Respectively
Brakes are the essential safety components of any vehicle. Disc brakes and drum brakes have different functions and operate at the rear and front of the car. To find out which should be installed on which part, check the following reasons.
1. Braking Capacity
Every time you press the brake, out of the vehicle’s total weight, only thirty percent is transferred to the rear and seventy percent to the front.
When talking about the braking capacity of disc brakes and drum brakes, the more reliable disc brakes are what you need to use to handle such a significant weight.
Conversely, drum brakes are cheaper and can wear out easily due to their inability to handle the weight.
Capacity of disc brakes and drum brakes
Therefore, this gives you a reason to install the most effective braking system at the front, which is disc brakes, of course.
To clarify the use of disc brakes and drum brakes at the front and rear, economic factors have their own causes.
The manufacturing cost of disc brakes is much higher than that of drum brakes due to their overall structure, specially designed to provide the necessary resilience to stop your entire vehicle.
In addition to important components, the disc brake assembly includes a metal drum, a small caliper (which impedes the vehicle), and a thin rotor as well.
By consulting experts or using their maintenance tips, you can also extend the lifespan of these brakes.
Unlike disc brakes, drum brakes are affordable due to the need for fewer moving parts. When drum brakes are used at the rear, it’s easy to share energy between the parking brake and the regular brakes.
But, when it comes to driving in the rain, disc brakes are more effective. So, if you expect superior performance from your vehicle, opt for disc brakes. On the other hand, to make driving more economical, nothing beats drum brakes.
3. Hardware Requirements
As mentioned earlier, disc brakes require additional hardware and high hydraulic pressure to enhance performance.
But, all these components help the brakes cool down effectively and quickly, making them less vulnerable to fading or warping with high temperature.
Choosing the right disc brakes and drum brakes
Surprisingly, drum brakes do not have a caliper support and require little hardware, as everything is shareable in its core.
Furthermore, they are also equipped with a smaller master cylinder near the pedal, as it cannot handle much pressure. Insufficient hardware fixation leads to warping and discoloration due to high temperature, as they cannot cool down easily.
FAQ
Is it possible to use disc brakes at the rear of a vehicle?
It is possible to use disc brakes at the rear, and some sports and high-performance vehicles use four-wheel disc brake configurations to enhance braking performance.
However, this configuration can be more expensive and may not be necessary for daily driving since the front brakes handle the majority of the braking force.
Can I upgrade my vehicle’s braking system to have disc brakes at the rear?
You can upgrade a vehicle’s braking system to install disc brakes at the rear, but this may require significant modifications and can be costly.
It is essential to consult a professional mechanic or an automotive expert to ensure that such an upgrade is feasible and safe for your specific vehicle.
Are there specific situations where rear drum brakes are better than disc brakes?
Rear drum brakes can be advantageous in situations where cost-effectiveness and simplicity are prioritized over high-performance braking.
They are also well-suited for vehicles that primarily operate at low speeds with frequent stops and starts, where the rear brakes do not experience as much heat buildup.
What happens if I neglect the maintenance of my rear drum brakes?
Neglecting the maintenance of rear drum brakes can lead to reduced braking performance, increased stopping distances, and a higher risk of brake failure.
Do all vehicles follow the front disc brake and rear drum brake configuration?
No, although the front disc and rear drum configuration is common, it is not universal. Some vehicles, especially luxury or high-performance cars, use four-wheel disc brake configurations to enhance braking performance.
The choice of braking system can vary depending on the intended use and design of the vehicle.
Are there benefits to having disc brakes on all four wheels of a vehicle?
Yes, having disc brakes on all four wheels can ensure consistent and high-performance braking across the entire vehicle.
This configuration is often preferred in sports cars and performance vehicles, where superior braking performance is essential for handling and safety.
How can I tell if my vehicle is equipped with disc brakes at the front and drum brakes at the rear?
You can generally identify your vehicle’s brake type by inspecting the wheels. Look through the wheel spokes to see if there is a flat, shiny disc visible near the front wheels.
For the rear wheels, you might see a round, drum-shaped structure. Additionally, consulting your vehicle’s owner’s manual or contacting the manufacturer can provide you with this information.
Can I convert my rear drum brakes to disc brakes for better performance?
It is possible to convert rear drum brakes to disc brakes to improve braking performance. However, this is a complex and often costly modification that may require specific parts and expertise.
It is advisable to consult a qualified mechanic or an automotive specialist to assess the feasibility and cost of such an upgrade for your specific vehicle.
Conclusion
These factors are sufficient to choose the best for your car. Disc brakes are appealing for their quick braking and durability.
Drum brakes are the most affordable for driving. So, use the reasons above to choose the best combination between disc brakes and drum brakes right now!
Things that could indicate an imminent BMW water pump failure
A single small defect on one component can affect the overall operation of the vehicle. So, to help you, here are some useful tips that will help you determine the failure of your BMW water pump.
When we talk about the water pump, it is the centerpiece of the engine’s cooling system. And if it stops working, the real problem begins!
5 Things That Help Determine BMW Water Pump Failure
The function of a water pump is to continuously circulate coolant throughout the entire cooling circuit. It thus regulates the flow of the coolant. A faulty water pump can cause your Bimmer’s engine to overheat.
Therefore, you should check your vehicle’s water pump as soon as you encounter these situations.
1. Squealing and Whirring Noises
The cause of this high-pitched squealing from your BMW could be a loose belt. This loose belt could mean a loose pulley or worn bearings in the water pump.
If the bearings in your BMW are completely worn out, it might be necessary to change your water pump to avoid a water pump failure.
2. Engine Overheating
Identify BMW water pump failure. Source: Internet
Several reasons can cause your BMW’s engine to overheat. If you notice your car’s temperature gauge is in the red or the dashboard displays warnings, you should immediately consult an automotive expert.
A faulty water pump will cause your car to overheat, leading to other engine damage. You could also face costly repairs for blown head gaskets and cracked cylinder heads if your water pump fails.
3. Coolant Leaks
If you ever notice an imminent leak coming from the front part of your BMW, you should not ignore it.
It’s possible that the leak is a sign of many problems about to occur. If the fluid color is blue, it might be a coolant leak from the water pump.
4. Steam Emitted from the Radiator
Steam coming from your radiator is not a good sign at all. It can come from engine overheating caused by a malfunctioning water pump. The main role of the water pump is to circulate water to the radiator.
If the pump is not working correctly or if the hoses have many disconnections, the coolant will not pass from one point to another in the engine, making it vulnerable to overheating.
5. Rust on the Water Pump
Corrosion and rust on the water pump can also be an indication of your BMW’s water pump failure. This corrosion prevents the water pump from moving the coolant properly.
In this case, it is necessary to have your pump replaced to ensure the proper functioning of the vehicle. If you wish to learn more about the proper functioning of a water pump, discover some maintenance tips provided by automotive experts.
Things that could indicate BMW water pump failure. Source: Youtube
FAQ
1. Can I continue driving my BMW if I suspect a water pump problem?
It is not recommended to continue driving your BMW if you suspect a water pump problem.
Using a vehicle with a faulty water pump can lead to serious engine damage due to overheating. It is best to have the problem diagnosed and repaired promptly.
2. How can I avoid BMW water pump failure?
Regular maintenance is essential to avoid any water pump failure. Follow the maintenance intervals recommended by your BMW manufacturer and have the cooling system regularly inspected by a qualified technician.
Replacing the water pump and associated components at the recommended intervals can help ensure its longevity and prevent unexpected failures.
3. How much does it cost to replace a BMW water pump?
The cost of replacing a BMW water pump can vary depending on the model, year, and where the service is performed.
On average, you can expect to pay between $300 and $800 for parts and labor. Costs may be higher for luxury or high-performance BMW models.
4. Can I replace the water pump myself?
While some experienced mechanics may attempt to replace a water pump themselves, it is a complex job that often requires specialized tools and knowledge of the BMW cooling system.
For most drivers, it is advisable to have a professional mechanic or a BMW dealership perform the replacement to ensure it is done correctly.
5. How long does a typical BMW water pump last before needing replacement?
The lifespan of a BMW water pump can vary depending on factors such as driving conditions, maintenance, and the specific model of your BMW.
However, on average, a water pump can last between 60,000 and 100,000 miles (96,000 to 160,000 kilometers).
6. Are there specific BMW models known for having water pump problems?
While water pump problems can occur on various BMW models, some models, like the BMW 3 Series E90, are known for having more frequent water pump failures.
It is essential to note that regular maintenance and prompt attention to warning signs can mitigate these issues.
7. Can I use any type of coolant in my BMW, or does it require a specific coolant type?
BMWs generally require a specific type of coolant recommended by the manufacturer.
It is essential to use the appropriate coolant to ensure the proper functioning of the cooling system and avoid compatibility issues. Refer to your BMW owner’s manual for the recommended coolant type.
8. Is water pump failure covered by the BMW warranty?
Warranty coverage for water pump replacement can vary depending on the terms of your BMW’s warranty.
In some cases, water pump replacement may be covered by a new car warranty or an extended warranty if the issue occurs during the warranty period.
Consult your warranty documentation or check with your BMW dealership for specific coverage details.
Final Words
So, the elements mentioned above are responsible for your BMW’s water pump failure. Next time, if you encounter such situations, have them addressed immediately.
Remember that maintaining your BMW’s cooling system and promptly addressing any warning signs of water pump failure can help you avoid costly repairs and ensure your vehicle’s proper operation. If you suspect a problem, consult a qualified technician for proper diagnosis and repair.
Automatic transmission not shifting to 3rd gear: causes and solutions
A transmission is a complex mechanical component that operates through numerous intricate mechanisms. Maintaining and servicing these machines is delicate because an issue with one small component can damage the gearbox. One such problem is when the automatic transmission does not shift into third gear.
Signs that the automatic transmission is not shifting into 3rd gear
The problem can manifest in several ways that may be easy to recognize and track.
First, you might notice that the transmission shifts into first then second gear but does not shift into third. It feels like the gear slips into neutral when you push it into third.
Another example could be that the automatic transmission does not shift into third gear at all. It smoothly shifts between first and second and vice versa, but it simply stays in second when you try to push it up to third.
In this case, the catalytic converter can touch the side of the valve body area, overheating the transmission and creating metal shavings in the pan.
Act immediately when you encounter gear shifting problems. (Photo: DriveSpark)
Automatic transmission not shifting into 3rd gear: What are the reasons?
A functional automatic transmission can upshift, downshift, and stop based on appropriate commands. But if it doesn’t, there must be an internal issue affecting performance. If you ignore the signs for too long, it can lead to potential transmission failure.
Let’s see what the reasons could be for the car not shifting gears from second to third.
Low fluid level
An overheating engine can be the cause of the gear locking up, and a low transmission fluid level can be the reason for the transmission overheating.
In fact, a low fluid level is the cause of a number of transmission-related problems. Therefore, the first step in solving a gear locking issue should be to check the transmission oil.
Check for leaks at the input and output shaft seals, fluid lines, pan gasket, and cooler if the level is low. If there is no leak, flush the used oil and refill the container.
Also, don’t forget to check the radiator coolant. The cooler inside the radiator can sometimes leak and contaminate the radiator coolant.
Dirty transmission fluid
Transmission oil is needed to lubricate the gears and internal moving parts. It functions like engine oil, except it is specifically designed for transmissions. As transmission fluid ages, dirt and debris begin to accumulate in it.
Degraded transmission fluid makes normal gear shifts much more difficult. It can also permanently damage the transmission if not drained and replaced promptly.
Consult your vehicle’s owner’s manual for how often to change the transmission oil. By following these instructions, you can ensure the transmission remains in optimal condition.
Degraded transmission fluid makes normal gear shifts much more difficult. (Photo: AxleAddict)
Shift solenoid problem
Inside the transmission, there are several shift solenoid coils responsible for automatically shifting gears when the TCM decides to do so. If one of them fails, it can lead to shifting problems with any gear, including 3rd gear. So, this is most likely a faulty shift solenoid.
Shift solenoid tubes are most commonly obtained by removing the valve body, which is done by removing the transmission oil pan from the car, but in some cases, you have to completely remove the transmission and take out the box.
Failing torque converter
The torque converter is responsible for engaging and disengaging the transmission from the engine. It consists of important components, such as the stator and turbine.
Any part of the torque converter can fail, which can lead to transmission slipping. It can also cause problems when shifting to a specific number.
Faulty PCM or TCM
If the PCM or TCM fails, transmission performance is degraded. These parts are responsible for the gearbox’s performance. In this way, it acts as the brain of the system.
When the PCM starts to fail, you may also notice other symptoms. You often see the Check Engine light and experience irregular gear shifts. The vehicle may even go into limp mode until the issue is resolved.
What to do when the automatic transmission does not shift into 3rd gear?
Here are some solutions for your reference on how to fix a car that is not shifting gears, particularly the third one.
Check the throttle cables
Changing the fluid solves many transmission problems, but if the issue of the automatic transmission not shifting into 3rd gear persists, the parts you need to check are the throttle cables.
A faulty cable with excessive play is likely to create problems with smooth shifting. It can also completely block the 3rd gear shift.
Inspect the PCM
A faulty PCM could also be the cause. (Photo: AutoYas)
A faulty PCM (Powertrain Control Module) will affect transmission performance, as it controls the gearbox mechanism in most car models. The PCM will have no influence if the speed sensor fails and causes a problem with the automatic transmission not shifting into 3rd gear.
In this case, the transmission will not shift gears properly. To fix this, you need to check the speedometer to see if it’s working. If not, replacing the VSS could be the solution.
Read the error code
If there is an error in the vehicle’s onboard computer, an error code is set. You can read these codes and learn more about the issues with the OBDII scanner.
Each vehicle uses different codes, even though some are common. For example, you might see code P0606 or P0113 if there is a problem with the PCM. Regardless of the code you see, you can research online and look up the problem for a quick solution.
Call an expert
Even if you are an experienced mechanic, you will still have to deal with some problems that are too unfamiliar to you. When you see a code or a problem and don’t know how to solve it with your basic knowledge, it is always ideal to call a professional.
In many cases, a repair done with the wrong approach can lead to more serious problems, sometimes impossible to fix. So be vigilant and remember to call an expert to perform the difficult task for you.
Even if you are a skilled mechanic, you will still have to deal with problems that are too unfamiliar to you. (Photo: Thame Cars)
FAQ on automatic transmission not shifting into 3rd gear
1. Why is my automatic car not shifting gears?
Fluid is one of the reasons why an automatic transmission does not shift gears. It will affect the gears if it is not at the proper level or if the type of fluid used is inappropriate. Another important factor is the possibility of an ECM failure.
Here are the 2 main reasons why the automatic car is not shifting gears
2. Can an automatic transmission not shift into 2nd gear?
Yes, an automatic transmission can be stuck in 2nd gear. This problem can be a sign of low transmission fluid and a broken transmission control solenoid.
3. How do you reset the transmission control module?
Turn off your vehicle’s engine and wait 5 to 10 seconds. Start the engine and let it idle for a few seconds. Turn off the ignition and wait another 30 to 40 seconds. To reset your vehicle’s transmission control module, repeat these steps 2 to 3 times.
4. What are the signs of a bad shift solenoid?
The general role of a solenoid is to control the flow of transmission. Here are the symptoms of a faulty shift solenoid you need to watch out for.
Gear shift delay during acceleration and deceleration.
Your transmission is locked in neutral position.
Gear shifting is difficult.
Even when you press the brakes, the engine continues to run noisily.
Your transmission fails to downshift and your engine is quite noisy.
5. Is a solenoid an easy fix?
A failing solenoid can paralyze your machine or manufacturing process, but fortunately, it is a part that can usually be repaired or replaced once you have identified the source of the problem.
6. How much do you pay for transmission shift solenoid replacement?
Replacing a single transmission solenoid can cost between $200 and $450. However, if the problem is so severe that you need to replace the entire set, the cost can reach between $300 and $800.
Conclusion
We have just reviewed all the basic aspects to understand why the automatic transmission does not shift into 3rd gear. I hope you find this article informative and understand exactly what to do when facing this problem.
Why my diet goes up and down when I’m parked
Have you ever noticed your car’s engine starting to run erratically while idling? Understanding this issue is essential for your vehicle’s well-being and performance. So why does my RPM go up and down when parked? In this section, we will outline the main culprits and solutions for a car that idles roughly when parked.
Engine RPM Fluctuations: A Normal Engine Function
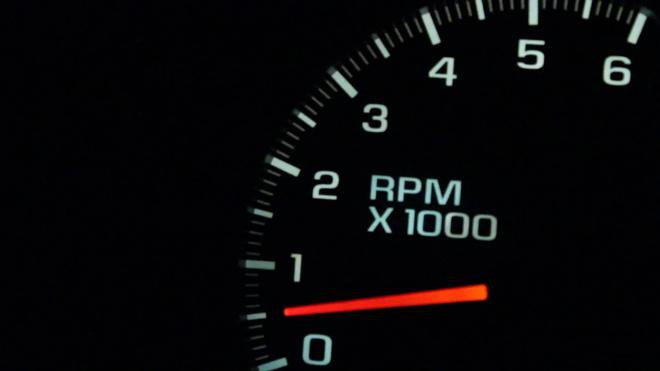
RPM, or Revolutions Per Minute, is a parameter that affects vehicle performance, closely related to power and torque. Simply put, RPM is the number of revolutions the car’s engine makes in 1 minute, measured in RPM and displayed on the engine tachometer in the digital instrument cluster (dashboard).
Engine RPM is inversely proportional to the vehicle’s gear ratio and power, reaching a maximum index of 5,000 to 7,000 RPM. For each vehicle gear ratio, the ideal engine RPM is different.
Engine RPM moving while parked (Photo: qmotor.com)
For gasoline engines, the engine speed when starting the vehicle reaches 50 RPM. When the car is not moving and you are not pressing the accelerator, the RPM is typically between 600 and 1000 RPM. At that point, the temperature drops to around 80 to 90 degrees, not too hot, sufficient to ensure stable and smooth engine operation. As for diesel engines, the average engine speed at startup is 90 RPM. This slight up-and-down movement helps maintain a steady idle and ensures efficient engine operation. Therefore, it is normal for the engine’s idle RPM to fluctuate slightly.
If your car hasn’t been started for a while, you will feel jerks upon restarting. This is when the car automatically increases the engine RPM to 1000. You don’t need to worry too much if you notice a sudden increase in engine RPM in this case, as it is a normal mechanism of the car’s engine.
Why Does My RPM Go Up and Down When Parked?
An unstable RPM while parked occurs when the RPM changes continuously and regularly, unable to maintain the necessary stability. The movement of RPM while parked is normal. If the RPM fluctuations are minor, but this number is excessive compared to the standard level, it’s time to investigate the reasons for this issue:
1. Dirty Throttle Body
The first thing to check is the throttle body. The main function of the throttle body is to control the air intake into the engine. The throttle body is equipped with a throttle plate that opens or closes in response to the pressure you apply to the accelerator pedal. The position of the throttle plate affects the amount of air entering the engine.
At idle, when you release the accelerator pedal, your throttle is almost closed. But if this part is clogged with sticky carbon deposits, the throttle may experience slight sticking during its opening or closing. This sticking can cause the throttle to remain more open than intended, disrupting the optimal air-fuel ratio and leading to undesirable idle RPM fluctuation.
2. The Idle Air Control Valve Itself
The IAC valve controls the amount of air that bypasses the throttle and is used to control the engine’s idle speed. What happens if this small device doesn’t work properly? If the IAC valve gets stuck in the open position, an excessive amount of air enters the engine, leading to a lean air-fuel mixture and variations in RPM while driving and parked.
If the IAC valve is dirty or damaged, it may operate irregularly, which can cause codes P0505, P0506, and P0507 to appear during inspection. These are secondary symptoms indicating a faulty IAC valve.
3. Vacuum Leak
Next, we have vacuum leaks. If air enters the engine without being measured by a MAF sensor, it’s called a “vacuum leak.” Your engine needs a precise balance between air and fuel to operate correctly. The ECU adjusts the amount of fuel based on the air entering the engine. If the ECU cannot determine the correct amount of fuel to inject, the unbalanced air-fuel ratio leads to inefficient combustion. In response, the engine may increase its RPM to try to compensate for the extra air, but it may overshoot the RPM and have to reduce it. And this can cause the RPM to surge.
4. Clogged Engine Parts
A clogged engine air filter can disrupt the airflow entering the engine. At idle, there is already less air entering the engine. If an air filter is clogged, it disrupts the delicate air-fuel balance, which can lead to engine RPM fluctuations. Similarly, a dirty throttle body (the valve that controls airflow) or clogged fuel injectors can also contribute to the problem by preventing a consistent fuel distribution.
If an air filter is clogged, it disrupts the delicate air-fuel balance, which can lead to engine RPM fluctuations (Photo: pinterest.com)
5. Throttle Position Sensor
A throttle body sensor is used to measure the opening of the throttle and thus controls the amount of air that can flow into the engine’s intake manifold and sends signals to the engine PCM regarding the throttle position. If this signal is inconsistent, the engine will run unsteadily, and the engine RPM will fluctuate immediately. Often, the engine will idle but struggle to accelerate. This is because the computer is not telling the engine to inject as much fuel as needed while, at the same time, the airflow is increasing.
6. Damaged Ignition System
When the engine’s ignition system cannot distribute sparks evenly and sufficiently, it’s easy for the engine RPM to fluctuate abnormally.
This problem is often due to broken spark plugs or ignition wires, ignition coils, etc. Additionally, installing a damaged distributor also hinders the spark distribution process. Older cars are prone to this phenomenon.
Why Shouldn’t You Ignore the Fluctuation?
Not addressing a fluctuating engine RPM issue can lead to further problems down the line. It not only affects vehicle performance but can also damage the engine if not dealt with promptly.
Loss of Engine Performance: Engine RPM fluctuations can reduce engine performance and increase fuel consumption, negatively impacting the powertrain’s lifespan.
Affects Other Systems in Your Vehicle: Unpredictable increases and decreases in engine RPM can have negative effects on other car systems, including the suspension system, transmission system, tire system, braking system, and steering system.
Increase Emissions: If the engine RPM is not functioning correctly, the exhaust system can cause black smoke, bad odors, and increase toxic emissions into the environment, affecting human health and the living environment.
In conclusion, slight engine RPM fluctuation while parked is normal. However, if the engine RPM becomes excessive, it is important to have your car checked by a mechanic to avoid further issues.