F1’s Apple TV Shift: Digital Future or Fan Exclusion?
F1’s Exclusive Move to Apple TV
Formula 1 has announced a groundbreaking exclusive broadcasting agreement with Apple TV, set to commence in 2026. This five-year partnership will see all F1 content—including practice sessions, qualifying rounds, sprint races, and Grand Prix events—stream solely on Apple’s platform. The shift marks a decisive move from traditional broadcasters like ESPN to a singular digital service, following the collaboration on the Apple Original Films production “F1 The Movie.”
Revolutionizing Sports Broadcasting
This transition represents a significant evolution in how major sports are consumed. By partnering with Apple TV, F1 aims to leverage cutting-edge technology to enhance viewer experiences. to individual preferences. The move aligns with a broader trend of sports properties migrating to streaming services to reach global audiences more directly and innovatively.
Potential Challenges for Fans
While the deal promises technological advancements, it raises concerns about accessibility. Fans accustomed to watching races on cable or free-to-air channels may face barriers due to subscription costs and the need for compatible devices. This could alienate segments of the audience, particularly in regions with limited internet infrastructure or where Apple TV has a smaller footprint. The exclusivity might test the loyalty of long-time supporters who value convenience and affordability.
Impact on the Broader Sports Landscape
F1’s exclusive arrangement with Apple TV could set a precedent for other sports leagues considering similar moves. If successful, it may encourage more properties to prioritize digital platforms over traditional media, reshaping the economics and reach of live sports. However, the outcome will depend on whether the benefits of innovation outweigh the risks of excluding viewers, ultimately influencing future broadcasting strategies across the industry.
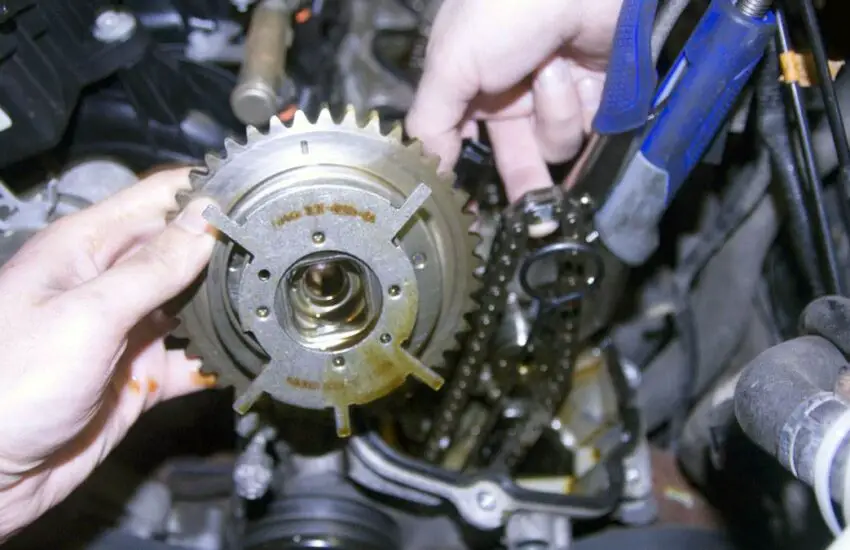
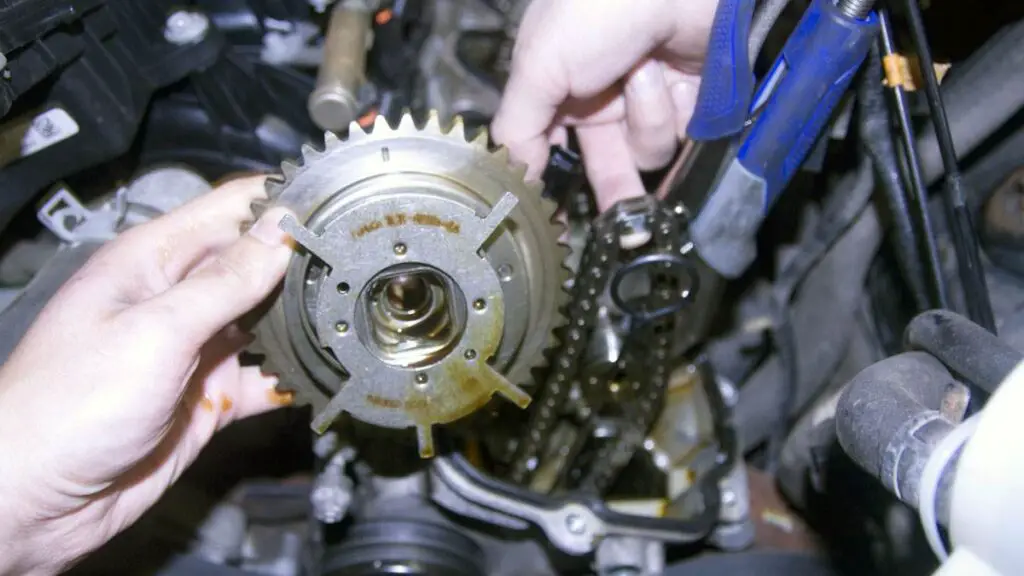
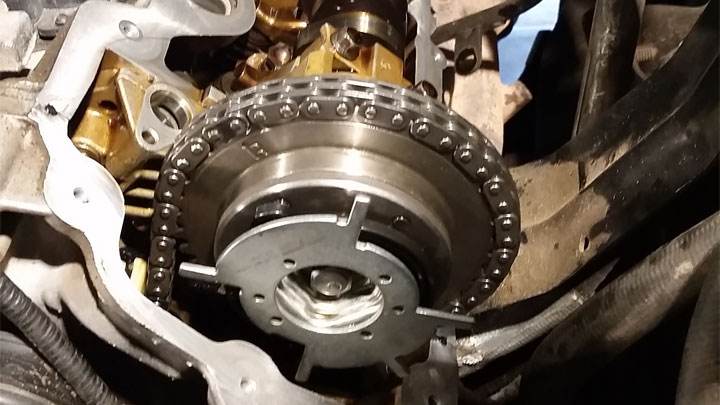
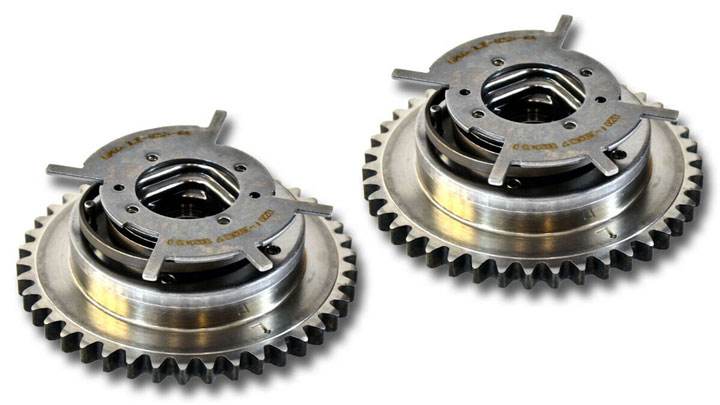
Symptoms of a bad cam phaser
Modern engines use variable valve timing (VVT) for increased efficiency by adjusting the camshaft phase according to conditions. Although effective, VVT engines are prone to cam phaser failures, a specific component controlling cam timing.
Understanding the symptoms of a failing cam phaser and its causes gives you the necessary knowledge to address this issue before major engine damage occurs. Unfortunately, the cost of replacing the cam phaser will be high, but there is one thing you can do to reduce it.
What is a Cam Phaser?
A cam phaser is an integral part of all engines using variable valve timing. The cam phaser itself is responsible for advancing or retarding the position of the engine’s camshaft(s) relative to the crankshaft, as commanded by the PCM/ECM.
This effectively varies the timing of each valve lift event compared to the standard static orientation.
Most cam phasers are hydraulically driven, by oil metered through the engine’s VVT oil control solenoid(s). These solenoids themselves are electrical rather than hydraulic in nature and are controlled via an electrical signal sent by the vehicle’s control module.
Simply put, cam phasing is initiated by the vehicle’s computer but carried out by individual cam phasers, with the oil control solenoids acting as intermediaries.
When an engine’s operating software determines that a certain degree of cam phasing would be more efficient under the circumstances, power/ground is directed to the engine’s oil control solenoids, causing them to open, allowing pressurized oil flow to their respective cam phasers.
This hydraulic pressure then causes the phasers to index, in turn mechanically rotating the engine’s camshaft(s).
Even when everything is fine and working as intended, cam phasers tend to be a high-failure item in VVT engines. This places increased importance on recognizing the symptoms of cam phaser failure.
Symptoms of a Bad Cam Phaser
The failure of a cam phaser is often accompanied by one or more secondary symptoms. By learning to recognize these symptoms, you can minimize excessive downtime and avoid further engine damage.
Here are some of the most common signs associated with cam phaser failure.
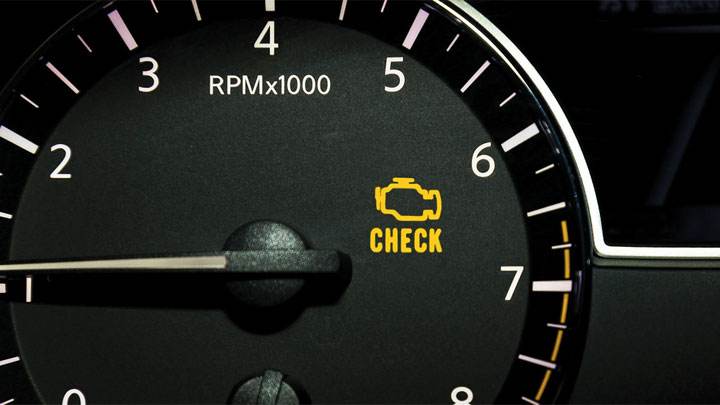
#1 – Check Engine Light
An engine’s management software is quite adept at detecting ongoing cam phasing issues and can quickly detect feedback anomalies from one or more sensors that would indicate a lack of desired cam phasing.
In almost all cases, this will result in the illumination of the check engine light.
#2 – Cam Phaser “Click”
Most often, a failing cam phaser will begin to make an audible clicking noise, unlike anything most motorists have heard. This noise occurs when the cam phasers fail to lock into the desired position as they otherwise should, causing some degree of play.
When a cam phaser fails, you may also notice that your vehicle’s performance begins to suffer. This lack of operational efficiency is due to an engine’s inability to actuate its camshafts as desired.
As a result, engine performance suffers as a whole, particularly under certain operating criteria.
#4 – Reduced Fuel Economy
You may also notice that your vehicle’s fuel economy suffers in the presence of a faulty cam phaser. This, again, stems from an engine’s inability to actuate its cams as commanded by the vehicle’s operating software.
This in turn leads to reduced combustion efficiency and less-than-optimal fuel consumption.
#5 – Rough or Erratic Idle
It is also possible for a vehicle’s engine to exhibit a rough or erratic idle if one or both cam phasers are failing. This is yet another product of suboptimal performance due to incorrect or inadequate camshaft indexing or phasing.
One might find that this issue is more evident at certain operating temperatures.
What Causes Cam Phaser Failure?
As mentioned above, cam phasers tend to be a high-failure-rate item in VVT engines. But why is that?
One of the most common causes of premature cam phaser failure is slightly low engine oil pressure. Cam phasers require adequate oil pressure not only for operation but also for lubrication. A lack of adequate oil pressure caused by oil degradation or a worn-out oil pump can quickly damage an engine’s cam phasers.
However, it is also important to remember that cam phasers can also fail due to normal wear and tear. As with any mechanical component, time and continued use will eventually take their toll. After all, an engine’s cam phasers are actuated numerous times during every driving event, making wear inevitable.
What to Do If You Suspect a Bad Cam Phaser
If you believe your vehicle’s cam phaser is failing, you should act quickly to find an appropriate solution that does not unnecessarily prolong the repair process. As detailed above, there are a multitude of secondary symptoms that often accompany a faulty cam phaser, many of which negatively impact a vehicle’s drivability.
While it is possible to drive a vehicle with a faulty cam phaser, it is not advisable to do so for an extended period, as the vehicle’s overall performance will suffer.
Furthermore, the presence of a bad cam phaser will certainly negatively impact a vehicle’s fuel economy, causing unnecessary pain at the pump (especially with today’s gas prices). This stems from the fact that a VVT engine is only capable of achieving maximum efficiency when the desired cam phasing is achieved.
In any case, the exact cause of a vehicle’s cam phasing failure should be diagnosed and repaired as soon as possible. This will mitigate any further risk of additional engine damage and restore engine performance to a state of increased efficiency.
If you do not feel comfortable performing such repairs yourself, schedule an appointment with a trusted service center as soon as possible.
Cam Phaser Replacement Cost
The cost associated with replacing a cam phaser can vary significantly from one vehicle model to another. This is due to variations in parts and labor between different makes and models. Nevertheless, repairs of this nature tend to fall within a somewhat rough price range.
On average, one can expect to pay between $800 and $2,500 to replace their engine’s cam phasers. Of this total price, approximately $100 to $400 can be attributed to parts cost, while the remaining $400 to $2,000 comes from the many hours of labor required to perform such a repair.
You can likely reduce costs by having the cam phaser repaired at a good independent repair shop rather than a dealership, but when several hours of labor are required, it won’t be cheap.
Which Vehicles Are Most Likely to Have Cam Phaser Failure?
Although cam phaser failure tends to be relatively common in most vehicles equipped with VVT engines, certain makes and models are more prone to such difficulties than others. In fact, several vehicles have even been subject to recalls to varying degrees for such issues in recent years, further highlighting the severity of cam phaser failure.
Over the past two decades, the Ford F-150 has experienced a wide range of cam phaser failures. This issue is relatively widespread and spans several model years.
Additionally, a multitude of associated Ford SUVs that share a common powertrain with the F-150, such as the Lincoln Navigator and Ford Expedition, have also experienced their share of cam phaser failures.
What is a Cam Phaser Lockout Kit For?
A cam phaser lockout kit is a popular modification that can be applied to most VVT engines. Kits of this nature prevent the actuation or phasing of an engine’s camshaft, thereby eliminating variable valve timing capabilities altogether.
This avoids repeated failures of cam phasers and other VVT-specific components, which tends to be both frustrating and costly. Lockouts are also commonly used by those experiencing cam phaser “rattle.”
However, using a cam phaser lockout or delete kit has some drawbacks. Car owners may notice that their vehicle’s performance is partially hindered under certain circumstances due to a lack of phasing capability. One might also notice a reduction in fuel economy.
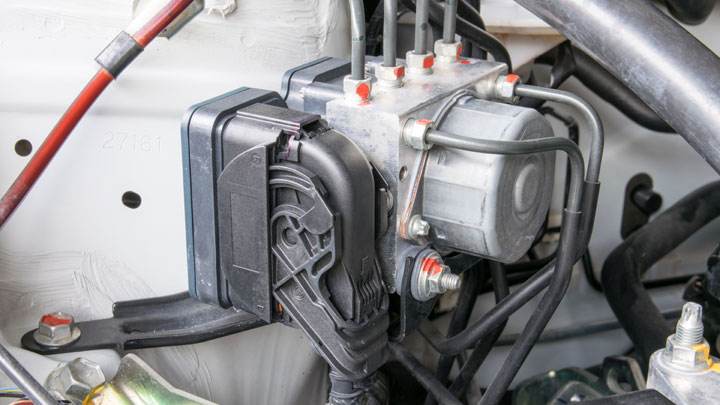
Symptoms of a faulty ABS module
Anti-lock braking systems prevent dangerous lock-ups, but the ABS module that controls them can fail over time. Recognizing the symptoms of a faulty ABS module is essential for maintaining safety.
This guide will cover the warning signs of module failure and how to address them. With knowledge and preventive care, the ABS can continue to provide life-saving performance.
What is an ABS Module?
An ABS module is a microprocessor computer integrated into the electrical system of all modern vehicles.
This module is responsible for monitoring and operating a vehicle’s anti-lock braking system, which regulates the hydraulic pressure distributed to the brake assemblies at each respective wheel end, preventing lock-up during panic or emergency stops.
The ABS module itself relies on inputs from various sensors to facilitate the various functions it is responsible for. Some of the most valuable inputs come from each wheel speed sensor. These sensors detail the speed at which each wheel rotates relative to the others, thereby allowing the ABS module to detect a lock-up condition.
A vehicle’s ABS module also performs system self-tests with each key cycle and logs related system error codes if necessary. Furthermore, this module relays relevant data to other vehicle control modules, such as the PCM, via the CAN-BUS communication network.
Where is the Module Located?
The ABS module on most vehicles is located in the engine compartment, although some may also be found along a vehicle’s chassis frame rail.
Most often, the ABS module is found bolted in the driver’s side subsection of the engine compartment, in close proximity to the ABS block itself. In fact, on some vehicles, this module is bolted directly onto the ABS block itself.
Symptoms of a Faulty ABS Module
When an ABS module fails or is in the process of failing, a number of secondary symptoms can appear. By recognizing these symptoms, you can address the issue at hand much more quickly than would otherwise be possible.
Here are some of the most common symptoms associated with a faulty ABS module.
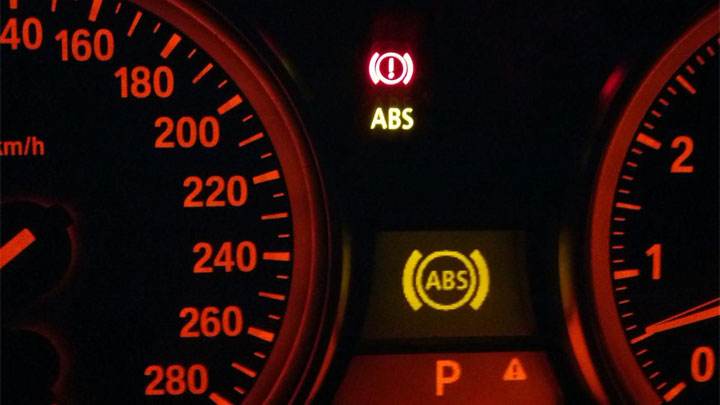
#1 – ABS Light Illuminated
Since a vehicle’s ABS system performs system self-checks with each key cycle, relevant faults are stored fairly quickly as they occur.
Once such a fault has been stored, an ABS warning light illuminates on a vehicle’s dashboard, thereby alerting the driver of a problem that needs to be resolved.
#2 – Brake Lock-Up
Sometimes, an ABS module can fail and cause unintended braking, many of which occur rather aggressively, such as brake lock-up while driving.
What is even more concerning is that these occurrences are often intermittent in nature and happen without warning during normal braking.
#3 – Changes in Required Braking Effort
If you notice that your vehicle suddenly requires more or less effort on the brake pedal to stop, your ABS module could be the cause.
This often occurs when the ABS circuit finds itself unable to accurately regulate hydraulic brake pressure as it once could.
Is It Safe to Drive With a Faulty ABS Module?
Although a vehicle can be driven with a faulty ABS module, it is not suggested to do so for extended periods.
This comes from the fact that ABS function will cease upon failure of the ABS module. Therefore, a vehicle will be left without the use of a valuable safety feature for which it was originally designed.
That being said, you will still be able to use your standard hydraulic brakes in the event of an ABS module failure. This will allow you to continue on your way and safely reach a point of convenience for potential diagnosis and repair.
However, it is not advisable to rely on this knowledge to facilitate the long-term operation of a vehicle without properly functioning ABS.
What Can Cause ABS Control Module Failure?
Although ABS control modules are extremely robust by nature and often last the lifetime of a vehicle, they do sometimes fail for various reasons.
One of the primary factors related to ABS module failure is impact. These modules are often compromised during collisions, even if they show no outward sign of damage.
In cases where impact is not the cause of ABS failure, water intrusion, corrosion, or electrical overload are the main culprits.
Simply put, whenever an ABS module is subjected to conditions outside the norm, its lifespan can be significantly compromised. Even more troubling is the fact that failure can occur months, or even years, after such contamination begins.
ABS Module Replacement Cost
The cost of replacing a vehicle’s ABS control module can vary significantly from one make and model to another. However, it is safe to say that replacing such a key and complex component is not the cheapest of auto repairs, especially considering today’s inflated parts costs.
Generally speaking, one can expect to spend between $600 and $1,200 to have their vehicle’s ABS module replaced. The middle of this range tends to be fairly accurate for most domestic vehicles on the road today.
In almost all cases, the cost of parts significantly outweighs the cost of labor when performing such repairs.
Does the Module Have a Fuse?
The vast majority of vehicles on the road today are equipped with an in-line fuse on the electrical side of the ABS system. This fuse provides power to the ABS module itself and serves as a circuit protection device in the event of circuit overload or an unintended ground.
In most cases, a vehicle’s ABS fuse is located in the power distribution block, in the general vicinity of all other critical fuses and relays. The integrity of this fuse can be easily checked using a 12-volt test light or through a simple continuity test with an analog or digital multimeter.
Can I Replace the Module Myself?
In most cases, it is best to leave ABS module replacement to professionals, although those with a reasonable degree of mechanical aptitude might succeed in such endeavors. However, it is important to realize that some ABS modules can require considerable effort to remove and install, depending upon the specific manufacturer’s design.
In some cases, it might also be necessary to flash a new ABS module using a professional-grade scan tool. Alternatively, at least a few manufacturers require that an ABS bleeding procedure be performed after the ABS module itself is replaced. Again, this often requires the use of an expensive, professional-grade diagnostic scanner.
Can an ABS Module Be Repaired?
Depending on the failure in question, it might be possible to repair your vehicle’s faulty ABS module. However, this falls to those who are intimately familiar with the inner workings of such a module itself. Therefore, it is not advised for the average DIY mechanic to undertake such an endeavor.
There are a number of companies that will repair your vehicle’s ABS module for a fee. However, doing so requires the removal of the ABS module in question before sending it to a qualified repairer.
This could be a solution to consider if you can spare the vehicle needing repair for several weeks while its faulty ABS module is repaired and mailed back.
Jeep Wrangler 4xe Software Update Strands Owners
Software Glitch Cripples Jeep Wrangler 4xe Fleet
A recent software update deployed across the Jeep Wrangler 4xe plug-in hybrid fleet has left numerous owners with inoperable vehicles. What was intended as a routine enhancement has instead resulted in widespread operational failures, transforming daily commutes into logistical nightmares for affected drivers.
Unexpected Breakdowns and Safety Concerns
Reports indicate that vehicles began experiencing sudden power loss and complete system shutdowns, sometimes while in motion. This has raised significant safety alarms, with owners describing harrowing experiences of their SUVs becoming immobilized in traffic or refusing to start in parking lots. The problematic update appears to interfere with critical vehicle systems, preventing normal operation.
Manufacturer Response and Owner Frustration
While awareness of the issue has grown, a comprehensive solution remains elusive for many stranded motorists. Service centers have seen an influx of affected vehicles, though diagnostic processes and repair timelines vary significantly. Some technicians have managed to restore functionality through complex system resets, while others struggle with persistent electronic faults.
Broader Implications for Connected Vehicles
This incident highlights the vulnerabilities inherent in modern connected vehicles. As manufacturers increasingly rely on over-the-air updates, the potential for widespread system failures grows. The Jeep Wrangler 4xe situation demonstrates how a single software deployment can simultaneously impact thousands of vehicles, leaving owners without reliable transportation for extended periods.
The automotive industry faces growing pressure to implement more robust testing protocols for electronic systems. Vehicle owners now confront not just traditional mechanical concerns but also digital reliability issues that can render even new vehicles unusable through no fault of their own.
Symptoms of a Faulty or Clogged Transmission Filter
While most people know all about oil filters and air filters, the one that many drivers overlook is the transmission filter. But just because it’s not as well-known doesn’t mean it can’t cause major problems for your vehicle.
Knowing the symptoms of a faulty (or clogged) transmission filter can help you understand what’s going on with your vehicle, and knowing how often you should replace a transmission filter can help prevent your vehicle from developing problems in the first place.
What is a Transmission Filter For?
The transmission filter works much like your vehicle’s oil filter, removing contaminants from the oil before they can damage other parts of your vehicle’s transmission. Your vehicle’s transmission oil works much like engine oil, providing cooling, lubrication, and cleaning benefits.
But to get the most out of these properties, the transmission fluid must stay clean, which comes down to the transmission filter. Even though the transmission oil system shouldn’t contain many contaminants, even a few contaminants can create big problems. The transmission filter ensures this doesn’t become an issue.
Where is the Filter Located?
It depends on the type of vehicle you drive, but you can find the transmission filter either inside the transmission oil pan or outside the transmission pan.
If the filter is inside the pan, it’s usually a paper element, and if it’s outside, it’s typically a screw-on transmission filter.
Transmission Filter vs Screen
transmission screen
While transmission filters are important, not all vehicles filter transmission fluid the same way. One of the most common alternatives to a transmission filter is the transmission screen.
Vehicles with a transmission screen typically place them inside the transmission pan, and the transmission fluid must pass through the screen during operation. These are usually metal screens and you never need to replace them, although you should perform regular fluid flushes to keep the fluid clean.
Meanwhile, transmission filters can be placed inside or outside the transmission pan, and they feature an active filtering element that you’ll need to replace every time you perform a fluid flush.
Generally, filters do a better job of keeping the fluid clean, but since you need to replace them with every flush, it also increases maintenance costs.
Bad Transmission Filter Symptoms
If your transmission filter starts to fail, you’ll notice a few noticeable symptoms. However, even if you start noticing these symptoms, it’s best to stick to the recommended maintenance intervals.
If you follow the recommended maintenance intervals, you should change the transmission filter before you start noticing any of these symptoms.
#1 – Rattling Noises
Rattling noises can occur with an old transmission filter for different reasons. First, the transmission filter element itself can break and rattle. Then, if the filter is no longer working properly, metal chips from the transmission can start rattling inside the transmission.
Unfortunately, if your transmission is making a rattling noise, even if an old transmission filter is the cause, it’s likely to require expensive repairs.
#2 – Whirring or Whining Noises
If you drive a vehicle with a manual transmission, you’re more likely to hear a whirring or whining noise instead of a rattle. However, since most manual transmissions don’t have a transmission filter, this usually isn’t the cause.
But keeping that in mind, it’s possible for an automatic transmission to have these noises, and often the problem is a clogged transmission filter. Sometimes simply replacing the filter fixes the problem, and other times other components are already damaged.
#3 – Leaks
While there are many potential causes of a transmission fluid leak, one of them is a clogged filter. Clogged filters don’t allow transmission fluid to flow as it should through the rest of the system, and the increased pressure can cause seals to fail.
If you have a transmission fluid leak, replace the pan gasket, flush the transmission fluid, and replace the filter to ensure the problem doesn’t happen again!
#4 – Contaminated Transmission Fluid
If you have an old filter, it won’t filter the transmission fluid as effectively as it should. Dark red, brown, or even black transmission fluid all indicate that it’s time to flush the transmission fluid and install a new filter.
#5 – Shifting Problems
If your vehicle starts having shifting problems due to an old transmission filter, it’s way too old. This happens with a clogged transmission filter that doesn’t let fluid flow as freely as needed through the engine.
When this happens, it can prevent other components from working as they should, and it can even damage those components.
#6 – Unusual Smells
If the transmission filter gets too old, it can’t effectively filter the transmission fluid. In doing so, it starts to lose some of its viscosity and lubricating properties. As a result, the transmission fluid can get too hot and start to burn. Burning transmission fluid gives off a distinct smell.
How Often Should You Change a Transmission Filter?
Similar to the transmission fluid drain interval, you should consult the owner’s manual to see what your vehicle needs regarding the transmission filter changes are concerned. However, many automakers recommend changing the transmission filter every 30,000 miles or every two years, whichever comes first.
Whenever you change the transmission filter, you should also perform a transmission fluid flush. But before you drop the pan and drain the fluid, do yourself a favor and check your vehicle’s requirements, as some newer vehicles use a sealed system and last 100,000 miles or more.
Can the Filter Be Cleaned and Reused?
If your vehicle uses a metal screen, then yes, you can clean it and reuse it. But for typical transmission filters, you cannot clean and reuse them. The filter element wears out over time and if you try to clean it, you will damage it.
When you put it back in your vehicle, it won’t filter contaminants as it should and you might even introduce contaminants directly into the system. When you perform a transmission fluid flush, you should replace the filter every time.
Transmission Filter Replacement Cost
Since you need to perform a transmission fluid flush every time you change the transmission filter, it costs a bit more than you might think at first. Not only that, but often when replacing the transmission filter, you need to drop the entire transmission oil pan, which also significantly increases the price.
Overall, you can expect to spend between $400 and $500 for a full fluid flush and transmission filter change. Of that cost, only about $200 is for parts.
If you own a vehicle with an external transmission filter, you can expect to spend less, typically between $250 and $300 for a transmission fluid flush and a new filter.
Do Manual Transmissions Have a Transmission Filter?
Since the manual transmission doesn’t use a pressurized system like an automatic transmission, there’s really no reason to install a transmission filter with an automatic transmission. Because there’s no pressure in a manual transmission, there’s no way for a manual transmission to filter the fluid.
However, since there’s no pressure in the system, it’s also much less likely that different contaminants will cause problems with manual transmissions. You’ll still need to follow the fluid flush according to the manufacturer’s recommendations. But if you do that, you shouldn’t encounter any problems.
Roundabout World Record: 5-Hour Drive for Charity
An Unusual Automotive Challenge in a Roundabout
Driving enthusiasts often push boundaries, but few have attempted what one driver recently accomplished. In a display of endurance and precision, a new world record was set by completing five continuous hours of driving within a single roundabout. This remarkable feat was undertaken not for personal glory, but to raise awareness and funds for charitable causes, demonstrating how unconventional methods can draw attention to important issues.
The Record-Breaking Achievement
On a quiet Saturday morning, the driver embarked on this unique journey, navigating the circular path repeatedly without pause. The challenge required immense concentration and skill to maintain a steady pace while avoiding monotony and fatigue. Spectators and supporters gathered to witness the event, which quickly gained local attention for its creativity and dedication.
Preparation and Execution
Months of planning went into ensuring the attempt was safe and compliant with local regulations. The vehicle used was equipped with standard safety features and underwent rigorous checks to handle the prolonged operation. The driver followed a strict regimen to stay alert, incorporating breaks for hydration and brief stretches within the allowed parameters of the record guidelines.
Impact and Recognition
This endeavor successfully highlighted the power of community-driven initiatives, inspiring others to think outside the box for charitable endeavors. While the physical act of driving in circles may seem straightforward, the symbolic message of perseverance resonated with many, turning a simple roundabout into a stage for global goodwill.
Lessons from the Circular Marathon
Such events remind us that innovation in fundraising knows no bounds. By combining a passion for driving with a commitment to charity, this record showcases how ordinary settings can become platforms for extraordinary efforts. The success of this venture may encourage similar initiatives, fostering a culture of creative altruism worldwide.
Carbon Accumulation by Direct Injection: Symptoms and Preventive Measures
Direct fuel injection in engines is more common nowadays because it improves fuel economy. However, it is not an ideal method as carbon deposits form on the piston, intake valves, and other surfaces of the combustion chamber.
To understand how direct injection carbon buildup accumulates and how to prevent it, let’s consider both aspects separately.
Direct Injection Carbon Buildup: Identifying the Symptoms
Loss of Power and Acceleration
If you have noticed a substantial decrease in your car’s power and acceleration, direct injection carbon buildup could be the cause. Deposits on the intake valves disrupt the proper airflow and fuel combustion, which compromises engine performance.
Rough Idling
Carbon buildup can cause irregular idling, or even engine stalling. This happens when deposits interfere with the proper closing of the intake valves, leading to uneven airflow.
Decreased Fuel Economy
Are your trips to the gas station becoming more frequent? Carbon buildup can hinder fuel atomization, causing inefficient combustion and thus reducing fuel economy.
High Emissions
Carbon buildup can result in the emission of higher levels of harmful gases. If you fail emissions tests or notice dark exhaust smoke, it is imperative to investigate the presence of carbon deposits.
Direct Injection Carbon Buildup: Why Does It Happen?
Without further delay, let’s get straight to the reasons for the problem.
Inability to Clean the Valve and Port
The main cause of carbon buildup on valves is that detergents and added fuel do not come into direct contact with the intake valves.
This occurs primarily because fuel is injected directly into the cylinders instead of behind the valve. As a result, the fuel and detergent are unable to clean the port and valve.
High Combustion Pressure
The problem worsens when combustion pressure is higher and mixtures are leaner.
In fact, during direct fuel injection, more energy is produced than during port fuel injection. Thus, when a suboptimal flame front is generated, unburned fuel increases inside the combustion chamber.
Moreover, when the valve opens for the intake stroke, these byproducts are exposed to the valve, thereby forming a carbon deposit.
Symptoms of Direct Injection Carbon Buildup. (Photo: WapCar)
Note: Even the air passing through the valve is not hot enough to burn these byproducts.
Cylinders Show Low Vacuum
While starting the engine, try attaching a pressure transducer to the intake manifold. A lower vacuum during intake strokes in one or more cylinders may indicate partially obstructed intakes caused by carbon buildup.
A compression test can also reveal this condition: carbon buildup on the intake ports obstructs intake air, causing a slow increase in cylinder compression, but it eventually returns to normal.
Another Cause
When the intake valve enters the combustion chamber for a short period, the byproducts of the combustion process meet the valve, which sticks to the neck of this part.
How to Prevent Direct Injection Carbon Buildup?
With a multitude of ways to prevent direct injection carbon buildup, there are indeed three best possible ways to try:
Regular Maintenance
One of the ideal ways to avoid carbon buildup is periodic maintenance. While following essential maintenance tips, fully synthetic oil should be changed every 5,000 miles. This allows the intake valves to operate efficiently.
Replacing Spark Plugs
To reduce the deposit of unburned fuel in the chambers and thus prevent it from sticking to the valves, replace the spark plugs.
Tip: The precise time to replace spark plugs depends on the mileage recommended by the manufacturers.
Fuel Injector Cleaning
Cleaning is essential for proper fuel spraying into the chamber. Therefore, maintaining it every 30,000 miles can save you huge expenses later.
Last but not least, a new software update for the car’s ECM can help reduce carbon buildup on the valves by adjusting the timing of the spark plug and valve.
How to Stop Direct Injection Carbon Buildup. (Photo: Pinterest)
Exploring DIY Cleaning Techniques
For those who enjoy a hands-on approach to vehicle maintenance, consider these DIY methods:
Thorough Intake Valve Cleaning
Use a direct injection intake valve cleaner to manually remove carbon deposits from the intake valves.
Consistent Use of Top-Tier Fuel
Consistently using high-quality fuel can serve as a preventive measure against carbon buildup over time.
Mitigating Short Trips
Frequent short trips prevent the engine from reaching its optimal operating temperature, thus increasing the risk of carbon buildup. Combine errands for longer trips whenever possible.
FAQ on Direct Injection Carbon Buildup
What Triggers Carbon Buildup in Direct Injection Engines?
Carbon buildup is due to the absence of fuel washing in direct injection engines, allowing deposits to accumulate on the intake valves and combustion chambers.
Are All Fuel Injector Cleaners Suitable?
It is advisable to use fuel injector cleaners specifically formulated for direct injection engines.
How Often Should Intake Valves Be Cleaned?
Intake valve cleaning should ideally occur every 30,000 to 60,000 miles; however, consult your car’s manual for precise recommendations.
Does Warranty Cover Carbon Buildup Issues?
Warranty coverage varies; therefore, consult your vehicle’s warranty documentation or your dealer for details.
Can I Perform Intake Valve Cleaning at Home?
Although DIY methods exist, for optimal results, it is recommended to enlist the services of a professional mechanic for intake valve cleaning.
Watch the video from Deutsche Auto Parts to deeply understand why direct injections have issues with carbon!
In conclusion, these tips will surely help prevent direct injection carbon buildup. For more information on preventive measures, you can also consult the reputable auto repair and maintenance workshop.
I hope you will understand more about direct injection carbon buildup and the solutions for cleaning the valves from this article.
The car pulls to the right: possible reasons and solutions
How do you feel when your car pulls to the right or left while driving? Frustrating, isn’t it? It could also pose a safety issue, as the car pulling to one side can cause the driver to lose control on a difficult road. It’s hard to focus on driving when you’re fighting with the steering wheel to keep the vehicle straight.
Are you facing the same problem? Keep reading to learn the causes and solutions.
Why is my car pulling to the right?
Applying constant pressure on the steering wheel is tedious. Moreover, it takes away the joy of driving. Various components, including the tires, are affected when the steering wheel pulls to the right while driving.
A wide range of issues can trigger problems. Let’s discuss the causes that make a car or truck pull to one side:
Uneven tire pressure
The first thing you should check when your car pulls to the right is the tire pressure. For example, the vehicle’s height will not be proportionate when there are underinflated tires on one side. Low tire pressure increases rolling resistance, leading to a misalignment problem.
Overinflation is just as serious, as it causes the car to pull to one side. This happens because an overinflated tire makes the car veer away.
Uneven tire pressure could be the cause.
How to fix it? Measure the pressure with a tire gauge and inflate all tires to the correct PSI. The specifications for the maximum pressure are found on the driver’s side door jamb.
Misaligned Wheel
A car or truck pulls to the right when the wheel is not aligned. Uneven tire tread wear is another indication of this problem. Any delay in resolving this issue will lead to more serious problems.
How to fix it? Correcting the wheel or tire alignment means fixing the suspension’s position. It must be at a right angle so that the wheel is in the central position and the tires make contact with the road, according to the owner’s manual.
Brake System Complications
Complications in the braking system, including a stuck caliper, dry slide pins, and a collapsed brake hose, can create a pulling problem.
A stuck caliper is the most common issue. Calipers apply pressure to the brake pads by drawing energy from the hydraulic braking system. They are essential for stopping the vehicle after pressing the brake pedal. The car will pull to the side if one of them is not functioning properly.
How to fix it? An operational braking system is essential for driving safety. A professional mechanic repairs any issue with the system.
Torque Steer
This condition occurs when engine torque affects the steering. A front-wheel drive (FWD) car pulls to the right during acceleration in case of torque steer. Several components can be the cause of the problem: a loose steering component, a faulty lower control arm bushing, a damaged engine mount, a flexible tie rod, or excessive play in a ball joint.
How to fix it? Since a number of components could be involved for this problem to occur, it’s best to take the vehicle to a garage. You may need to install a limited-slip differential (LSD), track bars, a center support bearing, or repair several other components.
Faulty Steering Linkage
A loose, deteriorated, or weak tie rod end is another reason why a car pulls to the right when turning. Wild shaking of the wheel will occur regularly when the situation worsens. Newer vehicles use a rack and pinion system instead of a steering gearbox.
How to fix it? A steering linkage can be damaged for various reasons. Taking the car to a repair shop is the best way to diagnose the root cause and perform the repair.
Worn Wheel Bearing
Bearings are essential for the proper rotation of the wheel. When one of them wears out, the car will display several warning signs, and pulling to one side is one of them.
Pulling to the side is a safety issue.
How to fix it? Repairing a wheel bearing is a complicated process. You should seek professional help to resolve this issue.
Worn Out Suspension Parts
The suspension is likely to give out at some point. Several parts, including ball joints, control arms, struts, shock absorbers, and bushings, can wear out over time. Deteriorated components will cause the vehicle to move to one side when braking. Suspension parts show signs of wear over a long period. Thus, you may not be aware of the problem unless a part is damaged or broken.
Porsche Cayman EV’s Clever Rear Window Disguise
Innovative Camouflage in Porsche’s Electric Sports Car
The upcoming Porsche Cayman EV prototype showcases an ingenious approach to concealing its design secrets. While traditional camouflage wraps obscure body lines, Porsche engineers have implemented a sophisticated digital deception system in the rear window area. This technology represents a significant evolution in prototype testing methodology for electric vehicles.
Digital Deception Technology
Instead of conventional physical covers, the Cayman EV employs an advanced LCD film integrated directly into the rear window surface. This innovative solution can display artificial shapes and patterns that completely distort the vehicle’s actual proportions and design elements. The system creates optical illusions that make it nearly impossible for observers to determine the true roofline, window shape, or rear deck configuration.
Engineering Advantages
This digital camouflage provides multiple benefits beyond traditional vinyl wraps. The technology allows engineers to quickly modify the disguise patterns electronically without physical intervention. It also preserves the vehicle’s aerodynamic properties during testing, unlike bulky fabric covers that can alter airflow and affect performance data collection. The system maintains full visibility for test drivers while completely confusing external observers and photography equipment.
Electric Vehicle Development Strategy
Porsche’s approach reflects how electric vehicle development requires new testing methodologies. With fewer mechanical components to hide compared to internal combustion vehicles, manufacturers must focus on concealing aerodynamic innovations and battery packaging solutions. The rear window disguise specifically protects Porsche’s unique solutions for rear-engine electric sports car packaging, where thermal management and weight distribution present particular challenges.
This technological leap in prototype camouflage demonstrates how automotive manufacturers are adapting to the electric era while maintaining their traditional secrecy around upcoming models. The system successfully balances testing transparency for engineers with complete opacity for competitors and enthusiasts attempting to decode the vehicle’s final design language.
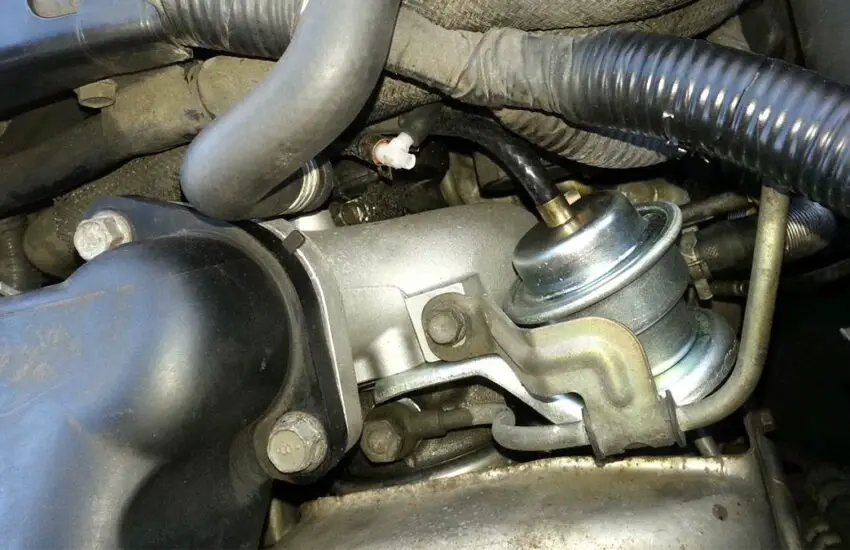
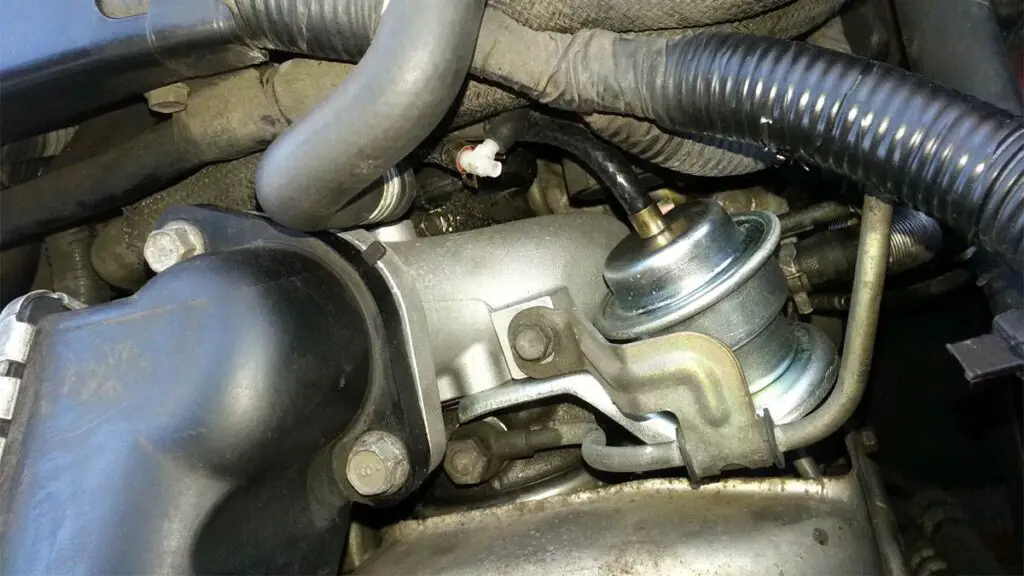
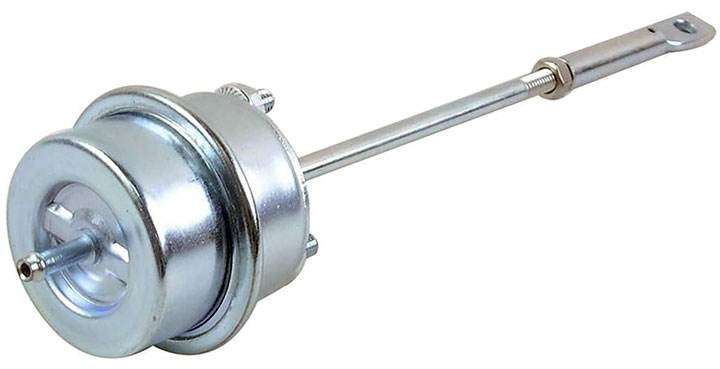
Symptoms of a faulty relief valve
Turbochargers promise powerful performance, but when the internal wastegate fails, that power turns into problems.
Discover the typical symptoms of a turbocharger wastegate failure (some of which can be quite alarming), what causes them, and how much it will cost to repair or replace your wastegate.
What is a Turbo Wastegate?
A turbo wastegate is an essential component found under the hood of vehicles equipped with turbochargers.
It is used to regulate the maximum speed of the turbocharger’s turbine, in turn governing the overall boost production as a whole. As a result, the risk of developing an overboost condition within a motor’s forced induction system is significantly reduced.
How a Wastegate Works
To better understand the process described above, you must first familiarize yourself with the basics of turbocharger operation. A turbocharger uses the exhaust energy produced during the combustion process to spin a specialized turbine wheel used to direct pressurized air into an engine’s intake tract.
This oxygen-dense intake air is ideal for producing more volatile combustion, especially when additional fuel is metered to each respective cylinder.
A wastegate regulates the turbocharger turbine’s speed by redirecting excessive exhaust energy away from an engine’s turbo, under specific conditions. Simply put, the maximum energy acting upon the driven (exhaust) side of a turbocharger’s turbine shaft is effectively limited by its corresponding wastegate, which in turn keeps maximum boost pressures in check.
Turbo wastegates come in several different forms and can consist of an internal or external arrangement, depending on the application. Regardless, most turbocharger wastegates feature a spring/diaphragm arrangement, which is acted upon by pressurized air distributed via an attached sensing line.
Here is a good video on how internal and external wastegates work:
When a turbocharger wastegate fails, a number of secondary symptoms can occur, some of which tend to be more concerning than others. Recognizing these symptoms can prove essential when attempting to expedite the repair of the issue at hand.
Here are some of the most common symptoms associated with a bad wastegate.
#1 – Check Engine Light
In most cases, wastegate-related issues will cause a vehicle’s check engine light to illuminate. This stems from the fact that an engine is unable to achieve desired intake pressures during operation.
An OBD2 scan tool should be used to discover which specific diagnostic trouble codes (DTCs) have been stored by a vehicle’s ECM to confirm if it is a wastegate issue. Some examples of wastegate-related codes include: P0234, P0243, P0244, P0245, and P0250.
#2 – Lack of Sufficient Boost
When a turbo’s wastegate is stuck open, exhaust gasses are vented away rather than being directed to an engine’s turbo’s exhaust side. As a result, boost pressures are significantly reduced.
#3 – Reduced Fuel Economy
Additionally, when a wastegate remains stuck open, excess fuel will be burned in an attempt to reach the engine’s expected power output. However, this desired power level will never be achieved, due to insufficient intake airflow.
#4 – Erratic Boost Pressures
When a turbo’s wastegate remains stuck closed, the risk of engine overboost increases significantly. As a result, erratic or excessive boost gauge readings are often recorded. If not quickly remedied, severe engine damage can result.
Causes of Turbo Wastegate Problems
Turbo wastegate failure can be caused by a multitude of underlying issues, a number of which are not always easy to identify. However, learning to troubleshoot these issues can prove essential when attempting to prevent recurring wastegate failures.
Here are some of the most common causes of turbo wastegate failure.
#1 – Carbon Buildup
In some cases, a wastegate can experience failure due to carbon fouling. As carbon generated by exhaust gasses contaminates a wastegate’s internal diaphragm, a bypass often results.
In the most extreme of cases, this carbon contamination can even cause a wastegate’s internal diaphragm to rupture.
#2 – Weak Actuator Spring
A turbo wastegate can also fail due to normal wear and tear, as its actuator springs begin to age. When this occurs, a wastegate can begin to vent unexpectedly, causing erratic boost pressures.
#3 – Improper Adjustment
At times, both internal and external wastegates can require adjustment. The procedure for doing so varies by wastegate configuration. An improperly adjusted wastegate can lead to a number of operational abnormalities.
Replacement and Repair Cost
The cost of repairing or replacing a turbocharger wastegate can vary significantly from one vehicle model to the next.
This primarily stems from the fact that some external wastegates are far easier to repair than their internal counterparts. This fact alone can make estimating wastegate repair/replacement costs quite difficult.
Generally speaking, you can expect to pay between $200 and $600 to have your vehicle’s turbocharger wastegate repaired or replaced. However, if a failed wastegate itself necessitates turbocharger replacement, cost skyrockets, often totaling $2,000 or more.
Where is the Wastegate Located?
There are two different types of turbocharger wastegates in use today; internal and external.
As their name implies, internal wastegates are located within the turbocharger itself, affixed prominently to the turbine housing. Wastegates of this style typically feature a pneumatic actuator, flapper valve, crank arm, and rod end.
Alternatively, some turbochargers are equipped with externally mounted wastegates, which are positioned between an engine’s exhaust manifold and the intake-side turbine housing of a turbo.
This style of wastegate moderates intake airflow by diverting incoming exhaust gasses, in the event that boost pressures exceed their rated threshold.
Internal Wastegate
Wastegate vs Blow-Off Valve
Both wastegates and blow-off valves are designed for use with turbocharged engines and serve to reduce the risk of overboost. However, the manner in which each of these two components is used differs slightly from one another, most notably in terms of each’s location.
As mentioned earlier, wastegates are positioned ahead of the turbo, along an engine’s exhaust manifold or, alternatively, within the turbocharger’s turbine housing itself.
Conversely, blow-off valves are positioned within an engine’s intake tract, downstream of the turbo itself. These devices vent off excess boost pressure, rather than preventing its buildup, as a wastegate does.
Do All Turbocharged Vehicles Have Wastegates?
Turbocharged engines and wastegates go hand-in-hand, with the vast majority of turbocharged engines featuring a wastegate of one type or another. That being said, there are a few exceptions to this general rule, the most widespread of which pertains to the newest, most advanced variable geometry turbos.
The variable geometry turbocharger is unique, as it offers many of the same charge-limiting capabilities, without the use of a dedicated wastegate.
Turbochargers of this type feature specialized vanes on the exhaust side, which move in response to various operating conditions. This movement redistributes the flow of incoming exhaust gasses, thereby moderating the speed of the turbocharger as a whole.
Can You Run a Turbo Without a Wastegate?
Audi R8 Biturbo (Credit)
Most turbocharged engines in production today utilize wastegates in one way or another. This is due to the fact that wastegates serve as somewhat of an engine protection device, preventing overboost from occurring.
Without this level of protection, severe engine damage could occur, as a turbocharged engine reaches its maximum RPM. Even though, in theory, it is possible to operate a turbocharged engine without a wastegate, doing so would prove largely impractical.
To accomplish this feat, you would be forced to find the perfect turbo for your specific application, which only reaches an engine’s maximum boost threshold when it has reached maximum RPM.
As this prospect is largely unattainable under real-world conditions, the use of a wastegate is deemed necessary.
What is Wastegate Rattle?
Wastegate rattle is a condition in which a persistent “rattling” or “chirping” is emitted from an engine’s turbocharger. This noise is most often heard at idle, but is sometimes also audible during periods of light acceleration. Wastegate rattle is most prevalent in high-mileage engines in most cases.
Much like many other turbocharger-related issues, wastegate rattle is most often attributed to significant wear that accumulates over the course of a turbo’s lifespan.
This “rattle” originates from the wastegate itself and is due to the worn bushings and rod ends of the actuator located there. Due to this wear, the wastegate no longer holds firmly, thereby causing an audible rattling.