Only a little mechanical knowledge is needed to perform a brake piston replacement. Additionally, you must have a DIY mindset. A soft brake can be the result of many factors. There may be air in the brake lines or the master cylinder may be leaking.
In all these cases, it is recommended to replace the brake piston. Using a brake bleeder, you can remove the air. By the way, to perform a brake piston repair, you must follow the steps below.
Tools and materials
Ratchet or tire iron
Car jack
Wrench
C-clamp
Drain pan
Brake bleeding kit
Pin punch set
Pliers
Brake caliper piston removal tool
Air hose
#1: Remove the wheel and lift the car
Using the tire iron or ratchet, loosen the lug nuts and lift the car using the jack. Use the jack stand to secure the position and remove the tire and lug nuts. Set them aside now.
#2: Remove the brake pads and caliper
Remove the retaining clips that hold the pads to the caliper. Then, detach the pads from the caliper.
To remove the caliper, push the brake pistons toward the rotor, compressing the brakes. As soon as the pressure is released, remove the caliper.
Get rid of the retaining clips that hold the pads to the caliper. (Photo: Mechanic)
#3: Remove the pistons from the caliper
When replacing a brake caliper piston, remember to prevent one of the pistons from moving while removing the other.
Once you have secured one piston, use a pressurized air hose to blow out the other. Use a cloth to wrap the caliper before blowing out the piston, to prevent brake fluid from splattering.
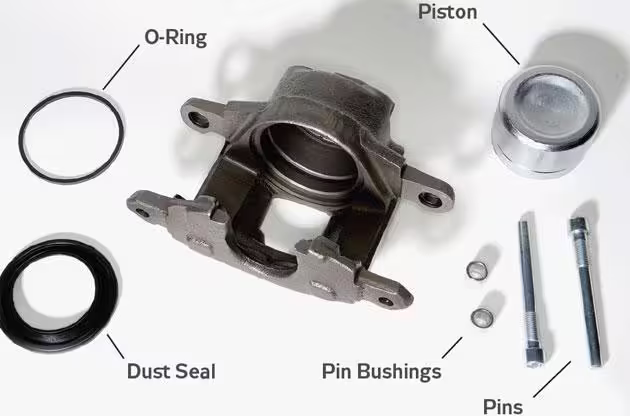
#4: Cleaning / Replacing the brake piston
The next step in brake piston removal is to clean the caliper. The piston kit includes a seal for the piston cylinder, as well as a retaining pin and a rubber dust boot.
Additionally, replacement retaining clips are there to keep the pads attached to the caliper. You must replace these parts. Often, you will also need to clean the pistons.
#5: Reassemble the caliper
As soon as you finish cleaning the parts, put the pistons and other new parts back on the caliper. The piston orientation must match the rotor.
The cut-out area on each piston indicates the correct way to proceed with reassembly. During final adjustment, remove the pads to ensure the pistons compress toward the rotor. To avoid having spongy brakes, leave enough room to be able to install the pads.
Even though it’s quite difficult, once you’ve done it, it should be easier for you. Fully bleed the brake cylinder after completing the replacement work and filling the master cylinder.
FAQ
1. Can weather conditions affect the need to replace the brake piston?
Yes, extreme weather conditions can accelerate the wear of brake components, including the piston.
In very cold climates, for example, moisture can freeze inside the caliper, which can cause the piston to seize.
Conversely, in very hot climates, the increased temperature can contribute to the degradation of piston seals, leading to leaks or sticking.
2. Is there a way to prevent brake piston problems?
Regular maintenance and inspections are essential to avoid brake piston problems. This includes checking the brake fluid levels and quality, as dirty or low brake fluid can lead to caliper and piston malfunctions.
Additionally, avoiding aggressive driving habits that cause excessive brake heat can help extend the life of your brake pistons.
3. How does the brake piston material affect its performance?
Brake pistons can be made from various materials, including steel, aluminum, and phenolic (a type of plastic).
Steel pistons are durable and withstand high temperatures well, but they can be prone to rust.
Aluminum pistons are lighter and help dissipate heat more quickly, but may wear out faster.
Phenolic pistons, while less heat conductive than metal, do not expand as much under heat and resist corrosion.
The choice of material can affect the piston’s performance and longevity.
4. Can upgrading the brake piston improve braking performance?
Switching to high-performance brake pistons, typically made from materials that better withstand high temperatures, can improve braking performance, especially under demanding conditions such as racing or heavy towing.
However, for everyday driving, standard pistons are usually sufficient if properly maintained.
5. What are the environmental implications of disposing of old brake pistons?
Disposing of used brake pistons, especially metal ones, can have environmental consequences if not done correctly. It is important to recycle metal pistons as much as possible.
Phenolic pistons, however, should be disposed of in accordance with local plastic waste regulations, as they can release harmful chemicals if incinerated.
6. Is it possible for a brake piston to cause uneven brake pad wear?
Yes, if a brake piston seizes or does not retract properly, it can lead to uneven brake pad wear.
One pad may wear out faster than the other, reducing braking efficiency and potentially causing the vehicle to pull to one side during braking.
Conclusion
Replacing a brake piston is a detailed process that requires careful attention, the right tools, and a solid understanding of brake systems.
Whether you are an experienced DIY mechanic or a novice ready to tackle your car’s maintenance tasks, it is essential to approach brake piston replacement with caution due to its critical role in vehicle safety!
The car shakes when braking: what you need to know
Your car experiences daily ups and downs. Your car sends you signals about many issues. These signals may seem normal, but ignoring them can lead to major problems that could require a lot of effort to resolve. Car shaking during braking is one such signal that should not be ignored. The reason for this shaking can be anything, including tires, brake discs, or any other cause. Ultimately, it’s better to address it early rather than fix it later.
To make driving safer and smoother, diagnose the cause of a problem in every possible way.
Car Shaking During Braking: Common Causes
Every vehicle’s brakes come in the form of discs or drums, and friction and resistance are the reasons they work. When you feel this shaking, low or high friction and resistance could be one of the causes. Additionally, other reasons may be behind this phenomenon.
1. Tires
Tires are the most common cause of these shakes. If the tires are unbalanced, the steering wheel or the car shakes. According to some studies, shaking can start around 80 or 90 kilometers per hour, and if not addressed at that point, the situation can worsen at 100 kilometers per hour. But there’s no need to worry, as the situation improves with increasing speed. However, it’s helpful to consult a professional car mechanic for maintenance advice.
Worn rotor causes car shaking during braking. Source: Daily Post Share
2. Worn Rotor
A worn-out disc can be the cause of car shaking during braking. In this case, the disc may move from side to side, exceeding the maximum allowable value, which is about 0.05 mm. A dirty or rusty disc surface and a thin spot on the disc can be the reason.
3. Warped Rotor
Incorrect tightening of a new rotor after maintenance can cause the car to shake during braking. It is necessary to tighten the rotor according to a specific pattern and precise torque for the proper functioning of the car.
4. Brake Caliper Seizure
You may feel vibrations in the steering wheel when the brake caliper engages. The situation can worsen as the car accelerates. Additionally, you might also smell a burning odor.
You can avoid tire issues by purchasing new, high-quality tires. Moreover, it’s best to check the tires before and after maintenance.
Main causes of car shaking during braking. Source: Car and Driver
It’s easy to fix the brakes by servicing the caliper during a maintenance session. If your car has traveled more than 1,200 kilometers, it’s necessary to take it for maintenance as soon as possible. You can determine if the caliper is stuck by noticing that the front or rear brake pads wear out more than the others.
Conclusion
The best idea is to consult a top-notch car mechanic to solve your car problems. Experts can point out the cause of car shaking during braking and can offer you the perfect solution.
You can make your car last a long time by following all maintenance tips and heeding warning signs, starting today!
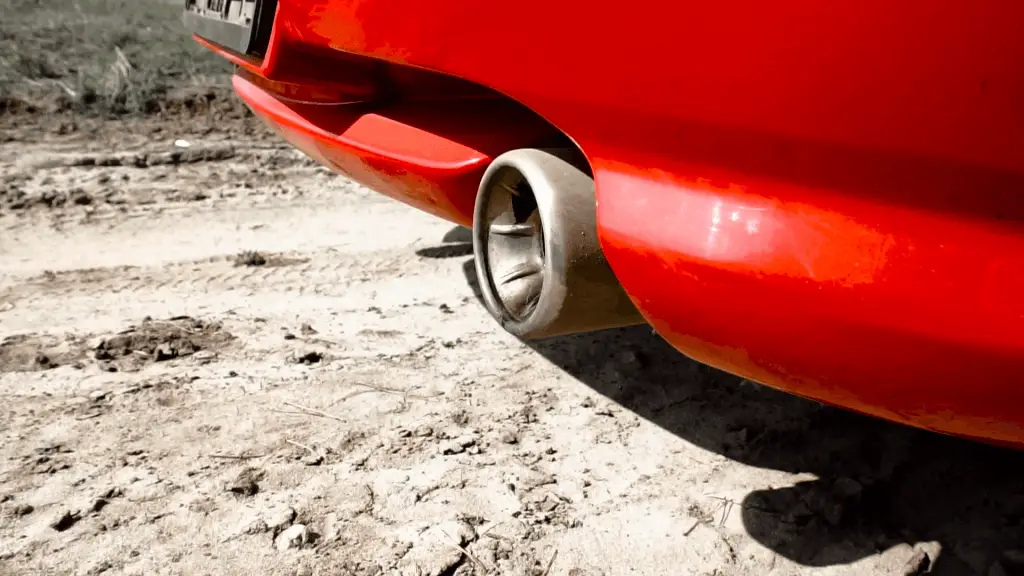
Seven fake exhaust pipes
Aesthetically, every component of the car must look authentic when it comes to analyzing the car’s design. The exhaust pipe, which is one of these components at the rear of the car, must be taken into account during its design.
However, to mask certain technical drawbacks like a small engine, manufacturers actually play with innovative designs of the component. All this is done with the aim of attracting customers’ attention.
And, some of these solutions can obviously be found with exhaust pipes that are otherwise nothing more than fake exhaust pipes.
Seven Adherents of Fake Exhaust Pipes
1. Mercedes C-Class
All models in Mercedes’ C-Class category are actually equipped with “Float” type exhausts. These are in fact just a fake exhaust pipe design. Actually, these are completely blocked, and no gas passes through them on some diesel models. To know more about the rear exhaust pipes, they are located just below the car, which is not otherwise visible.
2. Mercedes-AMG GT
The trapezoidal exhaust outlets at the rear of this car are rather fake. The two outlets located at the corner of the rear of the Mercedes-AMG GT could be better designed.
3. Skoda Octavia RS
Previous generations of the Octavia were equipped with a simple exhaust system with two outlets connected to a single rear housing. However, on recent models, the transformed design hides the rear housing behind the trim on one side of the car, which can be called the worst transformation or fake exhaust pipes on Skoda models.
4. Ferrari California
The round-shaped exhaust is much smaller than the tips suggested by the fake ones, which is a shame because in the world of supercars, bigger is better. Clearly and unfortunately, the pre-turbo California model is a blunder in this regard.
Ferrari artificial exhaust pipes. Source: Ferrari
5. Lexus IS-F
This point is quite bothersome, because the Lexus IS-F features diagonally stacked pipes, which are connected to the rear housing. These pipes are nothing more than a presentation element in the car, with no utility, unlike the RC-F.
6. Audi RS 6
RS models from Audi have a tradition of designing the exhaust system at the rear of the car in an oval shape. This design is quite poor because if you look closely, you can notice that it is simply the heat shields hiding the four small pipes.
7. Audi R8
Like the V8 model, the exhaust system is quite similar to that of the V10 R8 model.
On the V8 model, the two exhaust pipes are integrated into two rounded bumpers on each side of the car. However, on the V10 model, these rounded bumpers have been replaced by a single oval-shaped bumper on each side of the car. Surprisingly, no changes are made to the set of ordinary pipes.
To conclude, just like these fake exhaust pipes, there are many other violations against fashion and maintenance of exhaust pipes that need to be addressed. In fact, these fake models should not sway you when purchasing one of the brand’s cars. Ultimately, these fake models can actually ruin you.
All-wheel drive or four-wheel drive – Definition and differences
Four-wheel drive (4WD) systems have gained popularity over the decades, becoming a key selling point for car manufacturers. This demand has led to a proliferation of vehicles equipped with 4WD or all-wheel drive (AWD), suitable for all segments (SUVs, sedans, etc.). Yet, despite their omnipresence, the distinction between 4WD and AWD remains unclear to many. Are these transmissions identical? Or do they hide fundamental differences? Let’s explore their specificities.
What is a 4WD Transmission?
Also called Four by Four, 4WD is the preferred system for off-road vehicles. It comes in two types:
1. Part-Time 4WD
Operation:
Under normal conditions, the vehicle runs in two-wheel drive (usually the rear wheels).
The driver can manually activate 4WD mode to distribute torque evenly to all four wheels.
Limitations:
No center differential: The lack of a differential between the front and rear axles makes its use on paved roads risky (risk of “binding” or component damage).
Low Range: An essential option for extreme terrain (mud, rocks), it multiplies engine torque for climbing steep slopes.
2. Full-Time 4WD
Operation:
All four wheels are always driven, with a center differential allowing independent axle rotation.
Ideal for switching between roads and rough paths without manual intervention.
Vehicle Examples: Jeep Wrangler (Part-Time 4WD), Toyota Land Cruiser (Full-Time 4WD).
Key Takeaway: Part-time 4WD requires judicious use – reserved for difficult terrain, it avoids transmission overheating on pavement.
👉 Curious to learn more about AWD? Discover its features in the next section!
Jeep Patriot, a four-wheel drive vehicle. Source: Autotrader
Full-Time 4WD Transmission: Operation and Characteristics
Vehicles equipped with a full-time 4WD transmission send torque to all four wheels permanently, regardless of the surface (road, mud, snow, etc.). Unlike part-time systems, this configuration includes a center differential that allows the front and rear axles to rotate at different speeds, thus avoiding mechanical stress on pavement.
Key Features
Center Differential:
Allows for independent axle rotation, ideal for cornering on roads.
Can be locked manually or automatically in extreme conditions (e.g., sand, rocks) to synchronize the wheels and maximize traction.
Differential Lock:
Locks the differentials (center, front, or rear) to eliminate rotational differences between the wheels.
Useful in case of traction loss (e.g., a wheel in the air or on ice).
Low Range:
Reduces vehicle speed while multiplying torque for climbing steep slopes or overcoming obstacles.
Present on dedicated off-road 4WDs (e.g., Jeep Wrangler, Toyota Land Cruiser).
All-Wheel Drive (AWD): A Versatile Alternative
Unlike full-time 4WD, AWD (All-Wheel Drive) is designed for primarily on-road use, with automatic adaptations.
Major Differences from 4WD
No 2WD Mode: AWD cannot completely disengage one axle.
No Differential Lock: Traction management is entirely electronic (sensors, ECU).
Dynamic Torque Distribution:
On models like the Porsche 911 Turbo, up to 100% of torque can be sent to the front or rear axle depending on grip.
On roads, torque is often distributed asymmetrically (e.g., 40/60 front/rear) to optimize stability.
When to Choose Full-Time 4WD or AWD?
Criterion
Full-Time 4WD
AWD
Primary Use
Technical off-road, extreme terrain
Urban driving, light snow, sport
Manual Control
Yes (diff lock, low range)
No (automatic)
Examples
Land Rover Defender, Mercedes G-Class
Subaru Outback, Audi Quattro
Fuel Consumption
High (weight, mechanical resistance)
Moderate
Why Do These Transmissions Exist?
Full-Time 4WD:
For adventurers and professionals (agriculture, mountain rescue).
Resists shocks, water, and terrain deformations.
AWD:
Improves safety and performance on roads (acceleration, handling).
Meets the demand from drivers seeking a compromise between versatility and comfort.
Myths to Debunk
❌ “AWD/4WD makes you invincible on ice”: Only winter tires or chains guarantee optimal grip.
❌ “Full-time 4WD is useless in the city”: Some premium SUVs (e.g., Range Rover) use it for comfort and status.
Conclusion
Full-time 4WD remains the king of off-road, while AWD appeals for its intelligence and daily adaptability. The choice depends on your needs: explore the trails or dominate the pavement! 🚙💨
Mazda CX3, an all-wheel drive vehicle. Source: BBC.com
All-Wheel Drive (AWD) vs Four-Wheel Drive (4WD): Why Do These Systems Exist?
AWD (All-Wheel Drive) and 4WD (Four-Wheel Drive) systems meet distinct needs in terms of traction and control. Here is an analysis of their purpose, mechanisms, and applications.
1. Why Do Manufacturers Develop These Transmissions?
Responding to Driver Needs
Traction Improvement:
AWD: Optimizes grip on slippery roads (snow, rain) and during acceleration (e.g., Audi R8).
4WD: Dominates off-road (mud, rocks) thanks to robust mechanical features (e.g., Jeep Wrangler).
Market Diversification:
Urban SUVs (AWD) appeal to families, while 4WDs target adventurers and professionals.
Technological Innovation
AWD: Intelligent electronic systems (sensors, ECU) for real-time adaptation.
4WD: Proven mechanics (differential lock, low range) for durability.
2. Compared Operation
AWD (All-Wheel Drive)
Automatic Torque:
Sends power to all four wheels permanently, with variable distribution (e.g., 60% rear, 40% front).
No Low Range: Designed for pavement, not for extreme slopes.
Concrete Example:
Audi R8: AWD instantly sends torque to the front wheels in case of rear traction loss, reducing wheelspin and improving acceleration.
4WD (Four-Wheel Drive)
Mechanical Options:
Low Range: Reduces speed and multiplies torque for technical obstacles.
Differential Lock: Forces wheels to rotate at the same speed, ideal in case of total traction loss (e.g., a wheel in the air).
Concrete Example:
Jeep Wrangler: In 4WD Low mode, the vehicle climbs 45° slopes thanks to multiplied torque.
3. Comparison Table
Criterion
AWD
4WD
Torque Distribution
Automatic, adjusted by ECU
Manual or fixed (50/50 front/rear)
Low Range
Absent
Available for extreme terrain
Differential Lock
No (electronic management)
Yes (mechanical or electronic)
Fuel Consumption
Economical (light systems)
High (weight, mechanical resistance)
Target Audience
Urbanites, sports enthusiasts, families
Adventurers, off-road professionals
4. Concrete Applications
AWD
Sports Cars: Audi R8, Porsche 911 Turbo (optimized acceleration).
Off-Road Vehicles: Toyota Land Cruiser, Mercedes G-Class (shock resistance).
Utility Vehicles: Ford F-150 Raptor, Jeep Gladiator (heavy loads, towing).
5. Myths to Debunk
❌ “AWD is enough for deep snow”: Without winter tires, even AWD will slip.
❌ “4WD is useless in the city”: Premium SUVs (e.g., Range Rover) combine comfort and off-road capability.
6. Why Do These Transmissions Proliferate?
Consumer Demand: Search for safety and versatility.
Marketing: The terms “AWD” and “4WD” reassure and enhance vehicle image.
Technology Evolution: Hybrid and electric systems integrating AWD (e.g., Tesla Model Y).
Conclusion
AWD and 4WD transmissions coexist because they meet complementary needs:
AWD: For daily life, on-road performance, and difficult weather conditions.
4WD: For adventure, work in hostile terrain, and robustness.
The choice depends on your usage: do you prefer to tame the pavement or explore the unknown? 🚗🏔️
Audi R8. Source: MotorTrend
Difference Between All-Wheel Drive (AWD) and Four-Wheel Drive (4WD)
Here is a clarification of the key differences, myths to avoid, and advice for choosing between these two systems:
1. Comparison Table
Criterion
AWD (All-Wheel Drive)
4WD (Four-Wheel Drive)
Power Reception
Car Oil Leak: Threats and Solutions
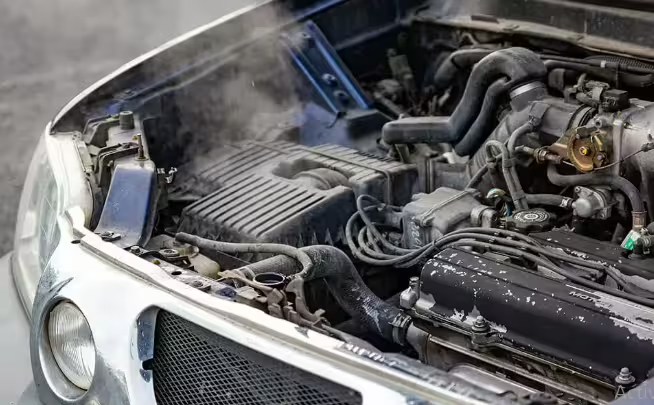
Finding a puddle of liquid under your vehicle is a worrying sign for any driver. Oil is an essential element of an automobile’s mechanism because it allows the engine to operate with adequate lubrication. It increases the lifespan of components by reducing corrosion and friction between moving parts. Therefore, a black puddle under the car signifies an oil leak, which can be the cause of many serious problems.
The Dangers of Oil Leaks
This is a problem that should not be ignored or set aside. The risks it can lead to are as follows:
Premature wear of hoses and rubber seals.
Creating a fire risk if you continue to drive with a leak.
Engine wear and premature failure if the problem is not resolved in time.
If you suspect a leak, measure the oil level to be sure. Additionally, you will notice strange smells and the color of the smoke coming from the exhaust pipe will be different. Refer to the next section to learn how to fix the problem, as it poses a potential risk of a car accident and injury to you and other passengers.
The engine can fail if you ignore the problem for a long time. (Photo source: Getty Images)
How to Fix an Oil Leak Problem
If you have no prior experience with car repair, it would be best to take the car to a repair shop. But if you like to get your hands dirty, try the following tips:
Replace the Broken Gasket or Worn Seals
The engine is composed of several components and shafts. Each joint of the different parts has a seal to keep the oil inside the engine, while each shaft is surrounded by a seal. The more you drive, the more the engine parts move, the shafts rotate, the temperature drops below freezing and then suddenly rises to hundreds of degrees. These combined elements contribute to the deterioration of the sealing product and the gaskets. The oil begins to leak slowly, but soon the hole becomes large enough to create a puddle.
New gaskets and seals are not expensive, but replacing them takes time because you may have to unscrew or remove many components to reach the damaged ones. If you think this is too much work, contact a professional mechanic.
Replacing a broken gasket can be a lengthy process. (Photo source: Pixabay)
Use an Engine Oil Leak Sealer
If the leak is minimal, a good quality engine oil leak sealer can do the trick! It is a type of liquid that you need to mix with the engine oil. It seals the leak from the inside out and acts as a conditioner for the seal and gasket, returning them to their original shape. Due to its liquefied state, it does not clog any passages.
Tighten Loose Bolts
Sometimes, loose bolts are the cause of the oil leak problem. This is a common problem because nuts and gaskets tend to loosen over time. The solution is to tighten them with a torque wrench. However, different car models have different specifications regarding the model and tolerance to use for tightening the bolts. Therefore, consult the owner’s manual and know the requirements.
What you need to know about how to rebuild a transmission
A transmission problem can be costly, and fixing it isn’t as simple as changing oil or inflating a tire. Repair work is complex and requires the experience and expertise of qualified mechanics. The thought of dealing with a dead transmission is downright frightening, because not only does it keep draining your wallet, but the numerous trips to the garage, the hundreds of phone calls with the mechanic, and adding up the numbers on the expense tally will wear you out. Learning how to rebuild a transmission can help you avoid all these hassles.
Remember, you need to have sufficient technical knowledge to perform all the procedures for rebuilding a transmission. If you have no idea or aren’t confident enough to do the technical work, consult a mechanic to handle the job.
Does the Transmission Need to Be Rebuilt?
Before learning how to rebuild a transmission, you need to determine if your transmission actually needs it. Sometimes, repairing certain parts and replacing a few others is enough to restore functionality.
How do you know what kind of treatment the transmission needs? That’s where the experience of a qualified mechanic comes in. If you don’t have enough knowledge about the transmission mechanism, let an auto repair shop handle the diagnostic process and identify the cause of the problems.
A diagnosis is necessary to determine if repair or rebuilding is needed. (Photo source: nicefon)
Repairing certain parts will cost much less than rebuilding the entire transmission. Therefore, from a financial standpoint, it’s wise to have the problem diagnosed by a trusted mechanic or a reputable repair shop. Making the right decision can save you thousands of dollars.
How to Rebuild a Transmission: A Brief Overview of the Procedures
Is it hard to rebuild a transmission? It’s quite difficult and demanding if you’re not equipped with the proper knowledge and tools. But, with a bit of know-how, attention to detail, and skills in handling automotive mechanisms, you can learn how to rebuild a transmission.
Step 1 # Buy a Transmission Rebuild Kit
The kit contains all the tools you need for the rebuild and some spare parts. There are four types of kits, and they may or may not include gaskets, seals, rings, bands, clutches, washers, modulators, filters, and O-rings.
You need to buy the right kit containing all the necessary components and tools to complete the process.
Step 2 # Transmission Removal
The next step in this lesson on rebuilding a transmission is to detach the entire engine assembly. At the same time, also unbolt the torque converter and transmission oil pan before removing the transmission. Do this carefully, as it involves many parts that look similar. Not keeping track of them can lead to confusion.
After disassembly, drain the fluid. You can label each part so there’s no confusion during reassembly.
Label all parts after disassembly. (Photo source: cookinglove)
Step 3 # Cleaning and Replacement
When you’re repairing the transmission, it means you already know which parts to replace and which to keep. After disassembly, clean the components you plan to keep and replace the broken ones with new parts.
Step 4 # Putting It All Back Together
The final step is to reassemble all the components into their housings. Perfectly functional parts won’t work if you assemble them incorrectly. Labeling the parts will be helpful at this stage.
After reassembly, perform all pressure tests to be sure you’ve done everything correctly. It’s best to have the whole thing checked by an experienced mechanic before you start driving the car.
How Long Does It Take to Rebuild a Transmission?
You already know how to rebuild a transmission, but how long does it take? Well, that depends entirely on you, your skills, and your work pace.
But it can take one to four days if you send it to a garage. A one-day job means the transmission is already diagnosed and removed from the engine. It will take four to five days if the mechanic needs to find the problems, remove it, perform some repairs, and then reinstall it.
It will take fewer days if you decide to rebuild the entire system, as most parts will be replaced anyway.
Rebuilding can take 4 to 5 days. (Photo source: fyple)
How Much Does It Cost to Rebuild a Transmission?
A complete rebuild can cost between $3,000 and $4,000. Remember, a rebuild kit itself isn’t expensive. You can reduce expenses by doing it yourself. A repair shop charges that much due to labor costs.
Other factors come into play in determining the final amount: the type of transmission, the vehicle’s make and model, and the price of the damaged parts. Rebuilding the transmission of a luxury or sports brand like Mercedes-Benz, Ferrari, or Porsche will be more expensive than that of a classic Toyota or Honda car.
How to Find and Repair an Exhaust Leak in Your Car?
An exhaust leak can lead to many problems. If you’re lucky, it won’t cause you many issues, apart from some strange noises.
But in most cases, it’s the cause of serious performance problems in a vehicle. It can affect fuel consumption and trigger the “check engine light.”
The worst scenario in the case of a major leak could be that the car’s cabin fills with carbon monoxide, a toxic gas.
That’s why we need to find the causes and know how to detect an exhaust leak as quickly as possible to ensure your vehicle’s safety. Let’s take a look at the details below.
Signs that the car’s exhaust pipe is malfunctioning
Fuel-powered vehicles generate emissions. Typically, these exhaust gases are expelled through the vehicle’s exhaust system.
So, let’s examine the signs below indicating how leaks are emitted from the car’s exhaust pipes. This will help you know how to find an exhaust leak and methods for exhaust leak repair.
How to detect an exhaust leak in your car? Source: HyreCar
1. The bad smell emitted by the car’s exhaust pipe
When driving a car, if you notice that the exhaust pipe is emitting an unpleasant odor, it means the exhaust pipe has been misused, with poorly treated exhaust gases or simply a leaking exhaust causing a bad smell.
So, this is the time when you need to replace your car’s exhaust pipe.
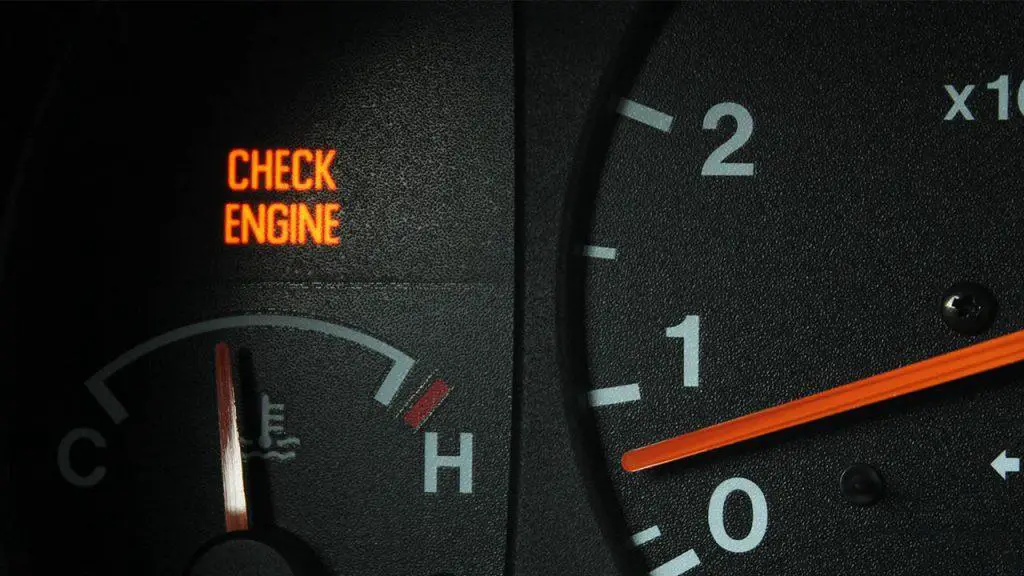
2. The check engine light comes on
The engine light will come on if the exhaust does not meet standards.
Car owners undergoing inspection, if detected, must quickly receive instructions to repair and fix it in time to ensure safety while driving as well as to ensure emissions meet environmental standards.
The check engine light comes on in case of an emissions leak. Source: Bankrate
3. The automobile’s exhaust pipe makes noises
When the vehicle is running, if the exhaust pipe detects noise, it is also an important sign indicating that you need to check the exhaust.
Typically, the exhaust pipe makes more noise when it’s leaking. Immediately take the vehicle to a repair shop to avoid rapid degradation if the problem is detected.
How can an exhaust leak make noises? Credit: Shutterstock
How to detect an exhaust leak
The first step to repairing such a leak is to find it. If you think there is a problem with your exhaust system, there are several ways to find it.
Small exhaust leaks often show up as some soot around the outside of the pipe. So, simply look for this black soot when inspecting the entire exhaust system.
Inspect particularly the flexible joints (usually emissions are hidden under the mesh, so you need to pinpoint to find where an exhaust leak is coming from)
You must first find the leak to be able to repair it. Source: AxleAddict
Preparation before the trick to find an exhaust leak
So, before moving on to the part: How to find an exhaust leak? We need to prepare a few things to meet all the necessary conditions.
The first thing is to find someone to do this job with you.
Secondly, lift your vehicle to get a good view of the exhaust system (use an axle lift).
And you need to go under the car to get an overview of the exhaust system, so this way, you can inspect the whole thing.
Prepare fully before finding an exhaust leak in your car. Source: LiveAbout
Specific steps to fix your car’s emissions leaks
Step
Description
1
Start the vehicle
2
Listen to your car’s noise to inspect the sound of the exhaust system
3
Take a look in your car’s muffler and stuff a new cloth into the exhaust, this will make leaks more apparent (tell your partner to look around your car while you do this)
4
You will hear the leak noise clearer and better, and there should be a small amount of leakage at the outlet hole at the back of the muffler if there are exhaust leaks in your car.
5
Take a closer look at the exhaust system by removing the cover.
6
Observe the manifold inside to check if the leaks are coming from the downpipe. This will help you clarify the position from which the leaks are coming out.
How to repair an exhaust leak
Methods vary slightly depending on the size of the holes. You will use an exhaust patch for small perforations while larger ones will require an aluminum patch.
Repairing a leak – more or less significant
Use a steel brush to scrub the area around the leak. Clean thoroughly to remove rust, mud, or dirt.
Smooth the clean surface with fine-grit sandpaper. This will remove tiny dirt particles that survived the steel brush.
Rinse the cleaned area with acetone (or nail polish remover if you don’t have this chemical). This will help the tape form a stronger bond with the metal surface.
If it’s a small exhaust leak, use exhaust tape or epoxy.
Follow the application instructions provided with the tape, as some adhere well to a hot surface while others require it to be wet. Use at least two layers of tape for a stronger, tighter wrap.
Methods will be different for small and large holes. Source: YouTube
If the hole is larger but still smaller than three inches, you can repair it with aluminum patches.
Anything larger than that will require replacing the entire part. You should always apply the epoxy before putting the aluminum patch over the leak area. Use hose clamps to hold the patch firmly around the exhaust pipe.
Never forget to wear glasses and gloves. Otherwise, dirt and rust particles can get into your eyes and acetone can irritate your skin. Also, take the car to a maintenance workshop if the leak is larger (more than 3 inches / 7.5 cm).
All the information above has shown a clear way to answer the question: How to find an exhaust leak and has also published some methods for repairing an exhaust leak when using the car.
The ultimate guide to replacing piston rings
A vehicle’s engine is composed of several parts. Piston rings are essential components that are precisely placed between the piston and the cylinder. Their purpose is to regulate oil pressure, maintain gas compression, transfer heat from the piston to the cylinder, and prevent the piston from knocking against the cylinder wall. Car engine problems begin to occur when these O-rings are worn. This is why people care about replacing piston rings to avoid engine-related issues.
The Fastest Method for Replacing Piston Rings
A series of donut-shaped piston rings are made from cast iron, allowing them to retain their shape under load or heat. These rings are inexpensive but crucial for the engine’s proper functioning. According to expert maintenance advice, entrusting your vehicle to a professional is an excellent choice to have your car’s engine checked. Below are some telltale signs of faulty piston rings.
Excessive Exhaust Smoke
Piston rings can withstand high pressure. However, they begin to deteriorate over time. Excessive exhaust smoke from the engine can be a definitive sign of faulty piston rings. Pay particular attention to the smoke, especially if its color appears gray or white. Engine oil leaking into the combustion chamber creates thick white or gray smoke.
A fault in the piston rings can lead to problems with your car’s engine. (Photo source: istockphoto)
Excessive Oil Consumption
As mentioned above, when oil leaks into the combustion chamber, vehicles start consuming too much oil. Thus, instead of adding oil every 5,000 to 8,000 kilometers, drivers need to add it regularly. If your situation is the same, it’s time to have your car inspected by professionals.
Poor Acceleration Power
A car engine begins to lose power due to damaged or worn piston rings. As lack of compression starts to occur, the engine loses its power. Simply put, a car takes longer to accelerate because of faulty piston rings. Experts know how to change piston rings to solve this problem.
Poor Vehicle Performance
One of the worst things that can happen to a vehicle is when it doesn’t start completely. A vehicle’s performance is considered poor when the driver fails to accelerate. In such a case, the only option left for the driver is to tow the vehicle to the nearest mechanic. You don’t have to worry, as such conditions only occur when drivers ignore the first three symptoms. Therefore, vehicle inspection is crucial for your vehicle to run perfectly for a long time.
Piston Ring Replacement: A Complete Starter Guide
Car engine problems are a real headache. If you want your vehicle to run efficiently, you need piston rings that fit well between the piston and the cylinder. Piston ring replacement requires special attention. This is why people prefer to take their car to the garage to have the task done without any issues. If you want to try it, you’ll need some necessary tools and your car’s maintenance manual. Let’s learn about the process in detail.
STEP 1: Locate the Piston Rings
First, you need to access the piston rings by removing the cylinder head. Make sure to disconnect the required components before removing the part. Drain the coolant before removing the exhaust manifold. Use the wrench to loosen the bolts holding the essential parts.
Once that’s done, disconnect the distributor and remove the spark plug wires. Carefully unscrew the valve corners. The real challenge comes with the pushrods and rocker arms. You’ll find a nut on top of each rocker arm; remove them independently. Finally, pull the pushrods through the cylinder head.
Piston ring replacement is an ideal choice when signs of a bad piston are noticed. (Photo source: Pixabay)
A pro tip for removing the cylinder head bolts is to start with the outer bolts. Clean the dirt and grease from the top of each cylinder before moving to the next step.
STEP 2: Clean the Piston and Remove the Rings
Cleaning is imperative before replacing the piston rings. This process may seem simple but requires special attention until the end. When you cover all the cylinder holes, you feel a sense of relief because no piston debris can fall inside the cylinders. Now, clean the dirt before removing the piston.
In many cars, you cannot change the piston rings without removing the pistons. Generally, this can vary from car to car. Therefore, get the maintenance manual to understand the concept in detail. In a well-ventilated area, use kerosene and soak all the removed pistons in it.
Use the piston ring tool and remove the worn rings. Equip yourself with a feeler gauge to check if all the ring grooves are present on the piston. If you find that the grooves are worn, you’ll need to replace the rings with a new piston. If you have difficulty moving the rings, let them soak overnight in kerosene.
STEP 3: Insert New Piston Rings
Stretch the replacement piston rings using the piston ring tool. Be very careful as they can break if you stretch them too much. It’s best to secure the piston rings in the ring grooves. During this process, inspect the piston twice to ensure you don’t encounter any problems when replacing the rings with connecting rods.
The final step is to reverse the entire process. It’s essential to check the cylinder head gasket before replacing the cylinder head. It’s best to perform the replacement during work on the piston rings. Reattach all the components and place the cylinder head on the engine block.
Vehicles start consuming too much oil due to an oil leak in the combustion chamber. (Photo source: minimobracing)
The Epilogue
Piston rings are a crucial element of a car engine. If you want them to have a long lifespan, you must maintain them regularly. Even a small defect in the piston rings can cause you trouble with your car’s engine. The above guide on piston ring replacement will help you perform the task effectively. However, it’s always recommended to take your car to the garage periodically.
What are the main signs of a faulty heater core?
The car’s cooling and heating system makes your long journeys more pleasant in unpredictable weather. Repair and maintenance of this system are essential to maintain normal temperature inside the cabin. A cooling system preserves the car’s heating and freezing functions. It includes many components to perform this job perfectly. And the heater core is the main component of a cooling and heating system. If the heater core fails, you might have to face some dilemmas. An in-depth study of signs of a faulty heater core can help you understand its proper functions.
Let’s discuss the first signs of a broken heater core after understanding the heater core and the cause of its failure.
Heater Core and Failure Explanation
A heater core is a radiator-like device used to heat a vehicle’s cabin. The radiator is the equipment located under your car’s hood. The radiator and the heater core are connected. Coolant flows through the heater core. When the liquid is warmed, the heater core provides heat that radiates through your vehicle’s heater. Therefore, it also plays an important role in your car’s air conditioning system. The function of the heater core is to share the work with the air conditioning compressor to reach the temperature you set. It can also defog your windshield and dehumidify the cabin air.
This is what the heater core looks like
The cause of heater core failure is roughly the same as what causes the radiator under the car’s hood to fail before the manufacturer’s estimate: it’s the lack of maintenance. The coolant flowing through your radiator will pass through the heater core. Skipping a few radiator maintenance schedules will lead to an increase in the size and quantity of rust particles and other debris, which will clog the heater core passages. Even if your radiator can survive with minimal maintenance, the heater core, with narrower passages, will clog up sooner than the radiator and fail earlier than expected.
5 Major Signs of a Bad Heater Core to Know Right Now!
The heater core is located just below the steering system and the dashboard. Its components such as cables, hoses, the coolant reservoir, and the exhaust are located on all sides of the dashboard. To summarize the previous part simply, the heater core is the main component that controls the internal heating and cooling functions to normalize the cabin atmosphere. The heater core regulates the coolant in a cooling system to transport hot air to the cabin and also prevent overheating. Furthermore, the coolant reduces the temperature that leads to fogging on the windows.
Let’s review the symptoms of a bad heater core:
1. Pungent Smell in the Car
A strange smell in your car is one of the main signs of a malfunctioning heater core. If you notice an acrid smell when using a cooling or heating system, it’s time for proper repair. This strange smell is a sign of a coolant leak. The coolant might also have spilled out of the coolant reservoir. So, repair the entire system as soon as possible.
Watch out for unpleasant odors
2. Coolant Leak
Another important sign of a damaged heater core is a coolant leak inside and outside the car. It’s quite easy to suspect a coolant leak in the car on the passenger side or a coolant spill on the ground. This happens when the system is cooler than usual. The front seats of the cabin might be damp in case of a leak.
3. Foggy Windows
Foggy windows are also one of the main signs of a malfunctioning heater core. If your car’s windows fog up from the inside, it’s certain that your car is facing heater core problems. This indicates that radiator fluid is leaking inside the car cabin, making it foggy. The foggy window function is also known as window condensation. It might be wise to follow maintenance expert advice for proper preservation of the car’s cooling system.
4. Cooling System Failure
If your cooling or heating system is not working properly, it’s time to have it maintained or repaired. A lack of heat or warmth inside the cabin is evidence that the cooling system is faulty.
Ensuring the cooling system works well
5. Insufficient or No Heat
One of the most visible signs is the absence of hot air coming from the vehicle’s vents when the heater is on. This can indicate a clogged or blocked heater core that is not allowing hot coolant to flow through it.
A heater that isn’t doing its job is a major red flag, but the core isn’t always the problem. Other faulty components like a fuse, the cabin air filter, and the fan or vent flaps can also be the cause.
Furthermore, a faulty heater core can produce hissing or gurgling sounds when the heater or defroster settings are activated. These sounds usually indicate trapped air in the cooling system or coolant flow issues.
It’s best to rule out these issues first, as accessing the heater core is not an easy task that requires at least some mechanical skills. This is something to remember the next time you are tempted to skip radiator maintenance.
In Conclusion
That’s all! Here are some signs of a malfunctioning heater core that required repair and maintenance. If you suspect a problem with your vehicle’s heater core, it is advisable to have it inspected and repaired by a qualified mechanic or automotive technician. They can accurately diagnose the problem and recommend the appropriate course of action.
Read this article several times to know how to tell if the heater core is faulty. Make sure to have your car repaired and maintained on time to avoid these problems.
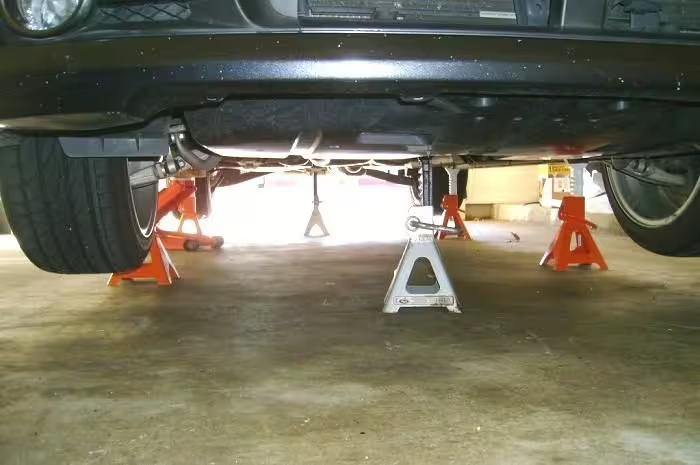
How to properly use car candles
Car jack stands are designed to support a vehicle after lifting it with a floor jack. This is a common tool you’ll see in all auto repair shops and in the garages of weekend DIY mechanics.
You need to know how to properly use car jack stands. This is necessary for your safety during vehicle maintenance or routine repairs.
Car Jacks: How to Use the Tool
A car jack is a specialized device used to lift heavy objects. It’s quite bulky and difficult to operate with human strength alone. You can therefore use this equipment to lift objects weighing several tons, even tens of tons, or even hundreds of tons.
Regarding cars, if there are no specialized lifting platforms like those found in service centers, people will use jacks or stands to lift and hold the car chassis at a height, in order to create more favorable conditions for inspecting and repairing the car, especially for replacing car tires. Nowadays, car owners often equip their vehicle with a jack or stand so they can use it in situations where inspection and repair are needed:
Park the car.
The first step in using jack stands is to park the vehicle on a solid, flat surface, free of debris. Otherwise, an uneven or soft surface can cause the jack stands to slip, which could lead to a serious accident or fatal injuries. Make sure you have used the parking brake to keep the vehicle stationary.
Use wheel chocks.
If you need to work on the front, use chocks on both sides of the rear tires and vice versa. The chocks will keep the vehicle in place and prevent any sudden movement or slipping.
Identify the lifting points.
The lifting points are the strongest areas of a vehicle. These points are capable of supporting the weight when the vehicle is lifted. Consult the owner’s manual provided by the car manufacturer to find the lifting points before using car jack stands.
Lift the car with a floor jack.
Place the floor jack under a lifting point on the side where you will be performing the work. Lift the car to a point where you can comfortably perform the repair or maintenance work.
Place the jack stands.
Once the vehicle is lifted, place the jack stands under the lifting points. Adjust the height so that the car is securely nestled in the jack stands. If necessary, raise or lower the floor jack to achieve the appropriate height.
Remove the floor jack.
Once the jack stands are in place, slowly remove the jack. Then, gently push the car to ensure it is securely fixed on the jack stands.
You can now begin working under the car. Knowing how to properly install jack stands under the car will allow you to more easily perform many small maintenance and repair jobs yourself. However, you must always take all precautions and safety measures before crawling under the car.
For complete and risk-free safety, place large wooden blocks near the lifting points. They will protect you in case the jack stands fail.
Notes on Using Car Jack Stands
Only use the jack to temporarily lift the vehicle; never lift it for an extended period. Lifting the vehicle for a long time, or lifting the entire vehicle, is the task of a vehicle lift (a device with a professional safety system) or a mechanical lift (a mechanical lifting mechanism, where the risk is very low).
Choose the correct location for the lifting jack and the placement location. Under the car, there will be locations for placing jacks, specialized pads, and suitable locations for placing both.
Shift into Park for automatic transmission vehicles, or into 1st gear for manual transmission vehicles, before lifting the vehicle.
Engage the parking brake and place wheel chocks on the opposite side of the wheel being lifted (diagonally) to prevent the vehicle from moving when lifted. The chocks can be as simple as bricks, stones, or wood found by the roadside. In situations where the parking brake cannot be used, such as when repairing a rear wheel, wheel chocking is even more important.
Park the vehicle on level ground before proceeding with lifting. If your car has a flat tire on a sloped road, try to park the car near the curb, turn the wheels toward the curb, engage the parking brake, and chock the wheels on the downhill side to prevent the car from moving.