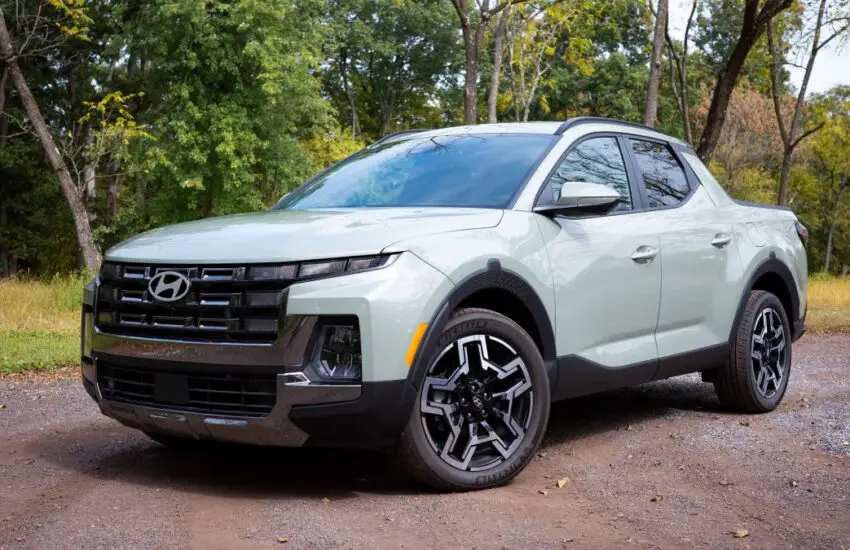
Waymo Launches UK Self-Driving Jaguar I-Pace Pilot

Waymo’s Autonomous Jaguar I-Pace Hits UK Roads

Waymo, a leader in autonomous vehicle technology, has initiated a pilot program in the United Kingdom featuring its advanced Jaguar I-Pace fleet. This marks a significant step in bringing fully self-driving cars to European streets, with the UK government endorsing the trial to explore the future of urban mobility. The program aims to assess how these vehicles integrate into existing transport networks and handle diverse driving conditions.

UK’s Progressive Approach to Autonomous Driving

While many European nations remain cautious about permitting driverless vehicles on public roads, the UK has adopted a structured and phased strategy. This pilot allows for real-world testing under strict regulatory oversight, ensuring safety and public confidence. The Jaguar I-Pace models, equipped with Waymo’s latest sensor and AI systems, will navigate select urban areas to demonstrate their capabilities in complex traffic environments.

Implications for Future Urban Transport

The deployment of Waymo’s autonomous taxis could reshape how people commute in cities, offering a glimpse into a future with reduced congestion and enhanced road safety. By collecting data on vehicle performance and public interaction, the pilot will inform policies and technological refinements. This initiative not only highlights the UK’s commitment to innovation but also sets a precedent for other countries considering similar advancements in smart transportation solutions.

P208F – Reductant Injector Valve Stuck Closed, Bank 2, Unit 1

P208F Possible Causes

  • Faulty reductant injection valve
  • Reductant injection valve harness is open or shorted
  • Poor electrical connection in reductant injection valve circuit

What Does It Mean?

How to Fix Code P208F

Check the “possible causes” listed above. Visually inspect the related wiring harness and connectors. Check for damaged components and look for broken, bent, pushed out, or corroded connector pins.

P208F Possible Symptoms

Illuminated engine light (or service engine soon warning light)

P208F Meaning

The reductant dosing valve (reductant injection valve) is used to dose and atomize the reductant fluid before it mixes with the exhaust gases. The normal operating frequency ranges between 3 Hz and 0.3 Hz. The coolant body contains heat sink fins to maintain the injector and reductant below the boiling point. If the detected temperature approaches the maximum temperature threshold, the reductant spray will be increased in quantity to actively cool the valve.

P2090 – Low value of the B camshaft position actuator control circuit, bank 1

How severe is this DTC?

The severity of this code can vary greatly from a simple check engine light on a vehicle that starts and runs to an automobile that idles roughly or does not start at all. The code can be serious depending on the symptoms present. If the code is caused by a faulty timing chain or belt, the result can be internal engine damage.

What are some of the symptoms of the code?

Symptoms of a P2090 fault code may include:

  • Irregular engine idle
  • Decreased oil pressure
  • Engine may misfire
  • Poor engine performance
  • Increased fuel consumption
  • Change oil or service soon light is on
  • Check engine light on

What are some common causes of the code?

Causes

of this P2090 code may include:

  • Worn timing belt or chain
  • Faulty camshaft variable timing solenoid
  • Faulty variable valve timing actuator
  • Engine oil level too low
  • Blown fuse or fuse link (if applicable)
  • Misaligned timing components
  • Corroded or damaged connector
  • Faulty or damaged wiring
  • Faulty ECU

What are the troubleshooting steps for P2090?

The first step in the troubleshooting process for any malfunction is to search for Technical Service Bulletins (TSBs) for the specific vehicle by year, model, and engine combination. In some circumstances, this can save you a lot of time in the long run by pointing you in the right direction.

The second step is to check the oil level and condition. Proper oil pressure plays a key role in the operation of this circuit. Next, locate all components in this circuit and perform a thorough visual inspection to check the associated wiring for obvious defects such as scraping, rubbing, bare wires, or burns. Then, identify connectors for security, corrosion, and damaged pins. This process should include all related sensors, components, and computers.

Advanced Steps

Advanced steps become very vehicle-specific and require advanced equipment suited to operate accurately. These procedures require a digital multimeter and vehicle-specific technical references. Other ideal tools for this situation are a timing light and an oil pressure gauge. Voltage requirements vary depending on the specific year and model of the vehicle.

Timing Checks

Timing must be checked using the appropriate testing equipment and adjustments must be precise for the engine to run properly. An incorrect timing reading indicates that essential timing components such as the belt, chain, or gears may be worn or damaged. If this code appears immediately after replacing a timing belt or chain, you may suspect misalignment of timing components as a possible cause.

Voltage Checks

Camshaft and crankshaft sensors are provided with a reference voltage of approximately 5 volts from the ECU.

If this process identifies the absence of a power source or ground, continuity tests may be required to check the integrity of wiring, connectors, and other components. Continuity tests should always be performed with the power disconnected from the circuit, and normal references for wiring and connections should be 0 ohms of resistance. Resistance or lack of continuity is an indication of faulty wiring that is open or shorted and must be repaired or replaced.

What are the common repairs for this code?

  • Replacement of the camshaft variable timing solenoid
  • Replacement of the variable valve timing actuator
  • Replacement of the blown fuse or fuse link (if applicable)
  • Cleaning corrosion from connectors
  • Repairing or replacing faulty wiring
  • Changing oil and filter
  • Replacing the timing belt or chain
  • Flashing or replacing the ECU

Common mistakes may include:

Replacing the ECU or sensors is often done in error, when incorrect timing alignment or insufficient oil pressure is the problem.

I hope the information consulted in this article has been helpful in guiding you in the right direction to correct the issue with the camshaft position actuator control circuit error code. This article is strictly informative, and the technical data and service bulletins specific to your vehicle should always take priority.

P2091 B Camshaft Position Actuator Control Circuit High, Bank 1

How severe is this DTC?

The severity of this code can vary greatly from a simple check engine light on a vehicle that starts and runs to an automobile that will idle roughly or not start at all. The code can be serious depending on the symptoms present. If the code is caused by a faulty timing chain or belt, the result can be internal engine damage.

What are some of the symptoms of the code?

Symptoms of a P2091 trouble code may include:

  • Irregular engine idle
  • Decreased oil pressure
  • Engine may misfire
  • Poor engine performance
  • Increased fuel consumption
  • Change oil or service soon light is on
  • Check engine light on

What are some common causes of the code?

Causes of this P2091 code may include:

  • Worn timing belt or chain
  • Faulty camshaft variable timing solenoid
  • Faulty variable valve timing actuator
  • Engine oil level too low
  • Blown fuse or fusible link (if applicable)
  • Misaligned timing components
  • Corroded or damaged connector
  • Faulty or damaged wiring
  • Faulty ECU

What are the troubleshooting steps for P2091?

The first step in the troubleshooting process for any malfunction is to search for Technical Service Bulletins (TSBs) for the specific vehicle by year, model, and engine combination. In some circumstances, this can save you a lot of time in the long run by pointing you in the right direction.

The second step is to check the oil level and condition. Proper oil pressure plays a key role in the operation of this circuit. Next, locate all components in this circuit and perform a thorough visual inspection to check the associated wiring for obvious defects such as scraping, rubbing, bare wires, or burns. Then check the connectors for security, corrosion, and damaged pins. This process should include all associated sensors, components, and computer.

Advanced Steps

Advanced steps become very vehicle-specific and require appropriate advanced equipment to perform accurately. These procedures require a digital multimeter and vehicle-specific technical references. Other ideal tools for this situation are a timing light and an oil pressure gauge. Voltage requirements vary depending on the specific year and model of the vehicle.

Timing Checks

Timing must be checked using the appropriate testing equipment and adjustments must be precise for the engine to run properly. An incorrect timing reading indicates that essential timing components such as the belt, chain, or gears may be worn or damaged. If this code appears immediately after replacing a timing belt or chain, you may suspect misaligned timing components as a possible cause.

Voltage Checks

Camshaft and crankshaft sensors are typically supplied with a reference voltage of approximately 5 volts from the ECU.

If this process identifies the absence of a power source or ground, continuity tests may be required to verify the integrity of the wiring, connectors, and other components. Continuity tests should always be performed with the power disconnected from the circuit and normal readings for wiring and connections should be 0 ohms of resistance. Resistance or lack of continuity is an indication of faulty wiring that is open or shorted and must be repaired or replaced.

What are the common repairs for this code?

  • Replacement of the camshaft variable timing solenoid
  • Replacement of the variable valve timing actuator
  • Replacement of the blown fuse or fusible link (if applicable)
  • Cleaning corrosion from connectors
  • Repairing or replacing faulty wiring
  • Changing oil and filter
  • Replacing the timing belt or chain
  • Flashing or replacing the ECU

Common mistakes may include:

Replacing the ECU or sensors is often done in error, when misaligned timing or insufficient oil pressure is the problem.

I hope the information in this article has been helpful in guiding you in the right direction to correct the issue with the camshaft position actuator control circuit error code. This article is strictly informational and the technical data and service bulletins specific to your vehicle should always take priority.

Leapmotor D19 Sets New Electric SUV Battery Benchmarks

Revolutionizing Electric Vehicle Battery Capacity

Leapmotor D19 electric SUV

The automotive industry is witnessing a significant shift with the introduction of the Leapmotor D19, an electric SUV that establishes unprecedented standards in battery capacity. This Chinese manufacturer has developed a vehicle that pushes the boundaries of what’s possible in electric mobility, offering both standard and range-extended versions that deliver exceptional performance.

Unmatched Battery Performance Options

Leapmotor D19 stands out in the competitive electric SUV market through its innovative battery technology. The vehicle offers two distinct powertrain configurations, both designed to address common concerns about electric vehicle range. The standard version features a massive battery pack that provides industry-leading range figures, while the range-extended model incorporates additional technology to further enhance driving distance without compromising performance.

Advanced Engineering and Design

Beyond its impressive battery capabilities, the D19 incorporates cutting-edge engineering solutions that optimize energy efficiency. The vehicle’s aerodynamic design reduces drag coefficient, while intelligent thermal management systems ensure optimal battery performance in various climate conditions. The integration of lightweight materials throughout the chassis contributes to improved energy consumption rates, making the most of the substantial battery capacity.

Impact on Electric SUV Standards

The introduction of the Leapmotor D19 represents a milestone in electric vehicle development, particularly in the SUV segment where energy demands are typically higher. By offering record-breaking battery capacity in both standard and range-extended configurations, this vehicle sets new expectations for what consumers can anticipate from electric SUVs. The technology demonstrated in the D19 likely signals future directions for the entire electric vehicle industry.

As electric vehicles continue to evolve, the Leapmotor D19 establishes a compelling benchmark for battery technology and range capabilities. Its innovative approach to addressing range concerns through both pure electric and extended-range solutions demonstrates the maturing landscape of electric mobility options available to consumers worldwide.

P2092 A, Camshaft Position Actuator Control Circuit, Bank 2 Low

How severe is this DTC?

The severity of this code can vary greatly from a simple check engine light on a vehicle that starts and runs to an automobile that will idle roughly or not start at all. The code can be serious depending on the symptoms present. If the code is caused by a faulty timing chain or belt, the result can be internal engine damage.

What are some of the symptoms of the code?

Symptoms of a P2092 trouble code may include:

  • Irregular engine idle
  • Decreased oil pressure
  • Engine may misfire
  • Poor engine performance
  • Increased fuel consumption
  • Change oil or service soon light is on
  • Check engine light on

What are some common causes of the code?

Causes of this P2092 code may include:

  • Worn timing belt or chain
  • Faulty camshaft variable timing solenoid
  • Faulty variable valve timing actuator
  • Engine oil level too low
  • Blown fuse or fuse link (if applicable)
  • Misaligned timing components
  • Corroded or damaged connector
  • Faulty or damaged wiring
  • Faulty ECU

What are the troubleshooting steps for P2092?

The first step in the troubleshooting process for any malfunction is to search for Technical Service Bulletins (TSBs) for the specific vehicle by year, model, and engine combination. In some circumstances, this can save you a lot of time in the long run by pointing you in the right direction.

The second step is to check the oil level and condition. Proper oil pressure plays a key role in the operation of this circuit. Next, locate all components in this circuit and perform a thorough visual inspection to check the associated wiring for obvious defects such as scraping, rubbing, bare wires, or burns. Then check the connectors for security, corrosion, and damaged pins. This process should include all associated sensors, components, and computer.

Advanced Steps

Advanced steps become very vehicle-specific and require appropriate advanced equipment to perform accurately. These procedures require a digital multimeter and vehicle-specific technical references. Other ideal tools for this situation are a timing light and an oil pressure gauge. Voltage requirements vary depending on the specific year and model of the vehicle.

Timing Checks

Timing must be checked using the appropriate testing equipment and adjustments must be precise for the engine to run properly. An incorrect timing reading indicates that essential timing components such as the belt, chain, or gears may be worn or damaged. If this code appears immediately after replacing a timing belt or chain, you may suspect misaligned timing components as a possible cause.

Voltage Checks

Camshaft and crankshaft sensors are typically supplied with a reference voltage of approximately 5 volts from the ECU.

If this process identifies the absence of a power source or ground, continuity tests may be required to verify the integrity of the wiring, connectors, and other components. Continuity tests should always be performed with the power disconnected from the circuit and normal readings for wiring and connections should be 0 ohms of resistance. Resistance or lack of continuity is an indication of faulty wiring that is open or shorted and must be repaired or replaced.

What are the common repairs for this code?

  • Replacement of the camshaft variable timing solenoid
  • Replacement of the variable valve timing actuator
  • Replacement of the blown fuse or fuse link (if applicable)
  • Cleaning corrosion from connectors
  • Repairing or replacing faulty wiring
  • Changing oil and filter
  • Replacing the timing belt or chain
  • Flashing or replacing the ECU

Common mistakes may include:

Replacing the ECU or sensors is often done in error, when misaligned timing or insufficient oil pressure is the problem.

I hope the information in this article has been helpful in pointing you in the right direction to correct the issue with the camshaft position actuator control circuit error code. This article is strictly informational and the technical data and service bulletins specific to your vehicle should always take priority.

P2093 High Control Circuit for Camshaft Position Actuator, Row 2

How severe is this DTC?

The severity of this code can vary greatly from a simple check engine light on a vehicle that starts and runs to an automobile that will idle roughly or not start at all. The code can be serious depending on the symptoms present. If the code is caused by a faulty timing chain or belt, the result can be internal engine damage.

What are some of the symptoms of the code?

Symptoms of a P2093 fault code may include:

  • Irregular engine idle
  • Decreased oil pressure
  • Engine may misfire
  • Poor engine performance
  • Increased fuel consumption
  • Change oil or service soon light is on
  • Check engine light illuminated

What are some common causes of the code?

Causes

of this P2093 code may include:

  • Worn timing belt or chain
  • Faulty camshaft variable timing solenoid
  • Defective variable timing actuator
  • Engine oil level too low
  • Blown fuse or fuse link (if applicable)
  • Misaligned timing components
  • Corroded or damaged connector
  • Faulty or damaged wiring
  • Faulty ECU

What are the troubleshooting steps for P2093?

The first step in the troubleshooting process for any malfunction is to search for Technical Service Bulletins (TSBs) for the specific vehicle by year, model, and engine combination. In some circumstances, this can save you a lot of time in the long run by pointing you in the right direction.

The second step is to check the oil level and condition. Proper oil pressure plays a key role in the operation of this circuit. Next, locate all components in this circuit and perform a thorough visual inspection to check the associated wiring for obvious faults such as chafing, rubbing, bare wires, or burns. Then, check connectors for security, corrosion, and damaged pins. This process should include all related sensors, components, and control unit.

Advanced Steps

Advanced steps become very vehicle-specific and require appropriate advanced equipment to perform accurately. These procedures require a digital multimeter and vehicle-specific technical references. Other ideal tools for this situation are a timing light and an oil pressure gauge. Voltage requirements vary depending on the specific year and model of the vehicle.

Timing Checks

Timing must be checked using the appropriate testing equipment and adjustments must be precise for the engine to run properly. An incorrect timing reading indicates that essential timing components such as the belt, chain, or gears may be worn or damaged. If this code appears immediately after replacing a timing belt or chain, you may suspect misalignment of timing components as a possible cause.

Voltage Checks

Camshaft and crankshaft sensors are typically supplied with a reference voltage of approximately 5 volts from the ECU.

If this process identifies the absence of a power source or ground, continuity tests may be required to verify the integrity of the wiring, connectors, and other components. Continuity tests should always be performed with the power disconnected from the circuit, and normal readings for wiring and connections should be 0 ohms of resistance. Resistance or lack of continuity is an indication of faulty wiring that is open or shorted and must be repaired or replaced.

  • What are the common repairs for this code?
  • Replacement of the camshaft variable timing solenoid
  • Replacement of the variable valve timing actuator
  • Replacement of the blown fuse or fuse link (if applicable)
  • Cleaning corrosion from connectors
  • Repairing or replacing faulty wiring
  • Changing oil and filter
  • Replacing the timing belt or chain
  • Flashing or replacing the ECU

Common mistakes may include:

Replacing the ECU or sensors is often done in error when misaligned timing or insufficient oil pressure is the problem.

I hope the information in this article has been helpful in guiding you in the right direction to correct the issue with the camshaft position actuator control circuit error code. This article is strictly informational, and the technical data and service bulletins specific to your vehicle should always take priority.

P2094 – Camshaft Position Actuator Control Circuit B, Bank 2

How severe is this DTC?

The severity of this code can vary greatly from a simple check engine light on a vehicle that starts and runs to an automobile that will idle roughly or not start at all. The code can be serious depending on the symptoms present. If the code is caused by a faulty timing chain or belt, the result can be internal engine damage.

What are some of the symptoms of the code?

Symptoms of a P2094 fault code may include:

  • Irregular engine idle
  • Decreased oil pressure
  • Engine may misfire
  • Poor engine performance
  • Increased fuel consumption
  • Change oil or service soon light is on
  • Check engine light on

What are some common causes of the code?

Causes

of this P2094 code may include:

  • Worn timing belt or chain
  • Faulty camshaft variable timing solenoid
  • Faulty variable valve timing actuator
  • Engine oil level too low
  • Blown fuse or fusible link (if applicable)
  • Misaligned timing components
  • Corroded or damaged connector
  • Faulty or damaged wiring
  • Faulty ECU

What are the troubleshooting steps for P2094?

The first step in the troubleshooting process for any malfunction is to search for Technical Service Bulletins (TSBs) for the specific vehicle by year, model, and engine combination. In some circumstances, this can save you a lot of time in the long run by pointing you in the right direction.

The second step is to check the oil level and condition. Proper oil pressure plays a key role in the operation of this circuit. Then, locate all components in this circuit and perform a thorough visual inspection to check the associated wiring for obvious defects such as scraping, rubbing, bare wires, or burns. Next, check the connectors for security, corrosion, and damaged pins. This process should include all related sensors, components, and control unit.

Advanced Steps

Advanced steps become very vehicle-specific and require appropriate advanced equipment to perform accurately. These procedures require a digital multimeter and vehicle-specific technical references. Other ideal tools for this situation are a timing light and an oil pressure gauge. Voltage requirements vary depending on the specific year and model of the vehicle.

Timing Checks

Timing must be checked using the appropriate testing equipment and adjustments must be precise for the engine to run properly. An incorrect timing reading indicates that essential timing components such as the belt, chain, or gears may be worn or damaged. If this code appears immediately after replacing a timing belt or chain, you may suspect misalignment of timing components as a possible cause.

Voltage Checks

Camshaft and crankshaft sensors are typically provided with a reference voltage of around 5 volts from the ECU.

If this process identifies the absence of a power source or ground, continuity tests may be required to verify the integrity of the wiring, connectors, and other components. Continuity tests should always be performed with the power disconnected from the circuit, and normal readings for wiring and connections should be 0 ohms of resistance. Resistance or lack of continuity is an indication of faulty wiring that is open or shorted and must be repaired or replaced.

What are the common repairs for this code?

  • Replacement of the camshaft variable timing solenoid
  • Replacement of the variable valve timing actuator
  • Replacement of the blown fuse or fusible link (if applicable)
  • Cleaning corrosion from connectors
  • Repairing or replacing faulty wiring
  • Changing oil and filter
  • Replacing the timing belt or chain
  • Flashing or replacing the ECU

Common mistakes may include:

Replacing the ECU or sensors is often done in error when misaligned timing or insufficient oil pressure is the problem.

I hope the information in this article has been helpful in guiding you in the right direction to correct the issue with the camshaft position actuator control circuit error code. This article is strictly informational, and the technical data and service bulletins specific to your vehicle should always take priority.

Yutong’s Electric Buses Quietly Dominate Europe

Yutong’s Strategic European Expansion

The Chinese electric bus manufacturer Yutong is methodically strengthening its foothold across European markets. Rather than pursuing aggressive expansion, the company has adopted a measured approach focused on building sustainable partnerships and meeting stringent European quality standards. This calculated strategy has allowed Yutong to become an increasingly common sight on European roads while maintaining its position as global industry leader.

Proven Technology Driving Adoption

Yutong’s success stems from its proven electric vehicle technology that meets Europe’s demanding operational requirements. The company’s buses demonstrate impressive range capabilities and charging efficiency, making them suitable for diverse European climates and topographies. Municipalities and private transport operators across the continent are increasingly turning to Yutong’s solutions for their reliability and lower total cost of ownership compared to traditional diesel alternatives.

Yutong electric bus IC12e model

European Manufacturing Partnerships

Rather than simply exporting vehicles from China, Yutong has established strategic manufacturing partnerships within Europe. This localized production approach helps the company navigate complex regulatory requirements while reducing delivery times and import costs. These partnerships also create local employment opportunities, fostering positive relationships with European communities and governments.

Environmental Impact and Future Prospects

As European cities accelerate their transition to zero-emission public transportation, Yutong’s comprehensive electric bus offerings position the company for continued growth. The manufacturer’s expanding European presence contributes significantly to reducing urban carbon emissions while providing reliable mass transit solutions. Industry analysts predict Yutong’s market share will continue growing as more European transport authorities commit to electrification timelines.

P2095 – Bank 2 Camshaft Position Actuator Control Circuit High

How severe is this DTC?

The severity of this code can vary greatly from a simple check engine light on a vehicle that starts and runs to an automobile that will idle roughly or not start at all. The code can be serious depending on the symptoms present. If the code is caused by a faulty timing chain or belt, the result can be internal engine damage.

What are some of the symptoms of the code?

Symptoms of a P2095 fault code may include:

  • Irregular engine idle
  • Decreased oil pressure
  • Engine may misfire
  • Poor engine performance
  • Increased fuel consumption
  • Change oil or service soon light is on
  • Check engine light on

What are some common causes of the code?

Causes of this P2095 code may include:

  • Worn timing belt or chain
  • Faulty camshaft variable timing solenoid
  • Faulty variable valve timing actuator
  • Engine oil level too low
  • Blown fuse or fusible link (if applicable)
  • Misaligned timing components
  • Corroded or damaged connector
  • Faulty or damaged wiring
  • Faulty ECU

What are the troubleshooting steps for P2095?

The first step in the troubleshooting process for any malfunction is to search for Technical Service Bulletins (TSBs) for the specific vehicle by year, model, and engine combination. In some circumstances, this can save you a lot of time in the long run by pointing you in the right direction.

The second step is to check the oil level and condition. Proper oil pressure plays a key role in the operation of this circuit. Then, locate all components in this circuit and perform a thorough visual inspection to check the associated wiring for obvious faults such as chafing, rubbing, bare wires, or burns. Next, check the connectors for security, corrosion, and damaged pins. This process should include all related sensors, components, and control unit.

Advanced Steps

Advanced steps become very vehicle-specific and require appropriate advanced equipment to operate accurately. These procedures require a digital multimeter and vehicle-specific technical references. Other ideal tools for this situation are a timing light and an oil pressure gauge. Voltage requirements vary depending on the specific year and model of the vehicle.

Timing Checks

Timing must be checked using the appropriate testing equipment and adjustments must be precise for the engine to run properly. An incorrect timing reading indicates that essential timing components such as the belt, chain, or gears may be worn or damaged. If this code appears immediately after replacing a timing belt or chain, you may suspect misalignment of timing components as a possible cause.

Voltage Checks

Camshaft and crankshaft sensors are typically supplied with a reference voltage of approximately 5 volts from the ECU.

If this process identifies the absence of a power source or ground, continuity tests may be required to verify the integrity of the wiring, connectors, and other components. Continuity tests should always be performed with the power disconnected from the circuit, and normal readings for wiring and connections should be 0 ohms of resistance. Resistance or lack of continuity is an indication of faulty wiring that is open or shorted and must be repaired or replaced.

What are the common repairs for this code?

  • Replacement of the camshaft variable timing solenoid
  • Replacement of the variable valve timing actuator
  • Replacement of the blown fuse or fusible link (if applicable)
  • Cleaning corrosion from connectors
  • Repairing or replacing faulty wiring
  • Changing oil and filter
  • Replacing the timing belt or chain
  • Replacing the ECU

Common mistakes may include:

Replacing the ECU or sensors is often done in error when misaligned timing or insufficient oil pressure is the problem.

I hope the information in this article has been helpful in guiding you in the right direction to correct the issue with the camshaft position actuator control circuit error code. This article is strictly informational, and the technical data and service bulletins specific to your vehicle should always take priority.