
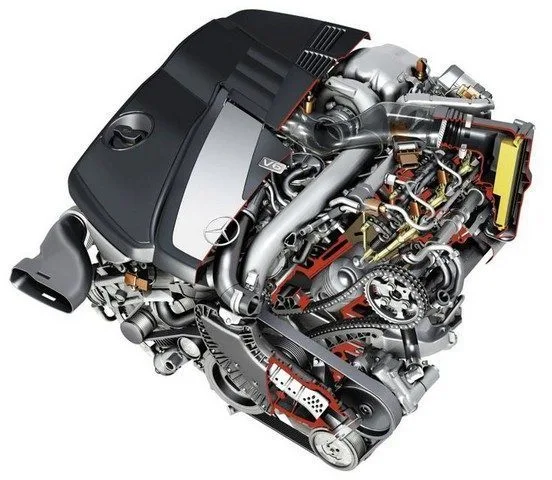
BLUETEC is the Mercedes-Benz brand name applied to their “clean” diesel cars. Let’s take a technical tour of the BLUETEC system from the engine to the exhaust pipe.
(more…)
(more…)

Owning a Mercedes Benz is undoubtedly a luxury experience. However, to maintain the efficiency and elegance of this automotive icon, it is essential to be diligent regarding its maintenance. A crucial element of this maintenance is the Mercedes Benz A3 service, a meticulous process of verification and optimization designed to ensure your vehicle is always at its best. This document takes a close look at this essential aspect of your Mercedes maintenance, focusing on its various aspects: understanding it, its importance, the technology behind it, and how it optimizes your Mercedes experience.
Mercedes Benz is a brand renowned for its design of luxury vehicles. They are not only recognized for their impressive designs and performance but also for their constant technological innovation. Among these innovations, the Mercedes Benz A3 service deserves special attention.
The Mercedes Benz A3 service is a car maintenance system that addresses the common needs of your vehicle. This service uses cutting-edge technology and advanced diagnostics to continuously monitor the condition of your car.
The main objective of this service is to prevent problems before they can lead to a major breakdown. Whether it’s an issue with the engine, brakes, lighting system, or anything else, the A3 service analyzes your vehicle to detect early signs of problems.
Furthermore, with A3, you receive personalized recommendations regarding the necessary maintenance for your car. It alerts you if you need to change the oil, inspect the brakes, or replace filters.
What is particularly remarkable about this service is the seamless integration with a mobile application. The app offers complete control of your car at a glance and allows you to schedule service appointments at your convenience.
In conclusion, the Mercedes Benz A3 service is a technologically advanced solution that makes managing your car’s maintenance easier. It is a futuristic way to ensure your vehicle’s longevity, reduce the risk of major faults, and guarantee you a worry-free driving experience. This service demonstrates Mercedes Benz’s ongoing commitment to using technology to enhance safety and convenience for drivers.

The Mercedes Benz A3 service is a technological advancement that promises to offer true peace of mind to its users. It is more than just a diagnostic tool: it is a way to ensure your luxury vehicle remains as performant and impressive as the day you first got it.
First, every component of your Mercedes is analyzed and evaluated by the A3 platform. Thus, any anomaly or preliminary symptom of malfunction is immediately reported before the problem has time to develop. It’s not just a matter of maintenance; it’s a matter of active prevention.
Moreover, the incorporation of the A3 service into a mobile application means this key information is always at your fingertips. You don’t have to wait to see a warning light on the dashboard: the app will inform you well before. It is a true innovation in the field of car maintenance.
Furthermore, the A3 service introduces a degree of personalization we have never seen before. It is not a standard maintenance program: it is specially tailored to your car and your driving habits. You will receive precise recommendations on the most appropriate times to schedule your maintenance appointments.
Finally, integrating the A3 into your daily life is easy, thanks to the user-friendly interface of the mobile application. You can access your vehicle’s information, schedule service appointments, and even contact technical support directly from the app itself.
The appeal of the Mercedes Benz A3 service lies in its fusion of technological innovation with a keen sense of customer service. By adopting this innovative technology, Mercedes Benz continues to define and exceed expectations in the world of luxury automobiles.

By focusing on the technologies deployed by the A3 service, one can observe the use of Artificial Intelligence and Internet of Things (IoT) technologies to deliver an unparalleled service experience. The integrated AI system analyzes the vehicle’s condition in real-time and alerts the driver when anomalies are detected. Furthermore, thanks to the Internet of Things, critical parts of the vehicle are connected and communicate with each other, enabling precise detection and proactive prevention of breakdowns.
It is also worth noting the presence of a digital dashboard that displays real-time information about the vehicle’s condition. Drivers can thus clearly and concisely visualize relevant information about their car, such as brake wear, tire condition, oil level, among others.
Another key element of the A3 service is the use of data technology. By collecting and analyzing driving and maintenance data, the A3 service can predict potential problems and recommend specific maintenance services based on the vehicle’s precise needs. This allows the driver to have more accurate and personalized tracking of their vehicle’s condition, optimizing the car’s longevity and reliability.
The success of the A3 service also lies in its use of mobile technology. Thanks to the dedicated application, car maintenance becomes a matter of a simple click. Drivers can now monitor their vehicle’s condition, schedule service appointments, and get 24/7 assistance from their mobile phone.
In conclusion, the Mercedes Benz A3 service is a testament to the successful marriage between technology and customer service. It demonstrates that innovation is not just about new technology but also about the proper application of it to enhance the user experience. With the A3 service, Mercedes Benz raises the bar for luxury car maintenance to a new level.

The A3 service and its intelligent features
The Mercedes Benz A3 Service stands out for its intelligent use of technology, designed to optimize the user experience. It boasts an impressive range of intelligent features that allow for real-time analysis of the vehicle’s performance. Thanks to Artificial Intelligence (AI) and Internet of Things (IoT) technologies, the A3 service can monitor and analyze various critical components of your vehicle to keep it in optimal running condition.
Detect. Prevent. Repair.
Real-time analysis allows for the rapid detection of any anomaly that might involve a degradation in performance. Whether it’s brake wear, tire condition, or oil level, every relevant piece of information is visualized on your vehicle’s digital dashboard.
The A3 service goes beyond simply detecting problems. Thanks to intelligent algorithms, it is able to predict potential issues and propose tailored recommendations. This is proactive breakdown prevention in action.
A daily technological partner
The beauty of the A3 service lies in its seamless integration with your mobile phone via a dedicated application. With a simple tap of your finger, you can monitor your vehicle’s condition, schedule a service appointment, and even get 24/7 assistance.
The application is designed to be user-friendly and informative, with an attractive interface that makes managing your Mercedes Benz easier than ever.
So, whether you are a die-hard tech enthusiast or simply someone who appreciates comfort and convenience, the Mercedes Benz A3 service offers you a cutting-edge solution for your vehicle’s maintenance.
Essentially, the A3 Service is the perfect illustration of the successful marriage between technology and customer service. By harnessing new technologies, it offers an innovative way to enhance the user experience in luxury car maintenance.
In other words, the A3 service transcends the traditional design of automotive maintenance to pave the way for a new era of luxury car care – an era in which technological innovation and customer service go hand in hand.
In conclusion, it is clear that the A3 service has the potential to significantly enhance your Mercedes Benz driving experience. It is not just a technological add-on; it is a true partner to help you get the most out of your vehicle. With its predictive features, advanced connectivity, and user-friendly mobile application, the A3 service is truly prepared for the future of automotive maintenance.
It is undeniable that the Mercedes Benz A3 service plays an undeniable role in maintaining the performance, efficiency, and reliability of your vehicle. But more than that, it enhances the quality of your driving experience and helps preserve your car’s resale value. Investing in the A3 service is investing in the comfort, style, and pleasure of driving your Mercedes Benz, allowing you to both protect your investment and fully appreciate the luxury it offers. Thus, the next journey you take behind the wheel of your Mercedes will be even better, thanks to the promise of safety, performance, and reliability offered by Mercedes Benz’s commitment to service excellence.

Get a solution to your Mercedes Benz stuck shift in park problem with these few straightforward steps.
Have you ever started your Mercedes-Benz but discovered that the transmission gear selector refused to shift from Park (P) to Drive (D)? Or have you ever turned off the car but been unable to put the gear lever back into Park position? Don’t get upset, it’s not a transmission problem. Some troubleshooting steps can help you quickly resolve the issue.
This article will show you how to manually get the car out of park and how to troubleshoot gear selector issues without the help of a mechanic.
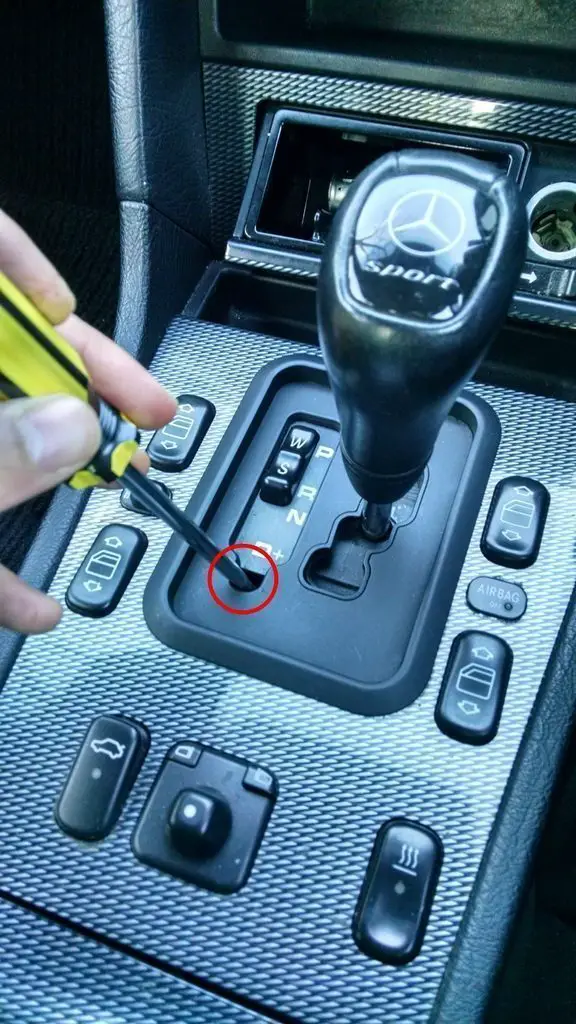
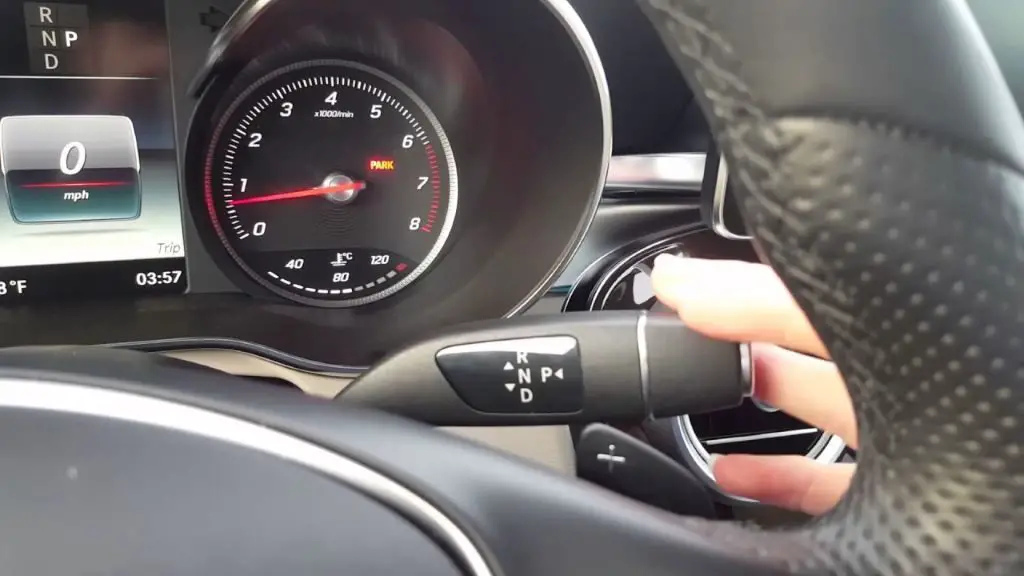
If your Mercedes-Benz automatic transmission gear selector is stuck, you can manually move the gear lever from park (P) to drive (D) using the gear lever override function found on almost all Mercedes-Benz models, including C-Class, E-Class, CL-Class, ML-Class, SLK-Class, and other models.
If your car starts fine, but you can’t get the gear lever into Drive and you notice the gear lever is stuck, some symptoms may accompany it:

Mercedes-Benz cars equipped with an automatic transmission have a gear selector lock safety device. When you turn off the ignition, this safety device locks the gear lever in the Park position. To move the gear lever from Park to Drive, reinsert the key into the ignition and turn it to the on position.
The locking mechanism allows the gear lever to come out of park mode when you press the brake pedal and when you turn the ignition to position I, II, or Run.
The list of the most common reasons why the gear selector won’t come out of or go into park and won’t shift includes:
If your Mercedes-Benz gear lever fails to come out of park, first check the battery. After verifying the battery is fully charged, look for a faulty brake light switch or a damaged gear shift module.
It is common for the brake light switch to fail. This is often the cause of a transmission stuck in Park. When this happens, the gear lever will not release unless you press the brake pedal, which is proper operation. Once the brake light switch stops working correctly, the gear lever won’t be able to tell if you are pressing the brake pedal or not, causing it to stay in park. Avoid checking if the brake lights are working to determine whether the brake light switch is working or not. This is not an ideal test to determine if the brake light switch is working.
A major symptom you easily notice when the brake light switch fails and you can’t get the car out of park is that the ESP, ABS, or BAS lights will also come on. This indicates that the brake light switch may need replacement.
The gear shift assembly can malfunction due to wear or internal failure. The gear shift lock solenoid, located inside the gear shift assembly, can fail. The plastic parts inside the gear lever can fail. If this happens, you will need to manually get the car out of park while waiting for the part replacement.
You can check the gear selector on your instrument cluster. If it does not display the current position of the gear lever such as P, R, N, D, it’s probably a good sign that the gear shift module is faulty.
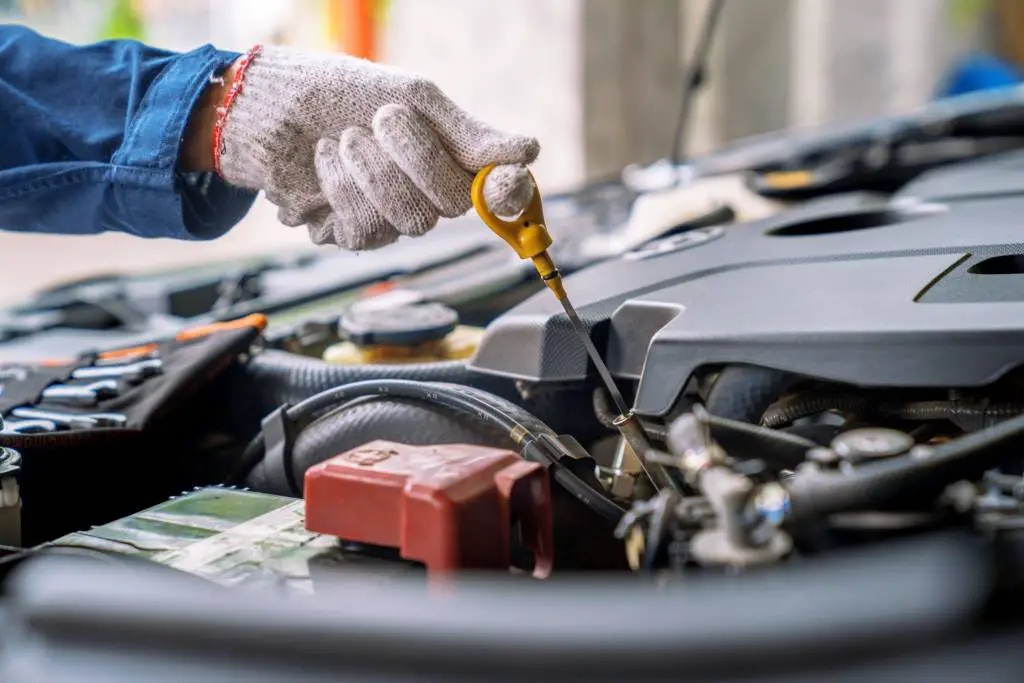
Low or flat battery voltage is a common cause for the gear lever not being able to come out of park. You should replace a discharged battery before proceeding with other repairs. It is quite simple to replace your car’s battery.
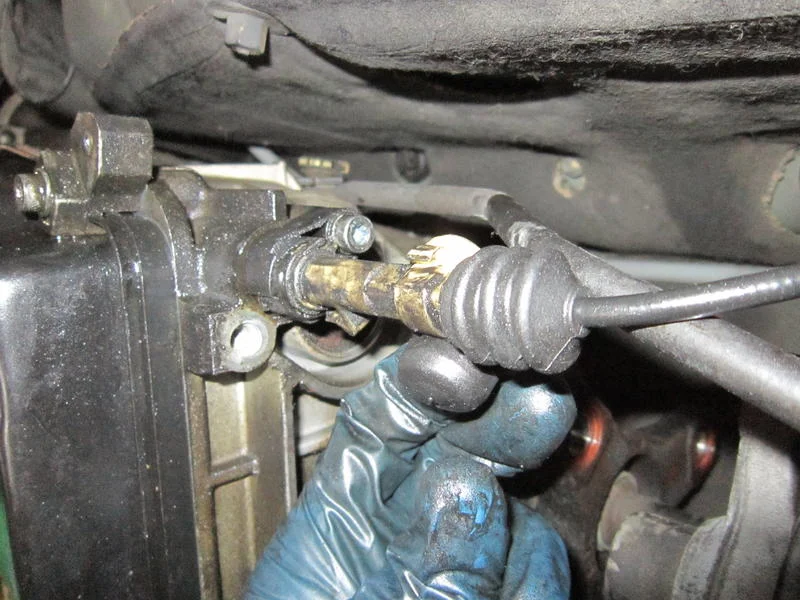
The ignition switch must be in position I, II, or the engine running. After turning the key to any of these positions, the gear lever is unlocked from park, via a cable or an electronic switch. If the cable or the ignition switch fails, the gear lever may remain stuck in park.
Avoid forcing the gear lever to shift, as you can break other parts by forcing the car to move. As an alternative, try the following steps to manually get your car out of park. Additionally, you can also use the same procedure to move the gear lever from neutral or reverse to park position.
Troubleshooting a Stuck Gear Lever That Won’t Start
Turn the key to position II and press the brake pedal several times, this will make the solenoid inside the gear lever come out of park. Listen for a click from the gear shift module, you might hear the solenoid unlocking. If you hear the click, it’s a good sign. This means the ignition is stimulating the locking mechanism and allowing the gear selector lever to come out of the PARK position.
Read the fault codes by getting an advanced diagnostic scanner. Alternatively, you can get a diagnostic scanner, they are inexpensive and easy to use. Using an OBD2 scanner is simple, even for a novice. see these very cheap ones on Amazon below.
After step 2, remove the brake light switch and troubleshoot it using a digital multimeter. If you have no knowledge of how a multimeter works, you can replace the brake light switch instead of testing it. The brake light switch is very cheap.
If the Mercedes-Benz gear lever still cannot be moved out of the park position, the gear lever selection module may be faulty. This could be due to a broken plastic lever inside the gear lever or spilled drinks on the center console. You can open the gear shift module and then proceed to replace the broken plastic part.
The Shift Lock mechanism is a safety device on the car and YES, it is required. This is because it prevents the car from accidentally coming out of park.
Yes, all older and newer models have a gear lever lock function.
Use another object to manually release the gear lever.
Caution must be exercised when lubricating parts of the gear shift mechanism. Avoid getting fluid into the electronic components of the gear lever. You can lubricate the moving parts as well as the ball and metal with steam. Seek the services of a professional mechanic if you are unsure which parts to lubricate.
You can achieve this by using the method described above to get your Mercedes-Benz out of park.
Some Mercedes-Benz models such as the S-Class W220 and CL-Class do not have a hole to manually release the gear lever from park. In this case, you can manually move it to park.
If the gear lever refuses to come out of park unless you press the brakes, you should first check the brake light switch. You can ask someone to watch the brake lights when you press the pedal. If the brake lights come on, it means that part is in good condition. Then you need to look for a faulty gear shift lock solenoid by pressing the brake pedal and listening for a click.
The sound indicates that the solenoid is working properly.
If your car passed both tests listed above, the problem may be caused by a broken plastic piece inside the gear lever assembly. These plastic bits break all the time, causing a stuck gear lever. Some mechanics may simply replace the entire gear lever assembly, which costs about $1,200.00 at the dealer.
I hope this article was able to resolve your Mercedes Benz gear shift problems
Managing Mercedes-Benz gear shift issues requires understanding the nuances of its transmission system, known for its sophistication and engineering excellence.
However, like any complex mechanical system, it can encounter problems.
Here are some common gear shift issues encountered in Mercedes-Benz cars:
This issue manifests as a delay in gear engagement when shifting from “Park” to “Drive” or “Reverse.” The car may hesitate for a few seconds before engaging the gear, indicating a potential problem within the transmission system.
Some Mercedes-Benz owners report harsh or jerky gear shifts. Instead of a smooth transition, gear shifts may feel abrupt or violent, which could be due to issues with the Transmission Control Module (TCM), worn transmission components, or inadequate transmission fluid levels.
Unexpected or uncontrolled gear shifts can occur, with the vehicle potentially shifting spontaneously to a different gear while driving. This erratic behavior can be particularly concerning as it may affect the vehicle’s control and driving stability.
Gear slippage happens when the transmission unexpectedly slips during driving, typically from a higher gear to a lower gear or into neutral. This issue can lead to a noticeable loss of power and acceleration.
In some cases, a Mercedes-Benz may get stuck in a single gear and refuse to shift up or down. This condition, often referred to as “limp mode,” is a safety feature designed to protect the engine and transmission from further damage, but it significantly limits the vehicle’s performance.
Another issue involves the inability to shift the vehicle out of “Park” mode. This could be due to a faulty brake light switch, problems with the gear lever locking mechanism, or an issue within the electronic systems controlling the transmission.
Leaks in the transmission fluid are not uncommon and can lead to several of the aforementioned problems, including delayed engagement and harsh shifting. Regular checks can help identify and address this issue promptly.
The process begins with a thorough diagnosis, involving the use of a professional diagnostic tool to check for error codes stored in the vehicle’s onboard computer system.
This step is crucial as it can identify specific issues affecting the gear shift mechanism, such as a malfunctioning sensor like the transmission speed sensor, or problems with the Transmission Control Module (TCM). Accurate diagnosis is essential for effectively addressing the problem without unnecessary repairs.
One of the most common factors leading to gear shift issues is the condition and level of the transmission fluid. Insufficient or contaminated fluid can severely impact the transmission’s ability to shift smoothly.
It is essential to ensure the fluid is at the correct level and has not degraded over time. Mercedes-Benz vehicles require specific types of transmission fluid, and using an incorrect fluid can cause significant damage to the transmission.
Therefore, fluid replacement should always comply with the specifications provided by Mercedes-Benz.
In some cases, gear shift issues can be resolved or mitigated through software updates for the Transmission Control Module. These updates aim to fix known bugs and improve transmission operation.
Vehicle owners should check with authorized Mercedes-Benz dealerships or service centers to determine if software updates are available for their specific model, which could potentially resolve gear shift problems without the need for mechanical repairs.
When gear shift issues are due to mechanical faults, such as a faulty gear selector module, clutch problems, or more severe transmission damage, professional mechanical repairs will be necessary.
The complex design and engineering of Mercedes-Benz transmissions require specialized knowledge and tools for accurate repair work, so it is advisable for these repairs to be carried out by certified Mercedes-Benz technicians.
In some cases, this may involve replacing major components or even the entire transmission.
Preventive maintenance plays a crucial role in minimizing the risk of gear shift issues. By following the recommended maintenance schedule, vehicle owners can ensure that potential Mercedes Benz gear selector problems are identified and resolved early on.
Regular maintenance includes transmission system checks, fluid changes, and inspections of mechanical components, helping to preserve vehicle performance and extend its lifespan!
Adapting your driving style, such as avoiding aggressive starts and stops, can reduce stress on the transmission and potentially prevent some issues.
However, it will not resolve existing mechanical or electronic problems but could extend the transmission’s lifespan.
Some models may experience harder shifts during the first few minutes of driving, especially in cold weather, as the transmission fluid warms up.
If the problem persists after the vehicle has warmed up or is particularly severe, it is worth investigating further.
Aftermarket modifications, especially those affecting engine power or the transmission itself, can impact gear shifting. These modifications can strain the transmission beyond its intended capacity, leading to issues.
In some cases, resetting the TCM can resolve gear shift issues, especially if they are software-related. This process can clear error codes and recalibrate shift patterns. However, it is a temporary solution if there is an underlying hardware problem.
Frequent use of paddle shifters in a manner that significantly deviates from the vehicle’s automatic shift patterns can lead to increased transmission wear.
While occasional use is within the vehicle’s capabilities, constantly pushing the transmission to its limits can accelerate wear and tear.
When it comes to Mercedes-Benz gear shift issues, it is crucial to address the problem methodically, starting with a thorough diagnosis.
Given the complexity of these vehicles, seeking assistance from professionals specialized in Mercedes-Benz or similar high-end vehicles is often the best solution!
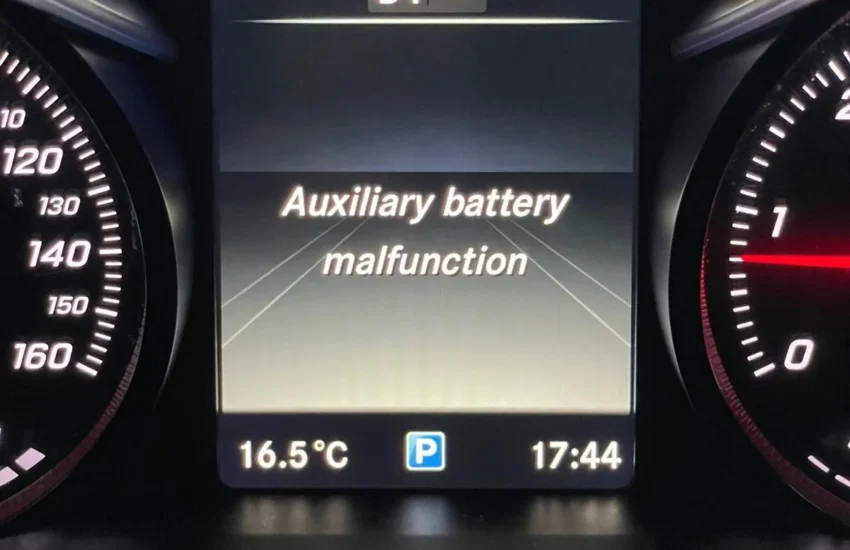
If the auxiliary battery fails in a Mercedes, it can lead to a series of problems, such as loss of memory settings, dimming of interior lights, and even difficulties starting the main engine in some cases.
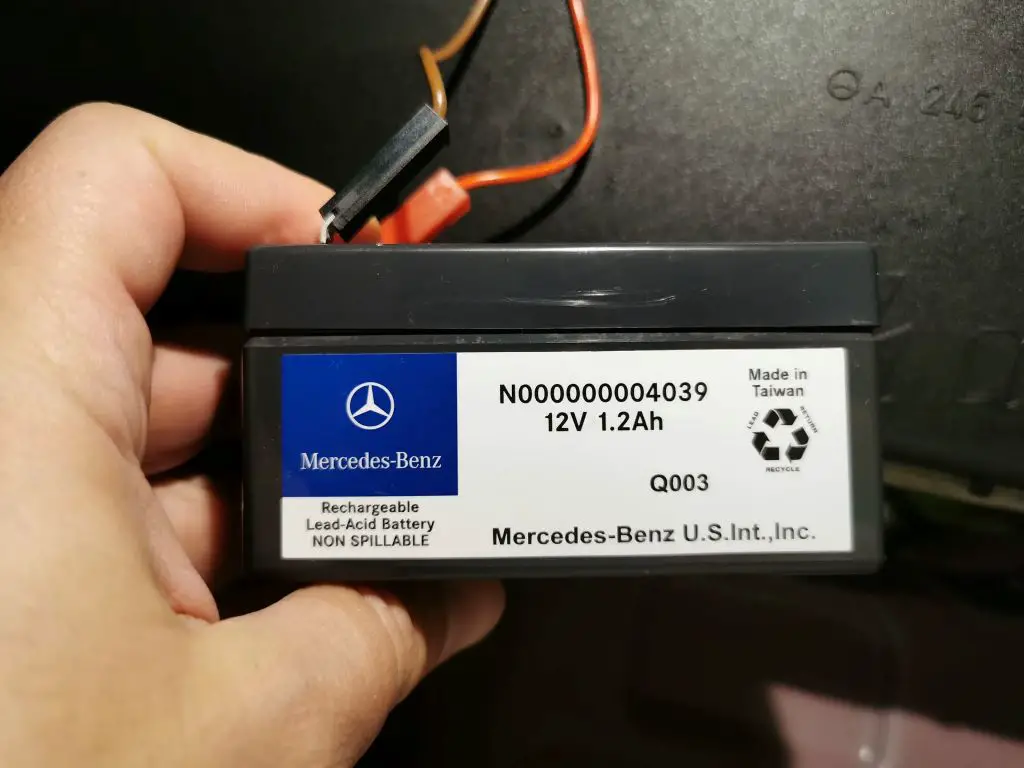
The auxiliary battery system in Mercedes-Benz vehicles comprises several essential components. The auxiliary battery itself is a secondary power source that stores energy for specific electrical components.
A Battery Management System (BMS) monitors the auxiliary battery’s state of charge, voltage, and temperature, ensuring optimal performance and preventing overcharging or deep discharging.
The charging circuit, consisting of the alternator and voltage regulator, is responsible for recharging the auxiliary battery. The alternator generates electricity, while the voltage regulator ensures the battery is charged at the appropriate voltage.
A network of wires and connections links the auxiliary battery to the various electrical components it powers, ensuring adequate communication and energy flow.
The auxiliary battery system works in conjunction with the main battery to power specific electrical components and maintain memory settings.
It is typically charged by the main battery or by the alternator when the vehicle is running. Once charged, it stores energy for use when the vehicle is off or when the main battery power is insufficient.
Like any other battery, the auxiliary battery has a natural lifespan. Over time, the battery’s internal chemical composition can degrade, leading to reduced capacity and performance.
Factors such as extreme temperatures, frequent charge cycles, and deep discharges can accelerate this degradation process.
A faulty charging system can prevent the auxiliary battery from charging correctly. Problems with the alternator, voltage regulator, or charging circuit can hinder the battery’s ability to store and supply energy.
Faulty alternator diodes, defective regulators, or loose connections can all contribute to charging problems.
Electrical faults in the wiring, connections, or other components can also impact auxiliary battery performance. Corrosion, short circuits, or damaged cables can disrupt the flow of electricity to and from the battery, leading to various issues.
Excessive use of electrical accessories, leaving lights on, or faulty components can drain the auxiliary battery faster than it can be recharged.
A faulty alarm system, interior lights left on, or a defective electrical component can put a strain on the battery, leading to premature discharge or failure.
A faulty auxiliary battery can lead to various issues related to comfort functions. You may notice that your power seats, windows, sunroof, or other electrically controlled functions no longer work correctly.
Additionally, the radio and navigation system may not be operational.
The auxiliary battery is responsible for storing memory settings for various vehicle functions. If the battery malfunctions, you risk losing seat memory settings, radio presets, climate control settings, or other customized vehicle settings.
While there is no specific warning light dedicated solely to a Mercedes-Benz auxiliary battery malfunction, you may notice other warning lights illuminating on the dashboard if the battery is faulty.
A depleted auxiliary battery can also affect the main battery’s ability to start the engine. If the auxiliary battery is not functioning correctly, it may not be able to provide the necessary support to the main battery, which can lead to slow or difficult starting.

If the auxiliary battery is worn out, damaged, or irreparable, it will need to be replaced. Using a compatible and approved battery is essential to ensure optimal performance and compatibility with your Mercedes-Benz vehicle.
When selecting a replacement battery, consider factors such as the battery’s Cold Cranking Amps (CCA), reserve capacity, and overall quality.
Consulting a qualified mechanic or your local Mercedes-Benz dealer can help you choose the right battery for your vehicle.
To repair or replace faulty charging system components, such as the alternator or voltage regulator, seek professional assistance. A qualified mechanic can accurately diagnose car problems and perform the necessary repairs.
Faulty wiring, connections, or other electrical components in the auxiliary battery circuit can also contribute to battery problems.
It is essential to address these issues promptly to avoid further damage and ensure the proper functioning of the auxiliary battery system.
The auxiliary battery in a Mercedes powers secondary systems like the start-stop function, Electronic Stability Control (ESC), and other convenience features.
Its primary role is to relieve the main battery of these smaller tasks, thus ensuring the proper functioning of the vehicle’s main electrical systems.
In most cases, the vehicle will continue to operate because the main battery handles essential functions. However, some features like the start-stop system or electronic parking brake may be disabled.
The auxiliary battery’s lifespan is typically between 4 and 6 years, but this can vary depending on driving conditions, climate, and general usage. Frequent short trips or extreme weather conditions can reduce the battery’s lifespan.
While rare, a faulty auxiliary battery can sometimes trigger warning lights on the dashboard, including the check engine light, especially if the issue affects systems connected to the battery, such as the start-stop function or power steering.
Ignoring an auxiliary battery malfunction can lead to the failure of specific functions like the automatic start-stop system, power supply to electronic stability systems, or even the parking brake on some models.
Even though the car may still be drivable, over time, the strain on the main battery may increase, which can lead to further electrical problems.
Replacing the auxiliary battery is relatively straightforward on some Mercedes models and can be done by an experienced DIYer.
However, some models require special tools or access, so if you are not familiar with car repairs, it is best to let a professional handle it to avoid damaging the vehicle’s electrical systems.
While auxiliary battery malfunctions can occur in any Mercedes, they tend to be more frequently reported in models with advanced electronic systems, such as the S-Class, E-Class, and some SUVs that rely heavily on the auxiliary battery.
Yes, disconnecting the auxiliary battery without proper precautions can reset or disable certain vehicle systems like the clock, radio presets, and navigation settings.
In some cases, a software issue in the vehicle’s control module may misinterpret the auxiliary battery’s status, triggering a malfunction warning.
A software update from a Mercedes dealer can resolve this issue, although it is always good to check the actual battery condition first.
While auxiliary batteries are present in both Mercedes hybrid and electric models, their role is even more crucial as they help manage many electronic systems.
A malfunction could potentially cause more disruptions in hybrid or electric models, thereby affecting the vehicle’s overall performance.
By understanding the common causes, symptoms, and solutions related to auxiliary battery malfunction in Mercedes, take proactive steps to maintain your vehicle’s auxiliary battery system health and ensure a smooth driving experience.
⚠️ Note: This list contains standard diagnostic trouble codes (DTCs) that are used by all manufacturers to identify vehicle issues.
The codes provided below are generic codes that may not apply to all vehicles. Automobile manufacturers may use manufacturer-specific DTCs that differ slightly from the codes below.
| Code Range | Associated Code Range |
|---|---|
| 📌 P0000 to P0099 | 📌 P2000 to P2099 |
| 📌 P0100 to P0199 | 📌 P2100 to P2199 |
| 📌 P0200 to P0299 | 📌 P2200 to P2299 |
| 📌 P0300 to P0399 | 📌 P2300 to P2399 |
| 📌 P0400 to P0499 | 📌 P2400 to P2499 |
| 📌 P0500 to P0599 | 📌 P2500 to P2599 |
| 📌 P0600 to P0699 | 📌 P2600 to P2699 |
| 📌 P0700 to P0799 | 📌 P2700 to P2799 |
| 📌 P0800 to P0899 | 📌 P2800 to P2899 |
| 📌 P0900 to P0999 | 📌 P2900 to P2999 |
| Code Range | Associated Code Range |
|---|---|
| 📌 P0A00 to P0A99 | 📌 P3000 to P3499 |
| 📌 P0B00 to P0B99 | 📌 P1000 to P1099 |
| 📌 P0C00 to P0C99 | 📌 P1199 to P1999 |
P1304 Ford ≠ P1304 Toyota).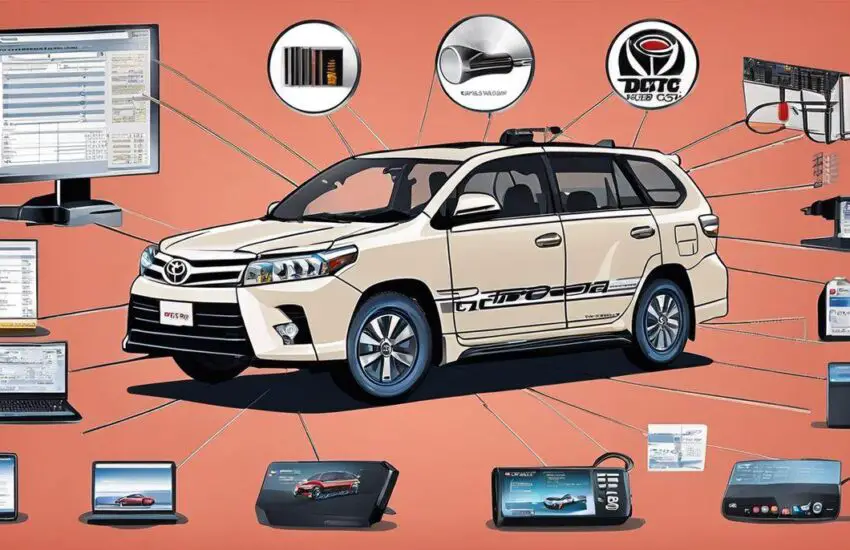
Addressing the issue of the Toyota DTC C1201 error code is not a task to be taken lightly. It is intrinsic to Toyota vehicles and requires a thorough understanding. With this in mind, we will decipher what the DTC C1201 code means, its significance, its importance, and why every Toyota vehicle owner should understand it. Going further, we will discuss the possible causes of this error code appearing, exploring the most common scenarios that can trigger it.
Every tech-savvy person who has ever owned a Toyota probably knows that facing error codes can be both frustrating and mysterious. One of the most common codes one might encounter is the DTC C1201. Let’s get straight into the details of what exactly the Toyota DTC C1201 error code is.
The DTC (Diagnostic Trouble Code) C1201 error code is specific to Toyota vehicles and is generally associated with braking problems. It signals poor communication between the onboard computer and the braking system. In simpler terms, it means that the car’s braking system is not transmitting information correctly to the onboard computer.
Now, why is this serious? The engine control system of a Toyota is designed to enter a safety mode whenever it detects an anomaly in the system. If the braking system cannot communicate properly with the onboard computer, the engine will consider this an anomaly and switch to safety mode, which can limit the vehicle’s performance and impact the overall braking efficiency.
What are the possible causes of this error code? There can be several reasons for the DTC C1201 code to appear on a Toyota vehicle. It could be due to a faulty wheel speed sensor, an anomaly in the ABS pressure sensor, or poor overall condition of the braking system.
How to fix it? The first step is to check the wheel speed sensors and ABS pressure sensors for any defects or premature wear. It might also be wise to check the entire braking system for any signs of damage or excessive wear. If these initial steps do not resolve the issue, it is recommended to schedule an appointment with a specialized technician for a more in-depth diagnosis.
Ultimately, every error code has a meaning and a possible solution, and the Toyota DTC C1201 error code is no exception. Understanding what this code means and how to resolve it can help avoid future problems and keep your Toyota in perfect working order.

Let’s now move on to a deeper analysis of the probable causes of the DTC C1201 error in Toyotas. A more advanced diagnosis might be necessary to detect the root cause of this problem. The technical complexity that characterizes this type of failure requires a diagnosis that takes into account several components of the braking system.
One of the main causes could be a malfunction of the Engine Control Unit (ECU). In a Toyota vehicle, the ECU is the main component that manages and monitors all aspects of the vehicle’s performance. Therefore, it is possible that the C1201 error code appears when the ECU stops functioning correctly.
Similarly, the brake circuit pressure sensor could be the source of this problem. If this sensor does not provide an accurate reading of the brake pressure, the C1201 error code could be triggered. A malfunction of this sensor could result from excessive wear, exposure to very high temperatures, or even a technical failure.
The C1201 code on the dashboard can also be a sign of communication link problems between the ECU and the wheel speed sensor. If this link fails, a discrepancy can occur between the information transmitted by the sensor and its interpretation by the ECU, which can cause the C1201 error to appear.
Furthermore, other mechanical issues can also cause the C1201 error code. Among them, one can cite braking problems themselves, such as worn or damaged brake discs, brake fluid level too low, or general brake wear after prolonged use.
Finally, it should be remembered that, although this problem can be resolved by owners themselves in some cases, it is highly recommended to consult a specialized technician if the error persists after initial resolution attempts. It is essential to understand that not resolving this issue could potentially endanger the safety of the driver and passengers, especially if it is directly related to the effectiveness of the braking system. To summarize, when faced with a C1201 error code, it is crucial to react quickly and effectively to ensure a safe and comfortable driving experience.

Identifying the possible causes of the DTC C1201 error code leads us to better understand how to deepen the necessary inspections. However, it is crucial not to overlook certain additional parameters in our investigation.
Power failures, such as a dead battery or a failing alternator, can also cause this error code. They must be considered during the diagnosis. Checking the battery and the alternator of your Toyota should therefore be done before any other steps.
An electronic or electrical problem can also trigger the DTC C1201 error code. Loose, corroded, or even broken wires can send erroneous signals to your ECU and trigger this error code. It is therefore advisable to have all cables and connectors related to the braking system examined.
ECU (Engine Control Unit) failures can also cause the DTC C1201 code to appear. Although rare, a faulty ECU could emit false error codes. If none of the other resolution steps have worked, it would be wise to have the ECU tested.
Effectively eliminating the Toyota DTC C1201 error code involves rigorous diagnosis, followed by targeted intervention based on the identified problem. To resolve this, the following steps are recommended: carefully inspect the battery and alternator, check the electrical and electronic wiring, and test the ECU. If the problem persists after these steps, it is recommended to call upon an automotive professional for a more in-depth diagnosis.
It should be remembered that any intervention on the braking system requires precise know-how. The assistance of a specialized technician is essential to ensure an effective resolution and, above all, the safety of your vehicle. Thus, every Toyota can continue to offer optimal performance, increased safety, and an unparalleled driving experience.

Undoubtedly, technology has greatly facilitated the understanding and the resolution of the Toyota DTC C1201 error code.
To fully appreciate its value, it is essential to review some key technological innovations that have transformed the way of diagnosing and resolving this error code.
First, there has been the rise of Vehicle Diagnostic Scanners (VDS) which have provided a platform to facilitate the identification of the specific problem related to the Toyota DTC C1201 error code. These devices are capable of reading and interpreting the error codes from the vehicle’s onboard computer, thus offering vehicle owners and specialized technicians a fast and accurate means of interpretation. With these devices, diagnostic time is reduced, ensuring a faster resolution of the problem.
The rise of repair assistance software, such as those that can provide real-time solutions for the Toyota DTC C1201 error code, is another significant technological advancement. These software have a comprehensive database of common vehicle problems and possible solutions. They are intuitive enough to guide users to the probable cause of the problem and provide recommendations for its resolution.
It is worth mentioning the advances in artificial intelligence (AI) and their application in the field of automotive mechanics. AI systems can analyze thousands of scenarios in a fraction of a second, thus offering a quick and accurate insight into the probable cause of the Toyota DTC C1201 error code. Furthermore, they can synthesize data and recommend a resolution plan based on statistics and diagnostic information. They also offer the possibility to track trends in error codes and predict potential future problems.
That said, despite all these technological advances, an important reminder must be made: these technological tools should not replace human expertise. Certainly, they can signal problems, provide insight, and even recommend solutions, but human intervention is still indispensable to validate and implement these solutions. A specialized technician has the necessary knowledge and experience to correctly interpret this information and take the necessary actions.
In conclusion, although resolving the Toyota DTC C1201 error code may seem complicated at first glance, technological progress has made this process much simpler and more efficient. Between vehicle diagnostic scanners, repair assistance software, and AI assistance, understanding and resolving this error code is now within reach of almost everyone.

Automotive diagnostic technology has made detecting, understanding, and correcting the Toyota DTC C1201 error code much easier. Thanks to modern diagnostic tools, it is possible to read and understand these error codes without having to call a professional. However, it is essential to remember the importance of quickly identifying anomalies and taking appropriate corrective measures, especially when the error code concerns the engine control system or the vehicle stability control system.

Mastering the P0420 error code specific to Ford is essential for all Ford vehicle owners and users. Being aware of this error, its potential causes, how to diagnose it, and possible ways to resolve it can greatly facilitate vehicle handling and maintenance. Our focus, in this context, aligns with the P0420 error code, and this exploration will offer readers a detailed understanding of what it means, how it affects their vehicle, and why it is important to monitor it.
In the world of automobiles, the Ford DTC P0420 error has become a recurring topic. Despite its frequency, the meaning behind this technical error code is not widely known. So, let’s delve into the meaning of the Ford DTC P0420 error code.
First, DTC is an acronym for Diagnostic Trouble Code. It is a coding system that automotive mechanics use to identify a problem in a vehicle. In the automotive industry, these codes are universal and have significantly helped in diagnosing car problems.
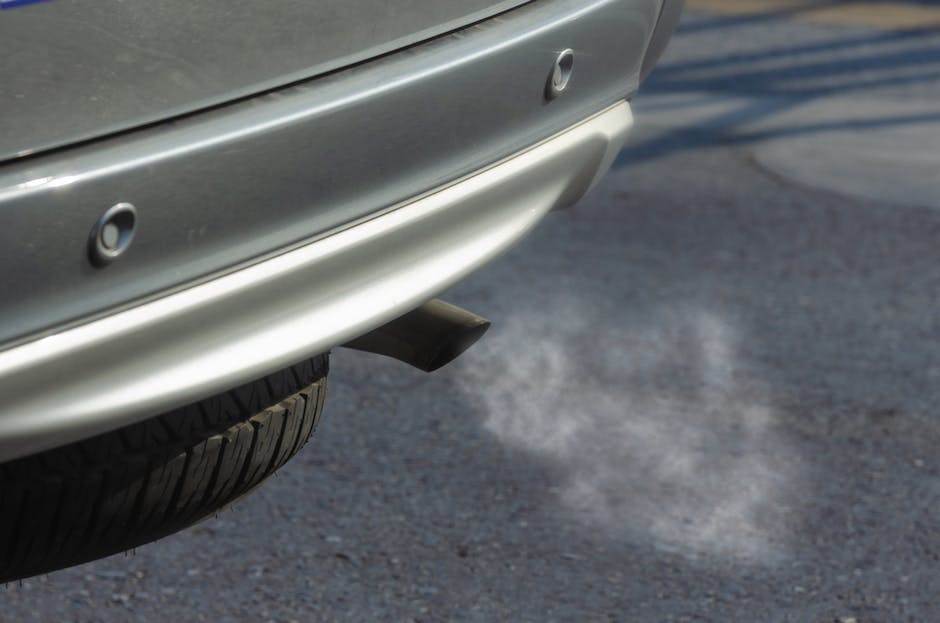
The P0420 code specifically means that the vehicle’s emission control system is operating outside acceptable limits. The “catalyst,” an essential part of the emission system, is what scores below the expected efficiency. In simpler terms, it means the car is polluting more than it should.
So, what causes this problem? There are several reasons why a vehicle may display the Ford DTC P0420 error code. This can include a faulty oxygen sensor, leaks in the exhaust system, bad fuel, or even a catalytic converter that is not working properly.
So, how can this problem be resolved? First and foremost, an accurate diagnosis is essential. A qualified mechanic can help identify the exact cause. However, if you are a “Do It Yourself” enthusiast and prefer to solve the problem yourself, you might consider checking the items mentioned above.
Remember that the Ford DTC P0420 error code is not an alert to be taken lightly. It indicates a serious malfunction that can affect your vehicle’s performance and contribute to environmental pollution. Therefore, it is crucial to take corrective measures as soon as possible.
As automotive technology continues to advance, understanding these error codes becomes increasingly important. They are there to help us solve problems more effectively and without harming the environment. So, instead of being intimidated by this technical jargon, make an effort to understand these codes. Understanding the Ford DTC P0420 error code is an important step towards safer and more environmentally friendly driving.
In the complex world of automobiles, it is essential to understand error codes to optimize your car, especially error codes like Ford’s P0420. We have already discussed the various possible causes of this car anomaly. Now, we will explore some other common causes of this error in more depth.
Although we mentioned catalytic converter failure as a potential cause of the P0420 anomaly, it is essential to review it. This crucially important device plays a vital role in reducing automobile pollution. When it does not function correctly, it can trigger the P0420 error. Several factors can contribute to the wear of the catalytic converter, including prolonged use, overheating, or the use of poor-quality gasoline.
Another frequent cause of the P0420 error is a misfire. Indeed, when there is a misfire, it means that the gasoline is not properly burned in the cylinders. This unburned fuel can end up damaging the catalytic converter, which can trigger the P0420 error.
A faulty seal can also cause the P0420 error code. If exhaust gases leak through a defective seal, it can distort the oxygen sensor readings, leading to a P0420 error code.
A faulty Air/Fuel sensor can also trigger the P0420 error. This sensor, also known as the Lambda probe, measures the air-fuel ratio in the exhaust gases. If it does not function correctly, it can affect the performance of the catalytic converter, leading to the error code.
Understanding this error code can help resolve the problem more effectively and keep your car in good working order. Be sure to take your vehicle to a qualified professional for an accurate diagnosis. This way, you can enjoy safe, responsible, and eco-friendly driving. So, do not ignore the P0420 error code – it is an opportunity to become more aware of the technical aspects of your vehicle and contribute to a cleaner environment.

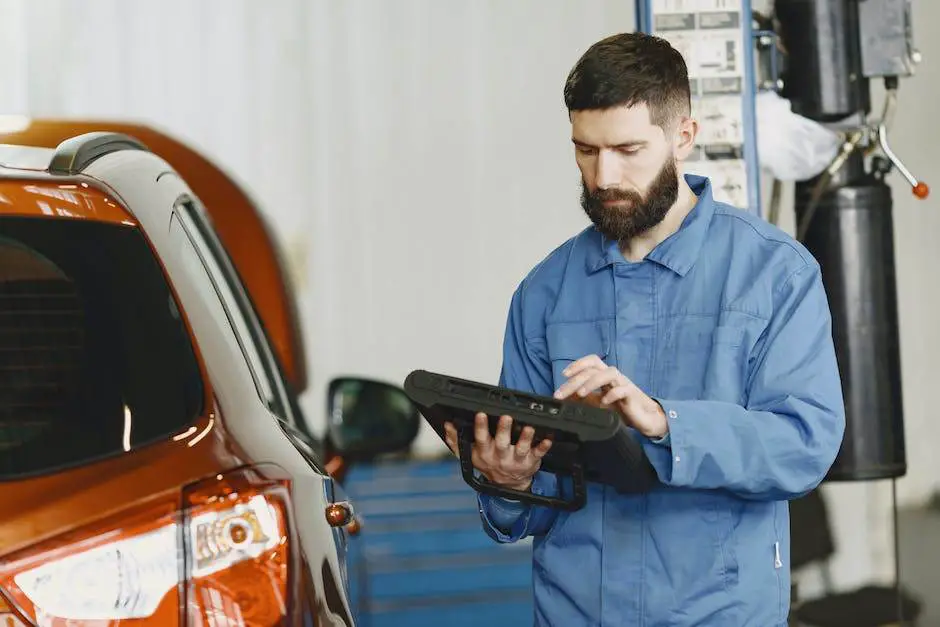
Dive into the technological arena of automotive diagnostics and voilà! You are in the exciting region where technology meets mechanics. Now, let’s see how a Ford owner can use an OBD2 diagnostic tool to diagnose the P0420 error code themselves.
First, you will need an OBD2 scanner, an essential tool for any automotive technology enthusiast. Simply plug your diagnostic tool into your Ford’s OBD2 port to begin the diagnostic scan process.
The results will give you a report on potential problems. For the Ford P0420, look for the enumeration of issues such as catalytic converter failure, a misfire, a faulty seal, or a malfunctioning air/fuel sensor. If any of these potential problems are detected, it is time to act.
An effective way to test your catalytic converter is to check the temperature at the front and rear of the converter using an infrared thermometer. A significant temperature increase at the rear would indicate an inefficient catalyst.
A misfire can be diagnosed by checking the spark plugs to see if they need replacement. If the seal is faulty, you will likely need to consult a qualified mechanic to replace it. For a malfunctioning air/fuel sensor, you can test it using a multimeter to check the voltage.
Remember that while self-diagnosis is useful, it has its limitations. It is always best to consult an expert if you are uncertain. Keeping this in mind, and with your new OBD2 diagnostic tool at hand, you can be assured of keeping your Ford at peak performance while contributing to a cleaner environment. Take the wheel; the automotive technology journey awaits you!
Let’s now move towards the solutions that can be considered to remedy this Ford P0420 error code. It is important to remember that each case is unique; the cause of the error code can be associated with various mechanical problems. Thus, a methodical and systematic approach is essential for problem-solving.
If the catalytic converter is faulty, replacement should be considered, especially if the vehicle has traveled a high number of kilometers. A new catalytic converter can significantly improve your vehicle’s emission system performance and eliminate the P0420 error.
Ignition problems are among the most common triggers for the P0420 code. To address them, one can consider changing the spark plugs or the wires if they are worn or corroded. Also, ensure that the ignition system is functioning correctly, as if the air-fuel mixture is not burned properly, it can damage the catalytic converter.
To solve a problem related to a faulty seal, it is often necessary to consult a professional. Indeed, the repair is often complex and requires specific tools. If the seal is damaged, it can be the cause of leaks and affect the catalytic converter’s efficiency.
If the malfunction of the air/fuel ratio sensor is the cause of the Ford P0420 error code, it may need to be replaced. Test the sensor with a multimeter to confirm proper operation before replacement.
It should be noted that using an OBD2 scanner is very important. It allows access to the car’s computer system to precisely identify the cause of the error. These scanners have evolved and now enable complex diagnostics for vehicle owners, even those without in-depth technical knowledge.
Nevertheless, it is important to consult a professional for a diagnosis if the error code persists. The expert will be able to locate the problem precisely and guarantee quality work for the benefit of your vehicle’s performance and the environment.
Finally, understanding and resolving this kind of technical problem is a step towards taking control of your automotive investment and contributing, even minimally, to the fight for a cleaner environment. So, challenge yourself to be part of the technological revolution in the automotive industry.

Thanks to understanding the Ford-specific P0420 error code, its impact on your vehicle, and how to manage it, the confidence you gain from maintaining your vehicle increases. Cars, like humans, require care and attention to function effectively and durably. By knowing the potential causes of the P0420 error, how to diagnose it, and the possible solutions, you are now better prepared to keep your vehicle healthy and prevent potential problems in the future. Keep in mind that resorting to a professional is crucial when you do not feel capable of handling this error yourself.
Error Code P0489 on Ford Transit Connect: Causes, Symptoms, and Solutions
Encountering error code P0489 on a Ford Transit Connect can be confusing for drivers. This code is related to the Exhaust Gas Recirculation (EGR) system, an essential component that helps reduce polluting emissions and ensures the engine runs properly.
The main warning sign is the illumination of the “Check Engine” light on the dashboard. Other symptoms may include:
Several factors can cause the P0489 code, including:
To accurately identify the source of the problem, using an OBD-II diagnostic tool is essential. This tool allows reading the error code and analyzing real-time data. A professional can then determine the exact cause and propose an appropriate solution.
Repairs vary depending on the detected cause. Here are some common interventions:
Although the P0489 code can be a source of inconvenience, it is generally easily resolved with a quick diagnosis and appropriate intervention. By taking the problem seriously as soon as it appears, you ensure the longevity of your engine and help reduce your environmental impact.
The P0414 error code on a Peugeot 206 can be a source of frustration for owners of this vehicle. This code indicates a problem with the secondary air injection (SAI) system, which is crucial for the proper functioning of the engine and the reduction of polluting emissions.
Symptoms
The “Check Engine” light is the most common symptom of the P0414 code. Other symptoms may include:
Causes
The P0414 code can be caused by several factors, such as:
Diagnosis
Diagnosing the P0414 code requires an OBD-II diagnostic tool. The code can be read and recorded by the tool. A mechanic can then use the code information to identify the cause of the problem.
Repair
Repairing the P0414 code depends on the cause of the problem. In some cases, the repair may be simple, such as cleaning the secondary air injection circuit. In other cases, the repair may be more complex, such as replacing the secondary air pump.
Tips
Here are some tips to help you manage the P0414 code on your Peugeot 206:
Conclusion
The P0414 error code on a Peugeot 206 can be a frustrating problem, but it can be solved. By following the tips above, you can minimize the inconvenience and get your vehicle back on the road quickly.
I hope this article was helpful to you. If you have any questions, please feel free to ask me.
Note: