
What Does It Mean?
This is a generic powertrain diagnostic trouble code (DTC) and generally applies to OBD-II vehicles with cruise control. Vehicle makes may include, but are not limited to, Dodge, Chrysler, Ram, Jeep, Hyundai, BMW, Vauxhall, Mini, Chevrolet, etc.
There are many benefits that come with the cruise control function. On long trips, there’s no need to constantly monitor and adjust speeds based on traffic and traffic laws. You press a button or two, and a combination of sensors, solenoids, modules, etc., ensures the vehicle keeps moving at the specified speed until you, or possibly external influences, deactivate or adjust the speed accordingly. Not to mention, the vehicle will have a good idea of how to maintain fuel economy at a good level throughout the journey, as when we drive, we don’t necessarily take everything into account to reduce costs.
Fortunately for us, the ECM (Engine Control Module) is responsible for the smooth but effective operation of the cruise control. The proper functioning of the systems relies on many sensors, switches, modules, VSS, etc. One of them being the cruise control servo. Most of the time, these are responsible for throttle control when you set and/or adjust the cruise control. By controlling the throttle and adjusting accordingly, with this servo, the ECM can adjust the speed easily and effectively. Many times, these servos are mechanically controlled via vacuum lines and throttle cables. The servo’s vacuum is controlled by solenoids which are, in turn, controlled by the ECM, which can interpret all other values before specifying throttle position, speed, etc. This fault refers to the circuit involved; refer to the service manual to determine exactly which physical circuit you are working on/diagnosing.
The P0594 Cruise Control Servo Circuit/Open and related codes (P0525, P0595, and P0596) are set when the ECM monitors a malfunction in the cruise control servo circuit. In the case of P0594 specifically, it is set when a general failure or an open electrical condition is detected in said circuit.
Example of a Cruise Control Servo:
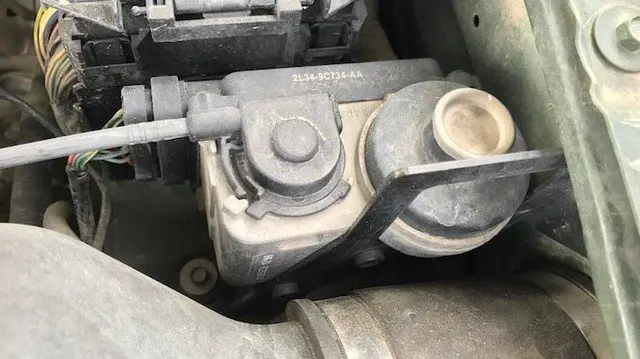
P0594 Cruise Control Servo
How Severe Is This DTC?
I will set the severity of this code to medium. Regarding most OBD2 cruise control error codes, they are quite minor. That being said, in this case, because the cruise control servo is not only directly connected to throttle control via a cable but is sometimes responsible for throttle position, it would be more severe than most.
To emphasize a point, if you neglect an active OBD2 fault, you risk not being aware of new fault codes. Even without symptoms, if not monitored, OBD2 error codes can lead to more serious and costly problems.
What Are Some of the Symptoms of the Code?
Symptoms of a P0594 diagnostic code may include:
Inoperative cruise control
Erratic cruise control operation
Vehicle speed is stuck
Limited vehicle speed with cruise control activated
Inaccurate setting of vehicle speed compared to desired or set speed
Specific cruise control functions faulty/erratic
What Are Some of the Common Causes of the Code?
Causes
of this P0594 cruise control code may include:
Faulty/damaged cruise control servo
Cruise control servo cable broken/stuck/disconnected/misadjusted
Wiring problem
ECM (Engine Control Module) problem
Water intrusion module
Connector problem
What Are the Diagnostic and Troubleshooting Steps for P0594?
The first step in the troubleshooting process for any malfunction is to check the Technical Service Bulletins (TSBs) for known issues with the specific vehicle.
Advanced diagnostic steps become very vehicle-specific and may require the appropriate advanced equipment and knowledge to operate accurately. We include the basic steps below, but refer to a repair guide specific to the year/make/model/powertrain for steps specific to your vehicle.
Basic Step #1
Generally speaking, cruise control servos are mounted somewhere in the engine compartment. Most of the time, they are near the throttle body; after all, they control the vehicle’s speed using it. Once located, perform a general visual inspection. Look at the cable, check that it is not fraying, bending, corroding, or showing any signs of malfunction. If the servo cable does not move freely when checking the throttle, the ECM may interpret it as a performance problem.
What does the servo look like? These are typically vacuum-controlled, so their physical condition could indicate a problem. It is important to check all vacuum lines going to the servo itself. Any cracked or deteriorated lines should be considered a sign of your vacuum system’s health. Therefore, I recommend replacing all related vacuum lines as they are inexpensive and could save you problems in the future.
Basic Step #2
On the electrical side of things, check the connector on the servo. Any broken tabs or loose connections should be repaired. The harness may run through tight areas and/or moving parts, so be aware of chafing areas that could cause a problem and repair broken/damaged wires.
Basic Step #3
Depending on the capabilities of your OBD2 scan tool, you can potentially monitor the servo’s operation with it connected to the vehicle. Sometimes, you may receive percentages or electrical values. Regardless, you can compare the values to its physical operation by watching it under the hood, with the wheels on the ground. This is an older procedure that can be problematic, especially when dealing with more modern vehicles. That said, always ensure that diagnostic/repair procedures are also recommended by your vehicle’s manufacturer. If you neglect to do your research here, you could easily damage other vehicle components.