So, how many of you car owners believe in DIY? We certainly do. And that’s why our maintenance section offers you such great DIY blogs. And this time, we’re going to explain how to remove rounded wheel nuts like a pro.
Often, when you try to remove these wheel nuts, the wrench slips and rounds off the edges of the bolts. So it becomes extremely difficult to remove that wheel nut when you want to change it. And since you might want to prepare your car for the upcoming winter months, you can learn more about wheel nuts.
Here, we explain how to remove a rounded wheel nut.
The Practical Tutorial on How to Remove Rounded Wheel Nuts
You need to pay attention to wheel nuts because they keep the wheel attached to the threaded wheel studs. The wheel studs, in turn, connect it to the car’s axle.
Before we start explaining how to proceed, let’s see what we need.
Required Tools
1/2″ drive breaker bar $15-20
1″ diameter iron pipe, 36″ length $10-15
Twist socket set for nut/bolt extractor $20-100
3 lb hammer $5-10
WD-40 or alternative penetrating oil $5
Replacement wheel nut $3
Total cost: $58-153 if you have nothing and need to buy everything
With your other emergency supplies stored in your car, I highly recommend keeping these items in the car as well, in case you need to repair your tires when you’re away from home.
Here’s how to remove rounded wheel nuts in 4 simple steps.
Step 1. Breaking the Rust
First, you apply targeted and generous amounts of WD-40 to the base of the lug nut to allow this penetrating oil to be drawn into the bolt threads by capillary action. If it’s very rusty, hit it a few times with the hammer to break up some of the rust before applying the WD-40 oil. Give the penetrating oils time to work, up to a day if you have enough time.
Step 2. Installing the Socket
Simply because the wheel nut is rounded, it can be difficult to install the socket onto the nut. So, take a socket, place its mouth over the wheel nut, and tap it on the back with the hammer. Make sure not to hit too hard. This could cause a bad socket lock. Keep tapping until it fits snugly.
Step 3. Working with the Breaker Bar
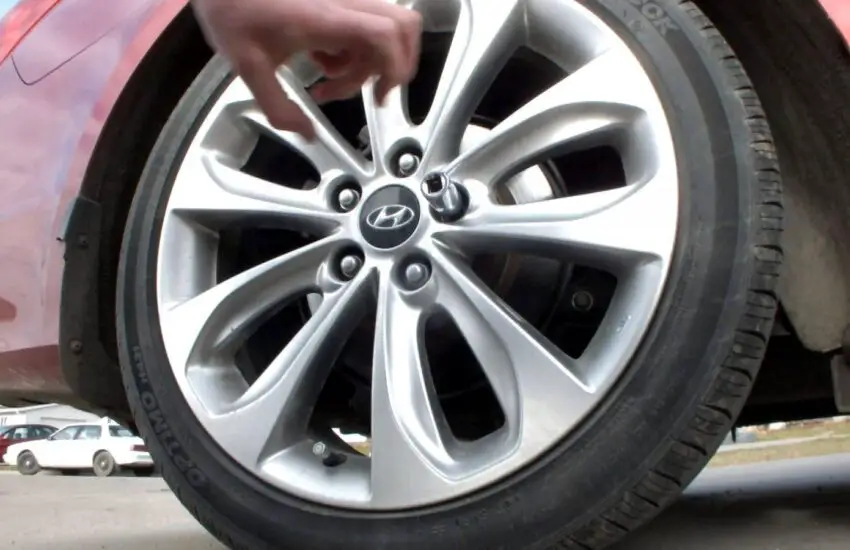
How to properly remove rounded wheel nuts (Photo: BMAC VAGS @ Youtube)
Now take the breaker bar and install it on the back of the socket. Start hitting the handle of the breaker bar with the hammer towards the left (counterclockwise).
When you do this several times, you’ll feel like you’re about to break the wheel nut.
Step 4. Breaking the Lug Nut
With persistent pressure to the right, the wheel nut will come loose with a snap. Now turn the socket a bit clockwise and counterclockwise and remove it. It will come off easily. But that’s not where the tutorial on how to remove a rounded wheel nut ends.
Step 5. Removing the Nut from the Socket
How to remove rounded wheel nuts for safe driving (Photo: How to do it on Youtube)
Once the nut is removed, you still have a problem: the wheel nut will still be stuck in the socket.
Screw the nut back on loosely with the socket. Then, gently tap the socket from top to bottom with the hammer. The socket will come out while the nut will be right there, slightly screwed on. You can twist it with your hand and remove it.
Alternative Strategies
Although our professional method usually works, some problems with removing rounded wheel nuts can arise and will require different strategies.
1. Stripped Stud
The lug nut spins freely but it doesn’t come off the stud. You drill the lug nut or the stud. Select a carbide drill bit that matches the size of your stud. You apply strong pressure while drilling at low speed to drill the center of the lug nut until it’s no longer attached to the stud. However, to drill the stud, you’ll need to replace it, which can be quite tricky for some vehicles.
2. Preventing the Problem
Those careless mechanics can easily overtighten wheel nuts with their impact wrenches. You should consider talking with your mechanic to ensure they apply the correct torque before starting work on your car. Remember that different cars have different lug nut tightening requirements. Cars require 60 to 100 foot-pounds of torque. Larger vehicles may require up to 300 foot-pounds of torque. You should consult your owner’s manual for the correct torque requirements.
Conclusion
Removing rounded wheel nuts can be a challenging task, but with the right approach and tools, it’s possible to overcome this common problem. It’s important to be patient and avoid applying excessive force, as this could further damage the wheel nuts or the wheel. There are several methods you can try to apply. Each method has its advantages and limitations, and the appropriate approach may vary depending on the specific situation.
I hope all this information is helpful to you. This is by far the simplest DIY tutorial on how to remove rounded wheel nuts like a pro. Let us know if you like it in the comment area below:
How to Increase Power in a 4-Cylinder Car
Most vehicles you see today are 4-cylinder engines. They are small, compact, and easily fit into almost any engine compartment. Interestingly, they are lighter, with one cylinder head, fewer moving parts, and one exhaust manifold compared to multiple cylinder banks.
4-cylinder engines are among the most versatile vehicles in this modern era. However, you might be unsatisfied with the power level produced by your car. Since modern technology has come with advancements in automotive engineering, car manufacturers have established ways to improve your vehicle.
There are several ways to extract more power from your vehicle’s 4-cylinder engine. Performing this activity would void your warranty. Its success depends on your skills, budget, and the number of options.
So far, writing this guide will provide answers to these specific questions ranging from: how to make a 4-cylinder faster than a V8, how to supercharge a 4-cylinder engine, turbocharger for a 4-cylinder engine, how much horsepower a turbo adds to a 4-cylinder, can you swap a 4-cylinder for a V8, and more.
Be patient; let’s get started right away!
How to Make a 4-Cylinder Faster Than a V8?
To make your 4-cylinder faster than a V8 engine, you need to turbocharge or supercharge it. You would do this through forced induction since V8 engines are larger than inline 4-cylinders. To produce greater power, it’s necessary to move the vehicle at a significant speed.
It would be vital to increase the power of 4-cylinder engines to make them faster and give the V8 engine a run for its money. That said, by removing vast chunks from inside its engine and replacing them with turbocharging or supercharging kits.
How to Increase Power in a 4-Cylinder Car?
The procedures to increase power in a 4-cylinder car are as follows:
1. Maintain Your Vehicle Properly
Most of the time, vehicle owners must pay attention to proper maintenance procedures. However, the best way to increase power is to follow the instructions recommended by your manufacturer. Such as oil changes, wheel alignment, brake checks, and a few others.
2. Install a Cold Air Intake
Remove the intake tube and airbox surrounding the 4-cylinder’s filter. Then, install a new intake designed to increase the air passing into your engine. Increasing the airflow into your engine would improve its mileage. However, most aftermarket intakes produce more noise than stock ones.
3. Improve Your Vehicle’s Exhaust Flow
Replace parts of your exhaust flow with larger diameter pipes. These larger pipes will reduce backpressure that would limit the speed at which exhaust gases could be expelled from the engine. You can replace the piping directly behind the catalytic converter (cat-back). You can also remove all the piping that leads to your exhaust manifold.
4. Reprogram Your Vehicle’s Computer
The computer controls important functions of most modern vehicles and their operation. Computer programs help balance efficiency, fuel consumption, output power, emissions, and reliability. Reprogramming would be vital to increase power. Get the right programming company for your vehicle online, or you can visit your dealer.
5. Replace Ignition Components
For your engine to function correctly, it needs fuel, air, and a spark to ignite the mixture. It would be helpful to replace worn spark plug wires and old spark plugs to increase the ignition of the air-fuel mixture.
6. Install a New Throttle Body
This is where your intake meets the engine when air enters the intake manifold. Thus, installing a larger diameter throttle body would allow more air to flow over the engine. As a result, this leads to an increase in engine power. For example, replacing a 65 mm throttle body with a 75 mm throttle body would increase airflow. Although replacing your throttle bodies would also require a new gasket between the body and the intake manifold.
7. Upgrade to More Aggressive Camshafts
Camshafts or cams help open and close the intake and exhaust valves. This also allows air and fuel to enter the engine and exhaust gases out at the right time. Remember that your engine’s stock camshafts are concerned with fuel economy, emissions, power, and efficiency. It would be appropriate to replace them with more specialized ones to increase engine power.
Note: Ensure all components to be installed are specific to your vehicle.
The Most Powerful Non-Turbo 4-Cylinder?
The highest power for a non-turbocharged engine is 340 hp. The 4-cylinder engine with this figure is the BAC Mono R 2.4 L inline 4-cylinder with 243 lb-ft. It achieves 0 to 100 km/h in 2.5 seconds, a top speed of 170 km/h, and the engine is mid-rear engine.
How Much Horsepower Does a Cold Air Intake Add to a 4-Cylinder?
The power level of a 4-cylinder depends on the potential power. The exact amount varies, but a car would have up to a 5% power increase with an excellent cold intake. However, a 4-cylinder engine would have marginal power due to its potential power. For example, a 200 hp 4-cylinder engine would gain about 10 hp when installing a cold air intake.
According to reports, the modding community had agreed that the cold air intake would be insignificant for naturally smaller engines (4-cylinders).
Maximum Power for a 4-Cylinder
The maximum power of a 4-cylinder engine is about 415 hp. The maximum power value comes from the German luxury brand, Mercedes-AMG CLA45 S, M139 2.0 L inline 4-cylinder. This vehicle is the most powerful 4-cylinder engine in the world with 369 lb-ft of torque. It also accelerated to 60 mph in 4 seconds when manufacturing the CLAS45 S.
How to Supercharge a 4-Cylinder Engine?
Supercharging a 4-cylinder engine is possible and can be achieved with forced induction. Even though car manufacturers prefer to supercharge larger engines, the result of a 4-cylinder would also be worth it. Supercharging forces compressed air into your engine, which is belt-driven. Supercharging is more efficient than turbocharging for vehicle owners who appreciate power at lower RPMs.
Here are the steps to supercharge your 4-cylinder:
Maintain your vehicle using your manufacturer’s guide.
Upgrade your exhaust system using larger diameter exhaust pipes.
Replace your ignition components.
Replace associated fuel modifications.
Use a supercharger kit such as a bracket and a larger serpentine belt to improve the supercharger pulley support.
Use a dry/wet nitrous oxide kit. This kit contains more oxygen than air; injecting nitrous into your 4-cylinder engine would be possible. On the other hand, the wet nitrous kit injects a mixture of fuel and nitrous into your cylinder. The essence of the wet type is to create more power, more safely than the dry kit.
Tune your vehicle professionally because you have installed the nitrous oxide kit and force-induced it. Doing this would support the power increase.
Turbocharger for 4-Cylinder Engine
A 4-cylinder engine consists of lines of each cylinder accordingly, forming a straight line. This gives it the reason why the 4-cylinder is also called an inline 4.
Introducing a turbocharger for a 4-cylinder engine would give it a displacement of less than 3 liters. Thus, the 4-cylinder becomes different since it is turbocharged.
Therefore, returning the exhaust gases into the cylinder would create a giant explosion when the pistons pump inside the cylinders. After turbocharging your 4-cylinder, the result will be more power and significant horsepower than some larger engines, like V8s.
Getting the right turbocharger for your 4-cylinder would be essential.
How Much Horsepower Does a Turbo Add to a 4-Cylinder?
Significantly, a turbocharger can add about 30 to 40% or 70 to 150 hp to a 4-cylinder engine. This power range is generally the same as what would be added to the diesel engine. So far, the turbocharger improves more power on a 4-cylinder than what the cold air intake adds.
Can You Swap a 4-Cylinder for a V8?
Yes, you can swap a 4-cylinder for a V8. To do this, you will need to weld new engine mounts while notching the metal and reinforcing areas. It depends if the 4-cylinder engine compartment would fit a V8 engine, which is only possible for vehicles produced in the last 25 years.
However, Caroll Shelby swapped a Ford V8 into an Alpine Sunbeam. As a result, he produced an incredibly controlled and very fast Sunbeam Tiger skate.
How to Increase Power in a Naturally Aspirated Engine?
A naturally aspirated engine is an atmospheric engine. It is not a turbocharged or supercharged engine.
Here are the steps to increase power in a naturally aspirated engine:
· Remove Restrictions in the Cylinder Head
Remove the primary restriction found in the cylinder head. The process must be performed by a professional.
· Add a Larger Diameter Throttle Body
Since air is an essential component that affects the overall combustion process, allowing more air would not only increase power but affect multiple elements of the naturally aspirated engine’s performance. Adding a larger throttle body will provide more air at a higher flow rate to increase power.
· Make Your Vehicle More Aerodynamic
Improving the aerodynamics, shape, and design of your vehicle would make a huge difference. You can make your vehicle aerodynamic and reduce weight to avoid feeling sluggish.
· Install a High-Performance Exhaust
Installing a cat-back exhaust will allow exhaust gases to leave the engine and exit the muffler much faster. It’s best to leave it to a professional if you get a kit for your exhaust.
· Switch to a High-Performance Camshaft
Choosing the appropriate camshaft will help you achieve better results at the manifold or exhaust. So, install a new camshaft to increase your vehicle’s power. Remember that your car may idle roughly.
· Install a New Water Injection Kit
Suppose you notice that your vehicle’s power has dropped for a while. Installing a water injection kit will help restore the previous level and maintain the naturally aspirated engine. This will also ensure that you get your vehicle back on track.
· Reprogramming
Changing the vehicle’s programs in terms of timing would be helpful. This will also modify the air-fuel mixture and necessary settings. When it comes to a naturally aspirated engine, you might get a minor difference in reprogramming.
Note: Please try to perform other vital services such as oil changes, fuel system cleaning, and using appropriate fuel.
Conclusion
Finally, there is no doubt that everything is possible today in the automotive world. Increasing the power of your naturally aspirated engine is more complex than it seems. The most significant improvement is to supercharge or turbocharge your vehicle with vital kits. Apart from that, any added component is marginal in its performance.
However, I have detailed the steps for you to increase your 4-cylinder’s power to a higher horsepower. Be sure to use the services of a professional during such a conversion. Feel free to share this guide with others!
Diagnosis, symptoms, and preventive measures of a blown head gasket
Do you have a blown head gasket? Discover the causes of blown head gaskets, how to repair a blown head gasket, and whether you can drive with a blown head gasket. We will also look at why a blown head gasket ruins an engine and how long can you drive your car with a blown head gasket?
A car’s head gasket plays an essential role in the proper functioning of a car’s engine, and if your car’s head gasket is blown, it can cause very serious damage to the car and even lead to major repairs.
What does blowing a head gasket mean?
A head gasket is a mechanical seal sandwiched between the surfaces of the engine block and the cylinder heads. The main purpose of the head gasket is to help contain the combustion process so you can have a functioning engine since it is part of the combustion chamber. Secondly, the head gasket provides a physical extension of the fluid passages from the head to the block.
Being so close to the combustion process, the head gasket must be strong. Most contemporary gaskets are made from steel, composite materials with copper used in high-performance applications. Head gasket sets are quite affordable despite the importance of this part. Removing the cylinder head can be very labor-intensive, hence the high cost of replacing a head gasket.
What causes head gaskets to blow?
Usually, the head gasket forms a kind of seal between the engine block and the cylinder head. The head gasket must seal both the high-pressure and exceptionally hot combustion gases and the engine coolant whose temperature can vary significantly. It is normal for head gaskets to develop leaks over time due to the wide temperature range and a relatively large surface area. Head gaskets can blow regardless of your vehicle model or the type of head gasket used.
The head gasket seals the coolant passage from the atmosphere and the combustion chamber, meaning you cannot see much of the head gasket on a vehicle with an installed engine. Symptoms of blown head gaskets can be difficult to diagnose because much of the gasket cannot be seen without disassembling the engine. A simple visual inspection will not prove a leak at the head gasket, so it is essential to know the other symptoms so you can perfectly identify a head gasket problem.
Symptoms of a blown head gasket
External coolant leak from under the exhaust manifold
Emission of white smoke from the exhaust pipe
Engine overheating
Bubbles in the radiator or bubbles in the coolant overflow tank
Weak cooling system
Milky white oil
Fouled spark plugs
Let’s now look at the symptoms one by one.
External head gasket leak
An external head gasket leak could cause coolant to leak from under the intake or exhaust manifold. This can only occur when the engine is fully warmed up. You might be able to identify the leak as a head gasket leak if there are no other cooling passages or pipes near the head gasket. But this may require you to add UV dye to the coolant and then observe if there are other cooling passages nearby. You can carefully locate the head gaskets with a UV light to spot the leak.
White smoke from the exhaust
In most cases, head gasket leaks are internal to the engine, allowing coolant to flow into the combustion chamber on each intake stroke. When this happens, the coolant burns with the combustion process and appears as white smoke emitted from the exhaust. White smoke may excessively come out of the exhaust when this occurs.
Engine overheating
It is normal for your engine to overheat after longer drives if your head gasket is blown. This is due to the lack of coolant because your engine is consuming it. Engine overheating can cause many problems, the major issue being the expansion of metal components beyond what they were designed for, which can cause cracks and distortions. This can cause irreversible damage to seals and gaskets.
Bubbles in the radiator
A leak from an internal head gasket allows exhaust gases to enter the coolant, in addition to allowing coolant to enter the combustion chamber. This can result in bubbles forming in the radiator or coolant reservoir. The coolant may appear to be boiling even when it is cold. Bubbles form when exhaust gases are forced into the cooling system during the combustion process.
Weak cooling system integrity
A leak in your head gasket, pressurizing your cooling system, and inspecting for pressure loss can prove that your head gasket is blown. Yet, this is not a completely convincing test because there could be other leaks you are unaware of.
White or milky oil
The leaking coolant seeps into your combustion chamber, causing it to flow past your piston rings into your oil. Oil and water can mix over time, giving the oil a milky white appearance. You can check this on your dipstick and around your engine’s oil cap. The mixture of water in your oil will reduce the oil’s effectiveness in lubricating your car. A lack of adequate lubrication will lead to wear on your cylinder walls and crankshaft and camshaft bearings.
Fouled spark plug
Burning coolant in your combustion chamber will leave tiny white deposits on your spark plug, usually around the ground strap and electrode. A fouled spark plug may not be a conclusive symptom of a blown head gasket, as other issues can cause these white deposits.
How to prevent head gasket failure
Head gasket failure can be avoided in several ways:
Keep combustion chamber pressures as low as possible. For turbocharged or supercharged vehicles, ensure your boost level is set to the factory setting.
Make sure your engine has no pre-ignition due to carbon buildup.
Maintain a low engine RPM to reduce stress and heat on your head gasket and avoid revving your engine at high RPM.
For cars with a manual transmission, avoid downshifting to slow the car and match the RPM to reduce head gasket pressure.
If you are rebuilding an engine, reduce the risk of a blown head gasket in the future by using properly lubricated head studs and tightening them according to the proper sequence to the correct torque setting.
What is the cost to repair a blown head gasket
The cost to repair a blown head gasket can vary significantly from one vehicle to another. Cost factors include:
Damage to the head or block
Number of cylinder banks
Overhead cam engines VS pushrod engines
Other replaced components
It is mainly the labor cost that makes head gasket repair expensive. The cost can therefore vary depending on the complexity of the job. A “V” style engine has 2 cylinder heads, so the repair cost will be high because the gasket of both heads will need to be replaced. Furthermore, an engine with overhead camshafts adds the complexity of removing the timing belt or chain, thus making the job more complicated. For a pushrod engine, the repair may not be too expensive since it only requires removing the rocker arms and pushrods. Machine work can add a lot of expense to a head gasket job, so it is essential to know the extent of the damage to the cylinder head or block to calculate the cost of repairing your head gasket.
Additionally, you should note that other parts may need to be replaced when repairing a head gasket, such as other gaskets, seals, parts, or water pump.
Avoid driving with a blown head gasket as it could damage the engine.
Does a blown head gasket ruin an engine?
Yes. A blown head gasket can damage an engine. Ignoring the symptoms of a blown head gasket can lead to problems such as a coolant leak. This could damage the catalytic converter. It can cause leaks in the engine oil, erosion of lubrication, which can damage the engine.
So, can a car still run with a blown head gasket? That’s the next area we look at?
Can you drive with a blown head gasket?
No. It is not advisable to drive with a blown head gasket, as it can foul the spark plugs and make your engine inefficient due to the deposits left by burning coolant. Coolant and combustion gas leaks can lead to high temperature gradients causing erosion of the leak area and possible cracks. The hot gases and cold coolant passing through the gasket hole can erode the metal cylinder head or even the engine block. This can make the cost of repair quite high.
How long can you drive your car with a blown head gasket?
It depends if there is coolant in the oil or if the oil looks milky. Gray smoke coming out of the exhaust pipe at startup may mean that coolant is leaking into the cylinders. Coolant burning in the cylinder can lead to long-term destruction of the rings and other parts. However, if the damage hasn’t lasted too long, you can get a Bar’s leak head gasket repair and pour it into the coolant tank. Be sure to follow the instructions. This should allow you to use it for a year or more depending on the condition of the gasket. You can also get a gasket kit, which is usually not expensive. It’s difficult to remove, but not impossible, or you may need to take the head to a machine shop if it is damaged.
How to start a car with a blown head gasket?
Watch this video to see some actions to take if you are trying to start your car with a blown head gasket.
Conclusion
Head gasket failure can be prevented by avoiding overheating your engine. Check the radiator and coolant overflow tanks whenever you check your oil level. Add coolant if necessary and immediately check for any mysterious fluid loss. Check radiator hoses for cracks or fraying and replace them at the first sign of damage.
Also check for any fluid leaks under your vehicle and any strange smoke. Note that the symptoms of a blown head gasket vary from vehicle to vehicle depending on the engine and the specific way the gasket is failing. Note that the gasket may still fail despite all your efforts; you should not expect it to last forever due to its construction and the environment.
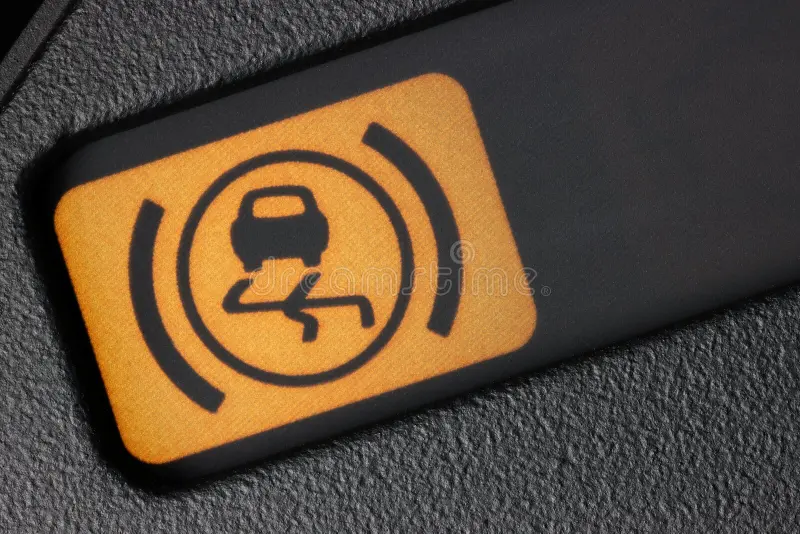
Can Worn Tires Cause the Traction Control Light to Illuminate
Worn tires are one of the most common causes of the anti-skid warning light coming on. Indeed, when tires are worn, they have less grip on the road, which can cause the wheels to skid.
When this happens, the anti-skid system kicks in and attempts to correct the problem. However, if the tires are too worn, they may not be able to do so effectively and the warning light will illuminate.
Anti-skid is an important safety feature in modern cars. It helps prevent wheels from skidding on wet or icy roads and can also help improve traction when driving on loose surfaces such as sand or gravel.
There are two main types of traction control systems: electronic and mechanical. Electronic systems use sensors to monitor the speed of each wheel and apply the brakes automatically if one starts spinning too fast. Mechanical systems use a limited-slip differential device, which allows some wheels to skid while others remain locked.
Both types of systems have their advantages and disadvantages. Electronic systems are generally more effective at preventing wheel skid, but they can be less reliable in off-road conditions where there may be a lot of dust or mud around the sensors. Mechanical systems are more likely to perform well in these conditions, but they can sometimes cause problems when cornering on dry roads, as they may cause excessive braking of the inner wheel.
Can Worn Tires Cause the Anti-Skid Warning Light to Come On?
Yes. There are several reasons why your anti-skid warning light may come on, but one of the most common is tire wear. When your tires become too bald, they cannot grip the road properly, which can trigger your anti-skid system.
This is because the system is designed to prevent you from skidding on slippery roads, so it activates when it detects that your tires do not have sufficient tread.
Does Low Brake Fluid Level Affect Anti-Skid?
One thing you don’t want to skimp on is brake fluid. A low brake fluid level can affect many systems in your car, including the anti-skid system. The anti-skid system prevents your car from skidding on wet or icy roads. If the brake fluid level is low, it can cause the system to malfunction and put you in danger.
You can take some steps to prevent this from happening. First, make sure to regularly check your brake fluid level and top it up if necessary.
If you notice changes in how your car handles slippery roads, take it to a mechanic immediately so they can check the anti-skid system. Following these simple tips can help ensure your safety on the road this winter.
What Are Two Things That Affect Traction and That You Can Control?
Traction is the force between two surfaces that allows one surface to move relative to the other. Traction can be affected by many factors, but there are two main ones you can control: tire pressure and tread depth.
Tire pressure impacts traction because it determines how much your tires contact the ground. The more contact your tires have, the more grip they will have on the road and the better your traction will be.
However, too high pressure can cause your tires to slide on wet or icy roads, so it’s important to find a balance.
Tread depth also affects traction, as it determines your tires’ ability to grip slippery surfaces. Deeper treads provide better grip than shallow treads, but they also wear out faster. This means you need to find a balance between having enough tread for good traction and not wearing out your tires too quickly.
How Do I Know If My Anti-Skid Is Broken?
There are a few things you can look for if you think your anti-skid might be broken.
Check if there is a warning light illuminated on your dashboard. If so, there is likely a problem with the system.
Another thing to check is unusual tire wear. If your tires are wearing unevenly or faster than usual, it could be a sign of a problem with the anti-skid system.
You might also notice that your car feels like it’s sliding or skidding more than usual when driving in slippery conditions; this could indicate that the anti-skid is not working properly.
Finally, listen for strange noises coming from under the hood; this could be a sign of a problem with one of the system’s components. If you notice any of these things, it’s best to take your car to a mechanic.
If your anti-skid is broken, it’s important to get it fixed as soon as possible. Otherwise, you could end up in a serious accident. Driving without anti-skid can be extremely dangerous, especially in slippery conditions.
How Long Does It Take to Repair Anti-Skid?
There is no definitive answer to this question, as the time needed to repair anti-skid can vary depending on the severity of the problem, the make and model of the vehicle. However, it generally takes a mechanic no more than a few hours to diagnose and repair anti-skid issues.
Tips
If you are experiencing problems with your anti-skid system, you should consult your owner’s manual for troubleshooting advice. If that doesn’t resolve the issue, you will need to take your car to a mechanic or dealership for more in-depth diagnosis and repairs. Be prepared to spend time and money on repairing your anti-skid system, but it will be worth it in the end!
Conclusion
There are several potential reasons why worn tires can cause the anti-skid warning light to come on in a vehicle. One possibility is that the tire tread is too low and doesn’t provide enough grip, which would trigger the warning light as an alert!
Another possibility is that there is a problem with the tire pressure sensor or another part of the system that monitors the condition of the tires. In any case, it’s important to have the issue checked by a mechanic so they can determine the exact cause and fix it accordingly.
How to Quickly Remove Dents from a Car at Home
Accidents are an unavoidable part of driving a vehicle. Even the most careful driver can have a bad day. However, minor damages can represent a financial burden if you have to take the car to a body shop every time. There are many ways to fix a dent on a car yourself at home, which will save a lot of money.
Dented Cars: How Did It Happen?
When they encounter dents on a car, most car owners immediately think of taking the car to a repair center. However, this condition can be completely corrected at home with small, shallow dents.
Car dents are likely to occur for many reasons such as collisions and falling foreign objects. For small, shallow dents, from 1 to 3 cm deep, with a not too large dented surface, drivers can fix them at home with simple solutions, but must be careful.
Whether it’s an objective or subjective factor, the car body will have a few slight dents which will lead to a loss of aesthetics.
You can completely fix it yourself at home with simple items or take it to a garage with professional methods. However, depending on each specific vehicle, body type, curvature, bumper or tire material… different treatments will need to be applied.
6 DIY Car Dent Repairs You Could Apply
With basic knowledge of solving and repairing minor car problems and a few tools, you can apply these five ways to fix a dent in a car:
1. Repair with a Plunger
This method will work for large, shallow dents on a flat surface such as the hood or door. Use a dent removal plunger for best results. Moisten its suction surface with a little water then press it onto the dent. Pull backward and repeat the process from different angles if the dent is large.
2. Use Dry Ice
This is an effective method if the dent is medium-sized. Dry ice (also known as smoke ice) is solid carbon dioxide used in food preservation and in medical pharmaceuticals. Few people know that this type of compound can effectively help repair car dents. First, the car owner should circle the dented area for more precise operation. After that, place a piece of dry ice with tongs on the area and do not keep it for more than a minute. Remove it and the dent is likely to pop out and be level with the surface. You may need to try several times. Remember to wear thick gloves and safety glasses, as touching them with bare skin would cause injuries similar to a burn.
3. Repair Dents from Behind
It is particularly useful for small depressions that would otherwise be difficult to repair with other methods. It is necessary to apply pressure to the back of the damaged area from inside the vehicle. Use your hands for larger dents, but those with a smaller diameter may need a hammer. Wrap a thick cloth around the head of a wooden mallet and tap the tapped spot with it.
4. Pull with Glue Dent Pullers
This is another way to easily remove dents. Choose a pull tab that matches or is larger than the size of the dent. Apply glue to the tab and quickly place it in the middle of the damaged area. Wait a moment for the glue to set. Now, attach a puller tool to the tab and turn the knob until the dent pops out. You will need to wax the vehicle after applying this system as the glue may create a small mess on the car body.
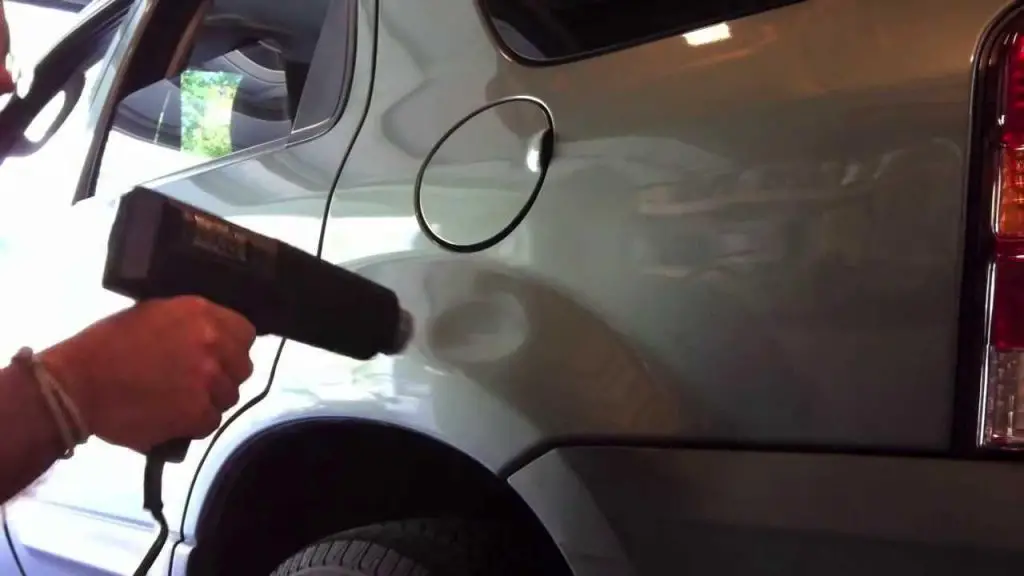
5. Repair Dents with a Hair Dryer
This will work if you want to fix a bulging spot. Use the hair dryer to apply heat to the raised area from five to seven inches away. Do this for two minutes and then check the flexibility of the metal. If it is malleable, take a can of compressed air and spray it on this area. Continue until the bulge returns to its original shape. Wipe the spot with a piece of soft cloth. Using safety glasses and gloves is necessary during this process to ensure your safety.
6. Repair Dents with Boiling Water
This method seems quite strange but is an effective way to repair car dents in the following positions: front bumper, rear bumper, and underbody, especially plastic parts… The car owner poured boiling water to expand the dent, then put their hand inside and gently pushed the dent so that it returns to its original shape. For dents in places that cannot be touched, after pouring boiling water, the driver immediately pours ice water to create a sudden temperature change to help restore the dent.
All the tools and ingredients needed for these easy dent removal processes will be available in your local retail stores. Any DIY dent repair requires caution and a bit of skill, as it will cost a lot of money if you damage the paint during the process.
Reasons why shifting from 1st to 2nd gear is difficult
The mechanism of an automatic transmission is complicated and it takes time, money, and expertise to fix it when there is a problem with this component. One of these complex problems is the difficult shift of the automatic transmission from 1st to 2nd. Even experienced mechanics struggle to find the exact reasons for this issue.
Difficult Gear Shift from 1st to 2nd: The Reasons
The gear shifting problem can persist even after replacing the fuel filter and pressure control solenoids. Sometimes it occurs when the engine is cold and you try to start it immediately without warming it up first.
Why does the automatic transmission behave this way? Here are some reasons and solutions for a difficult gear shift from 1st to 2nd:
Dirty Transmission Fluid
The fluid gets dirty over time, and when this happens, it causes many problems. Difficult gear shifts are among them. If the color is dark brown or burnt, changing it will likely solve this issue.
There is a recommended schedule in the owner’s manual for changing the fluid.
However, if the fluid changes color too often, the transmission is wearing out faster than normal. It could be a faulty bearing or clutch, so check these components if you need to change the fluid frequently.
Low Fluid Level
The fluid can drop below the normal level due to a leak somewhere in the pan gasket or in the input and output shaft seals.
Replacing these seals can be expensive because of their location inside the transmission. Instead, use a transmission sealant to repair the bent or shrunken seal(s).
This is a simple and less expensive solution that remains in the system until the next fluid change.
Faulty Components
Another reason why the transmission shifts from 1st to 2nd is that some components are faulty. It could be a cracked O-ring or a broken spring on the piston. Replacing them is the simplest way to get the gearbox back in order.
To replace these components, you need to remove the pan and the gasket. There is a cap on the right side of the transmission.
Detach the cap by removing the bolts attached to it. Then, remove the valve body. If the black transmission seal is already damaged or broken, you need to replace it.
The cap has a piston and a spring. Check their condition and the piston seal for any damage. If yes, replace them. If they are fine, proceed and inspect the valve’s second spring.
Clean or change this spring and reassemble all the components to put the transmission back together.
If you haven’t already changed the fluid and replaced the filter, do so while changing these parts. Otherwise, just keep the filter in a bag while you change the O-ring or spring, then reinstall it.
FAQ on Difficult Gear Shifting
What role does transmission fluid play in smooth shifting?
Transmission fluid lubricates and cools the moving parts inside the transmission while also providing hydraulic pressure to engage the gears. Low or degraded transmission fluid can lead to difficult gear shifts and other transmission problems.
Can a clogged transmission filter cause difficult gear shifts?
A clogged transmission filter can hinder the flow of transmission fluid, leading to a drop in hydraulic pressure. This can result in difficult gear shifts as the transmission struggles to engage gears smoothly.
Is a difficult gear shift always a sign of a serious transmission problem?
Not necessarily. While a harsh shift can indicate transmission issues, it doesn’t always mean a major problem. It can sometimes be resolved with routine maintenance, such as changing the transmission fluid and filter.
Can driving habits affect gear shifting?
Yes, aggressive driving habits, such as rapid acceleration or sudden deceleration, can put extra strain on the transmission and potentially lead to difficult gear shifts over time. Gentle driving can help prolong the transmission’s lifespan.
How can I handle difficult shifts from 1st to 2nd gear?
If you experience difficulty shifting gears, start by checking the transmission fluid level and condition. Ensure it is at the proper level and not discolored or burnt.
If the fluid is good, it is advisable to have the vehicle inspected by a qualified mechanic who can diagnose and fix the underlying issue.
Are difficult gear shifts covered by my vehicle’s warranty?
Whether difficult gear shifts are covered by your warranty depends on the specific terms and conditions of your warranty coverage.
Typically, powertrain warranties may cover transmission-related issues, but it’s important to consult your warranty documentation or contact the manufacturer or dealer for clarification.
Can a transmission flush help with difficult shifting?
In some cases, a transmission flush can help improve shifting performance by replacing old fluid with new fluid.
However, it’s essential to consult a professional technician to determine if a flush is appropriate for your vehicle’s specific situation.
Are there DIY solutions for difficult gear shifts?
While routine maintenance tasks such as checking and topping up transmission fluid can be DIY, diagnosing and repairing difficult shifting issues often requires specialized knowledge and equipment.
It is generally best to consult a qualified mechanic for proper diagnosis and repair.
Final Words
These are the most common reasons for the difficult gear shifting problem. However, if changing the fluid and replacing these parts do not solve the issue, you should take the car to a repair shop for a professional check-up.
How to unlock the door of a Toyota Camry without a key
I understand why you’re here, it’s probably because you’ve lost the keys to your Toyota Camry car or trunk, and now you’re looking for how to unlock the Toyota Camry door without a key. Well, that’s pretty much what we’re going to discuss in this article. We’re also looking at different methods to unlock your trunk and your Camry vehicles, usually without using the internet.
How to unlock a Toyota Camry door without a key
Yes, you and I know how annoying and stressful it is to lose your vehicle keys. However, it’s reassuring to know that you can still unlock or open your car door or Toyota trunk using a small object, a metal wire, or a coat hanger. So we’ll start first with how to unlock a Toyota Camry door without a key.
Although you must keep in mind that you risk damaging your vehicle’s door by doing this, I would recommend calling a locksmith to unlock the vehicle for you. And if you still want to unlock or open your car yourself, here are the steps to unlock a Toyota Camry without a key:
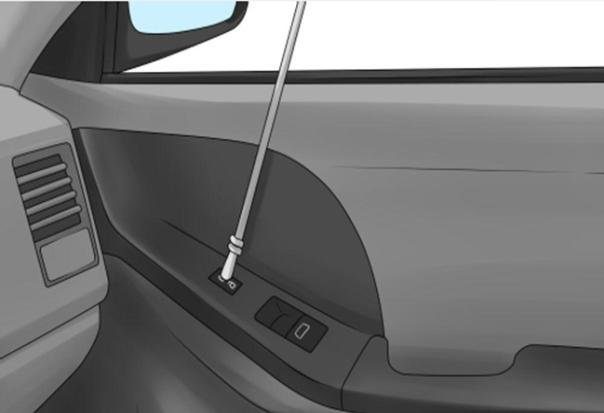
First, wrap a flat-head screwdriver or a screwdriver in a towel and insert it between the slightly cracked spot or right next to the door and the frame on the driver’s side of the vehicle.
Or insert a small wedge between the door frame and the front driver’s side panel of your Camry.
The screwdriver can be used to open the door by gently pressing on the door lock, but be careful not to damage the locking mechanism or the frame.
You can use another screwdriver or a wedge to open the door.
Insert a steel coat hanger or another long, rigid cable between the door frame and the door.
Use the coat hanger or the small metal wire to unlock your car’s keypad
Before opening the door, carefully remove the metal wire or coat hanger and also remove the wedges. You can now open the door.
How to unlock a Toyota Camry trunk without a key
I understand that you don’t necessarily want to spend a lot of money to unlock your trunk without losing the keys. So the techniques I’ve presented here will be very useful to you, and they won’t allow you to damage your trunk or your car door.
First technique:
Remove the left screw from the Toyota Camry’s license plate.
The screwdriver will be visible in the hole. You can either insert the screwdriver or push it through the hole.
The tip of the tool can be used to locate the hook in the trunk. Using your tool, remove it.
Once the trunk is open, the next step is to access the passenger compartment. This is done by releasing the seatback latch. You will find the latch in the section of each folded seat that is near the top edge of the trunk cavity.
Use a screwdriver to release a latch. Place it from the trunk on the left side and lift it into the open position.
When the latch opens, you’re done. This will allow you to access the passenger compartment and unlock the trunk.
Second technique:
You must first use adhesive tape to cover the edges of your trunk door. This will ensure your car’s paint doesn’t get scratched.
The plastic cap located at the top of the driver’s door must be removed. You just need to remove it.
Use the screwdriver to loosen the screw.
Pull the door handle to reach the key cylinder.
Remove the key cylinder and the wafers.
Use the screwdriver to push the +-shaped wafers into the pocket. Turn the screwdriver.
Once you have retrieved your keys, please put all the items back in their place. Once you’re done putting everything back, securely screw the handle back on.
Third technique:
If the rear seats of your Toyota Camry are foldable, this technique only applies to you.
You should check if your seats are foldable.
The hooks are located on the rear side of the back seat.
These hooks will allow you to remove the seat lock.
Fold down the rear seats.
Take your trunk.
The hook is located near the trunk lock.
Now, the trunk can be opened.
This article will solve your problem. You can now open your trunk easily if you have forgotten or lost your keys. It is common for people to forget their keys, which can lead them to have to deal with different problems. You can unlock your trunk using one of these methods. You need to familiarize yourself with how to use screwdrivers properly before delving into this and ensure they are gentle. These techniques must be used with patience. We all know that rushing is a waste. If you need professional help,
Here are some tips that can help you remember your keys wherever you go.
Tips to avoid losing your keys
Before you leave:
Before leaving your home, office, or public space, always check your wallet. This will remind you not to forget your keys.
Use keychains:
Keychains are a great way to organize your keys. You don’t need a keychain to keep your keys safe. You very often risk losing your keys. Keychains are a great way to have your keys at hand.
Keep spare keys handy:
You can buy spare keys for your car if you have often lost your keys. These spare keys can be used to open your car doors and trunk in case of loss. You won’t need to resort to these methods to open your trunk. These methods are tedious and time-consuming.
Bluetooth Trackers
It’s the age of technology. Make the most of this technological advancement. A Bluetooth tracker can be used to help you locate your keys and also serve as a reminder. You can also use a Bluetooth tracker to locate your keys and remind you where they are.
Many gadgets emit a loud sound that alerts you if you leave the keys behind. These gadgets can be used to help you.
Key holders:
You can find many holders available to hang your keychains and decorate your walls. These holders will be your only spot for the keys. This will reduce the risk of misplacing or losing your keys.
Use drawers:
Most people use drawers to store their important items. To keep your rings safe, you can use the drawer. You can always use your drawer to store your rings, but make sure you have removed all the extra material.
It’s harder to find the keys if there are a lot of things in your drawer.
In this section, we will address the P0299 error and provide you with a comprehensive guide to resolve underboost issues related to your vehicle’s turbocharger. We will present you with practical solutions and expert advice to help you fix this problem.
Key Points to Remember
The P0299 error is related to underboost of the turbocharger in your vehicle.
Common symptoms of turbocharger underboost may include loss of power, increased fuel consumption, and abnormal turbocharger noise.
To properly diagnose the P0299 error, it is essential to follow the recommended diagnostic steps.
Common causes of the P0299 error can include air leaks, boost pressure sensor problems, and exhaust restrictions.
Follow our practical solutions to resolve the P0299 error, based on the underlying cause.
Understanding the P0299 Error
To effectively resolve the P0299 error, it is essential to understand its causes and its impact on your vehicle’s turbocharger pressure. In this section, we will explain in detail the likely reasons for this error and why it can lead to turbocharger underboost.
The P0299 error, also known as “turbocharger underboost error,” occurs when your vehicle’s turbocharger does not provide the necessary amount of air to maintain proper pressure in the boost system. This can result in decreased performance, increased fuel consumption, and other mechanical issues.
The potential causes of the P0299 error can be multiple. It could be a malfunction of the turbocharger pressure sensor, a problem with the turbocharger wastegate, an air leak in the boost system, or other factors related to engine management.
Understanding these causes is essential to effectively resolve the P0299 error. By knowing the likely reasons for this error, you can take the necessary steps to repair your vehicle.
It is important to note that understanding the P0299 error does not replace a professional diagnosis. If you are unsure of the cause of this error or do not feel comfortable performing the necessary repairs, it is always recommended to consult a qualified mechanic.
Symptoms of Turbocharger Underboost
Your vehicle may exhibit several symptoms indicating turbocharger underboost. It is essential to recognize these signs to properly diagnose the problem. Here are some common symptoms that may alert you:
Loss of Power: You may notice a decrease in your engine’s power. Your vehicle may seem less responsive during acceleration or have difficulty maintaining a constant speed.
Excessive Smoke: If you observe black or blue smoke coming from the exhaust, this may be a sign of turbocharger underboost. This indicates that the turbocharger is not providing the correct amount of air to the engine.
Excessive Fuel Consumption: Turbocharger underboost can lead to increased fuel consumption. You might notice that you need to refuel more frequently than usual.
Abnormal Noises: Unusual noises coming from the engine compartment may indicate an underboost problem. Listen carefully for whistling, rattling, or strange rumbling sounds.
It is important to note that these symptoms can also be caused by other mechanical problems. Therefore, it is recommended to consult an automotive mechanic expert for an accurate diagnosis.
Diagnosing the P0299 Error
To effectively resolve the P0299 error, it is essential to properly diagnose the problem. Follow these diagnostic steps to determine the underlying cause of the P0299 error:
Check Error Codes: Use an automotive diagnostic tool to read the error codes stored in your vehicle’s onboard computer. Note all relevant codes to facilitate the diagnostic process.
Examine Symptoms: Identify the specific symptoms accompanying the P0299 error, such as loss of power, black smoke, or slow acceleration. This information can provide important clues about the cause of the problem.
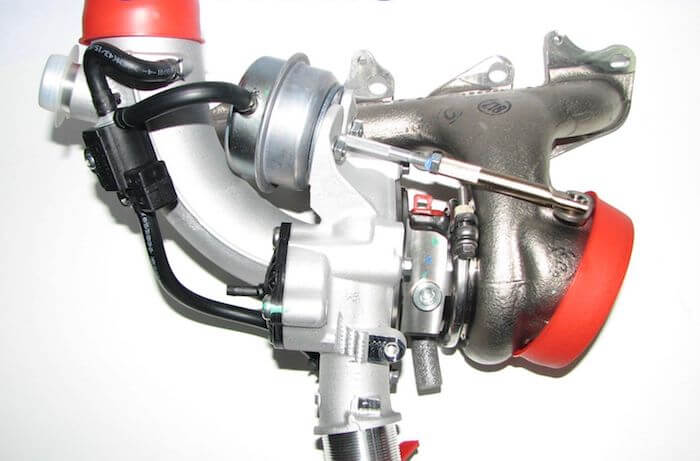
Check Boost System Components: Visually inspect the components of the boost system, such as the turbocharger, wastegate, and air lines. Look for signs of leaks, damage, or malfunctions that could cause underboost.
Check Turbo Pressure: Use a pressure gauge to measure the turbocharger pressure. Compare the readings with the manufacturer’s recommended specifications to determine if the pressure is within the normal range.
Examine Sensors: Check the sensors associated with the boost system, such as the Manifold Absolute Pressure (MAP) sensor and the boost pressure sensor. Ensure they are functioning correctly and sending accurate signals to the onboard computer.
Once you have performed these diagnostic steps, you will be able to more effectively target the underlying cause of the P0299 error. This will facilitate finding the appropriate solution to resolve this turbocharger underboost problem.
Common Causes of the P0299 Error
The causes of the P0299 error can vary from one vehicle to another. In this section, we will present the common causes of this error and explain in detail why they can lead to turbocharger underboost. Understanding these causes will help you more effectively target the appropriate solution.
1. Air Leak in the Intake System
An air leak in the intake system can lead to a loss of pressure, triggering the P0299 error. Faulty seals, cracked hoses, or leaks at connections can compromise the intake system’s seal. Air can escape before reaching the engine, resulting in turbocharger underboost.
2. Turbocharger Pressure Sensor Malfunction
The turbocharger pressure sensor is responsible for measuring the pressure generated by the turbocharger. A malfunction of this sensor can lead to a measurement error, which can trigger the P0299 error. If the sensor indicates a pressure lower than the actual pressure, the engine management system may think there is turbocharger underboost.
3. Turbocharger Clogging or Malfunction
Clogging of the turbocharger due to carbon deposit buildup or a mechanical malfunction can lead to a loss of turbocharger efficiency. This can cause underboost and trigger the P0299 error. Clogging can be caused by insufficient lubrication, unsuitable driving conditions, or prolonged use at low speeds.
4. Fuel or Injection System Problems
Problems with the fuel or injection system can disrupt the proper functioning of the engine and cause turbocharger underboost. A poor air-fuel mixture, a clogged fuel filter, or dirty injectors can impact engine power and lead to the P0299 error.
5. Poor Vehicle Maintenance
Insufficient vehicle maintenance, such as skipping regular oil changes, not replacing dirty air filters, or lack of cleaning the intake system, can cause problems that lead to turbocharger underboost. Poor maintenance can also contribute to other causes mentioned previously, thus worsening the P0299 error.
It is essential to properly diagnose the specific cause of the P0299 error to effectively resolve the turbocharger underboost problem. By understanding these common causes, you will be able to take the necessary steps to resolve the error and maintain your vehicle’s proper functioning.
Practical Solutions to Resolve the P0299 Error
Now that you have identified the cause of the error, it is time to move on to practical solutions to resolve the P0299 error related to your vehicle’s turbocharger underboost. In this section, we will offer you several methods and expert tips to help you fix this problem.
Check Turbocharger Hoses and Connections
One of the common causes of the P0299 error is an air leak in the turbocharger hoses or connections. Carefully check these components for any breaks, leaks, or disconnections. If you find a problem, repair it or replace the defective parts according to your vehicle manufacturer’s recommendations.
Clean the Air Intake System
Excessive carbon or dirt buildup in the air intake system can lead to turbocharger underboost. Regularly clean the air intake system with appropriate cleaning products to remove deposits and ensure optimal airflow. Follow the cleaning product manufacturer’s instructions and take the necessary safety measures.
Check Sensors and Solenoids
Faulty sensors and solenoids can also cause the P0299 error. Check the condition of these components and replace them if necessary. Be sure to choose high-quality replacement parts compatible with your vehicle. Perform the required adjustments and calibrations after replacing sensors or solenoids.
Check the Turbocharger Condition
A damaged or worn turbocharger can cause underboost and trigger the P0299 error. If all other solutions fail, it may be necessary to have the turbocharger condition checked by an automotive mechanic expert. If the turbocharger is defective, it will need to be repaired or replaced according to the professional’s recommendations.
Perform Engine Tuning or Reprogramming
Sometimes, the P0299 error can be resolved by performing engine tuning or reprogramming. Consult a qualified and experienced mechanic to perform this operation. Be sure to choose a trusted professional who has the knowledge and tools necessary to perform proper engine tuning or reprogramming.
Practical Solutions to Resolve the P0299 Error
Description
Check Turbocharger Hoses and Connections
Check the turbocharger system components for leaks or breaks and perform appropriate repairs or replacements.
Clean the Air Intake System
Remove carbon or dirt deposits in the air intake system to optimize airflow.
Check Sensors and Solenoids
Check the condition of sensors and solenoids and replace them if necessary.
Check the Turbocharger Condition
Have the turbocharger checked by a professional if the problem persists.
Perform Engine Tuning or Reprogramming
Consult a qualified mechanic to perform engine tuning or reprogramming if necessary.
Follow these practical solutions step by step to resolve the P0299 error and put an end to your vehicle’s turbocharger underboost. Keep in mind that some solutions may require technical knowledge and specific skills, so do not hesitate to call a professional if you have doubts or difficulties during repairs.
Preventing the P0299 Error in the Future
To prevent the P0299 error from recurring in the future and to maintain your turbocharger’s proper functioning, it is essential to take appropriate preventive measures. Here are some tips and recommendations to help you:
Use high-quality engine oil and adhere to the oil change intervals recommended by the manufacturer. Proper lubrication of the turbocharger reduces the chances of underboost.
Regularly check the condition and functioning of your air intake system. Leaks or obstructions can lead to a loss of pressure in the turbocharger.
Ensure your vehicle is fueled with quality fuel and use fuel suitable for the turbo engine. Poor-quality fuels can damage the turbocharger and cause errors.
Avoid over-revving and aggressive driving that can lead to turbocharger overheating. Follow the manufacturer’s recommendations regarding driving and speed limits.
If you notice symptoms of turbocharger underboost, such as loss of power or abnormal noises, immediately consult a qualified mechanic to diagnose and resolve the problem before it worsens.
Preventing the P0299 error requires regular attention to your vehicle’s maintenance and observing signs of underboost. By taking these preventive measures, you can avoid the inconveniences associated with this error and preserve your turbocharger’s performance in the long term.
Prevention Measures
Benefits
Use high-quality engine oil and adhere to recommended oil change intervals
Adequate lubrication reduces the risk of underboost
Regularly check the condition and functioning of your air intake system
Prevents leaks or obstructions that affect turbocharger pressure
Use quality fuel suitable for the turbo engine
Avoids damage to the turbocharger
Drive responsibly and avoid over-revving
Prevents turbocharger overheating
Consult a qualified mechanic in case of underboost symptoms
Avoids serious problems related to the P0299 error
Turbocharger Maintenance Tips
Regular maintenance of the turbocharger is essential to extend its lifespan and avoid underboost problems. Here are some practical tips to keep your turbocharger in good working order:
1. Adhere to Oil Change Intervals
Clean, quality oil is crucial for the proper functioning of the turbocharger. Ensure you adhere to the oil change intervals recommended by your vehicle manufacturer. This will guarantee optimal lubrication of the turbocharger and prevent the accumulation of harmful deposits.
2. Use Quality Fuel
Poor-quality fuel can damage your turbocharger. Be sure to use only quality fuel from reputable gas stations. Also, avoid letting the fuel tank run completely empty, as this can lead to dirt and debris being drawn into the fuel system.
3. Let the Engine Idle Before Shutting It Off
Before turning off your vehicle’s engine, let it idle for a few minutes. This will allow the turbocharger to cool down gradually, thus avoiding a sudden oil cutoff that can damage internal components.
4. Avoid Sudden Acceleration and Over-Revving
Sudden acceleration and over-revving can subject your turbocharger to excessive stress, increasing the risk of damage. Drive responsibly by avoiding violent gear changes and excessive acceleration.
5. Have Your Turbocharger Regularly Inspected by a Professional
To ensure your turbocharger is functioning correctly, it is recommended to have it regularly inspected by a professional. They can detect potential problems before they become more serious and costly to repair.
Following these maintenance tips for the turbocharger will help you keep your boost system in good working order and prevent P0299 errors. Remember that regular maintenance is the key to a high-performing and reliable turbocharger.
Consult an Automotive Mechanic Expert
If you do not feel comfortable resolving the P0299 error yourself, it is always recommended to seek the help of an automotive mechanic expert. Resolving turbocharger underboost problems can be complex and requires in-depth knowledge of automotive mechanics. Industry experts have the experience and expertise necessary to effectively diagnose and resolve the P0299 error.
Consulting an automotive mechanic expert offers many advantages. First, a qualified professional will be able to quickly identify the underlying cause of the P0299 error, saving you time and avoiding diagnostic errors. Furthermore, they will be able to propose solutions tailored to your specific vehicle, using specialized tools and equipment to perform the repairs.
To find the right mechanic, it is recommended to search for trusted professionals in your area. You can ask for recommendations from friends, family, or other vehicle owners who have encountered similar problems. Take the time to check online reviews and inquire about the experience and qualifications of potential mechanics.
Once you have identified a few potential mechanics, schedule a consultation. Use this opportunity to ask questions about their experience and problem-solving approach. A good mechanic will be transparent, communicative, and provide you with clear estimates
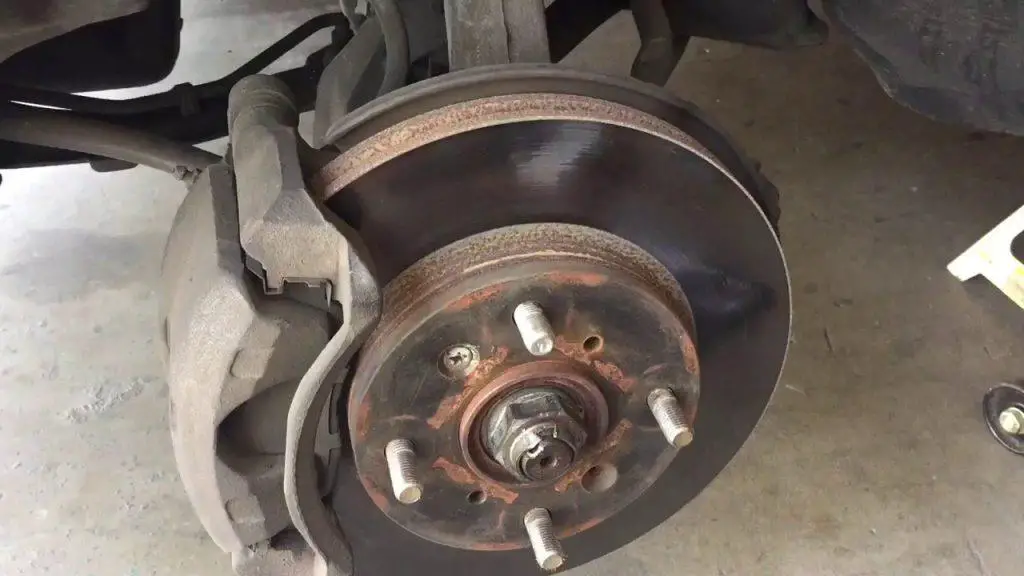
Everything you need to know about rotor thickness
Many people have stated that measuring rotor thickness is an important aspect of brake repair. But why is that? And what is the best time to check rotor thickness and how to do it? Let’s find out the answer right now in this blog with the automotive experts from CarFromJapan.
Important Things to Know About Rotor Thickness
In the past, most rotors were designed with sufficient thickness to allow for 02 or more brake pad replacements. Nowadays, to reduce weight and save on some costs, many car manufacturers often produce rotors with thinner thicknesses. Consequently, rotors are prone to wear down to the minimum thickness (which is usually indicated in the factory maintenance manual or on the rotor casting) by the time the first set of brake pads needs to be replaced – or perhaps even sooner in some situations.
Knowing the minimum rotor thickness of your car is very important to avoid any car accidents. (Photo: YouTube)
Knowing your vehicle’s minimum rotor thickness is very important because if your car’s rotor thickness is below the minimum level, your safety will be compromised. A worn or thinner rotor has less mass than a normal rotor, leading to a decrease in its ability to absorb and dissipate heat. Furthermore, the rotor’s strength is also diminished, resulting in more risks of cracking, or even braking failure.
For this reason, it is essential to check the rotor thickness during brake pad maintenance. If a rotor’s thickness is below the minimum specifications or cannot be resurfaced, we must replace the rotor immediately. In some regions, this is the law.
All vehicle rotors typically undergo the same wear. Therefore, when it comes to replacing a worn rotor, it means you need to replace both rotors on the vehicle. Automotive experts advise changing both rotors simultaneously (even if one of them is still functioning well) to maintain even braking from side to side. A noticeable difference in rotor thickness can cause the brakes to pull to one side.
When to Check Rotor Thickness?
Checking rotor thickness should be done whenever you replace the brake pads or before resurfacing the rotors. This will ensure that the rotors contain enough metal for safe braking. It is good practice to do this every time you change the brake pads, regardless of the interval between changes. The checking process takes you less than 5 minutes and is a good safety measure to consider.
How to Measure Rotor Thickness?
Measuring rotor thickness should be done whenever the brake pads need to be replaced.
When it comes to measuring rotor thickness, you just need to follow the detailed testing procedure found in any factory maintenance manual. Most procedures often indicate that you can simply use a micrometer to measure the rotor thickness, at 8 to 10 different locations. During measurement, keep a distance of about 45 feet and 10 mm from the edge of the rotor. It is important to note that all readings must be greater than the required minimum thickness. Furthermore, it must in no case exceed the minimum brake parallelism values indicated in the manual’s list. This is mandatory to ensure consistent and smooth braking performance.
After that, here is the proper guide for measuring rotor thickness:
First, depending on which rotors the drivers want to measure, you may need to lift the rear or front of the automobile. After that, the car owner can use the jack stand, a tool that must be used to secure the car.
Second, it’s time to remove the wheel nuts to take off the wheels. And then remove the brake pads. Remember to give the braking surface a good look: you want that spot to be clean and smooth, without cracks and without any visual damage.
Third, drivers need to measure the brake disc thickness. It is located inside the outer circumference of the rotor every eighth of a rotation.
Finally, car owners check the rotor to see if it matches the minimum thickness. Otherwise, you must replace it.
Brake Disc Thickness Chart;
Passenger Cars and Light Trucks
Heavy Trucks and SUVs
Minimum Front Rotor Thickness
Generally between 10 mm (0.394 inches) and 28 mm (1.102 inches).
Between 28 mm (1.102 inches) and 38 mm (1.496 inches).
Minimum Rear Rotor Thickness
Generally between 8 mm (0.315 inches) and 20 mm (0.787 inches).
Between 20 mm (0.787 inches) and 30 mm (1.181 inches).
Related Questions and Answers
1. What is the Average Lifespan of Rotors?
Many factors affect the average lifespan of your brake components. These include the type of brake pads, rotors, your driving style, and your maintenance. According to most companies producing brake pads and qualified mechanics, brake pads can last from 30,000 miles to 70,000 miles. The lifespan of brake rotors is much longer (3 times longer than that of pads). But again, all depend on many other factors such as how you maintain your braking system and your driving conditions.
2. How Much Do New Rotors Cost?
The average cost of new rotors varies from $30 to $75 each. Some higher-performance rotors can cost you over $100 each. Furthermore, prices heavily depend on many other factors such as type, brand, and quality.
When it comes to replacing brake rotors, some people often wonder whether they should buy aftermarket parts or Original Equipment Manufacturer (OEM) parts. Aftermarket and OEM parts have their own advantages. For example, aftermarket parts are generally cheaper and available in a wide range of options, while OEM parts are easier to choose and offer better quality assurance and come with a warranty.
3. Can I Drive with Faulty Rotors?
Rotors play a crucial role in allowing your car to stop once it is in motion. If the rotors are not functioning well, you may not be able to stop your car properly in an emergency. This can lead to many dangers if you need to stop to avoid pedestrians, a bicycle, a car accident, or other driving situations. Therefore, when you find that your brakes are not working as they should, you need to take your car to a mechanic for inspection as soon as possible.
Tell-tale Signs of Low Engine Oil and How to Fix It
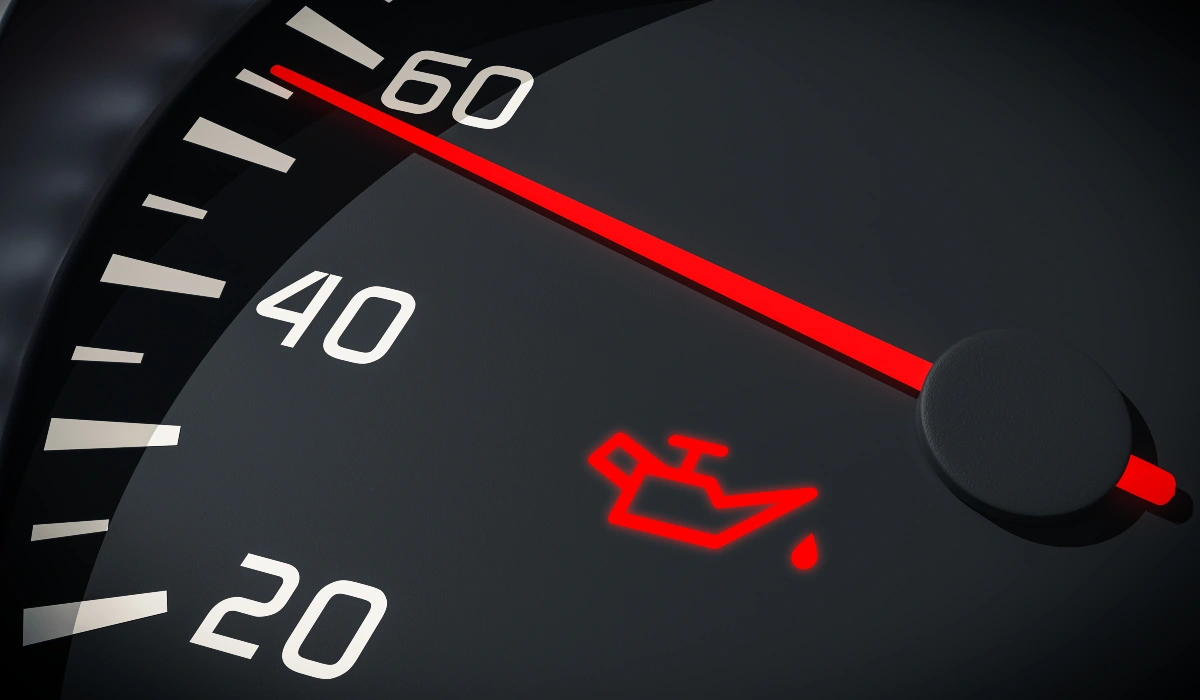
Engine oil is a vital element for the proper functioning of your vehicle. It lubricates the moving parts of the engine, reduces friction and wear, and helps maintain an optimal temperature. A low engine oil level can cause serious damage to the engine, so it is important to regularly check the oil level and top it up if necessary.
Signs of low engine oil:
Engine oil warning light on: The engine oil light is a red or orange warning light on the dashboard. It illuminates if the oil level is low or if the oil pressure is insufficient.
Engine noise: A lack of oil can cause a knocking or rattling noise coming from the engine. This noise is caused by metal parts rubbing against each other without adequate lubrication.
Loss of power: If the engine is not properly lubricated, it may lose power and performance.
Blue smoke from the exhaust: Blue smoke from the exhaust can be a sign that engine oil is burning in the combustion chamber.
Engine overheating: A lack of oil can lead to engine overheating.
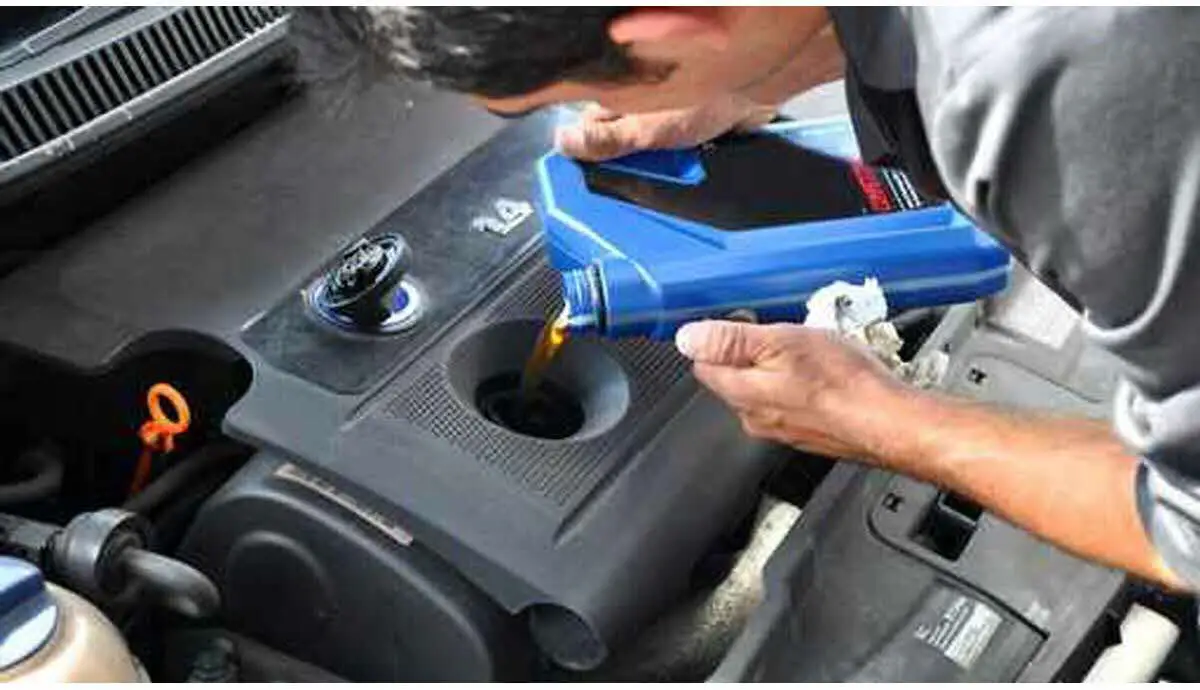
How to remedy low engine oil:
Check the oil level: The first thing to do is check the oil level using the dipstick. The oil level should be between the “MIN” and “MAX” marks on the dipstick.
Top up the oil: If the oil level is low, top it up with oil of the same viscosity as that recommended by the vehicle manufacturer.
Look for the cause of the problem: If the oil level drops regularly, it is important to find the cause of the problem. It could be an oil leak, excessive engine wear, or a cylinder head gasket issue.
Tips to prevent low engine oil:
Check the oil level regularly: It is advisable to check the oil level at least once a month.
Change the oil regularly: Engine oil should be changed regularly according to the vehicle manufacturer’s recommendations.
Use a quality oil: Use a quality oil that meets the vehicle manufacturer’s specifications.
Monitor signs of engine wear: If you notice signs of engine wear, such as unusual noises or loss of power, have your vehicle inspected by a mechanic.
Common causes of low engine oil
There are several possible causes for low engine oil:
Oil leaks:
Faulty cylinder head gasket: This is one of the most common causes of oil leaks. The cylinder head gasket is a gasket located between the cylinder head and the engine block. If it is faulty, it can allow oil to pass between the two parts.
Faulty oil seals: Oil seals are seals located on the transmission shafts and crankshafts. If they are faulty, they can allow oil to leak outside the engine.
Cracked oil pan: The oil pan is the reservoir that holds the engine oil. If it is cracked, there can be an oil leak.
Loose oil filter: If the oil filter is not properly tightened, there can be an oil leak.
Engine wear:
Worn piston rings: Piston rings are metal rings located on the pistons. They help keep oil in the combustion chamber and prevent exhaust gases from entering the crankcase. If they are worn, they can allow oil to pass into the combustion chamber, where it will be burned.
Worn cylinders: Cylinders are the bores in which the pistons move. If they are worn, they can allow oil to pass into the combustion chamber.
Worn valve guides: Valve guides are parts that guide the valves in the engine. If they are worn, they can allow oil to pass into the combustion chamber.
Other causes:
High oil consumption: Some engines naturally consume more oil than others. If your engine consumes a lot of oil, it is important to monitor it regularly and top it up if necessary.
Poor oil change: If the oil change is not performed correctly, used oil may remain in the engine. This used oil can degrade and cause problems, such as the formation of sludge and deposits.
Tips to prevent low engine oil:
Check the oil level regularly: It is advisable to check the oil level at least once a month.
Change the oil regularly: Engine oil should be changed regularly according to the vehicle manufacturer’s recommendations.
Use a quality oil: Use a quality oil that meets the vehicle manufacturer’s specifications.
Monitor signs of engine wear: If you notice signs of engine wear, such as unusual noises or loss of power, have your vehicle inspected by a mechanic.
By following these tips, you can avoid problems related to low engine oil and ensure the longevity of your vehicle.