Has your vehicle recently been faced with a bothersome check engine light, caused by an active P0328 fault? If so, you’re probably asking yourself many questions about the meaning of this fault and how to proceed.
Continue reading to find out exactly what a P0328 code means, its probable causes, its severity, and most importantly, how to fix it.
What does the P0328 code mean?
OBD-II Trouble Code P0328 Description
Knock Sensor 1 – Circuit High Input (Single Sensor or Bank 1)
The P0328 diagnostic trouble code indicates a high input voltage condition present in a vehicle’s knock sensor circuit. In the case of this specific DTC, the fault in question refers to the Bank 1 knock sensor, if the vehicle in question is equipped with a “V” configuration engine.
This feedback indicates a general anomaly within this sensor’s monitoring circuit, calling into question the accuracy of the monitoring.
To better understand this principle, one must first understand how a knock sensor works. Generally speaking, the knock sensor is designed to detect pre-ignition “ping” or “knock,” thereby allowing for spark timing retardation in response.
Sensors of this type also tend to detect other acoustic anomalies, such as those associated with rod knock or piston slap.
In the case of DTC P0328, the vehicle’s ECU has determined that the input voltage from the Bank 1 knock sensor has exceeded its intended operating threshold.
Most knock sensors operate on a 5-volt reference circuit, meaning the out-of-spec voltage in question would have remained in the high end of this spectrum for a prolonged period.
The P0328 diagnostic trouble code, in itself, does not solely indicate a faulty knock sensor, nor an actual pre-ignition event, although the possibility of either should not be overlooked.
In many cases, a short circuit condition is actually responsible for a fault of this nature, which places increased importance on meticulously checking the integrity of the related circuit.
Symptoms of the P0328 Code
The P0328 trouble code is often accompanied by a multitude of secondary symptoms, a few of which can be quite noticeable. Recognizing these signs often proves essential when attempting to speed up the overall diagnostic and repair process.
Here are some of the most common symptoms associated with DTC P0328.
- Illuminated Check Engine Light
- Abnormal Engine Noises (Knocking/Rattling)
- Reduced Engine Performance
- Irregular Idle
Causes of the P0328 Code

The P0328 diagnostic trouble code can be caused by one of several underlying issues, some of which tend to be easier to isolate than others. Understanding these potential causes can save time and effort when attempting to establish a solid diagnosis.
Here are some of the most common causes of a P0328 code.
- Faulty Knock Sensor
- Damaged Knock Sensor Circuit Wiring
- Interference in the Knock Sensor Signal
- Fuel with Poor Octane Rating
- Incorrect Fuel Pressures
- Internal Engine Damage
- PCM Failure
Is the P0328 Code Serious?
The P0328 diagnostic trouble code is generally considered to be rather serious in nature, due to some of the potential underlying problems that such a fault often signifies.
In the “best-case scenario,” the vehicle’s knock sensor might simply be faulty, or the electrical circuit for this sensor could be compromised. On the other hand, however, actual knock could truly exist, indicating a much more severe condition.
Even if the detected “knock” or “ping” is strictly the product of pre-ignition, prolonged operation in this state can eventually lead to accelerated engine wear or engine damage.
This stems from the simple fact that pre-ignition indicates combustion that is not ideal or optimally efficient. This, in turn, places excessive stress on a number of internal engine components.
In any case, the root cause of a vehicle’s P0328 trouble code must be carefully diagnosed and repaired as soon as possible. This will most likely prevent further engine damage. If you do not feel comfortable performing such repairs yourself, schedule an appointment with a trusted automotive service center at your earliest convenience.
Regardless of the specifics, diagnosing and resolving the underlying issue causing the P0328 trouble code in your vehicle should be a top priority. Taking prompt action can help prevent any risk of engine damage.
If you lack the necessary skills or tools to resolve this issue yourself, schedule an appointment with a reputable repair shop as soon as possible.
How to Fix the P0328 Code
You can identify and resolve the issue triggering the P0328 code in your car by following these troubleshooting steps. But before performing any repairs yourself, always consult the factory service manual for your exact make and model.
#1 – Check for Additional DTCs
Before beginning the diagnostic process, use a scan tool to check for any additional DTCs. All logged codes should be carefully diagnosed before continuing.
#2 – Inspect the Knock Sensor/Mounting
Start by carefully inspecting your vehicle’s knock sensor for any signs of damage. Likewise, the knock sensor itself should be checked for proper mounting and mounting tightness before continuing.
#3 – Check Wiring Condition
Next, all wiring related to the affected knock sensor should be carefully inspected for any signs of damage. Along the same lines, the knock sensor connector should be checked to ensure it is tight and free of corrosion.
#4 – Check Engine Integrity
At this point, it will be necessary to verify that your vehicle’s engine has not suffered any type of internal mechanical failure. Check engine coolant and oil levels by carefully checking for mixing of these two fluids.
Next, start the engine, revving it several times while listening carefully for abnormal noises. Any abnormal noise heard should be thoroughly investigated.
#5 – Check Freeze Frame Data
If no other issues are apparent, analyze the freeze frame data related to this fault. Check all knock sensor-related PIDs for obvious irregularities. If possible, replicate the conditions represented.
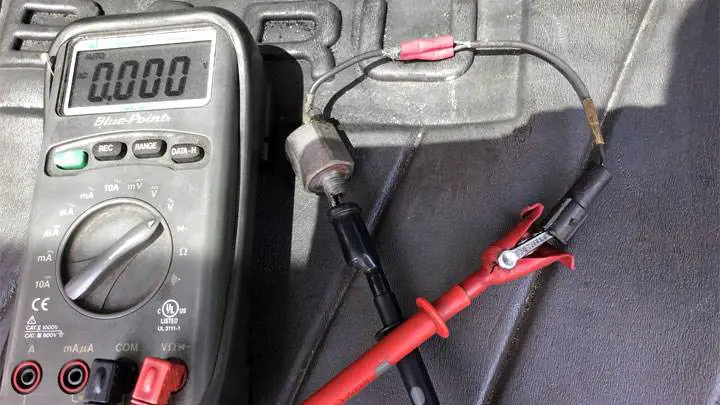
#6 – Test the Knock Sensor with a Meter
Although directly testing a knock sensor can be tricky, a few tests can be performed to check the sensor’s general functionality.
A multimeter can be used to measure between the 2 wires connected to this sensor while checking for continuity. A lack of continuity would indicate a faulty sensor.
Furthermore, these two wires can be back-probed and checked individually with the positive lead of a multimeter, while grounding them to a reliable ground. Ideally, the output of such a sensor should be between 0V and 4.9V.