Definition of Code P0119
The trouble code P0119 is a generic OBD-II code from the powertrain group. It indicates a problem with the Engine Coolant Temperature (ECT) sensor circuit, manifesting as an intermittent or erratic signal sent to the engine control module (PCM or ECU).
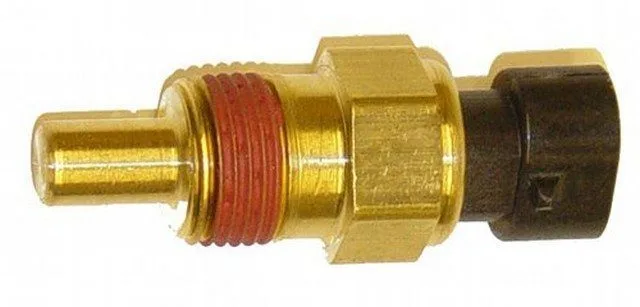
Role of the Engine Coolant Temperature Sensor
- Function: Precisely measure the coolant temperature to allow the PCM to regulate essential functions:
- The air-fuel mixture (rich when cold, lean when hot).
- Ignition timing.
- Idle speed.
- Activation and speed of the cooling fan.
- Regeneration of the diesel particulate filter (DPF) or EGR valve on some engines.
- Technical Principle: It is a Negative Temperature Coefficient (NTC) thermistor. Its electrical resistance decreases as the coolant temperature increases. The PCM sends a reference voltage (usually 5V) and interprets the returned voltage to determine the temperature.
- Sensor Types:
- 2-wire: Reference voltage (5V) and ground (signal for the PCM).
- 3-wire: Adds a dedicated wire to power the dashboard gauge.
Symptoms of Code P0119
- 🚨 Check Engine Light illuminated (MIL) on the dashboard.
- ❄️ Very unstable idle, especially during a cold start.
- ⚠️ Hesitation, stumbling, and power loss during acceleration.
- ⛽ Excessive fuel consumption and smell of gasoline (overly rich mixture).
- 🌡️ Cooling system malfunction: Cooling fan running continuously or not at all, risk of engine overheating.
- ⚠️ Difficulty starting in cold weather.
Possible Causes of Code P0119
Electrical and Mechanical Problems
- Faulty ECT Sensor: The thermistor is damaged, providing a resistance value outside the manufacturer’s specifications.
- Wiring Problems:
- Cut, frayed, or chafed electrical wires.
- Short circuits or faulty ground connections.
- Oxidized, loose, or corroded connectors (caused by coolant leaks).
- Low Coolant Level: A leak in the system can prevent the sensor from being properly immersed, skewing its reading.
- Faulty Thermostat: If it remains stuck open, the engine never reaches its optimal operating temperature, disrupting the system.
- Problem with the PCM: Although rare, an internal fault in the control module can be the cause.
Diagnosis and Repair Procedure
Required Tools
- OBD2 scanner to read codes and live data.
- Digital multimeter (DVOM) to measure resistance and voltage.
- Infrared thermometer to check the actual engine temperature.
- Basic tool kit, coolant, and contact cleaner spray.
Diagnostic Steps
- Preliminary Checks: Check the coolant level and condition. Look for any obvious signs of leaks.
- Visual Inspection: Carefully inspect the ECT sensor wiring and connector along their entire length. Look for physical damage, corrosion, or loose pins. Clean the connectors.
- Test with OBD2 Scanner:
- Read the live data. Compare the temperature value displayed by the sensor with the actual engine temperature measured with the infrared thermometer on the thermostat or radiator.
- A significant discrepancy or an erratic, jumping value indicates a problem.
- Electrical Tests (engine cold and disconnected):
- Resistance Test: Measure the resistance between the sensor pins. Compare it to the manufacturer’s reference values (e.g., ~2000-3000 Ω at 20°C). An infinite value (open circuit) or zero (short circuit) confirms a faulty sensor.
- Voltage Test: Reconnect the connector, ignition on. Measure the voltage between the signal wire and ground. It should be around 3V when cold and gradually decrease as the engine warms up.
Repair
- Replacing the ECT Sensor:
- Locate its position (usually on the engine block, cylinder head, intake manifold, or thermostat housing).
- Turn the ignition OFF. Disconnect the electrical connector.
- Carefully unscrew the old sensor. A small coolant leak is normal; catch it.
- Screw in the new sensor (use a new seal if necessary). Reconnect the connector.
- Repairing the Wiring: Solder and use heat-shrink tubing or replace damaged wire sections.
- Refilling Coolant: After replacement, top up the level with the appropriate mixture (often 50/50) and bleed the system of air.
Validating Repairs
- Clear the trouble codes with the scanner.
- Start the cold engine and let it warm up to normal operating temperature.
- Monitor the scanner data: the temperature should rise progressively and stabilize around 90°C.
- Perform a road test to verify that the symptoms (unstable idle, hesitation) have disappeared and that the Check Engine Light does not come back on.
Important Recommendations and Precautions
- 🔧 Priority: Do not ignore this code. A faulty signal can lead to severe overheating, damage the catalytic converter, and increase engine wear.
- ⚠️ Quality Parts: Prefer OEM quality or reputable brand sensors. Low-end parts often have an imprecise resistance curve and can cause the code to reappear.
- 🧤 Safety: Never open a radiator cap on a hot engine. Risk of severe burns. Handle coolant with gloves.
- 📄 Related Codes: Also diagnose codes P0115, P0116, P0117, or P0118 if present, as they relate to the same circuit.
💡 Need Help? This diagnosis can be complex. If you are unsure, consult a professional or use a platform like AllDataDIY to access wiring diagrams and procedures specific to your vehicle model.
References: Always consult your vehicle’s repair manual for precise resistance values and specifications.