A wide variety of gasoline piston engines are offered in today’s automobiles. One thing they all have in common is spark plugs. And spark plugs are a periodic maintenance item in your car.
A properly functioning spark plug will transmit the electrical signal from the car’s battery to the ignition coil and create a spark to ignite the air/fuel mixture present in each cylinder.
If a spark plug is not working properly for any reason, it can manifest in various ways, ranging from rough idling to poor acceleration and various other symptoms.
This article aims to provide guidance in analyzing your engine’s performance based on a visual inspection of its spark plugs.
Why Modern Day Spark Plugs Last So Long
As already mentioned, the spark plug’s role is to ignite the air-fuel mixture in each of your engine’s cylinders. Modern plugs perform this role admirably. Not so long ago, spark plugs had to be replaced every 10,000 to 12,000 miles.
Today, spark plugs can last up to 100,000 miles without needing maintenance. What has changed?
#1 – Fuel Injection
First, today’s car and truck engines are fuel-injected. Thus, air-fuel mixtures are well controlled by the engine’s computerized control module (ECM). We know that excessively high temperatures are a major enemy of spark plugs. But well-controlled air-fuel mixtures allow for more consistent combustion at lower temperatures than was possible in engines years ago.
#2 – Unleaded Gas
Second, the removal of lead from domestic gasoline has also helped extend spark plug life. When leaded fuels were common, lead deposits on the tips of spark plugs encouraged plug corrosion and prevented proper spark operation, thus negatively affecting their performance.
#3 – Better Materials
Third, we find that today’s spark plugs are made from much more durable materials than those of previous years. The electrical current-carrying component (especially the center electrode) of today’s plugs is often made of expensive platinum, iridium, or copper.
These advanced materials ensure that the spark plug anodes do not burn out as quickly and will carry electrical current more efficiently than older spark plug designs. The most common spark plug types using these advanced materials and their benefits are discussed here.
To help achieve the best engine life and performance, purchasing the highest quality spark plugs is highly recommended. And this includes reaching the manufacturer’s recommended mileage for plug replacement.
Spark Plug Removal
Tools Required
As with any automotive maintenance job, having certain tools on hand will make your life easier. For spark plug removal and reinstallation, the following basic set of hand tools and consumables is required:
- 3/8″ ratchet
- 3/8″ drive universal joint
- 3/8″ drive extensions (3″, 6″, and 10″)
- Spark plug boot removal tool (required for older engines)
- Spark plug gap gauge
- 3/8″ drive torque wrench (10 to 80 ft-lb)
- 3/8″ drive spark plug socket (one of the sizes below):
- 13/16″ (or 20 mm) for most full-size cars.
- 9/16″ (or 14 mm) for Ford and newer Asian cars.
- 11/16″ (or 18 mm) for older BMW cars.
- 14 mm bi-hex for newer BMW cars.
- (additional information on spark plug socket sizes HERE)
- Tube of silicone dielectric grease
- Workshop manual for your specific vehicle
To access the spark plugs, you will need the following additional hand tools:
- Set of 3/8″ drive sockets
- Set of combination wrenches (includes sizes from 3/8″ (10 mm) to 1/2″ (13 mm))
- Set of screwdrivers
- Small Channellock pliers
- Shop vacuum with a thin flat suction nozzle (for cleaning around spark plug holes)
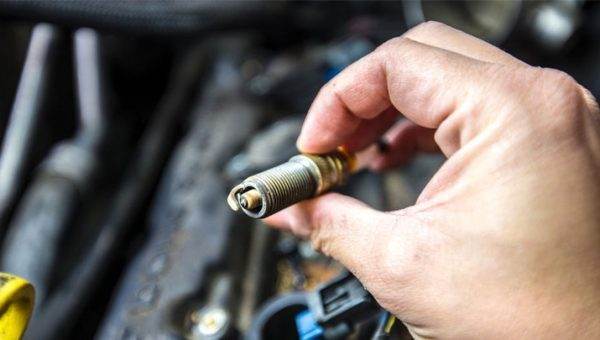
How to Remove Spark Plugs to Check Their Condition
Spark plugs are relatively simple to remove. Accessing them can be the main stumbling block. This can be especially true if your car’s engine is a transverse V6. For V6 engines, the plugs closest to the driver can often be the most troublesome to work on.
- Open the hood. Place an old but clean bath towel on each fender to minimize the risk of your belt buckle scratching the paint. Now, assess the engine layout. Determine the best way to access the spark plugs. Remove any cover(s) and/or insulating panels that prevent access to the plugs.
- Items such as wiring harnesses, hoses, and electrical modules blocking access to the plugs will need to be removed (or moved aside) to access the area directly above each plug.
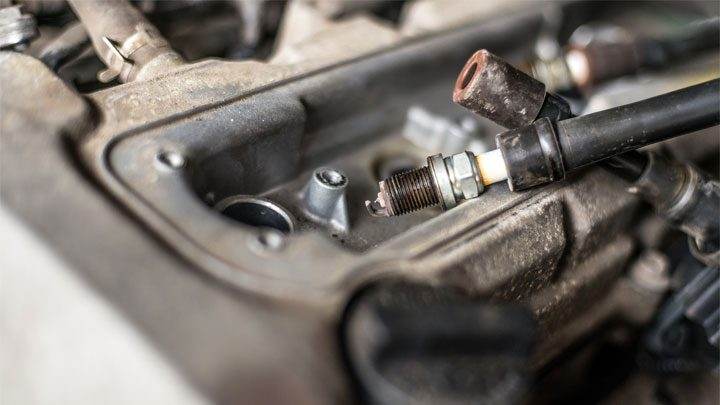
- In most modern cars, each spark plug will have an electronic module (the ignition coil) above each of the spark plugs. For older cars, a single large-diameter wire will go to the top of each spark plug. In this case, no coil will be present.
- If there is an ignition coil above each spark plug, it will need to be removed. Each coil will have a low-voltage cable connected to a connector. This cable must be unplugged.
- Study this connector. It will likely have a latch that needs to be moved or pressed to release it. Often these latches are a contrasting color. Using a screwdriver, release this latch. Remove the connector from the coil housing.
- Remove the fastener holding the coil in place and remove the coil from the spark plug.
- If there is no ignition coil above each spark plug, use the boot removal tool to remove the spark plug boot directly from the spark plug. Always grasp the boot as close to its base as possible. Gently wiggle the boot while pulling to help it come loose. Never remove a boot by grabbing its associated spark plug wire.
- Using the appropriately sized socket, extension, and universal joint if necessary, remove the spark plug. Make a note or label for each plug so you know which cylinder each one came from. If the spark plug hole is accessible, wipe the flat or tapered seat of the cylinder head with a clean cloth. With your Shopvac (or household vacuum), use the flat suction nozzle to vacuum dirt from that area.
Note: be careful to avoid dropping small parts or dirt into the spark plug hole. Even a small screw dropped into the combustion chamber could severely damage the engine.
Spark Plug Conditions and Colors
Living at the top of the combustion chamber, each spark plug will be affected and marked by everything that happens there. Therefore, inspecting each spark plug can reveal a lot about how your engine is operating.
This is where knowing which cylinder each spark plug came from can be useful. You may later need to inform your service technician about the cylinder that has a problem.
#1 – Normal Condition
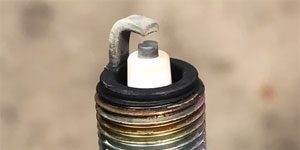
The insulator around the center electrode is grayish-white or yellowish-gray to brown. The side electrode is clean. This tells us that the combustion processes are normal.
There may be very slight oil burning, but nothing to worry about. Your engine is running well.
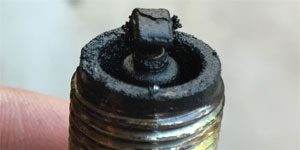
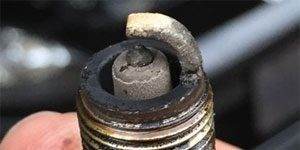
#2 – Sooted/Carbon Fouled
Plug surfaces evenly coated with dull black deposits.
Cause: Engine running too rich (too much fuel); dirty air filter; air-fuel mixture control at engine startup not working properly; excessive short-distance driving; incorrect spark plug.
#3 – Oil Fouled
Plug parts have a wet or shiny black coating.
Cause: Excess oil in the combustion chamber due to: oil level too high; crankcase ventilation system not working properly; piston rings and/or valve stem seals are very worn or broken.
#4 – Lead Fouling
Plug parts coated with a brownish-yellow glaze that may include a greenish tint. The glaze can be thin or thick and/or partially flaked.
Cause: Use of leaded fuel (usually not available in the US) or use of fuel additives containing lead.
#5 – Ash Fouling

Plugs coated with a thick, light-colored compound resembling ceramic. Brittle. Can be chipped with a fingernail or jackknife.
Cause: Excessive use of fuel and/or oil additives.
#6 – Center or Side Electrode Eroded/Melted Away
The center insulator may also be blistered or soft.
Cause: Spark plug and combustion chamber overheating due to poor quality fuel (octane rating too low); ignition timing too advanced; pre-ignition; engine running lean; incorrect spark plug.
#7 – Heavy Wear of Center Electrode
Electrode partially or completely worn away.
Cause: Spark plug has exceeded its service life; plug gap too large; incorrect spark plug.
#8 – Heavy Wear on Side Electrode
Electrode partially or completely worn away.
Cause: Poor quality fuel (octane rating too low); pre-ignition; excessive use of fuel and/or oil additives.
#9 – Center Electrode Insulator Nose Fractured

Small piece of insulator missing.
Cause: Mechanical damage (the plug was dropped); excessive deposits along the center electrode; the plug has exceeded its service life.
- Old spark plugs cannot be successfully cleaned. At a minimum, the plug conditions indicated in points 2 through 9 above will require the installation of new plugs.
- Obvious spark plug conditions in points 2, 3, 6, and 8 should encourage further evaluation of the engine, fuel, and ignition systems by a qualified maintenance technician for corrective action.
Installing New Spark Plugs
- Unpack your new spark plugs. Generally, spark plugs come from the manufacturer with the proper gap. However, it is wise to check this gap before installing them. The gap dimensions can be found in your workshop manual.
- Using the gap tool, check the gap between the center and side electrode. Spark plugs with multiple side electrodes (two or more) will have a factory-set gap and do not need to be checked.
- Using the bending tab on the gap tool, slightly bend the side electrode to achieve the proper gap. Do not bend the electrode excessively. A very slight gap change should suffice. Check and properly adjust the gap for each plug.
- Firmly press a new plug into the spark plug socket. Guide the socket and plug to the spark plug threaded hole. This may be easier to do with an extension on the socket.
- Now turn the socket clockwise (CW) by hand to screw the plug into the hole. The spark plug should screw in easily. If not, there may be cross-threading. In this case, do not force it, but remove it and realign it. Then try tightening it by hand again. Screw the plug in all the way.
- Find the spark plug torque value in your workshop manual. If your torque wrench is adjustable, set it to this value. Tighten the plug with the torque wrench.
- Apply a light coat of dielectric grease to the inside diameter of the spark plug boot. Firmly press the spark plug wire or coil boot onto each spark plug. Reinstall the power connector on each ignition coil.
- Repeat steps 2 through 4 for each spark plug.
- Reinstall all parts previously removed to access the plugs. Reposition wiring harnesses, hoses, and/or modules that were temporarily moved aside for access. Ensure that no wires or hoses are now contacting hot surfaces like exhaust manifolds.
- The plugs are now installed. You can start the engine. It should start and run properly.