
Depending on the make and model of your vehicle, a failing or defective CKP can produce one or more of the following symptoms:
- No-start condition
- Start and stall condition
- Irregular idle
- Hesitation
- Poor acceleration
- Increased fuel consumption
- Misfires
- Check Engine light on
However, problems in other systems (e.g., fuel or ignition systems) can also produce some of the same symptoms. Therefore, it is important to test the CKP to better diagnose the problem.
Although it is recommended to test a CKP sensor using an oscilloscope, it is not a common tool for many car owners or DIYers. Nevertheless, you can troubleshoot the sensor using a digital multimeter (DMM), whether your engine uses an inductive or Hall effect type sensor.
That’s what you will do here using this guide. However, keep in mind that you still need the electrical values for your vehicle’s make and model, to locate the sensor, identify the wires, and if necessary, replace it.
You can find this information in your vehicle’s repair manual. If you don’t have this manual yet, you can get a relatively inexpensive copy from the aftermarket via Amazon. Haynes manuals contain many pictures and step-by-step maintenance, repair, and troubleshooting projects for many systems in your vehicle. So you’ll recover the small investment in no time.
Hint
1. What is a CKP sensor used for?
2. How to know if you have a Hall effect or inductive CKP sensor
3. Troubleshooting a CKP sensor
Checking the wiring and sensor
Testing an inductive type CKP sensor
Testing a Hall effect CKP sensor
4. What to do if my CKP passes the test?
5. Replacing the CKP sensor
1. What is a CKP sensor used for?
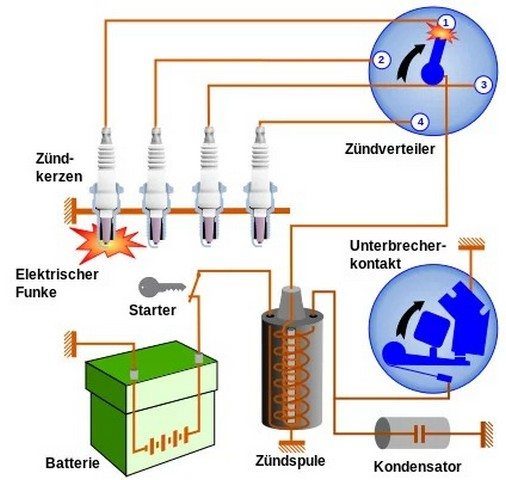
In general, the CKP monitors piston movement and crankshaft position. It also helps the computer monitor engine misfires and engine speed. The computer uses this information to adjust ignition timing and fuel injection.
However, a CKP sensor withstands heat and vibrations during engine operation. This eventually takes its toll and the sensor or its circuit can fail.
As with other emissions-related sensors, the car’s computer can store a diagnostic trouble code (DTC) pointing to a problem with the CKP sensor or the sensor circuit, such as:
P0315
P0335-P0339
P0385-P0389
If your engine uses a camshaft position sensor (CMP), you may also see a related code:
P0016-P0019
Therefore, it is important to troubleshoot the CKP when you suspect CKP problems to ensure it is the sensor, the circuit, or one of the system components it works with.
The following sections will help you test your CKP sensor using only a digital multimeter (DMM), whether your engine uses an inductive or Hall effect type sensor.
2. How to know if you have a Hall effect or inductive CKP sensor
Basically, most vehicles on the road today use one of two types of CKP sensors.
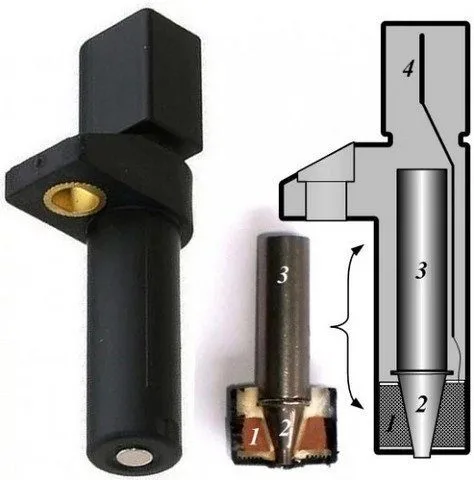
Inductive (Magnetic) CKP Sensor:
- May have one or two wires
- Mounts in front of a rotor or reluctor wheel
- Produces its own alternating voltage signal
Hall Effect CKP Sensor:
- May have three or four wires
- Mounts in front of a rotor or reluctor wheel
- Generates a digital signal (square wave)
- Requires an external power source and ground to produce the signal
3. Troubleshooting a CKP sensor
Many problems with the CKP sensor can be located in the wiring harness or the sensor connector. So be sure to check them carefully before starting to troubleshoot the sensor itself. But first, locate the sensor.
Depending on the make and model of your vehicle, you may find the CKP sensor:
mounted on a front engine cover or timing cover, near the crankshaft pulley or behind the harmonic balancer.
somewhere in the middle of the engine block.
under the starter.
at the rear of the engine, on the transmission bell housing near the flywheel ring gear.
If necessary, consult your vehicle’s repair manual to locate the sensor on your specific model.
Checking the wiring and sensor
Many times, a failing or inoperative sensor comes from a bad wire or connector. Perform a visual inspection of the harness and connectors between the sensor and the PCM or ignition module.
- Check wires for damage
- Check for loose wires
- Check for loose sensor mounting bolts
- Check that the electrical connector is not damaged
- Check the sensor itself for signs of damage
- If necessary, check the air gap between the sensor tip and the rotor. Consult your vehicle’s repair manual for specifications.
- Remove the sensor and check that there are no metal chips or shavings stuck to the magnetic tip of the sensor.
- Inspect the sensor’s reluctor wheel for any damage.
Testing an inductive type CKP sensor
The following steps give you an example of how to test an inductive type CKP sensor.
However, be sure to consult your vehicle’s repair manual for the electrical value specifications and, possibly, a recommended method for testing the CKP sensor in your particular model.
Disconnect the CKP sensor electrical connector.
- Set your digital multimeter to a DC voltage scale using a low range.
- Turn the ignition key to the On position, but do not start the engine.
- Place the black DMM wire to ground. This can be a clean surface on the engine, a metal bracket, or the negative (-) terminal of the battery.
- Touch the red DMM wire to each of the sensor wires on the harness connector you just disconnected. One of the wires should produce about 1.5 volts; otherwise, the sensor is not receiving reference voltage and needs to be fixed.
To prevent the engine from starting:
- Disable the fuel system by removing the fuel pump fuse or relay.
- Or disconnect the ignition wire between the ignition coil and the distributor.
- If necessary, consult your vehicle’s repair manual. This will prevent the engine from starting.
Set your digital voltmeter to a low range on the AC voltage scale.
Connect your meter leads to the sensor pins. Be sure to keep your meter leads away from moving engine parts during this test.
Have an assistant crank the engine for a few seconds while you watch the meter reading.
The sensor should produce a voltage pulse signal. If you see no voltage pulse, replace the sensor. Compare your results to the manufacturer’s specifications. Consult your vehicle’s repair manual.
You can check the resistance of your inductive CKP sensor:
- Set your digital multimeter to the Ohms scale.
- Disconnect your CKP electrical connector.
- Connect one DMM lead to one of the sensor pins and the other DMM lead to the other sensor pin. It doesn’t matter which.
- Turn on your DMM.
The reading should show a resistance value, usually between 200 and 2000 ohms, depending on your particular vehicle model.
Compare your results to the manufacturer’s specifications. You can find the specifications in your vehicle’s repair manual. If out of specifications, replace the sensor.
If the reading is infinite resistance, the sensor has an open circuit;
If the reading is zero ohms, the sensor has a short circuit.
Testing a CKP’s resistance
Do not test resistance on a Hall effect CKP sensor. The induced voltage can affect the operation of a good sensor.
When disconnecting the ignition wire from the distributor, ground it with a jumper wire.
When disconnecting the ignition wire from the distributor, ground it with a jumper wire.
Testing a Hall effect CKP sensor
It is best to test a Hall effect type sensor using an oscilloscope. But few DIYers own one. Nevertheless, you can use a digital multimeter to test this type of CKP sensor in your vehicle.
Although you won’t see the graph and the high and low voltage frequency that you see on an oscilloscope, you will get the average voltage coming from the sensor, which will give you an idea of its operation.
Remove the fuel pump fuse or relay to prevent the engine from starting during this test.
- If your engine uses a distributor, you can disconnect the center ignition wire and ground it to the engine using a jumper wire.
- If necessary, consult your vehicle’s repair manual.
- Disconnect the CKP sensor electrical connector.
- Set your digital multimeter to DC volts and to a 20 Volt range.
- Touch the black DMM lead to the black wire of the harness connector.
- Touch the red DMM lead to the red wire (power) of the harness connector.
You may need to check the wiring diagram for your particular model, if the CKP sensor uses different colored wires to identify the ground, power, and signal wires.
Turn the ignition key to the On position.
Your reading should be between 5 and 13 volts. Consult your vehicle’s repair manual for the reference voltage value for your particular model.
Turn off the ignition and reconnect the CKP sensor to the harness connector.
Touch the black DMM lead to the negative battery terminal.
Next, using the red multimeter lead, back-probe the black ground wire at the harness connector or the CKP sensor.
Have an assistant crank the engine for a few seconds. Your digital multimeter should read between 200 mv and 300 mv.
Now, touch your red DMM lead to the green (signal) wire on the harness connector or the CKP sensor.
Crank the engine for a few seconds. Your meter should read about 300mv. This is an average voltage value of the signal produced by the CKP sensor.
If necessary, compare your results to the specifications in your vehicle’s repair manual.
Although not as common, your car’s computer could also be at fault here.
Although not as common, your car’s computer could also be at fault here. | Source
4. What to do if my CKP passes the test?
Even if your engine shows symptoms of a bad CKP, it doesn’t necessarily mean that your sensor, wiring, or a connector is bad. The problem could lie with the components it communicates with.
There may be a problem with the ignition control module (ICM) or even, although less common, with the PCM itself, depending on your model’s particular configuration. If necessary, consult your vehicle’s repair manual.
5. Replacing the CKP sensor
Generally, replacing a CKP sensor is a fairly simple operation. However, on some models, you may need to remove one or more components to access the sensor. Consult your vehicle’s repair manual.
- Make sure the engine is cold and the ignition switch is in the OFF position.
- Disconnect the negative (black) battery terminal.
- On some models, you may need to lift the front of the vehicle and securely support it on jack stands to access the sensor.
- Disconnect the CKP sensor electrical connector.
- Unscrew the mounting bolt(s).
- Remove the sensor from the engine.
- Match the old sensor to the new one.
- If your sensor comes with an O-ring, apply a light coat of oil to the ring before installing the sensor. This helps position the sensor correctly, helps the sensor produce the correct signal, and prevents oil leaks.
- Install the new sensor in place and tighten the mounting bolts.
- Plug in the sensor electrical connector.
- Connect the negative terminal to the battery.
- On some engines, you need to set the correct gap for the sensor. Follow the instructions provided with your new CKP sensor or your vehicle’s repair manual. The following video gives you an idea of how to replace a crankshaft position sensor.