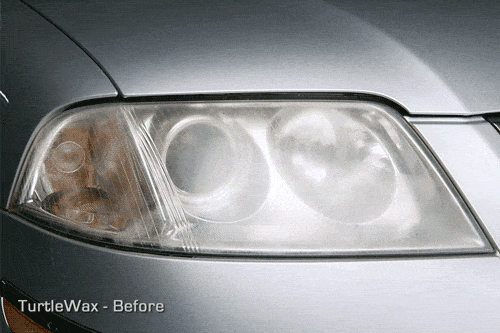

Haze, fog, clouding – no matter what you call it – there are easy ways to get rid of that plastic oxidation that clouds your vehicle’s headlights after years and miles of driving.
There are many headlight restoration kits available for purchase at auto parts and home improvement stores. For this story, we tested two different kits: a $25 kit from Meguiar’s and a $10 kit from Turtle Wax. Both kits come with a cleaning-clarifying compound, wet sanding pads, and a protective sealing solution. What do you get for $15 more? The more advanced Meguiar kit provides a clean microfiber cloth, an ergonomic handle for the wet sanding pads, and a polishing ball that attaches to a drill. The cheaper Turtle Wax kit comes with two solutions and a numbered set of sanding pads.
What You Need
- Headlight restoration kit
- Car wash solution, glass cleaner, or cold water spray
- Masking or painter’s tape
- Electric drill (optional depending on the restoration kit)
- Dry towels, cloths, or decorative cloths
- Elbow grease and patience

Step 1. Clean the headlight area with water and soap to wipe away dirt and debris on the surface. Windex or a household glass cleaner can also do the job. Make sure the headlights are completely dry, then move on to step 2.
Step 2. Once dry, tape off the surrounding areas near the headlights (the painted body panels of the car that touch the headlights). This is an important precaution as it prevents sanding damage to your car’s paint during the restoration process.
Some headlight restoration kits, like the Turtle Wax one we used, will require you to apply a layer of clarifying compound to the headlight assembly before any wet sanding.
Other headlight restoration kits may skip the necessary sanding in steps 3 to 5 and have you start polishing.
Step 3. Both headlight restoration kits provided different grits or strengths of sandpaper to use. Using a spray bottle filled with water or a provided lubricating liquid, wet the headlight and dampen the smallest piece of sandpaper.
Step 4. In a side-to-side motion, rub with pressure the smallest piece of sandpaper (1,000 or 1) over the headlight surface, being careful not to touch any other part of the car’s body. You want to create a complete “frosted” look that covers the entire headlight assembly. Always keep the piece of sandpaper and the headlight assembly wet with water.
Step 5. Move to the next highest grit of sandpaper (2,000 or 2) and rub the headlight in an opposite up-and-down motion. Continue, unless instructed otherwise, to keep the sandpaper and headlight wet.
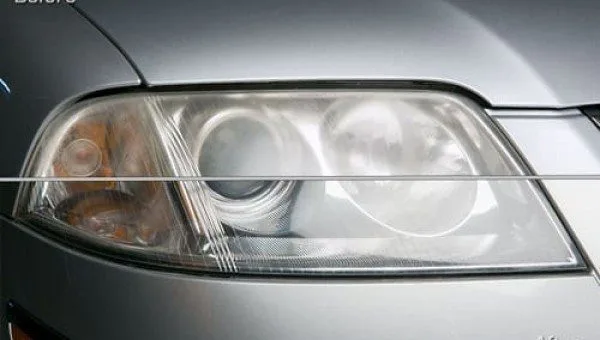
The Turtle Wax kit (pictured above) comes with two more levels of finer-grit sandpaper, resulting in more sanding. These small pads required more effort to use but were also better able to handle the curved areas of the headlights than the Meguiar kit (pictured below).

Steps 3 to 5 can last from 10 to 30 minutes depending on how cloudy the headlights are. Be patient and make sure not to accidentally touch the applicator to another part of your car. Scratches and paint damage can occur.
Step 6. Dry the headlight lens with a paper towel or a decorative cloth.

Step 7. Apply a dab of the provided polishing liquid or paste to an applicator pad or polishing ball (like the one included in the Meguiar kit pictured above). Using the applicator pad or polishing ball, perform a continuous back-and-forth motion over the headlight to clean the wet sanded frost. You should be able to see a difference in the clarity of your vehicle’s headlights almost immediately. Again, the polishing ball did not handle the curved surfaces of the headlights as well as the Turtle Wax kit.
Step 8. Dry the headlight lens with a paper towel or a decorative cloth.


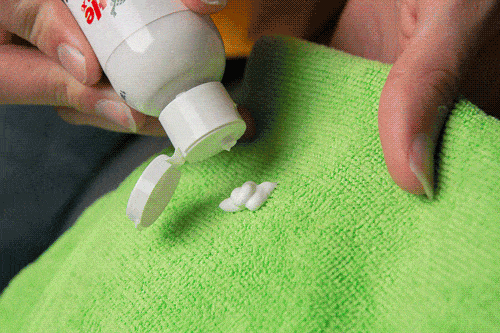
Step 9. Once you are satisfied with the improved appearance of your headlights, finish the job by pouring a conservative amount of sealer onto a separate applicator pad or towel – or in the case of the Turtle Wax kit (top image above), a small towel with the protector already applied – and rub it onto the headlights.
Step 10. Remove the tape around the headlights and you’re done. Make sure to let the sealer sit for a few hours, if possible, to allow everything to dry and seal, ensuring a fresh protective coating.
This process is not just for headlights. You can repeat the process on the vehicle’s taillights, side markers, or plastic fog lights. Do not use these products on glass.