
Why Your EGR Valve is Important
An Exhaust Gas Recirculation (EGR) valve, when functioning correctly, recirculates exhaust gases through the engine to reduce nitrogen oxide (NOx) emissions.
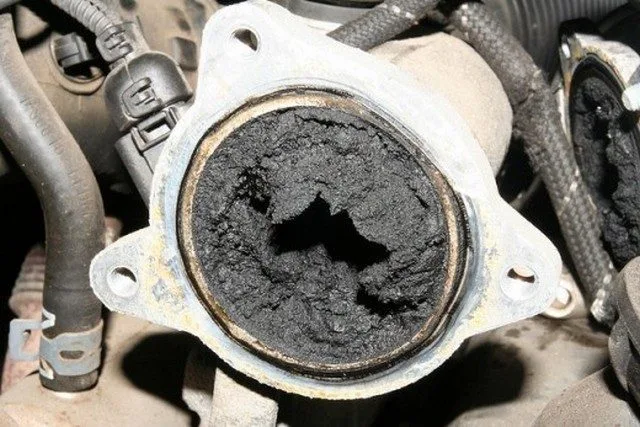
Usually, EGR valves do not completely fail. But clogged passages and orifices will significantly affect the operation of the valves and the engine.
A faulty Exhaust Gas Recirculation (EGR) valve can cause several symptoms:
- hard starting
- rough idle
- hesitation during acceleration
- engine power loss
- overheating
- stalling
- poor fuel economy
- increased harmful emissions
- ping
- knock
- detonation
- surge
Therefore, replacing the valve most often requires checking and removing buildup in the passages and intake manifold and sometimes under the throttle body as well.
You want to know for sure that the new or newly cleaned valve is working correctly; otherwise, drivability issues and high exhaust emissions will persist, even after installing the new valve
How to Replace Your EGR Valve
This guide will help you replace most of the most common electrically-operated, electric vacuum, and other electronically controlled EGR valves.
In most models, replacing an Exhaust Gas Recirculation (EGR) valve is not difficult. You can do it in your garage in about an hour or two, depending on your particular system, using common tools and a good solvent like carburetor cleaner.
If you need help, consult the vehicle repair manual for your car’s make and model. You can get a cheap aftermarket repair manual at one of the local auto parts stores in town or order one from Amazon, like this Haynes manual. These manuals come with step-by-step procedures and pictures for many maintenance and repair jobs you can do at home.
Before installing the new unit, make sure you have the correct EGR valve replacement for your particular car make and model. If you are replacing the valve, take the old valve with you to the auto parts store and compare it with the new one. If ordering from a web shop, match your old valve with the pictures that may be displayed on the site.
To get the right part, you will need information about your vehicle’s make, model, and engine size. The Vehicle Identification Number (VIN) can be helpful to get the correct valve calibration for your particular model. You can find your VIN on your registration card or a small plate on the driver’s side of the dashboard, best viewed through the windshield from outside the vehicle.
Some new EGR valves come with their matching gaskets. If yours doesn’t include them, buy the necessary gasket(s) or purchase gasket paper so you can make your own.
Tools and Other Items You Will Need
- New EGR Valve
- New EGR Valve Gasket
- Phillips screwdriver
- Standard screwdriver
- Adjustable wrench
- Allen key set
- Ratchet
- Socket wrench set
- Dull scraper or plastic scraper
- Safety glasses, if necessary
- Chemical-resistant gloves, if necessary
- Carburetor cleaner, if necessary
- Scratch awl, if necessary
- Shop rag
The EGR valve is usually located around the top or rear of the engine, and on one side of the cylinder head, near the intake manifold or on the intake itself. Depending on your particular model, the EGR valve may connect to a pipe that goes to the exhaust manifold. But you won’t have much trouble working with either type of valve.
If you still can’t locate the valve, look for it in your maintenance manual, which probably has a photo or picture of the valve itself. But, if you don’t have the manual, visit an auto parts store on the web and search for the valve using your vehicle information. Many online stores will have a picture of the specific valve you are looking for.
II. Removing the EGR Valve
Different types of EGR systems are used today. So you may need to disconnect more than one hose, electrical connector, or sensor to remove the EGR from your vehicle. If necessary, consult your vehicle’s repair manual.
Make sure the engine is cold and disconnect the negative (black) battery terminal. Depending on your vehicle model, you may need to enter a security code to operate the radio or another electrical device after reconnecting the battery. Check your car’s owner’s manual and make sure you have this information if necessary.
Next, remove the engine cover or air filter housing if necessary to get better access to the EGR valve. Use a Phillips or standard screwdriver.
Disconnect the vacuum hose from the top of the valve by hand, depending on your model. If you need to remove more than one vacuum hose, you can label each one to ensure you reinstall the hoses into the correct ports.
Check the condition of each vacuum hose. Replace those showing signs of wear or damage.
Disconnect any electrical connectors from the EGR valve or sensors if necessary.
Is your valve connected to a steel pipe? Use an adjustable wrench to loosen the pipe nut.
Then, loosen and remove the two or three mounting bolts that hold the valve in place using a wrench or a ratchet and socket. You may need to apply lubricant to the bolts if they seem quite tight. The bolts are continually exposed to heat and rust, which can make them difficult to remove.
If your valve is attached to a pipe, finish disconnecting the valve from the pipe now.
Remove the EGR valve and valve gasket from its mount.
III. Cleaning the Valve, Passages, and Ports
The EGR system includes several components like the EGR valve, pipes, sensors, control circuit, hoses, ports, and passages. Replacing a faulty EGR valve without checking or cleaning these other components can lead to system failure. Exhaust gases are prone to clogging passages with carbon deposits wherever they flow. Perform a visual inspection of the exhaust passages throughout the system to ensure the new EGR valve will function correctly. On some vehicle models, you may need to remove the fuel injectors or intake manifold to properly dislodge carbon buildup from the passages. Consult your repair manual if necessary.
After removing the valve, use a dull or plastic scraper to remove any trace of gasket material from the base of the valve (if reusing the same valve) and the intake or exhaust mounting surface.
To remove buildup, put on your safety glasses and chemical-resistant gloves and spray carburetor cleaner on it. If cleaning the valve itself, be careful not to let the solvent reach the valve diaphragm or electrical circuits or contacts.
Let the carbon soak in the solvent, then use the scratch awl (or a screwdriver or other similar tool) to remove carbon deposits around the ports and passages. Be careful, however, not to scratch the mounting surfaces. A stiff wire brush is an ideal tool for the job, but often carbon deposits can be hard as a rock to remove.
Some newer engine models use multiple EGR ports. Sometimes it is necessary to remove the intake manifold to properly clean all the ports to avoid drivability issues. If you need to remove the intake manifold, you may also need to replace the intake gasket. Consult your vehicle repair manual if necessary.
Check the throttle body bore and plate for carbon buildup and clean if necessary.
Use the wire brush to clean the pipes and a shop rag to clean the inside of a pipe, orifice, or socket if necessary. For more help with maintaining your new EGR valve and the EGR system’s exhaust passages, check out this article: How to Clean an EGR Valve.
The following video gives you some visual clues on how to clean the EGR valve.
Use a torque wrench to tighten the EGR valve bolts.
Use a torque wrench to tighten the EGR valve bolts. | Source
IV. Installing the EGR Valve
Installing the EGR valve is a straightforward process. However, you must ensure the valve is properly installed and tighten the bolts to the appropriate torque.
Position the new valve against the pipe and hand-tighten the pipe nut if yours is equipped with one.
Position a new gasket and start the valve mounting bolts through the EGR and gasket by hand.
Tighten the mounting bolts with the wrench – and the pipe, if applicable, with the adjustable wrench. Then, finish tightening the bolts with the torque wrench to avoid over-tightening the bolts and damaging the gasket, or leaving the bolts loose and causing a leak. Check the torque specifications for the bolts for your application in your vehicle’s repair manual.
Plug in the valve’s electrical connector, reattach the vacuum hoses, and replace the air filter housing and any other components you had to remove to access the valve.
Connect the negative (black) battery terminal.
Start the engine and check that the EGR valve is operating correctly and that there is no vacuum leak.
Replacing a faulty EGR valve doesn’t involve too much work, but removing carbon buildup in the passages, ports, intake, and other places can take some effort. Removing the buildup will help increase the valve’s lifespan and contribute to proper engine operation. The main causes of carbon buildup primarily lead to short trips or city driving, and increased engine oil consumption due to wear.
If possible, quickly check the passages under the EGR valve every two years and clean the system if necessary or approximately every 60 months to avoid drivability issues. Consult your vehicle’s maintenance manual for the emission control system maintenance intervals.