What are the possible causes of DTC P1300 Mitsubishi?
NOTE: The listed causes may not be a complete list of all potential problems, and there may be other causes.
Faulty power transistor
Power transistor circuit open or shorted
Poor electrical connection in the power transistor circuit
How to repair DTC P1300 Mitsubishi?
Check the “Possible Causes” listed above. Visually inspect the wiring harness and related connectors. Check for damaged components and look for broken, bent, pushed out, or corroded connector pins. Search for P1300 Mitsubishi questions and answers:
What are the possible symptoms of code P1300 Mitsubishi?
Engine light on (or service engine soon warning light)
What does code Mitsubishi P1300 mean?
The Engine Control Module (ECM) monitors the power transistor. The ECM sets the OBDII code when the power transistor does not meet factory specifications.
Effective ways to prevent catalytic converter theft
Catalytic converter theft has become a worsening problem in recent years. According to data from the National Insurance Crime Bureau (NICB), an estimated 65,398 thefts occurred nationwide in 2021. This represents a 353% increase compared to all catalytic converter thefts reported in previous years. Even though the surge in catalytic converter thefts appears to be easing in 2023, it continues to concern many drivers significantly. So how can you prevent catalytic converter theft? Let’s explore the solution to this issue.
Why Are Catalytic Converters So Popular Among Thieves?
Have you ever wondered what’s inside catalytic converters that makes them worthwhile for thieves? Required by law in the United States since the 1975 model year, car manufacturers must use precious metals such as platinum, rhodium, and palladium to help reduce vehicle exhaust emissions.
Thieves steal spare parts and then resell the whole unit for profit (Photo: bbc.co.uk)
In each catalytic converter, palladium, platinum, or rhodium can control the flow of car emissions by reacting with certain gases such as CO and NOx, thereby reducing the harmful effects of emissions when released into the environment. On the market, the precious metals contained in catalytic converters cost the same as, or even more than, the price of gold. And that’s the main reason for catalytic converter thefts.
After the COVID-19 pandemic, many automotive manufacturer supply chains had to close, leading to a slowdown in the auto parts and accessories market.
Thus, supply is insufficient to meet demand. Thieves take advantage of this opportunity to steal spare parts and then resell the entire unit for profit. They can even be shipped abroad and sold on online black markets…
However, in 2023, as the accessories market gradually recovered, the number of catalytic converter thefts significantly decreased compared to previous years, which is also a good sign for car owners worldwide.
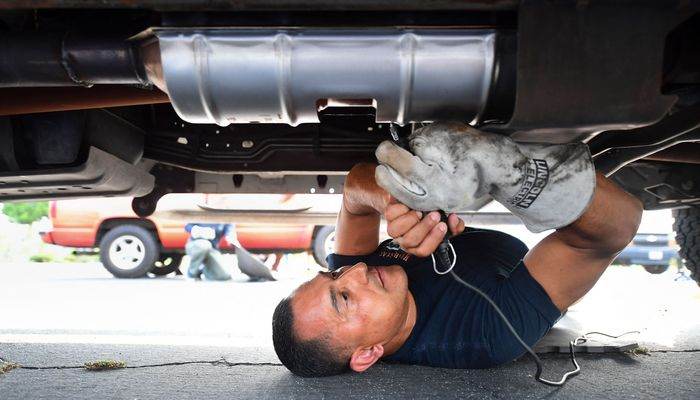
Catalytic converter thefts can occur in garages, at private residences, or even at car dealerships. Be especially cautious when parking on the street. What should we do to stop this problem?
How to Effectively Prevent Catalytic Converter Theft?
The truth is, it only takes a thief a few minutes to slip under your vehicle and cut out the catalytic converter with a battery-powered reciprocating saw. And car owners who rarely drive will often be targets for thieves, and there is no way to completely avoid this issue. In some states, scrap collectors may be required to provide photo identification when purchasing catalytic converters, but in many states, the black market for these items is difficult to track.
Replacing a catalytic converter can cost you several thousand dollars, so how can you prevent your catalytic converter from being stolen? To minimize the risk of falling victim to catalytic converter theft, you can follow some of the tips below:
1. Know the Signs If Your Car Is a Target for Thieves
SUVs, hybrids, and trucks are the vehicles that attract thieves the most, as the catalytic converters on these cars are often easily removable. Below, we want to share some specific car models to help you better understand:
Ford F-Series
Chrysler 200
Chevrolet Silverado
Toyota Prius
Toyota Camry
Honda CR-V
…
One of the main characteristics of these cars is that they all have high ground clearance, which will make it easier for thieves to access your catalytic converter.
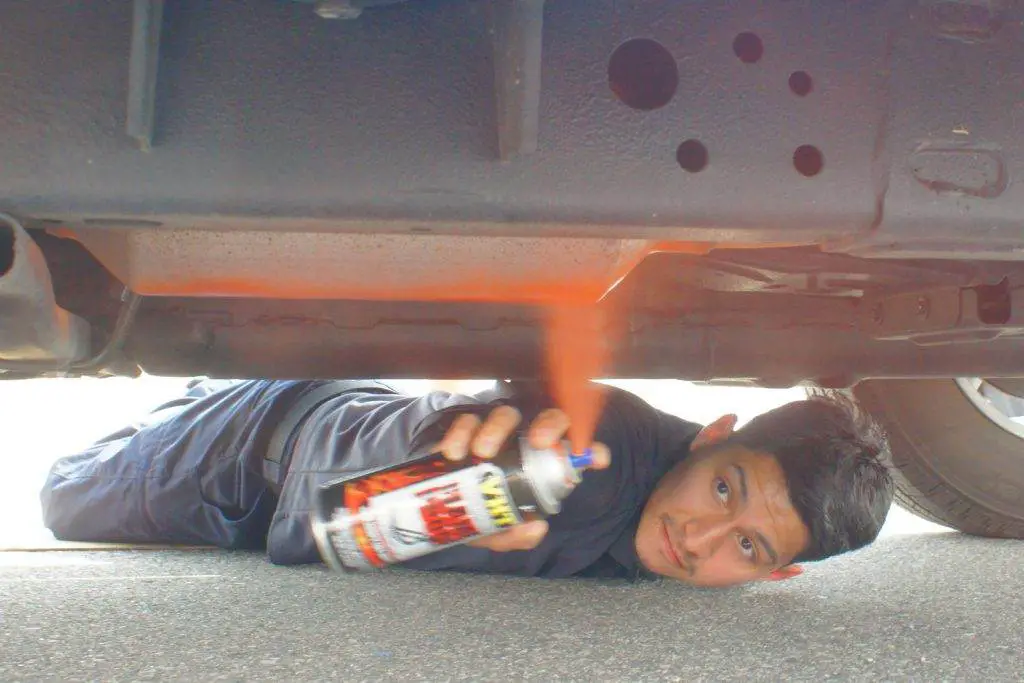
2. Paint a Catalytic Converter
Does car insurance cover catalytic converter theft? (Photo: moniteursaintpaul.com)
Spray painting your catalytic converter is another way to combat thieves. As recommended by the police, painting can make your catalytic converter a less attractive target, as it’s a sign indicating to scrapyards or auto shops that this part has been stolen. And the idea is that they will be less likely to buy these stolen parts. You can get most of what you need for this painting process at local auto stores.
You should choose a high-temperature bright paint or an exhaust manifold paint, as exhaust components get very hot and normal paints cannot withstand that temperature. Remember to use a scrubbing pad or sandpaper to prepare the surface so the paint adheres better. Additionally, you should engrave the VIN on your catalytic converter to easily check if this part has been sold on the market.
3. Choose a Good Parking Spot
If possible, keep your car in the garage. When you have to park on the street, choose a safe location and park in a well-trafficked area or near the entrance of a building or residents. Furthermore, experts state that drivers should park with their wheels facing the curb. This small trick can make it more difficult for thieves wanting to steal parts from your car. The difficult parking method mentioned above will make thieves quickly abandon their idea because it takes a lot of time and draws attention from those around them.
4. Use an Anti-Theft Device on the Catalytic Converter
Although installing such a device cannot guarantee 100% protection of your catalytic converter, it is likely to reduce theft of this component. Typically, anti-theft devices will be attached to your car’s chassis, making them difficult for thieves to remove. They usually include a metal clip or bracket that surrounds the catalytic converter and require special tools for removal. Catalytic converter locks are widely available and can serve as an obvious deterrent. If your vehicle is equipped with an alarm system, set the alarm to vibrate when the catalytic converters are cut, and the system will trigger the alarm.
The question is, “Does car insurance cover catalytic converter theft?” If, unfortunately, your catalytic converter is stolen and you have comprehensive insurance on your vehicle, the insurance company will handle the replacement of the catalytic converter and necessary repairs, minus your deductible. If you are unsure whether your auto insurance policy covers the loss of a catalytic converter, contact your insurance company for clarification.
I hope that after reading this article, you know how to protect your catalytic converter and travel safely.
How to remove windshield scratches
What could be the most unsightly and potentially dangerous thing in a beautiful car? Well, nothing beats scratches on the windshield or windows! A scratch on the body paint comes close, but it certainly doesn’t cause an accident. How to remove windshield scratches? Can you even fix this problem or do you have to change the glass?
What can cause windshield scratches
Several everyday objects can damage a car’s windshield.
Faulty windshield wiper blades
The surface of windshield wiper blades can harden with age and neglect, producing scratches, especially when the glass is dry. The same can happen if a small object, like a pebble, gets stuck between the blades.
Improper cleaning
Scratches can appear on your windshield if you wipe it with a rough/dirty cloth. The simplest technique for proper and safe cleaning is to use a soft microfiber or cotton cloth.
Road debris
Scratches are also produced by pebbles and stones thrown onto your windshield from the road, especially when driving behind vehicles and trucks, which easily trap road pebbles.
Damaged ice scrapers
If you live in a cold, snowy climate, you may sometimes need to remove ice from your car’s windshield and windows. Ice scrapers are designed to protect the windshield, but if they wear out or break, they can damage it.
How to remove windshield scratches?
A scratch or chip on the windshield obstructs vision while driving. Furthermore, even a hairline crack can turn into a real laceration over time. Once that happens, you have no other option but to replace the windshield, which is expensive.
What to do? You can simply repair the chip or crack so it doesn’t get bigger. Remember that it is not possible to repair a deep scratch, one deeper than 50 microns.
How do you know it’s technically repairable? If the crack catches your fingernail, it’s too deep to be repaired at home. If not, follow these methods:
For light scratches
Using an acrylic scratch remover to fill a light scratch or crack is the simplest answer to your windshield scratch removal problem.
You need to apply this liquid to the affected areas and rub with a damp microfiber cloth or super fine sandpaper (600 grit or higher). It will appear transparent once dry and conceal the damage with a protective layer.
Use a microfiber towel to rub the damaged area with the chemical. (Photo: Getty Images)
But this chemical is not available in many local stores. In this case, you can use a glass scrub product (such as Glass Science Glass Scrub).
It is mainly used to remove stubborn stains and grime. However, it also works very well for repairing light cracks on the windshield.
Wrap your hand in a damp microfiber towel, pour a little liquid on it, and rub the damaged area. Work on a small section (if the crack is large) at a time and maintain even pressure throughout.
It is an abrasive ingredient that will go through the surface if applied directly.
For deep scratches
Cerium oxide is an excellent solution for repairing deep scratches. These are still less than 50 microns but deeper than a simple surface scratch.
The chemical ingredient is mainly used in the ceramics and jewelry industries due to its low abrasiveness. It’s good for polishing metal, ceramic, and glass objects.
Use a drill to apply pressure. Source: Amazon.com
Add water to the powdered cerium oxide to get a semi-liquid paste. Apply it to the scratched area. A hand drill with a hard rubber polishing wheel attached will be useful in this case.
Use it to polish the area where the cerium oxide is used. The entire process requires patience and consistent application of the paste and polishing.
Pay attention to the consistency of the mixture and the amount of pressure applied by the drill. The reward will be a clean, scratch-free windshield that provides clear vision while driving.
How to prevent windshield scratches
Regular cleaning and maintenance
Clean it regularly using a soft microfiber cloth and a mild glass cleaner.
Remove stubborn dirt and bugs with a mixture of water and mild soap.
Avoid aggressive rubbing, which can cause scratches.
Proper wiper blade maintenance
Replace them every 6 to 12 months.
Keep the windshield and wiper blades clean.
Avoid using your wipers on a dry or icy windshield.
Parking considerations
Park in a garage or in a shaded area to minimize exposure to the elements.
Avoid parking under trees where falling branches or sap can cause damage.
Using windshield protection films
Clear adhesive films can provide an extra layer of protection against debris.
These films are almost invisible and can be easily replaced if damaged.
Avoiding abrasive cleaning materials
Use only microfiber cloths and mild cleaners.
Avoid using abrasive sponges or towels that could scratch the glass.
Remember to avoid using abrasive sponges or towels that could scratch the glass. (Photo: Andreï Popov)
Choosing the right windshield repair kit
In case of scratches on your windshield, it is essential to have the right repair kit:
Choose a high-quality windshield repair kit suitable for the type and severity of the damage.
Follow the instructions carefully for the best results.
Professional windshield maintenance
Schedule regular windshield inspections with a professional.
Address minor issues before they worsen and require costly replacements.
Signs it’s time to replace the windshield
Some signs indicate that a windshield replacement is necessary:
Deep and extensive scratches that obstruct your vision.
Multiple cracks and chips on the glass.
Compromised structural integrity, posing a safety risk.
FAQ on how to remove windshield scratches
Is toothpaste effective for removing scratches on a windshield?
To remove scratches from your windshield, do not use toothpaste. It is intended for teeth, not glass, and can worsen scratches.
How much does it cost to repair a scratched windshield?
The cost of repairing a damaged windshield varies depending on the type of automobile, the year of manufacture, and the extent of the damage. Please contact your local AIS Window Experts service center for an accurate price.
Is WD 40 effective for removing scratches on glass?
You should never use WD 40 to remove scratches from glass. WD 40 is not a polish; it’s a petroleum-based lubricant.
Are DIY windshield repair kits effective?
DIY kits can be effective for minor scratches, but for major damage, it’s best to seek professional help.
How often should I replace my wiper blades?
Wiper blades should be replaced every 6 to 12 months or as soon as you notice streaking or poor visibility.
Watch this video by John Engel to learn more about a simple DIY project to remove scratches from your glass!
You now know how to remove windshield scratches and have discovered some tips to avoid them.
Generally speaking, maintaining a scratch-free windshield is essential for your safety and driving experience. By following these preventive measures and promptly addressing any issues, you can enjoy a clear and unobstructed view of the road.
Remember that a little care today can go a long way in preserving the longevity and functionality of your windshield.
Are the sparks when starting a car safe or not
No matter how much you spent on your car, you will need to jump-start it sooner or later. However, starting a car is quite simple, but some issues, such as sparking, can occur when starting your car. Sparking when jump-starting a car is always a suspicious situation. Whether it’s sparks from the jumper cables or anything else, it’s important to know the reason for the spark and its consequences before it’s too late.
So, let’s see if sparking is safe or not.
Is Sparking When Jump-Starting a Car Safe?
There can be many reasons behind sparking when you try to start your car. You must be very careful when connecting the battery terminals with the cables. And facing such a situation while doing this can lead to dangerous circumstances.
1. Sparking – Normal or Strange?
When you stand in front of the car battery holding those cables, even a small spark can lead to greater danger. Sparking when jump-starting a car is worse than anything you’d want to see in your car. Follow every step of the car jump-starting method and try not to leave any gaps between the steps. The sudden spark could surprise you, and the chances of you hitting your head on the hood are higher. Moreover, hydrogen emission is a natural phenomenon of the battery. A small spark can cause an explosion that can blow acid onto everything, including you.
A few points no one told you about sparking when jump-starting a car. (Photo: Popular Mechanics)
Additionally, sparking at the connections is a sign of a discharged battery that exceeds about 10 A, which is dangerous for voltage spikes. If the spark comes from detachments, the situation could be worse than you think. The inductance may have been affected when the power is cut off and can generate a spark of a hundred volts.
In any phase, if you get a spark while proceeding with the jump-start, carefully attach the red jumper cable to the positive terminal of the good battery and the other to the positive terminal of the dead battery. Now, attach the black cable to the negative terminal of the good battery and the other cable to the grounding point of the dead battery.
2. The Right Way
If there is still sparking, leave it. Some car models have this feature where the battery grounding point is meant for sparking. It is not dangerous at all. Whether you are jump-starting for the first time or repeatedly, the correct method must be followed in every possible way. If you are unsure about the procedure, contact experts immediately. They will handle the situation and also share some maintenance tips with you.
Guidelines for sparking when jump-starting a car. (Photo: jarih/Getty Images)
Follow the steps below to learn more about this process:
Use the Appropriate Cable
Use sturdy, high-quality jumper cables specifically designed for jump-starting vehicles. The cables must be properly insulated and in good condition.
Turn Off Your Vehicles
Turn off both vehicles before connecting the jumper cables, including all electrical components such as the radio or headlights, to avoid power surges and reduce the risk of sparking.
Connect the Cable
Connect the positive (+) and negative (-) terminals of the jumper cables in the order of the dead battery and the good battery terminals. It is important to connect them in the correct order and ensure a secure connection.
Keep Cables Away from Moving Parts
Ensure the jumper cables are clear of any moving parts, such as engine fans or belts. Make sure they are placed away from hot surfaces or areas that could cause damage or pose a safety risk.
Maintain a Safe Distance
Once the cables are connected, step away from the engine compartments and keep bystanders at a safe distance. If sparking occurs, it is best to move away from the immediate area to avoid potential injury.
Start the Donor Vehicle
Start the engine of the donor vehicle (the one with the good battery) and let it run for a few minutes. This will help charge the dead battery.
Start the Stalled Vehicle
Try to start the stalled vehicle. If it starts properly, let it run for a while to allow the alternator to recharge the battery.
Disconnect the Cables
Once the stalled vehicle is running, carefully disconnect the jumper cables in the reverse order of connection (negative first, then positive). Avoid letting the clamps touch each other or any metal surfaces.
Remember, if you are unsure about jump-starting a car or if there are safety concerns, it is always best to seek help from a professional or roadside assistance service.
The battery becomes inefficient over time. So, replace the old battery with a new one before you face sparking while jump-starting a car. Be cautious and stay safe with the right guidelines.
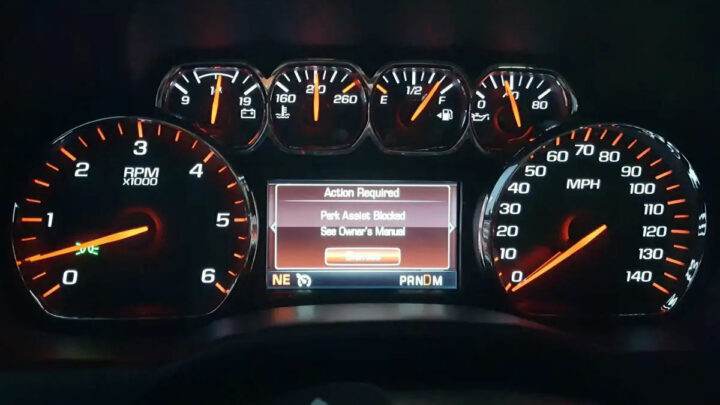
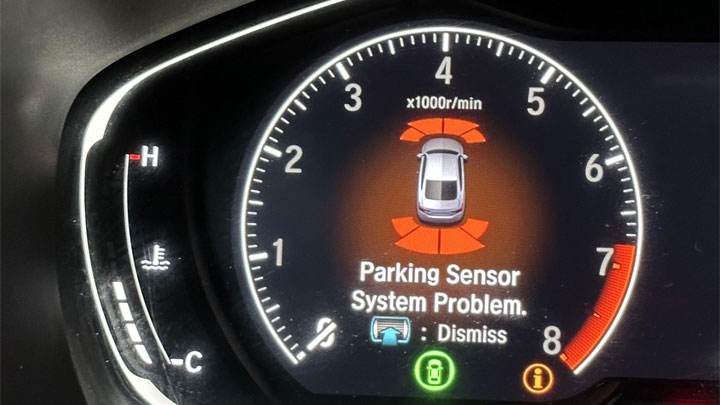
What does “Parking assistance blocked” mean
The Annoying “Park Assist Blocked” Light. If you drive a relatively recent vehicle, you may have seen this message (or a variant) appear on your dashboard screen. But what does it mean and should you be concerned?
In this article, we will explain what triggers the “Park Assist Blocked” warning, what it means for your car, and most importantly, what you can do to resolve this annoying issue.
What is Park Assist?
Over the past decade, car manufacturers have worked tirelessly to equip their vehicles with the latest and most advanced driving assistance features. As a result, vehicles have become safer to use when driven by detail-oriented drivers trained in using this technology.
One of the most useful and appreciated driving assistance features is Park Assist.
Park Assist provides drivers with audio and visual signals that help them park their vehicle safely. In almost all cases, an audible alarm triggers when you maneuver your vehicle in a way that positions it too close to an obstacle of one type or another.
Parking Sensor Warning on 2023 Volvo C40
In many cases, external cameras are also used to provide a visual image of these obstacles.
The latest versions of park assist now offer the ability to automatically apply a vehicle’s brakes if you get close enough to a stationary obstacle that a collision seems imminent. This, in turn, has virtually eliminated parking-related collisions among the newest vehicles, thereby saving thousands of insurance claims.
What Does a “Park Assist” Warning Mean?
Parking Sensor Problem on 2018 Honda Accord
Typically, the issuance of a “Park Assist Blocked,” “Park Assist Unavailable,” “Park Assist Off,” “Park Assist Malfunction,” or any other similar message means that a vehicle has identified a malfunction that would prevent its integrated park assist system from operating seamlessly.
In most cases, this means that one or more inputs are unavailable, which normally allows the park assist system to perform intelligent calculations regarding the proximity of obstacles relative to the vehicle itself.
Due to the risk of collision in less-than-ideal circumstances, a vehicle will disable all park assist functions, thereby mitigating unnecessary risks. In many cases, the only way to reactivate the park assist function is to resolve the underlying issue itself or perform a hardware reset of the fault in question.
However, if the latter of these options is chosen, the aforementioned park assist lockout is likely to recur as soon as the fault in question is re-registered.
Park assist sensor warnings are quite common. Car manufacturers have even issued service bulletins (like this one from GM) regarding this issue.
Common Causes
There are several potential causes for the appearance of a recurring “Park Assist Blocked” message. Understanding these potential causes can help you quickly identify the reason for your vehicle’s current issues and restore park assist functionality.
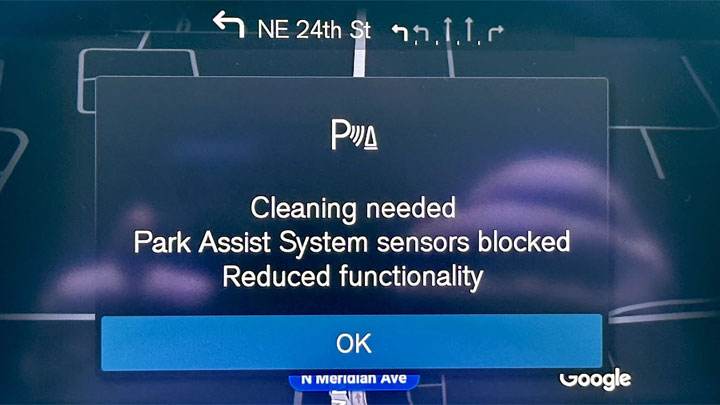
Here are some of the most common causes of park assist failures. Some vehicles may even display a more specific message like “Park Assist – Clean Sensor,” but the actual cause may be entirely different.
#1 – Dirty Sensors
Fortunately, the most common cause of a “Park Assist Blocked” message is dirty sensors. This is often due to dirt, mud, or gravel dust obstructing one or more sensors entirely.
In this case, the only viable solution is to thoroughly clean each of your vehicle’s sensors.
#2 – Heavy Rain
If you have ever encountered a park assist failure while driving in heavy rain, what you witnessed could be described as fairly normal.
If the precipitation becomes strong enough to interfere with a park assist sensor’s detection range, a “Blocked” message will often appear.
#3 – Excessive Speed
Many vehicles are programmed to allow the use of park assist functions only at certain speeds, for safety reasons. Although this lockout does not apply to all park assist functions, it is significant enough to warrant discussion.
If you are reversing at a relatively high speed and receive a “Park Assist Blocked” message, try slowing down your pace for better results.
#4 – Damaged Sensors
If your vehicle has recently been involved in a collision of any kind, do not be surprised if park assist functionality is lost. This is especially true if a vehicle’s front or rear bumpers have been damaged.
The sensors used by most park assist systems tend to be relatively fragile and prone to damage.
#5 – PCM Malfunctions
Although this is extremely rare, a vehicle’s PCM can fail, preventing it from effectively calculating data relayed by individual park assist sensors. As a result, park assist functionality is often lost.
However, you should absolutely rule out all other possibilities before condemning a PCM for such issues.
Where Are the Park Assist Sensors Located?
In most cases, vehicles using park assist functions are equipped with several ultrasonic sensors positioned in their front and rear bumpers. Each sensor is mounted and articulated in a specific way that offers a maximum detection angle.
This ensures that no obstacle in a vehicle’s path goes unnoticed and that safety is paramount in every situation. Typically, each of the aforementioned sensors has a dedicated detection range of 4 to 8 feet.
How to Reset a “Park Assist Blocked” Message
The exact procedure for resetting a vehicle’s “Park Assist Blocked” message differs from one vehicle model to another. For this reason, it is important to research the exact reset procedure provided for your specific vehicle make/model.
In any case, this warning message should be resettable via an interactive menu accessible using a quality automotive scan tool.
In most cases, a general reset of a vehicle’s park assist function can be achieved by toggling this option in your vehicle’s preferences menu. Doing so resets the system, thereby checking all its inputs in the process.
Assuming the issue previously encountered by your vehicle was intermittent in nature, this should restore park assist functionality.
Is It Safe to Continue Driving?
It is safe to continue driving in light of the “Park Assist Blocked” message. Although park assist functionality is canceled, you can continue to drive your vehicle as you normally would, as no other vehicle systems will be affected.
You will simply need to park manually without any additional audio or visual signals, as you would otherwise when driving a vehicle not equipped with park assist.
Is Unavailable Park Assist on Tesla the Same Thing?
Yes, in many ways, the “Park Assist Unavailable” message often displayed by various Tesla models is one and the same with the “Park Assist Blocked” warnings recorded by other vehicles.
Simply put, a malfunction in the parking guidance system has caused all park assist functions to be deactivated. This happens with Teslas for the same reason as with other vehicles.
The only exception is that Tesla vehicles tend to display this message immediately after downloading various updates, for largely unknown reasons.
Is it safe to drive a car in the rain?
Driving your car in the rain is like a nightmare, but it’s even worse when you’re stuck in the middle of the road with a dead battery. So the question is, “Is it safe to jump-start a car in the rain?”
The common belief is that it’s very dangerous when water and electricity come into contact, so many drivers fear that jump-starting a car in the rain could damage electrical components and might even pose a risk. What is the truth?
You can jump-start a car in the rain if you perform the process with the right precautions (Photo: pinterest.com)
Is It Safe to Jump-Start a Car in the Rain?
Jump-starting a car is like a lifeline when your battery is dead, but can heavy rain prevent you from performing this process or not? This question has raised many concerns among drivers. Don’t worry! Let’s state it clearly in this article:
“You can jump-start a car in the rain if you perform the process with the right precautions,” that’s our answer, but why? As we know, the car’s electrical system typically has a very low voltage of about 12 volts, so this will limit the risk of electric shock. Therefore, jump-starting a car in the rain can be safe and less likely to pose a danger to the driver. It can be said that repairing or doing anything with electrical equipment in the rain or in damp conditions also poses a danger to the repairer. However, if you must jump-start your car in the rain, it cannot harm you.
Human resistance can be up to 10,000 ohms, while the maximum current of a 12-volt battery is 0.012 amperes or 12 milliamps; it’s too low to cause electrocution. However, also be aware that just because there are no serious risks doesn’t mean there’s no potential danger, but remember that water is a very good conductor of electricity. To ensure safety, let’s follow a few steps below:
Safety Precautions Before Jump-Starting Your Car in the Rain
Common beliefs might scare us when jump-starting a car in the rain. You don’t need to be afraid; during this process, you should note the tips to ensure your safety and that of the vehicle:
Check the cable’s condition to ensure the insulation is working properly. This task is extremely important because when water seeps into a damaged cable, it will cause a short circuit.
Ensure raindrops do not enter the battery terminals and inspect your battery to make sure it’s not cracked before starting to jump-start your car.
Additionally, when trying to recharge the battery, keep it as dry as possible. Even if you run the least risk, the delicate electronics of the engine still don’t work well with water. Use an umbrella if you have one.
Always wear rain gear and rubber gloves to protect yourself from electric shocks. Moreover, you should equip yourself with extra eye protection to wear when you must come into contact with dangerous explosive or corrosive materials.
Connect the red wire to the positive terminal of the battery, marked with a (+) and a red cap. It should be noted that the red wire must not touch the ground or the vehicle’s body as it’s very dangerous. In general, please do not let the cables touch each other or any metal surface except your engine and the battery.
When jump-starting a car, never forget not to let your body touch the car, as it could accidentally become an electrical bridge between the two vehicles and the current could pass through the person, thus endangering their life.
Note that the terminals should always be cleaned and rust removed, ensuring electrical conductivity. You can use a dry cloth to clean the 2 terminals of the battery charger.
How to Properly Jump-Start Your Car in the Rain?
When jump-starting a car, always remember to ensure your body does not touch the car (Photo: pinterest.com)
Although car batteries are only 12 volts DC, that doesn’t mean jump-starting a car is without risks, such as eye injuries or damage to your car. Jump-starting your car in the rain can be safe and manageable as long as you follow the correct steps. Except for a few precautions like those mentioned above, we want to emphasize that performing these operations is equivalent to jump-starting in normal weather.
Step 1: Prepare Your Car
Just like the normal jump-starting process, the first step is to disconnect all electrical equipment in the car, such as the radio, air conditioning system, and lights… please switch to auto-stop mode so that the sensors don’t operate to reduce battery power consumption as much as possible.
Note: When jump-starting your car in the rain, you should not open the hood too early; keep the hood closed until you find another car to start the jump-start process. Because if water or moisture enters the engine compartment too much, it will be dangerous for the car’s components and for the jump-starting process. You can use covers or waterproof items on the hood to prevent the parts under the hood from getting wet.
Step 2: Park the Vehicles
The parking positions should be safe, with warning signals on or using warning devices to ensure safety. You should park the 2 cars as close to each other as possible to ensure the cable ends can reach, but keep a short distance between the two vehicles so they don’t touch and cause potential hazards.
Step 3: Connect the Cables
Before connecting the cable ends to the car battery, dry the battery and the clamps because wet batteries can conduct too much electricity, thus endangering the driver and the vehicle. Additionally, you must ensure the battery terminals are always clean and eliminate rust, thus ensuring electrical conductivity.
Connect the red clamp of the jumper cable to the positive terminal (+) of the dead battery. And the other end of the red cable to the positive terminal of the good battery. Use black ends (color to avoid confusion) to connect the negative terminal (-) of the booster battery to any metal component (unpainted) in the engine compartment of the vehicle with the dead battery, such as the chassis or body… Absolutely do not connect to the negative terminal (-) of a dead battery, as this could cause ignition and start a fire.
Step 4: Start and Test Your Car
You will then start the assisting vehicle to power the vehicle with the dead battery. Start the car with a good battery to run the engine for 3 to 5 minutes, then start the car with the dead battery. Let both cars run for about 3 minutes before removing the cables. If your car doesn’t start, try waiting a few more minutes, then continue restarting the engine until the car restarts. If the car still doesn’t start, you can contact towing service for quick assistance.
Step 5: Disconnect the Cables
If your vehicle operates normally as expected, in this last step, you will proceed to remove the cable in the reverse order of connection (remove the negative terminal first, then the positive). Once the vehicle is running stably again, you should go to the nearest reputable car maintenance center to check and repair it in time. Additionally, to limit this problem of a dead battery in the middle of the road, you should pay attention to regularly checking the car battery and replacing it at the right time or when you detect strange signs.
Some Possible Risks of Jump-Starting a Car in the Rain
Can you jump-start a car in the rain? Yes, positive. You should note that the car’s electrical system is 12 volts, not 110 or 240 like home wiring, so it will be safe to perform the jump-start process in the rain. However, this process will always carry some potential risks, regardless of the weather conditions in which you do it.
According to experts, making mistakes during jump-starting can sometimes have serious consequences. It can cause a fire in the car’s computer system and, even more dangerously, can cause the battery to explode, leading to serious injuries or even death, as we know that the acid in the car battery can be particularly dangerous in terms of skin burns or blindness. The next risk you might take is that of the assisting vehicle, as you don’t know how the vehicle operates and the manual may not be available, which could result in damage to the assisting vehicle. Moreover, not following instructions or incorrect technique can lead to an electric shock for the person holding the cable or anyone nearby.
How to permanently restore headlights
Foggy car headlights are not good news. This is a safety issue, as they reduce our vision during night driving, which can lead to accidents. Additionally, they also affect the aesthetics of your vehicle and decrease its value. Well, there’s no need to worry. There are several ways to show you how to restore headlights permanently, and they are so simple that even an amateur can handle them!
Signs of Car Headlight Failure
Car headlights are known to be one of the most indispensable lighting components in cars. Moreover, the automotive lighting system is designed with a variety of tools not only to illuminate the lack of light at night, but car headlights also have the task of alerting the vehicle when it engages in transport. So, before moving on to How to restore headlights permanently, we will first discuss the signs of car headlight failure.
Recognize these signs of car headlight failure (Photo: Genesis G90)
So, we will show here some signs of car headlight failure that you need to know for any type of situation.
When flashing headlights appear: the possibility of multiple headlights or flashing due to contact shutters and lighting switches is likely. Thus, the possibility of short-circuiting the inside of the phase, core, or wiring to the battery.
Incandescent light: The reflector with diffuse capacity or the bulb stuck in this case must be cleaned to ensure optimal lighting.
The headlight is not on: The lamp is not bright enough for the generator to climb too fast or run too long. Or perhaps the battery voltage regulator is discharged.
A light does not appear: If the lamp is not lit, a headlight may be burned out and needs to be replaced.
Temporary Fixes When Restoring Headlights
Who doesn’t know the toothpaste solution? Let’s go! A Google search will bring up dozens of pages suggesting cleaning your headlights with a mixture of baking soda and toothpaste. It’s a simple and inexpensive solution that works but won’t last more than a few months, or even less.
Toothpaste only provides a temporary solution. (Photo: Mike Wagner @ Youtube)
Another solution is to mix baking soda in distilled white vinegar and rub this concoction on the headlights. This will also properly clean the lights but won’t last more than a few months. For more details, you can refer to the temporary methods below:
Cleaning: Over time, headlights can become hazy or yellowed due to oxidation. Cleaning them thoroughly can improve their appearance. You can try using a headlight restoration kit, which often includes abrasive compounds and polishing pads designed to remove haze. Follow the instructions provided with the kit for best results.
Toothpaste: Surprisingly, toothpaste can be used as a temporary abrasive to clean headlights. Apply a small amount of toothpaste to a soft cloth or sponge and rub it in a circular motion on the headlight lens. Rinse with water and repeat if necessary. This method can help remove some of the haze and temporarily improve clarity.
How to Restore Headlights Permanently?
This DIY project won’t take more than a day. It’s super simple, inexpensive, and will likely last for a few years! You won’t need to remove the lights (although you can if you wish) or perform complicated work.
Tools You Need to Restore Headlights
A can of UV-resistant clear coat
Rubbing alcohol
A water spray bottle
Sandpaper
Tape
Trash bags or plastic sheets
Scissors
How to Restore Headlights
This simple DIY project will help you make your headlights clean permanently.
Tape around the headlights so as not to accidentally scratch the body paint. Now, start sanding but spray water on the surface to lubricate it. Start with 600-grit sandpaper, but 400-grit would be ideal if the lights are too dirty.
Sand in a circular motion and keep spraying water with the other hand. After that, use the sandpaper horizontally. If you started with 400-grit, repeat this process with 600-grit sandpaper.
This video will explain the entire process in detail.
When you’re done, rinse the surface with water and then dry it with a paper towel to remove the sanded plastic components. Your next step is to rub the headlights with a piece of ultra-fine 2000-grit sandpaper. Wash the lights again after sanding and use a paper towel to dry and clean them.
Now, pour some rubbing alcohol on the paper towel and rub it on the light. This is the final cleaning step that will remove any oil residue (which may have been transferred from your hands or other sources).
Now it’s time to apply the clear coat. However, don’t forget to cover the hood, bumper, and fenders with a plastic sheet or trash bag before spraying the solution. You need to apply three to four coats with a five-minute interval between each application.
The result will hold a pleasant surprise for you in this process How to restore headlights permanently (Photo: Amazon)
Let the UV coat sit for a day before removing the plastic sheets and adhesive tapes. You can leave it as is or wet sand it or use ultra-fine 3000-grit sandpaper. The process will be similar to the second step mentioned above.
Finally, you may want to apply wax to the lights. Scrape a bit of car wax onto a microfiber towel and rub it onto the surface. You should choose the best RV wax for fiberglass for better efficiency. After that, use another dry, clean towel to wipe it off well.
Using Headlight Experiences
So, after showing the specific way How to restore headlights permanently, the following experiences on using headlights will help you ensure safety while driving.
1. For vehicles that do not have a headlight switch, when traveling during the day, you should switch to parking light mode or switch to fog light mode so that the battery can be charged better.
2. On the highway, if there is a high divider beyond the range of the car’s headlights, use high beams for better visibility. The divider prevents light from traveling between the two sides, so you won’t have any issues with the headlights.
3. On highways with low dividers, or with only solid lines or dashed lines, use low beams to move, avoiding glare for vehicles coming in the opposite direction. If the road is open, turn on the high beams to see, but when the car lights are going in the opposite direction, switch to low beam mode within a radius of 150 meters.
These experiences will make the question “How to restore headlights permanently” unnecessary (Photo: Tesla Motors)
4. Do not use high beams when driving the car, because if the opposing vehicle forgets to turn off the high beams, both vehicles at the same time will prevent both drivers from seeing the road and the two cars will collide. If you want to pass the car, do not tailgate with high beams, so maintain a safe distance and flash the lights to signal.
5. When entering the road or needing to overtake or remind other vehicles to lower their high beams, the headlights should be used in the flashing type. In cars, headlights sometimes work better than honking, as moving cars are usually closed and it’s hard to hear the horn sound. Whereas a few flashes appear in the rearview mirror, the driver easily recognizes the car following them.
Final word, congratulations! You have completed the project How to restore headlights permanently. Enjoy the crystal-clear lights with bright lighting.
Car cleaning: Remove rust from the car with Coca-Cola
Coca-Cola is a proven hack, and people who remove car rust with Coca-Cola swear by it. It’s a handy trick, especially when it comes to chrome surfaces.
Coca-Cola may be a Western entity, but it’s a recognized name worldwide. However, beyond its good taste, many people use it for many other reasons.
From cleaning toilet bowls to removing greasy stains on fabrics, to cleaning car rust, everything falls in between. It’s common for bumpers and wheels of old cars to rust.
Well, for those who haven’t tried it yet, know that there’s pure science behind it. It does the job effectively, and this blog post will explain how to do it so you can add it to your list of maintenance tips.
How to Remove Rust from a Car with Coca-Cola
Here’s why Coca-Cola is the ultimate weapon against car rust:
Since it’s carbonated, it can dissolve metal oxides to break down rust and remove tarnish from several metals and their alloys.
It contains citric acid, which is known to remove stains. It also contains phosphoric acid, which can eliminate rust.
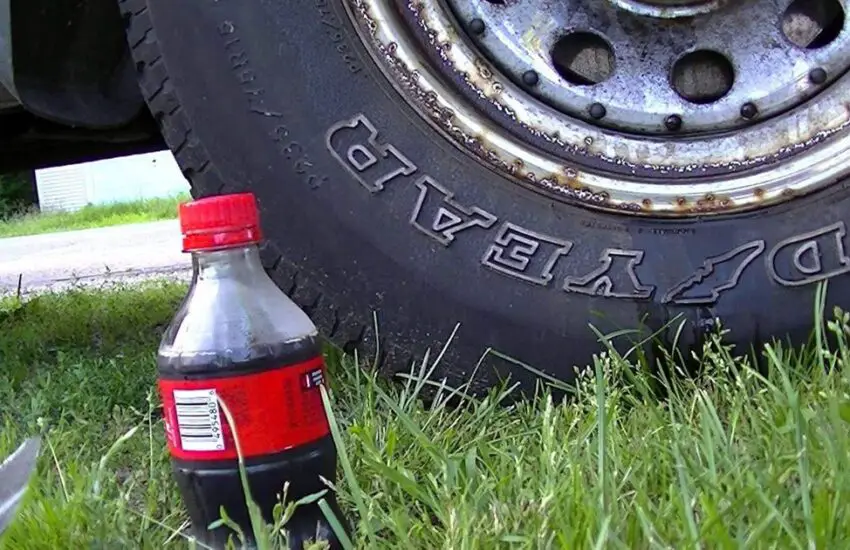
Follow how to remove rust from a car with Coca-Cola. (Photo: Sixty-fiveFord)
Things You’ll Need
Coca Cola
Take a full can or bottle, a bit flat so it doesn’t fizz right away. We prefer Diet Coke because it’s not sticky like regular Coca-Cola. So, once the rust is removed, you don’t need to spend much time cleaning the stickiness.
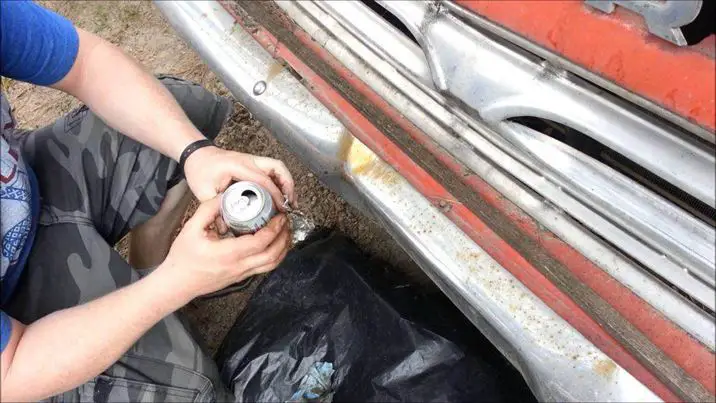
Sponge/Aluminum Foil
Many people prefer the sponge because it doesn’t scratch the chrome finish. Aluminum foil, however, is a better alternative because it requires less effort. At the same time, aluminum foil isn’t hard and thus won’t scratch the surface.
Cloths for Cleaning
If you use regular Coca-Cola, the stickiness will be significant. But even if you use Diet Coke, the car’s surface and bumpers will still remain sticky. Moreover, due to the color of Coca-Cola, you’ll need a cloth to wipe it frequently.
Soap and water for washing – To wash the surface cleanly
The Procedure to Remove Car Rust with Coca-Cola
The procedure is very simple and takes only a few minutes with very little effort. You should generally use it for cars, buses, or trucks with rusty chrome-finished bumpers or wheels.
You can remove car rust with Coca-Cola with little effort. (Photo: MINNESOTA PRAIRIE ROOTS)
Fold the aluminum foil into 3-4 layers so it doesn’t tear while you scrub. Simply pour some Coca-Cola on the surface and start scrubbing. Since the action is almost immediate, you don’t need to wait even a few minutes.
As you scrub, you’ll see the rust coming off onto the aluminum foil. As you go, keep wiping the surface with a cloth so no debris remains.
Repeat the process until the entire bumper is clean. Now make sure to wash the surface thoroughly with soap and water. You’ll be amazed to see it shine like new. This one is, in fact, one of the most impressive car hacks.
FAQ on Removing Car Rust with Coca-Cola
How does Coca-Cola remove rust from a car?
The phosphoric acid in Coca-Cola reacts with the rust, loosening its grip on the metal surface. Scrubbing with a cloth or brush enhances the process.
Is Coca-Cola a safe and effective alternative to traditional rust removers?
Coca-Cola can work against light surface rust, but professional rust removers may be more effective in severe cases. It’s generally safer than harsh chemicals.
What types of rust can Coca-Cola remove?
Coca-Cola is best suited for tackling light rust on non-critical parts. Extensive or structural rust may require professional treatment.
How do I use Coca-Cola to remove rust from my car?
Pour Coca-Cola on the rusted area, let it soak, scrub with a cloth or brush, and rinse. Repeat if necessary. Protective equipment is advised.
Are there any risks to using Coca-Cola on car rust?
While relatively safe, excessive use could damage the paint or make it sticky. Proper rinsing and drying are important.
Can Coca-Cola damage car paint?
Prolonged exposure or vigorous scrubbing may affect the paint. Careful application and prompt rinsing can mitigate risks.
How long does it take for Coca-Cola to remove rust?
The time varies depending on the severity of the rust. It may take several applications and some time to see visible results.
Are there other household items that can remove rust?
Yes, items like vinegar or baking soda can also help remove rust, although their effectiveness may differ.
Can Coca-Cola prevent future rust?
Coca-Cola’s rust removal is temporary. Applying a rust inhibitor or protective coating after cleaning can help prevent future rust.
Should I seek professional help for rust removal?
In case of extensive rust or critical areas, professional help is recommended. They have the expertise and tools to address severe rust issues.
What are the possible causes of Hyundai DTC P1314?
NOTE: The listed causes may not be a complete list of all potential problems, and there may be other causes.
Faulty ignition coil
Ignition coil harness is open or shorted
Poor electrical connection in the ignition coil circuit
How to repair Hyundai DTC P1314?
Check the “Possible Causes” listed above. Visually inspect the wiring harness and related connectors. Check for damaged components and look for broken, bent, pushed out, or corroded connector pins.
What are the possible symptoms of Hyundai code P1314?
Check engine light on (or soon-to-be maintenance required warning light)
What does Hyundai code P1314 mean?
Ignition Coil 2 Low Output is the generic description for Hyundai code P1314, but the manufacturer may have a different description for your specific model and vehicle year. Currently, we have no further information about the Hyundai P1314 OBDII code.
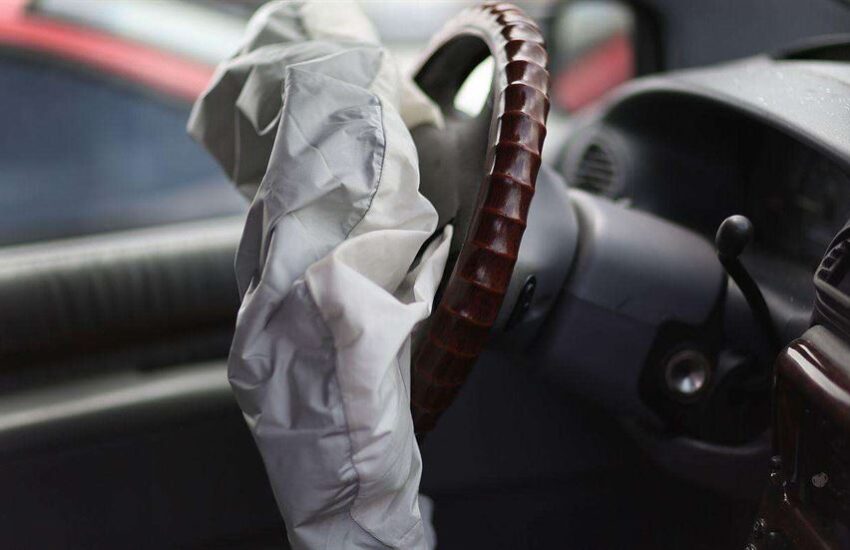
How to Disable the Airbag System in 6 Steps
Removing or deactivating an airbag is a delicate task but not impossible. The multitude of wires and fuses can confuse anyone, especially those encountering it for the first time. So, how to disable the airbag system yourself is what you might be looking for here.
So get ready now with your toolbox to disable the airbag, as we are going to give you the best solution to do it.
How to Disable the Airbag System? Find Out Here!
The reason for removing the airbag could be due to a medical issue, difficulty placing the baby seat, or any other possibility. Here you will find the best method ever designed to easily disable the airbag.
1. Purge the Power
The first step in the process of disabling your car’s airbag system is to cut off the electrical power. Since the airbag operates on electrical charge, it becomes imperative to disconnect access to the battery. So, to achieve this, cut the battery cable for a negative terminal charge. Now, leave the battery disconnected for a few minutes so that all charges dissipate to avoid any incident. Be cautious when cutting the power, as any charge left in the system could be catastrophic.
2. Remove the Fuse
To remove the fuse, you can refer to the car’s manual with the intention of removing the correct fuse. There may be many fuses under the seat. Thus, the car manual will help you reach the one directly connected to the airbag. Remove the fuse and keep it in a safe place.
How to Disable the Airbag System by Yourself
3. Remove the Dashboard Cover
Find the bolt to dismantle the dashboard, which is placed with the metal cracks. Loosen all the bolts that are somewhere in the groove using a screwdriver and carefully set the dashboard aside. The Flathead crew driver is ideal for this purpose.
4. Deactivate the Passenger Airbag
Deactivating the airbag from the passenger seat is as important as from the front seats. For this, you need to find the yellow wire. At the same time, detach the harness by pushing the green locking pin. You have now successfully deactivated the passenger seat airbags.
5. Remove the Lower Steering Wheel Panel
Before removing the lower steering wheel panel, mark the position of your wheels. Make sure the wheels are straight and aligned. Now remove the airbag.
6. Finally, Disable the Airbag
After successfully completing all phases, it’s time to remove the airbag. This last step is very simple because you need to find the same yellow wire that you found when deactivating the passenger seat airbag.
How to Disable the Airbag System in Your Car
The rest of the steps are the same: release the harness by pushing the green locking pin. Now, here’s how to disable the airbag system in your car!