Resurfacing Cylinder Heads with a Treadmill
Specialized workshop equipment quickly becomes very expensive. To acquire a machine for resurfacing cylinder heads, you generally need to budget at least 3000 euros, and this cost can increase significantly depending on the desired level of sophistication. Alternatively, if this investment is prohibitive, you can outsource this work to a professional with the proper equipment, but this involves waiting times. But what do you do when neither purchasing nor outsourcing are viable options? If you share the ingenuity of David Miller, creator of the Hemi Garage Hacks YouTube channel, the solution lies in building your own device from a treadmill.
A Proven and Effective Method
This approach is no joke. Miller claims to have resurfaced over 1000 cylinder heads with his homemade systems over the past 13 years. A remarkable achievement, especially considering that his latest version cost him less than 500 euros to assemble.
Key Components of the System
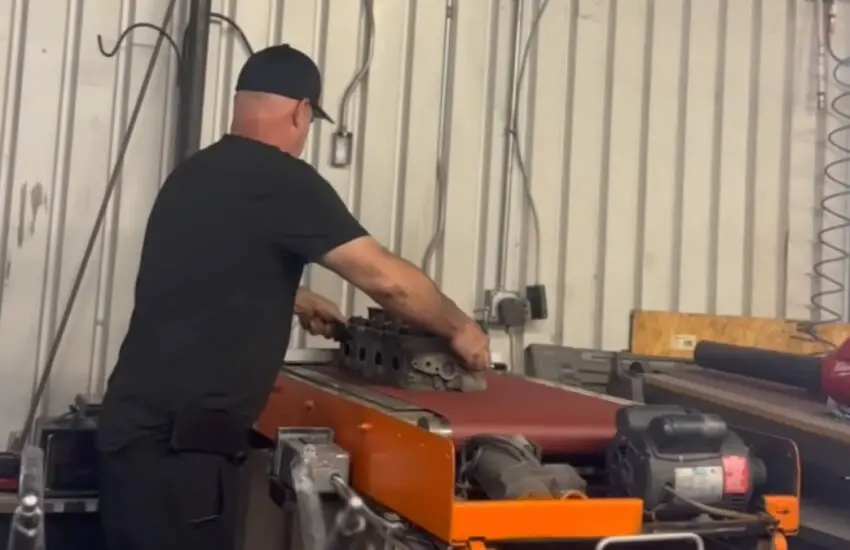
As he explains in his latest video, Miller based this build on a treadmill designed to handle heavy loads and a medical stretcher. The setup uses a granite slab topped with a glass plate, creating an extremely rigid base that allows the custom-ordered abrasive belts to move freely. A metal bar fixed at one end serves as a stop for the cylinder heads. Once this device is in place, the task becomes relatively simple.
Break-in and Finishing Process
It seems that four or five cylinder heads are needed to break in each abrasive belt. Up to that point, Miller manually polishes the surface of each piece. Beyond that stage, the system cleans the surfaces perfectly, allowing it to perform a complete resurfacing in just a few minutes. To achieve an optimal result, it is essential to move the cylinder head back and forth on the belt and change its direction at least once, or even twice. Although this operation is not the most complex, it requires some technique to guarantee perfect flatness, which is essential for engine sealing and performance.
Practical Considerations and Precautions
This DIY method, although ingenious and economical, is not without its challenges. The accuracy and uniformity of the resulting surface must be rigorously checked with appropriate metrology instruments, such as a precision straightedge and a dial indicator. Safety is also a crucial factor: using a modified treadmill requires enhanced precautions against mechanical and electrical risks. Vacuuming the metal and abrasive particles generated during machining is essential to protect the operator and the work environment.
Comparison with Traditional Methods
Compared to a professional resurfacing machine, this homemade system has limitations in terms of production capacity and perfect reproducibility. Dedicated machines offer superior automation, precision, and speed, justifying their cost for intensive use. However, for the amateur mechanic or the skilled DIYer working on occasional projects, Miller’s solution demonstrates that it is possible to achieve satisfactory results with a controlled budget and an inventive spirit. It paves the way for similar experiments for other garage machining operations.