
Advanced Driver Assistance Systems (ADAS) rely on accurate sensors, such as cameras, radars, and lidars, to function correctly. After replacement or repair, these sensors must be calibrated to ensure the safety and proper operation of ADAS systems like Automatic Emergency Braking (AEB), Lane Keeping Assist (LKA), or Adaptive Cruise Control (ACC).
Here is a step-by-step guide to calibrate ADAS sensors.
When should ADAS sensors be calibrated?
- Windshield replacement: If a camera integrated into the windshield has been removed or replaced.
- Sensor removal or replacement: Cameras, radars, or lidars that have been moved or replaced.
- Suspension changes or wheel alignment: Any adjustment affecting the vehicle’s alignment.
- Collision or impact: Even a minor impact can misalign the sensors.
- Software updates: Some systems require recalibration after updates.
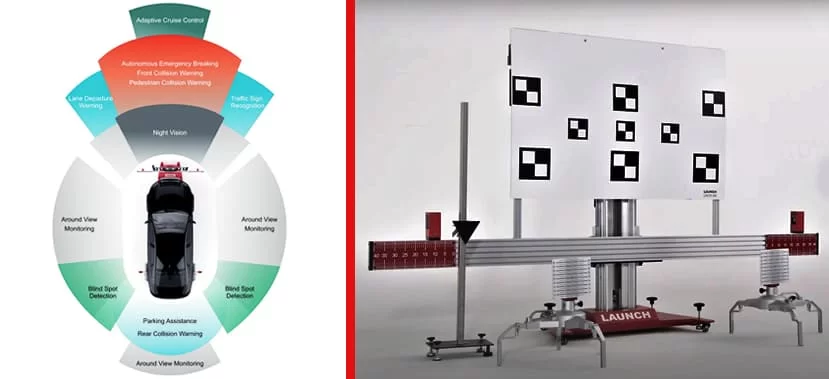
Types of ADAS Calibrations
- Static calibration: Performed in a workshop with specialized equipment.
- Requires a controlled space and specific targets (calibration panels).
- Dynamic calibration: Performed on the road with the vehicle in motion.
- Sensors recalibrate automatically using data collected during driving.
- Hybrid calibration: A combination of both methods, depending on the vehicle’s system.
Steps to Calibrate ADAS Sensors
1. Vehicle and Environment Preparation
- Clean the sensors: Ensure cameras, radars, or lidars are not obstructed by dirt or debris.
- Check tire pressure: Incorrect pressure can affect vehicle alignment.
- Stabilize the vehicle: Place it on a flat and level surface.
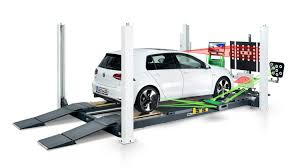
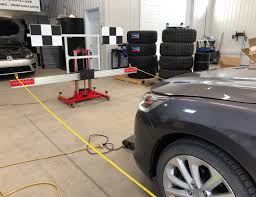
2. Use Calibration Equipment
- Calibration targets: Arrange the necessary panels or targets according to the manufacturer’s specifications.
- Specialized tools: Use an OBD-II scanner compatible with ADAS systems to access the calibration module.
3. Follow Manufacturer-Specific Steps
- Each vehicle has specific calibration requirements.
- Consult the maintenance manual or manufacturer’s technical documentation for required distances, angles, and parameters.
4. Static Calibration in the Workshop
- Install targets according to specifications.
- Connect the diagnostic tool to the vehicle.
- Let the software guide the necessary adjustments (alignment, camera angle settings, etc.).
5. Dynamic Calibration on the Road
- Initiate the process via the diagnostic tool.
- Follow instructions to drive the vehicle at a constant speed on a straight road.
- The system automatically adjusts the sensors based on collected data.
6. Validate the Calibration
- Test the ADAS system to verify proper operation (e.g., object detection, lane keeping).
- Check the diagnostic tool to ensure no error codes remain.
Common Mistakes to Avoid
- Not following manufacturer specifications: This can lead to misalignment.
- Using non-approved equipment: Universal tools are not always suitable.
- Forgetting software updates: ADAS systems often require updates to be compatible with new sensors.
Calibration Cost and Duration
- Cost varies depending on the sensor type and method used (static or dynamic).
- Calibration can take from 30 minutes to several hours depending on system complexity.
Conclusion
Calibrating ADAS sensors is an essential step to ensure the accuracy and safety of driver assistance systems. Whether after replacement, repair, or collision, it is crucial to follow manufacturer recommendations and use appropriate tools. If in doubt, it is best to entrust the task to a professional equipped to handle these sophisticated systems.